• Skip to main content
  • Skip to primary sidebar
  • Home
  • Contributors
    • Matt Beecroft, Master RKC
    • Martijn Bos, Master RKC
    • Andrea Du Cane, Master RKC
    • Angelo Gala, Master RKC
    • Chris Holder, Master RKC
    • Steve Holiner, Master RKC
    • Dan John, Master RKC
    • Mike Krivka, Master RKC
    • Thomas Phillips, Master RKC
    • Robert Rimoczi, Master RKC
    • Phil Ross, Master RKC
    • Max Shank, Master RKC
  • Workshops
    • HKC Workshops
    • RKC Workshops
    • RKC-II Workshops
  • Find an RKC Instructor
  • Resources
    • Articles
    • Forums
    • Kettlebells
    • Products
  • Blogs
    • PCC Blog
    • Strong Medicine Blog
  • Archives

RKC School of Strength

Official blog of the RKC

tutorial

The Kettlebell Get-up in Detail Part 2

May 6, 2021 By Ryan Jankowitz Leave a Comment


Ryan Jankowitz Demonstrating the move between the tall sit and the half windmill - kettlebell Get-Up Tutorial Part Two

Welcome back to my 3-part series on the kettlebell get-up! While my last post focused on the set-up, roll to elbow and the tall sit, today I’m going to focus on the leg sweep to windmill, lunge and stand up.

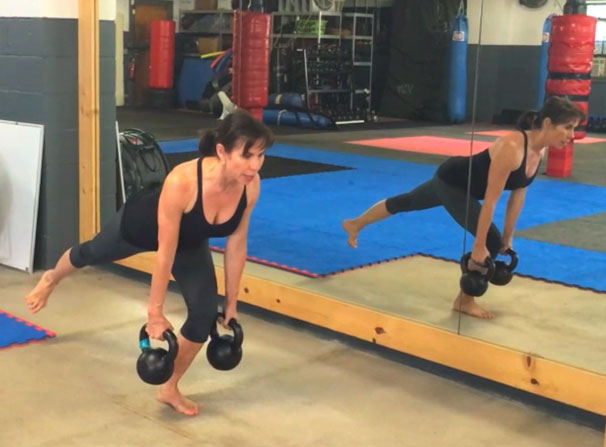
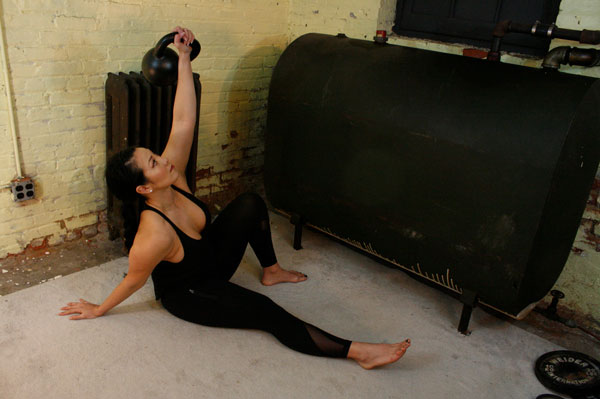
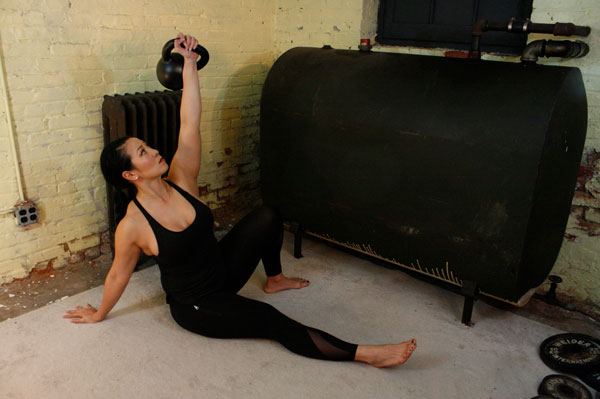
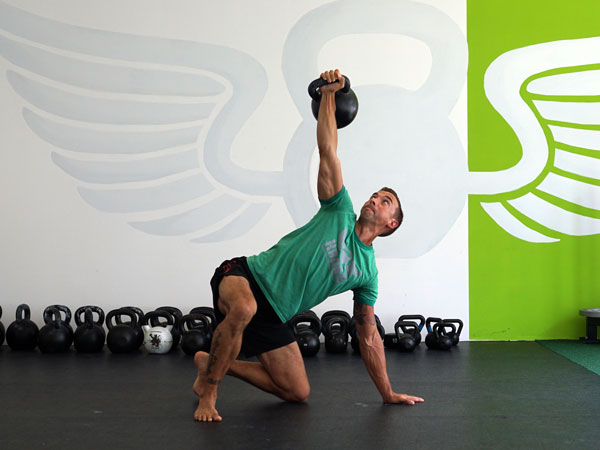
Once you’ve achieved the tall sit position, the next step is to sweep your leg back underneath you into the kneeling windmill position.

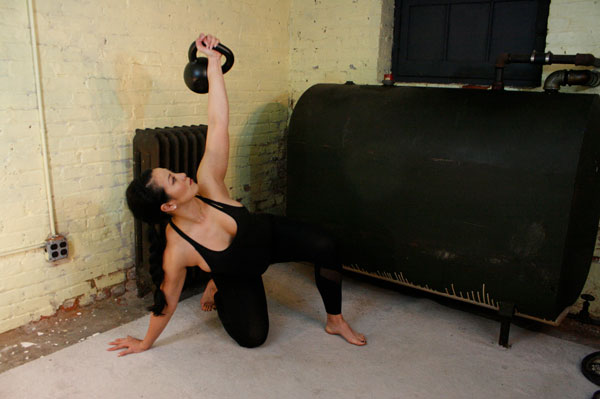
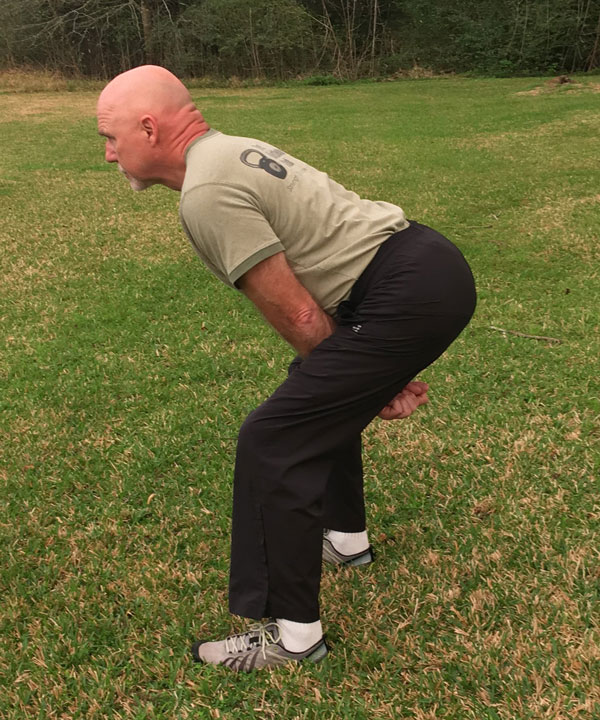
Some people may get confused at this part of the get-up because they are not sure how high they should bridge their hips before sweeping their leg back. This is mostly a matter of personal preference, however, I’ve found that with heavy get-ups doing a small bridge is the safest and most effective way to start the leg sweep. If you’re warming up with naked (no weight) get-ups or using a light kettlebell, then a high bridge can be okay. Just do what feels most safe and appropriate.

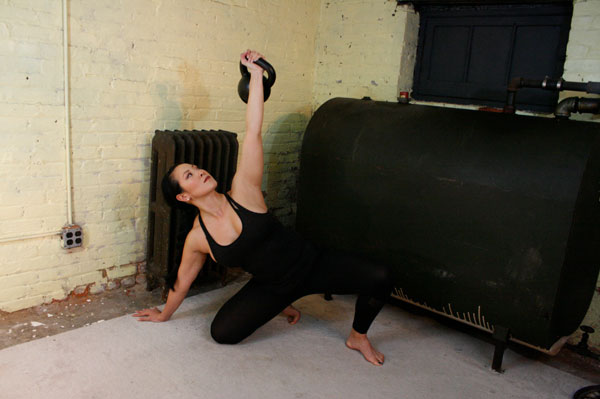
When you sweep your leg back, aim to line up your wrist, knee and ankle. A nice straight line here will allow you to load your hips and use your torso to straighten up to the kneeling position.  Also, make sure to tuck your toe under (dorsiflex) after you sweep your leg back and keep your toe tucked in order to help you with the lunge.

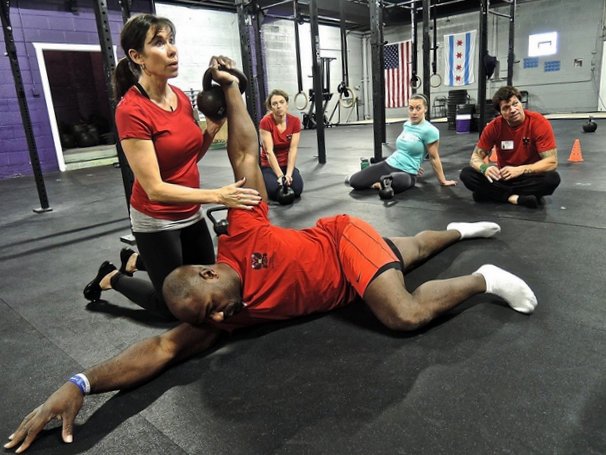
Be aware that if you don’t bring their knee back far enough, you will not be able to properly use your hips and torso to straighten up. When this happens, the arm on the ground and the lower back are overused—and at risk of injury.

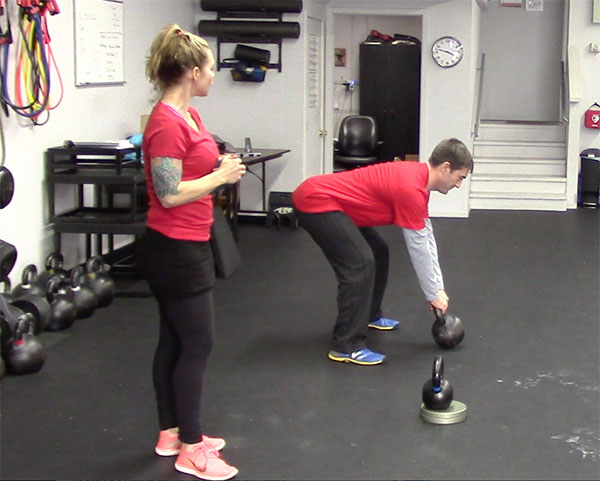
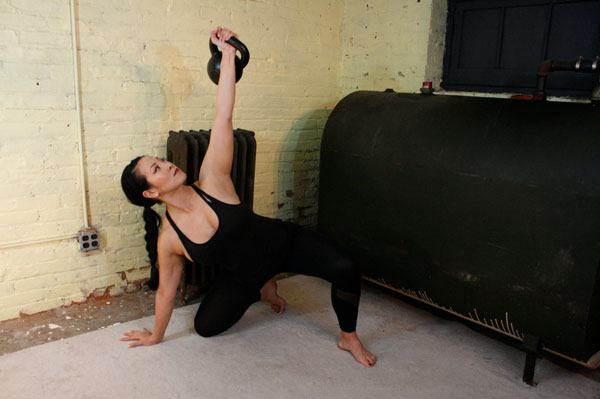
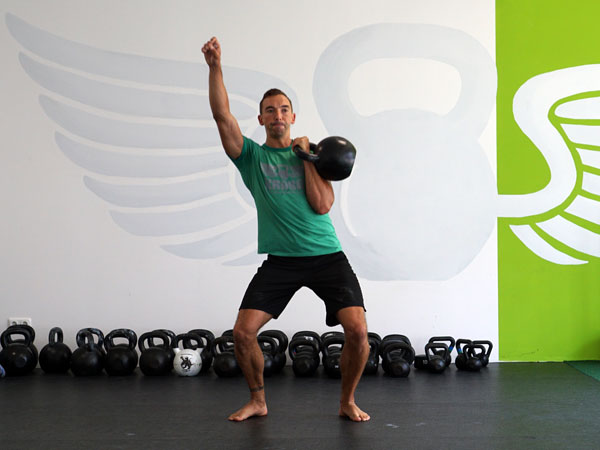
Now that you’ve straightened up, you must put yourself into a lunge position. Here are the two different ways to do this:

  1. “Windshield wiper” your back leg
  2. Step across with your front leg

When teaching the get-up at the HKC and RKC, the “windshield wiper” method is taught first. This movement can sometimes be uncomfortable for people who have had a knee injury, knee surgery, or their knee just doesn’t like this type of movement. In this case, step your front leg across to move into a lunge position.

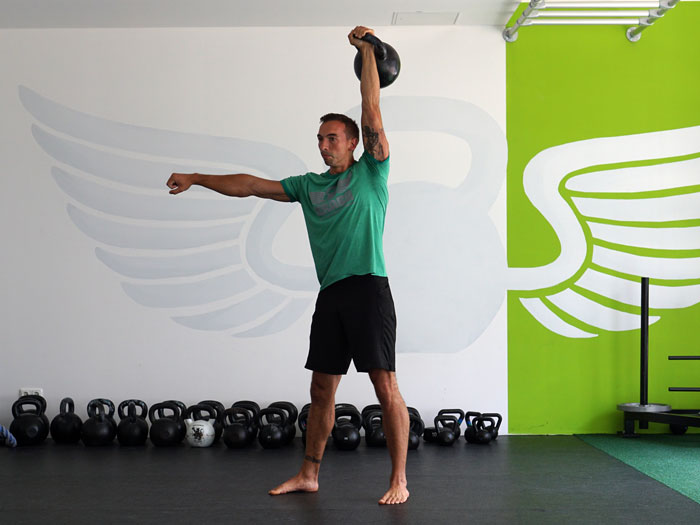
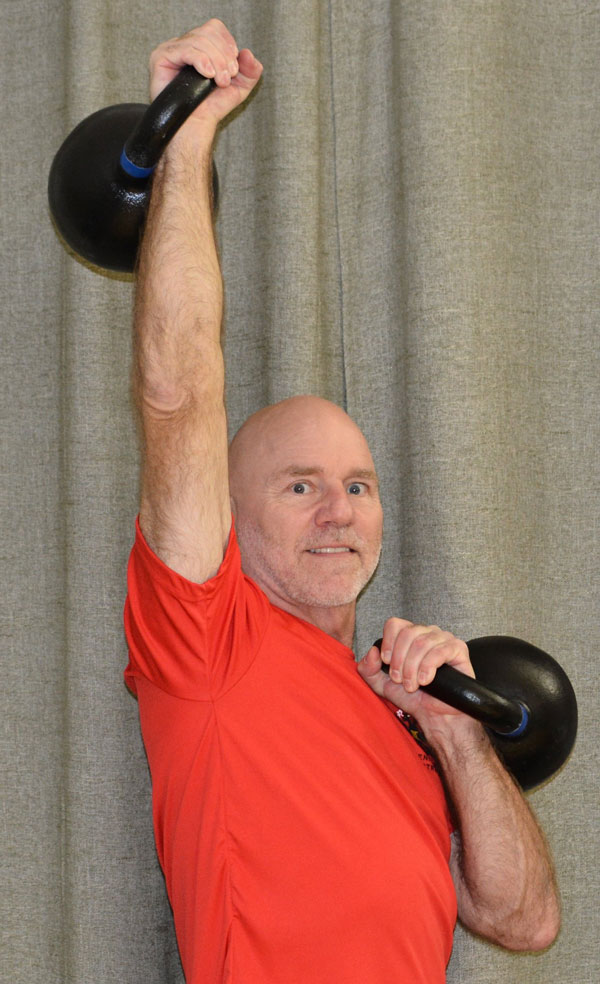
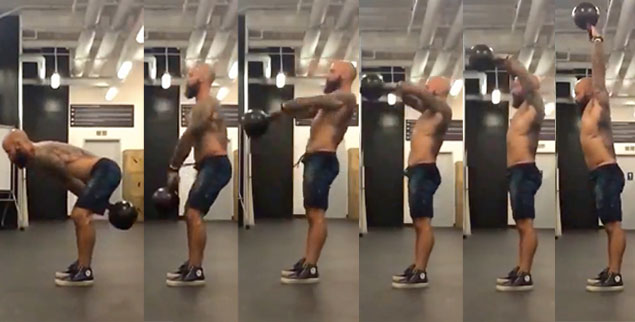
At this point, the arm holding the kettlebell should be vertical. The kettlebell should be behind your head so that if you were to look up you wouldn’t see the kettlebell in front of you. Now, you’re ready to stand up from the lunge. Push both feet powerfully into the floor to help you stand up. When you bring your legs together, hit your Hardstyle plank by contracting your glutes, quads and abs.

To see all of these steps in action, please watch this video:

Focus on improving these steps to gain the strength and confidence to perform the get-up with heavier kettlebells.

Stay tuned for my third and final blog post about the kettlebell get-up.

Stay Strong,
Ryan Jankowitz, RKC II

 ***

Ryan Jankowitz, RKC-II and owner of RJ Kettlebell, lives in Maryland with his wife and two dogs. They love to go hiking and spend time on the beach. When he’s not telling his dogs to stop chasing squirrels, Ryan enjoys spreading the RKC message and teaching others how to train with kettlebells. Try his 2-week advanced kettlebell plan: https://rj-kettlebell.ck.page/b59325e156

Filed Under: Kettlebell Training, Tutorial Tagged With: get-up tutorial, kettlebell get-up, kettlebell technique, kettlebell training, Ryan Jankowitz, turkish get up, tutorial

Rubik’s Get-Up

May 2, 2018 By Annie Vo Leave a Comment

Annie Vo Get-Up Rubiks Cube
When I first learned to perform a get-up, I was unsure of its purpose. It seemed almost like a series of random movements, ultimately resulting in getting off the floor. Of course, being able to get off the floor safely has its advantages, but even when progressing with resistance, it was still somewhat of a mystery to me.

Sometimes in order to understand new information, it is helpful to liken it to something old. The use of analogies in teaching has been shown to have a positive impact on the way we process new data. Analogies foster learning by highlighting the similarities between what we already know and that which we seek. The mind is complex.

Over the years I have come to think of the get-up like a Rubik’s Cube.

The Rubik’s Cube is a 3-D combination puzzle invented in 1974 by Hungarian sculptor and professor of architecture Erno Rubik. Originally called the Magic Cube, the goal is to align all of the color-coded squares on each side through a series of pivots. The shifts of the cube are smooth, tracking on an internal core track until the final destination is reached. The cube is considered incomplete if the sides are not aligned appropriately.

Although it is widely misreported that Dr. Rubik created “the cube” to be a teaching tool to help his students understand 3-D objects, his actual purpose was to solve the structural problems of moving parts independently—without the entire mechanism falling apart! In many ways, the get-up has the same goal.

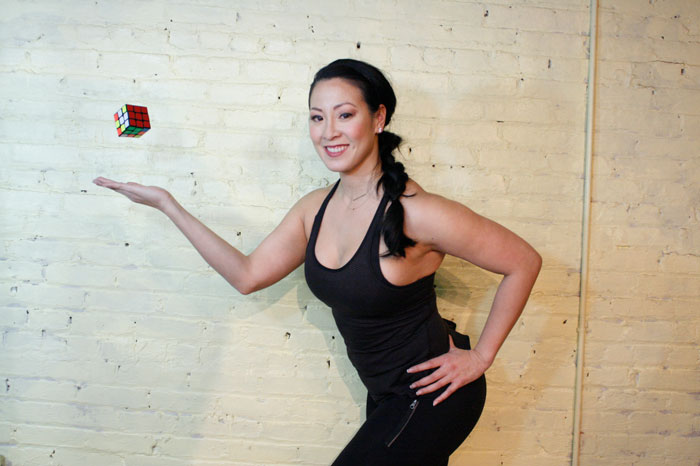
Each movement in the get-up is a pivot from the body’s core joints—the hips and shoulders. The pivoting should be smooth. Once the position is established, all “sides” of the get-up cube should also be aligned. The spine must be straight throughout the get-up. The body’s center of gravity must be balanced between the limbs. The angles of the hips and shoulders positioned to provide maximum support and stability. Each limb, joint and muscle must be arranged and coiled underneath the weight overhead to create a solid foundation.

As you develop your technique, you are likely to discover information about how you move, including strengths and weakness, balances and imbalances, and which areas should be developed. Your get-up is your sculpture. It is constantly evolving. The way you perform each pivot, swivel and shift can reveal or obscure what is truly beneath the surface. If you rush it, then you’ll miss the point.

As a Senior RKC Instructor, I’ve had the privilege of teaching the get-up to hundreds of coaches and kettlebell enthusiasts, spanning a multitude of backgrounds. Throughout my tenure, I’ve noticed that there are three common places in the get-up where symmetry and alignment tend to get neglected, even among experienced get-uppers. Here they are:

Initial Shift to the Elbow

The get-up begins in a lying position and is initiated by rolling up to your (unloaded) side. It is to be performed without any jerking or momentum. Imagine your trunk is one unbending steel rod that must be adjusted by wedging between the hip and shoulder. The result is a straight, stacked vertical line from the ground to overhead—a track as clear as the pathway of a Rubik’s Cube’s axis.

However, often the shoulder of the planted arm is forgotten in the pursuit of this vertical line, and sags forward. This is usually the result of not knowing how to find the alignment, and overcompensating. In short, it may feel like it’s lined up but it isn’t. If this is the case, there is unnecessary pressure on the front of the shoulder. To avoid this, make sure to preserve your vertical line by employing the support of the greatest shoulder stabilizer you have—the lat.

Problem shoulder position—Shoulder is rounded and relaxed.
Proper shoulder position—Shoulder is aligned and lat is packed.

Shift to the “Tall Sit”

When moving from the elbow to the straight arm seated position, the support shoulder has a tendency to rotate forward, therefore “exposing” itself and falling out of alignment. The support arm is arguably the most important part of the “tall sit” portion of the get-up because it determines whether you will be able to support your overhead weight (and bodyweight) while your legs swing under you. The support arm (and opposite leg) are responsible for supporting the body as it is lifted and rotated like a Rubik’s Cube.

To perform this transition with the greatest mechanical advantage, make sure your shoulder is in line with your planted hand and also rotated back and down, to ensure that the lat muscle is engaged.

Problem shoulder position—Shoulder is rounded forward.
Proper shoulder position—Shoulder is rounded back and in line with the hand.

Leg Sweep (both directions)

From the “tall sit” position, rotate your leg under your body, and place your knee on the ground. Sometimes people don’t bring the leg far enough under, on the way up. Remember, the angle of your hips should be roughly 90 degrees. Picture how difficult it would be to twist Dr. Rubik’s contraption if its sides were unaligned.

Conversely, a common mistake on the way down is to place the supporting hand (rather than the knee) out of alignment. It’s important to keep your grounded hand extended just beyond the knee.  A visible, vertical line should begin from the grounded hand, up through both shoulders, and overhead, ending in the kettlebell held firmly at the top.

Problem knee position—The knee is not drawn underneath far enough creating a less than 90 degree angle at the hip.
Problem hand position—The hand is placed out of alignment from the knee.
Proper hand, knee, shoulder alignment—Hips are at 90 degrees and a vertical line is created from grounded hand to KB.

These are time-tested tips to help improve your get-up. You’d be surprised how often revisiting these basics can help improve overall performance. Do not lose sight of the fact that your training is constantly evolving and never be afraid to revisit your foundation.

“Mind the edges of the cube or else Hell will literally break loose”

***

Annie Vo, Senior RKC, PCC Team Leader is a personal trainer, fitness writer and presenter in New York City. Contact her through her website annievo.com.

Filed Under: Kettlebell Training, Tutorial Tagged With: Annie Vo, fix get-up, get up, get-up tutorial, kettlebell technique, kettlebell training, tutorial

Getting Strong Fast: Four Effective Overhead Kettlebell Exercises

March 15, 2017 By Sebastian Müller 12 Comments

Sebastian Muller Overhead 40kg kettlebell press

Kettlebell exercises are much more common in fitness these days because of the RKC, CrossFit, strongman and functional training. But, only truly strong athletes will be able to lift heavy kettlebells overhead without risking injury.

When I began my training a few years ago, I hated it. No matter where I looked, everybody was stronger than me—at least that’s what I thought when I saw what others were lifting. But, the further I went down the path of strength training, I discovered a real secret. I learned why—after months of training—I still lifted lighter weights than the other guys (and girls).

The difference was that I pressed the weights with very strict form. I would clean a kettlebell and then press it until my arm was straight overhead. While this is an extremely effective way to train your body, it is not really useful for lifting very heavy weights.

If you want to move big kettlebells, you have to be creative. You’ll need to look for effective exercises and movements that allow you to use more of your muscles. This post will outline the four best exercises I’ve found for this purpose.

1. The Get-Up

Turkish wrestlers and aspiring athletes who trained with them used this exercise to prepare for the hard and demanding sport-specific wrestling training. If an athlete couldn’t “get up” with at least half of his body weight, he wasn’t allowed to participate in wrestling training. Being able to lift a lot of weight is just one advantage of the get-up. Your body will learn to work as a unit, and every muscle is involved with this movement. When I first did the get-up with a kettlebell, I chose the same weight I was using for strict presses. After a few weeks, I increased that weight by 100%.

Since one arm is holding the weight straight overhead during the entire get-up exercise, it strengthens and stabilizes your shoulder muscles. When you’re able to do the movement correctly and smoothly, then the goal of using half your body weight is absolutely realistic.

Sebastian Muller 40kg Get-Up

Performing the Get-Up

  • Start on your back, lying on the ground.
  • Safely pick up the weight, and extend your arm to press the weight overhead.
  • Push with your supporting leg to the side and roll up on your elbow.
  • Sit up straight.
  • Bring the knee of the extended leg under your hip.
  • Be sure your upper body is upright, and rotate it straight forward.
  • Stand up into a shoulder-width stance.

2. Bent Press (Advanced)

Old time strongmen and athletes of the 19th century did tremendous feats of strength with this exercise. You don’t see it very much these days, despite its many advantages. (The bent press is a very advanced exercise and should only be attempted when the kettlebell lifter is ready. Find an RKC-II instructor near you for help and coaching with this movement.)

But, if it is safe and appropriate for the trainee, the carryover from the bent press to other movements is gigantic. It also enormously improves hip and thoracic spine mobility. Another special thing about the bent press is that it has no “perfect form”. Everyone does it a bit differently. Although the process is always the same, there are three options: hip dominant (similar to the windmill), thigh dominant (closer to a squatting pattern), or a version that incorporates both movement patterns.

Sebastian Muller Bent Press 40kg

Performing the Bent Press:

  • Bring the weight up to the chest safely (the “rack position”).
  • Position your arm onto your big back muscles and let it remain there.
  • “Sit” under the weight by opening or hinging the hip and rotating the upper body until the arm holding the kettlebell is completely straight.
  • Straighten the hip and legs to return to the standing position.

3. Push Press

The push press bears the most resemblance to the strict press. But with the push-press, the upper body muscles only start to work when the kettlebell is already on its way up. The force of the push press comes from the legs and the hips. A small knee dip followed by an explosive hip extension transfers the force to propel the kettlebell overhead.

Sebastian Muller Push Press Bump with 40kg kettlebell

Performing the Push Press:

  • Bring the weight up to the chest safely (the “rack position”).
  • Hinge the hips and bend your knees slightly (about one quarter of a squat).
  • Explosively extend legs and hips (“bump” see the photo above).
  • Straighten the arm. After the bump, the handle of the kettlebell should be at about the height of your forehead, before you straighten the arm.

4. Jerk

The jerk is an exercise to bring up the most weight overhead with two kettlebells. It takes the upper body muscles responsible for the press almost completely out of the game. Everything in the jerk is similar to the push press up until the bump. When the kettlebells are forehead height, you have to do another dip with the knees and hips—and simultaneously extend both arms.

This exercise is super complex, but also allows you to use a lot of weight.

Performing the Jerk

  • Safely clean the kettlebells up to the chest (the “rack position”).
  • Hinge the hips and slightly bend your knees (about one quarter of a squat).
  • Explosively extend your legs and hips (“bump”).
  • Bend your knees and hinge your hips again when the kettlebell reaches your forehead. Simultaneously extend your arm.
  • Extend your legs and hips to stand up straight with the weight overhead.

Prerequisite Requirements for Safely Lifting Heavy Kettlebells Overhead:

Before you try these exercises, there are prerequisite requirements for lifting heavy kettlebells overhead—which include a certain level of mobility and stability to prevent overtraining or injury.

Sebastian Muller Overhead Reach Test

Test your overhead lockout position:

  • Stand with your back facing a wall with your heels about 5cm (about 2 inches) from the wall.
  • Your buttocks, upper back, shoulders and back of your head are touching the wall.
  • Hinge the hip so that you ‘’pinch’’ your hand to the wall. The pressure on the hand should be there during the entire exercise.
  • Put your other hand straight up overhead.

When the wrist of your fully extended arm touches the wall while your back remains stable, you will have fulfilled the mobility requirements. If you’ve run into trouble here, first work on your thoracic spine mobility and shoulder joints. To safely lift heavy kettlebells overhead, you will also need stable shoulder joints and a strong core musculature. You should have also mastered the basic kettlebell movements: swing, get-up, clean, press, squat, snatch.

The get-up is the best exercise to prepare your shoulders for heavy weights. When you master the get up, you will build a strong foundation for lifting heavy kettlebells. You can even increase the effectiveness of the exercise by adding overhead walks to your get-up sessions. For example, walk with the kettlebell overhead every time you are in the standing position of the get-up.

When a get-up with half your bodyweight is no problem for you anymore, and you are safe in the kettlebell basics, you are ready for the bent press, push press and jerk.

When Training with Heavy Kettlebells, Movement Quality is Essential

The movement patterns of the get-up, bent press, push press and jerk are complex. Many joints and big muscle groups have to work together perfectly. Before you can load these movement patterns with heavy kettlebells, you should master the movements. You simply can’t afford to stop and think about what you have to do next while you are holding a heavy kettlebell. The best way to avoid mistakes is to do everything correctly from the start. Be a professional and learn the exercises from a qualified coach.

Sebastian Muller Rack Position 40kg

How to Use These Exercises:

The movements we’ve discussed in this blog post can be divided into two categories: skill and power. Skill and power exercises belong at the beginning of your training routine. They require high focus, and we want to lift heavy kettlebells with these exercises. It’s a bad idea to tackle this combination while fatigued.

The get-up and bent press are in the skill category. They are complex movements that involve many muscle groups and joints. They are also performed slowly and under high tension. After warming up, do perfect repetitions in turns, always starting with your less strong side. One to a maximum of five sets will do a fine job. After ten total repetitions (five for each side), move on to other exercises.

The push press and jerk are power exercises. While these movement patterns are less complex, you need a lot of explosiveness and power. After warming up, do perfect repetitions in turns, always starting with your less strong side. One to a maximum of five sets will do a fine job. After ten total repetitions (five for each side), move on to other exercises.

Important Rules:

  • Be sure to fulfill the stability and mobility requirements for the overhead movements before attempting them—especially with heavy kettlebells.
  • Master the basics!
  • Learn all of the described movements from a qualified coach.
  • Always practice while fresh, with high focus. Aim to improve a little at every training session.

If you follow these rules, you will surely draw the admiration of others and have the best workouts of your life. Now that you know four exercises for lifting heavy kettlebells, go and lift your training skills to the next level.


***

Sebastian Müller, RKC Team Leader, and PCC Instructor is a personal trainer in Erfurt (Germany) and teaches seminars all over Germany. After 16 years of training he founded the first kettlebell studio in his federal state. He is the head coach of KRABA Erfurt (“Strength and Movement Academy”) and a passionate blogger. His focus lies on what he enjoys the most: to inspire people for simple training and making it an important part of their lives!  Translation by Martin Breternitz HKC, KRABA Erfurt

Filed Under: Kettlebell Training, Tutorial Tagged With: advanced kettlebell exercises, bent press, get up, heavy kettlebells, jerk, kettlebell training, kettlebells, push press, Sebastian Muller, tutorial

Naked Swings

February 22, 2017 By Jay Armstrong 4 Comments

Jay Armstrong, Senior RKC Seesaw Press

Two years ago I woke up one morning and fell out of bed. I could not stand up. My right leg was in extreme pain and it felt like there was high voltage electricity running through it. A nerve in my back had been pinched by my vertebrae. I spent a week in the hospital on morphine while they ran tests. (Okay I think it was a week). Eventually, they did minimally invasive surgery to relieve the pressure on the nerve. Then, I began the slow rehabilitation process…

I went for a follow up visit with the surgeon. He told me, “There are two types of patients. The first type will use this sort of pain event and back surgery as an excuse. They will be afraid, they won’t work on regaining their movement abilities and they will never fully recover. You are probably the second type. You are the kind of person who will try to do too much too quickly and will soon have a relapse.” His advice to me was to be very careful.

Naked Swings
Naked Swings

I wanted a speedy recovery but I certainly did not want to go through this again. I realized two important things:

  1. I must move if I wanted to regain my former movement skills and rehabilitate the lost abilities. (Yes, it was bad. After surgery, I was unable to get up off the floor without using my arms for assistance.)
  2. I must pace my recovery so that I maximized my progress and minimized the risk of injury.

I run a place called The Kettlebell Club in Houston, Texas and I teach regular group classes there. I wanted to get back to swinging the kettlebell as soon as possible but also wanted to heed the surgeon’s warning. So, as soon as I possibly could, I began practicing naked swings – lots of them.

In workshops, classes and demonstrations I had often shown students the various aspects of the kettlebell swing without a weight. But, I had not performed many repetitions of kettlebell swings without a kettlebell. When I began religiously practicing naked swings I immediately realized that I had found a real jewel. The speed of your kettlebell swing is fixed when you have a kettlebell in your hand. But, without a kettlebell, you can perform the swing motion at a variety of speeds from very slow to very fast. You will improve the way you use your respiration to support the swinging motion. You can even pause at various points in the swing to check your posture or the activation of specific muscles. (Clearly, posture and spinal stabilization were a key focus for me.)

Top of Swing Position

The top part of the kettlebell swing is a demonstration of ideal posture and spinal alignment. On each repetition, lengthen your spine, insure your thoracic spine is open, your head is over your shoulders, and your pelvis is in a neutral position (or slightly tucked).

The bottom part of the kettlebell swing is essentially the set up for a deadlift except that your hands have moved between your legs, behind your knees and lined up with your spine. Being able to spend time at the bottom of the kettlebell swing (since the kettlebell doesn’t force you to continue the movement) allows you to fine tune this position. You should feel a good loading of the posterior chain (i.e., glutes, hamstrings, back muscles, etc.) In addition, insure that your shoulders are well connected to your body while in this position.

Bottom of Swing Position

The naked swing will also help your understanding of the transitions from top to bottom and from bottom to top. Without the kettlebell dictating the speed of the movement, you can maintain your erect posture while your hands slowly (and safely) move downward before you begin your hip hinge movement.

I credit the thousands of reps of naked swings with accelerating my recovery and in a virtually risk-free manner. In addition, this work significantly improved my understanding of the mechanics of the kettlebell swing and gave me an excellent, new teaching tool.

***

Jay Armstrong is a Senior RKC, 6 Degree Black Belt TKD, and Master Z-Health Trainer.  The past 30 years have been dedicated to helping others develop confidence through increased strength and pain-free, exceptional mobility.  His quest for knowledge continues.  He runs The Kettlebell Club in Houston, Texas.

Filed Under: Kettlebell Training, Mobility and Flexibility Tagged With: Jay Armstrong, kettlebell exercises, naked swings, swings, tutorial

The Road to the Iron Maiden Challenge

January 18, 2017 By Katie Petersen 5 Comments

Katie Petersen Iron Maiden Challenge Kettlebell Press

I did it! I finally did it! This was all I could think for at least a month after completing the Iron Maiden Challenge. For anyone unfamiliar with this challenge, an Iron Maiden must complete a pistol, pull up, and strict press with the 24kg kettlebell (Beast Tamer: 48kg). I struggled with each of the lifts in different ways over the years; but did not understand my greatest obstacle until the day of reckoning, when I missed my first pull up. When all the training was done, I had one more beast to defeat and it was not in the shape of a kettlebell. It was the voice inside my head…the mean one…the one that self-sabotages, doubts, and makes me feel small. As defeat loomed, I had to find a way to cross over the dark swamp of uncertainty holding me back from everything I had worked toward. I had to rewrite my belief system; to accept my own moment of greatness; to open my heart to myself and let it shine brightly in the world. Here is my story.

In April 2013, I was doing a kettlebell workout with Rob Miller in a Chicago park. I performed a 24kg get-up for the second time ever, precariously balanced on uneven terrain as the sun’s blinding rays sealed my eyes shut. Ecstatic, I expected to revel in my unprecedented success and call it a day. Instead, Rob says “nice” and “you will have to do the Iron Maiden in October.” Excuse me? A pull up, one-arm press and pistol with a 24kg? I barely got a get-up with the 24kg, which took every ounce of effort I could muster. Was he serious? My final figure competition season had just closed and left me extremely depleted. I was not at all confident that I would regain the strength I’d lost, let alone surpass it. To give you an idea of where I started, I had just worked back up to 5 bodyweight pull ups; was very new to the pistol; had I not pressed anything heavier than the 16kg kettlebell.

My Iron Maiden trajectory began on a slippery slope of disbelief, intrigue, and dare I say, annoyance. Yep, annoyance was probably the biggest driver: annoyance that Rob thought it could be so easy for me;  annoyance that there were 4 or 5 women out there who had done it and here I was doubting myself; annoyance at how incredibly far-off this goal felt. And Rob just decided I would do it at an RKC Workshop in the next 6 months. Most of all though, I felt annoyance at my annoyance…who was I if I wasn’t willing to become greater than this moment? Those questions spun me down a path I did not expect. And so the journey began.

October 2013 simply was not a realistic goal date. But I did step forward with a new sense of discipline. That Summer/Fall I followed a Triphasic program focused around barbell squats and deadlifts to rebuild my strength base. About 4x/week, I worked on my kettlebell technique to prepare for the RKC.

By October, 2013  I attained the following:

  • Pull up: 12kg (26lb)
  • 1RM Pistol: 18kg (40lb)
  • 1RM Press: 18kg (40lb)

Although my baseline was a far cry from a 24kg, it was progress. It didn’t matter how long it would take. After five years of grueling off-season training, an unapologetic in-season diet, endless travel to national stages only to come within two places of professional IFBB status, I desperately needed a goal to fill! I had just gone fifteen months without entering so much as a 5k and had all of this pent up competitive-energy stirring. I was not going to quit until it was done.

I began learning from every blog post I could find about achieving the Iron Maiden or Beast Tamer and/or improving 1RM’s in these movements. Unsure of my next steps, I read Andrew Read’s Beast Tamer, which offered an excellent jumping off point with tips and routines. I discovered much of the material in the book roots from the RKC Level II curriculum. As intelligent and well-written as the book is, mastery of these movements meant experiencing the education for myself. My next move was crystal clear. I signed up for the RKC II in April 2014.   After going through the certification, my body awareness and neuromuscular connection around the pistol, press, and strict pull up grew exponentially. If you have any desire to be stronger these movements (especially if you want to be an Iron Maiden/Beast Tamer), learn from the countless months I spun my wheels with far less progress than I was capable of achieving.

From the beginning, the pull up was my toughest lift. Every week was jam-packed with heavy lifting and a consistent yoga practice—yet, I still managed to avoid my weakest link and didn’t even know it. Sounds naïve, I know, but I was doing them every week with negligible progress. As I look back, though, I can see how they were grossly deprioritized.

I overvalued how much deadlifts and ancillary back exercises would contribute to my pull up game. They inarguably help with strength; but the truth about getting better at pull ups is that you have to do more pull ups. After 8 months, doing low volume/heavy weight (2x/week) increased my 1RM to a 16kg; but I hadn’t added a single measly rep to my bodyweight max. My nervous system was missing literally hundreds of reps needed to genuinely fortify enough pull up strength for a 24kg.

I dug through the Dragon Door forum and found a plan that looked incredibly smart. I later found out, this program is actually in the RKC II manual!   It was time to ramp up the volume and get my baseline strength in order. This plan promised to bring a 5RM (bodyweight) to a 10RM in 1 month…sold! As you can see in the Pull-up Program below, you are supposed to attain a new max rep set every 6 days. It seems like such a tall order that I was shocked and impressed by how well the plan worked. About half-way through, a wrist injury sent me on a 2 week hiatus and I feared major regression.   Not a single rep was lost. I saw clear evidence on how much better a 10-15 min daily practice could preserve my strength than hitting it once or twice a week.

5 RM Pull-Up Program Chart
If needed, add 1 rest day/week. It will take 5 weeks to complete. For results, prioritize the pull up program. If you are not recovering well enough, scale back other training before increasing rest days. (Note: if you have a 9RM, begin there, i.e. Day 1: 9,10,11,12,13 and adjust accordingly).

Over a 6 week period, I glided from a 6RM to an 11RM. After a small recovery period, I attempted my first weighted pull up in 2 months. The 16kg max moved up to an easy 3 reps, as well as earning a new 1RM with the 20kg. Huge progress! I began reintroducing weighted pull-ups in a variety of routines; but gravitated most toward a 5-3-1 model. After years of dreading the pull up, I flipped the script on my “weakest lift” and it has remained one of my most proficient movements.

Katie Petersen Iron Maiden Pull Up

One of the greatest lessons I learned was to not get bullied by my own limiting beliefs. I didn’t feel strong doing the pull up so I unconsciously avoided them. I had become fixated on feeling strong in every workout. That sticking point with my ego had me devoting more time, attention, and planning toward the movements eliciting more progress. Physical weakness is just like any shadow inside–we might ignore it, justify it, or worse yet, accept it–but it will relentlessly beg for awareness in one way or another. Those weaknesses are here to teach us something, not to break us down. Ignoring the hard stuff just equates to a more strenuous lesson down the road, in far more areas than just training. Some of my best advice roots from this realization.

As it applies to training, if you are preparing for the Iron Maiden or any goal, pick your worst/least favorite movement and begin there. Do it every day. Nurture the movement. I no longer viewed the pull-up as part of my workout, the meat of my workout, or as a workout at all. For a measured amount of time, they became a daily practice that needed to feel as routine in my awareness as brushing my teeth. My body began to feel “off”, like I was missing something, on the days I rested. This created a higher degree of “habit” that was needed to groove the movement pattern deeply into the brain synapses, let alone muscle fibers.

Practicing everyday does not mean over-training, however; it also does not need to be a progressive-overload like this pull-up program. It does mean organizing and prioritizing around the goal. For example, if I was struggling with the pistol, I might follow something like this:

Training chart for pistols

In order to follow the pull up program, I had to face down another ego-check. I was accustomed to using weight in every pull-up session and didn’t want to be seen doing only bodyweight reps. That little brush of arrogance zapped pretty quickly as the daily work began. I couldn’t have managed weighted reps with the volume each week required. The beauty of de-loading is an allowance to drastically intensify volume and frequency without getting injured. Every rep is done to perfection or not counted. I can’t emphasize enough how beneficial it was to revisit the proverbial baseline, a.k.a. bodyweight reps vs. weighted reps. If you are stuck on a 1RM, re-programming in a similar system may just blow you away. Take yourself back to the oh-so-humbling 60% max and practice with it. Train with it regularly throughout the week rather than max out every set or every workout. Do something to improve the movement daily, including mobility drills and rest.

I practiced mobility not only on “off” days but also between every pull-up set (scapular pulls, wheel pose, foam rolling, crow pose, wall glides, pec stretches, etc.). In this way, everything I did spoke to my goal. Boldly set your intention: write it down, live it, know the outcome is already happening, and don’t let anything get in its way.

Now let’s talk about the other two lifts. Presses probably got the most attention in my Iron Maiden training. The press wasn’t as defeating as the pull up but it was a greater challenge than the pistol; so it made for the most fun in “seeing progress”.

I approached the press with a three part awareness of the movement:

  • The body has to sense the pattern of movement with total automation
  • The body has to sense the intensity of the goal load to lockout overhead (2nd half of press)
  • The body has to sense the intensity of the goal load to initiate out of rack (1st half of press)

Here’s how these three parts translated unto my training:

A. Patterning/Volume for Automation

Similar to my advice with the pull up, automation requires the pattern of movement to be a deeply rooted habit. With a max rep, not a nanosecond can be wasted for the body to “think” about what’s next. It just fires.   Ladders are a perfect way to pick up volume in a short period of time and jump start strength gains. Below is an example ladder. I followed something similar to this pressing routine 1x/week up until about 6 months out.

Patterning Volume For Automation
1:1 work to rest ratio (You go-I go, if you have a partner). If body is recovering well, add a few single rep sets after the indicated ladders.

B. Desensitizing Goal Load+ at Lockout

Drilling familiarity, stability, and strength with a 24kg+ in the overhead lockout. Below are some ways to make it fun. Adjust the weight according to your current state and goals. As a reference point for the tables listed, goal: 24kg, current max: 20-22kg, snatch test kettlebell: 14kg.

Getting up the Ladder

Each time I did the set of presses, it felt much lighter than expected after holding the heavier load for the duration of a get-up. You can skip rungs on the ladder if you are not making this the core of your workout.

Press Ladder Chart

Each time I did the set of presses, it felt much lighter than expected after holding the heavier load for the duration of a TGU. You can skip rungs on the ladder if you are not making this the core of your workout.

Overhead Walks Chart
Whenever possible, slow the negative/lowering of bell to rack at the finish of the OHW.

Dropset Chart

C1. Desensitizing Goal Load+ into RACK

This speaks to improving the proficiency and load with the clean. The clean bottles all the potential energy necessary to explode into a press. When I am maxing out, there is not a moment’s pause transitioning from clean to press. They blend into one fluid movement. Under this technique, if the clean is sloppy at a max load, the press isn’t going to happen. The practice is to clean heavier than necessary to convince the body of competence at the goal load.

Heavy Cleans Chart

Heavy push presses helps link the transition from rack to press, even with the use of momentum. I would often pair both the heavy cleans and heavy push presses into the same workout.

Push Press Chart

C2. Enhance firing out of RACK

Continuing the current from the clean into a press relies on whole body linkage. Squeeze your quads tighter then tight and push the floor away with your feet immediately upon pressing the bell. Do not let go of the legs. On a 1RM, my quads fatigue, not my shoulder. Below are two ways to practice speed out of the rack position, as well as leg/hip power production:

  • Hold kettlebell or barbell in the rack for 5 counts, then explosively press, singles @ 80%
  • Speed presses with 2 count pause in rack AMRAP @ 60%

I find an explosive clean and press technique can leave the bottom range of the press remarkably weak if slowed down. This is not to be overlooked and can be acknowledged by “revisiting baseline” and grabbing those lighter weights. Here are a few creative ways to pick up strength awareness through that first half of the press:

  • Bottoms up clean and press
  • 1 ½ reps: press halfway up, pause 2 counts, lower to rack; then press all the way up and lower to rack—this is one rep. Move SLOWLY through all portions of the rep.

I incorporate barbell presses to assist with A-C. While it is not an exact match to kettlebell pressing, the pattern is similar. In this way, you can train your body’s leg power, press initiation and lockout under a much heavier load than possible with double bells.

The final piece of the puzzle for both presses and pulls, is to consistently work on shoulder stability and mobility. This includes all the same stretches from the pull up section and adds the following:

  • Bottoms up cleans, racked carry, overhead walk, press, squat, pistol (single and double kettlebells)
  • Arm bar
  • Broken arm bar
  • Get-ups + shoulder circles
  • Windmill
  • Farmer’s walks
  • Racked carry

Once again, so many of the mobility drills, desensitizing techniques, and understanding of body linkage are attributed to the wisdom shared in an RKC-II Workshop.

The final lift, the pistol, was not as difficult to attain but absolutely needed work. I mostly needed to increase strength in the bottom range, as this is where I teetered most. The Beast Tamer book offered useful guidance in this area, too. A few of my favorite tricks:

  • Descend into pistol, hold for 10 seconds; replace the other foot to ground and stand from a close stance squat. Advance to stand up from 1 leg after the 10 sec hold.
  • 1 ½ reps: lower to bottom of pistol, rise halfway, lower back down, stand all the way up. This = 1 rep. Alternate sides at first, and work up to 3-5 consecutive reps each leg.
  • Bottom range reps: lower to bottom of pistol, rise several inches; lower again to repeat for reps.

I had achieved the 24kg pistol but was not rock solid. Back to baseline. Just like pull ups, I set a goal to achieve 10 unbroken bodyweight pistols before returning to weight. I purchased Paul Wade’s Convict Conditioning, which was equally entertaining as it was intelligent. Even though I felt skilled in this movement, I didn’t want to skip any steps only to reveal a weak point under heavier load. The book lays out a tier system of movements that must be completed to advance into the next tier. I followed his pistol progressions from beginning to end and the so-called regression work proved unexpectedly challenging!

Once I added weight back to the pistol, I followed a 5-3-1 or 3-2-1 sequence with at the finish of deadlift days. One other day/week, I continued to do a few high rep sets at bodyweight and the bottom range drills listed above.

For many people the difficulty of the movement begins with the mobility. Luckily, I have had a regular yoga practice for over 15 years and did not need to condition this area.   If you cannot easily squat below parallel with your feet touching together, focus on mobilizing. You don’t have to do yoga, but you will need to put calculated effort into improving hip and ankle mobility. It is also important to get comfortable with spinal flexion (practice plough pose + related variations in the side bar). On the other side of that flexion is creating and maintaining a strong, hollow ab position. The RKC II dissects how to conjure maximum cores strength and introduces many unique variations. I strongly recommend attending the Level II; but if you haven’t made it yet, Keira Newton delivers a helpful hollow plank series in this 5-Part Video Blog.

When accomplishing a long sought after goal, in this case about 2 ½ years, I almost forget where I started–the programming, the “un-programming”, the books, advice, practice, injuries, frustration, and oh yeah, life itself getting in the way. My journey was not a straight and narrow path, but I can say one thing for sure; if it was, I would have learned nothing. I ran into many walls and gained insight from each. As lengthy as this article has become, I believe the most valuable part of my achieving the Iron Maiden is the ability to share the inner intricacies of my experience.

So how did my story end? After all of this preparation, I unmistakably veered toward failure and had to conquer one last lesson…

I am staring down defeat, once again. What is it about this moment? It keeps showing up as if I have a choice. There it is…don’t I have a choice? I have just failed my first pull up attempt in the Iron Maiden Challenge and panic is rising in my chest. I gave it EVERYTHING I have and barely got my nose to the bar. I can’t begin to explain how shocked I felt in this moment. I had effectively turned the 24kg pull-up from my most challenging adversary into my most certain lift.   The press, on the other hand, had been tormenting me with a come-and-go as it pleases reliability along with a very fresh trap strain. Yet, somehow, I easily speared that kettlebell overhead several minutes earlier. I was literally in a state of confusion. How did I not do that?   I hear an echo of John Du Cane’s voice, “You have two more attempts. Take as much time as you need.” Half-dazed, I nod and crouch back to the ground, as if to clean my wounds.

Hovering above that bell, the faces, voices, and objects began to fade from the room. In one mosaic flash, 5 years of national figure competitions flooded my mind…predicted to win by national judges, websites, even myself…and year after year, defeat. I could hear my coach’s pep talk, telling me I gave it everything I could; it just wasn’t “my time”; it wasn’t “my turn to be on top”.   Maybe it’s like that today…it’s just not “my time”. It’s OK if I don’t have it today. I can do it at the next RKC… There I was again, feeding it, accepting the failure. Was it really that easy to let it all go?  Those once comforting words of the past were now freezing me in time. In all those years of competing, maybe it was me who wasn’t ready to win; maybe it was me who kept myself flying below the radar; and today, maybe it was me who kept my chin below that pull up bar. The moment staring me down wasn’t defeat. It was opportunity. This pull up will decide whether or not I become an Iron Maiden today. You only have one attempt….that’s all you have, that’s all you need. Pull it together NOW…an unwavering confidence rushed over me… It IS my time to shine. And as it turned out, I did have a choice that day.

The whole world is you vs. you. When I look back to where it all began, standing in the park, shaking my head ‘no’ to Rob’s seemingly absurd suggestion, I knew I was losing. That frustration powerfully transmuted into passion and determination. I have much gratitude for Rob stoking this fire and Dragon Door presenting this intensely rewarding challenge. Ultimately, I want to relay that anything is possible. Cliché? Maybe. I’ll say it again. ANYTHING you DESIRE and CHOOSE to stay COMMITTED to achieving, no matter what the obstacle, is possible. The seed was planted when I first heard about the Iron Maiden. Though, it took days to feel, weeks to want, months to believe, and years to harvest. For me, the road to the Iron Maiden is about so much more than building strength or staying devoted to a goal. Whether you are going after a max lift or simply looking for some motivation, remember that you are infinitely more powerful than your strongest moment and called to learn from your weakest.   I hope something written here might resonate with you and reflect your own inner strength.  Like any worthwhile journey, when you stand up to the struggle, you stand in your truth to embrace everything you can become. And somewhere in this space, you learn that you are becoming everything you always were…a star in your own story. I walked a long road of competitive endeavors in order to finally “see” that greatness is a part of me. It is a part of all of us. Now go out there and shine brightly in the world!


***

Katie Petersen is an RKC Team Leader, PCC Instructor, and also holds nutrition/training certifications with Poliquin, Precision Nutrition, and NASM.  She owns Active Evolution, a successful training and nutrition counseling business in Chicago, working with both online and local clients.  Katie also has a niche clientele of fitness competitors (bodybuilding, bikini, figure), as she has several years experience as an nationally ranked NPC Figure Athlete.  For online or personal training, visit her website, www.activeevolution.net or email Katie directly at petersenkatie1@gmail.com. Subscribe to her YouTube channels, Katie Petersen RKC and We Train Chicago to follow her training videos and tips.

Filed Under: Kettlebell Training, Tutorial Tagged With: Beast Tamer, Beast Tamer Challenge, How to train for the Iron Maiden Challenge, Iron Maiden Challenge, Katie Petersen, Katie Petersen RKC Team Leader, kettlebell training, kettlebells, RKC, RKC-II, training guide, training program, tutorial

Where and How To Grab The Kettlebell Handle

December 14, 2016 By Andrea Du Cane 5 Comments

Andrea Du Cane coaching rack position

As I travel around the country, I find there is a lot of confusion about where to grab the kettlebell handle—in the middle or in the corner? It is understandable that people are confused. After all, kettlebell training is still reasonably new to the broader public and it IS a very unique training tool. I hope to clarify some of this confusion and explain why certain grips are better for certain exercises, while some are definitely not appropriate for others.

The simplest way to break it down is to look at where you grab the kettlebell on the handle: the center or the corner. I’ll refer to this as the Center Grip or the Corner Grip.

This is very important. Unfortunately, many people do not pay attention to where they are grabbing the kettlebell. This is part of what I call the “set-up”. Every single kettlebell exercise has a set-up. This is where you stop and look at your feet, then determine where you place the kettlebell—in front of you for a swing/clean, or directly between your feet for a deadlift. You need to pay attention to where you place your hand on the kettlebell handle, and this too is determined by which exercise you are planning to practice.

Let’s begin by breaking down the different kettlebell grips, their uses, and advantages.


The Center Grip or Parallel Grip:

Grab the kettlebell in the center of the handle. The handle will generally lie across your callus pads with a slight downward angle toward the pinky side of the hand.

Rule of Thumb:

Anytime a kettlebell is held overhead, the kettlebell should be gripped in the middle of the handle.

Exercises:

presses, get-ups, kettlebell carries, windmills, snatches

Instructors at the Chicago RKC demonstrate kettlebell center grip

Why to Use the Center Grip:

1) The center grip keeps the kettlebell balanced so it won’t roll in either direction around the forearm. When the kettlebell is locked out overhead, the handle should be balanced in the palm. I have seen people lose control of the kettlebell and let the kettlebell roll around the forearm, not fun!

2) It helps to keep the wrist neutral. In contrast, a corner hold tends to pull the wrist into lateral flexion as well as flexion. This is very hard on the wrist. We want a strong forearm and wrist. An angled kettlebell tends to pull the wrist out of alignment.

3) During snatches a corner grip encourages the KB to spiral around the forearm, instead of the hand going through the middle and the kettlebell moving straight over the hand. A corner grip turns the snatch into a kind of GS spiral. This in turn, makes the landing less stable, the kettlebell is harder to control, and the shoulder can move around and become unpacked. Remember our snatches are Hardstyle, we use the force and speed of the hips to outrun the arm, and the fist punches through the handle fast. Once mastered, the kettlebell snatch using a center grip is both powerful and smooth, with no unnecessary movement at the lock out.

4) We need ALL our muscles to press heavy. If we hold the kettlebell at an angle during heavy presses, it puts the emphasis on the pinkie side of the palm which turns on mostly the triceps and lats. The corner grip turns off the part of the hand (thumb side) that facilitates the neurological connection with the pecs, biceps and anterior delts. When we press we don’t want to leave anything on the table, so we use the center grip.

Diagram of kettlebell corner grip
The corner grip turns off the part of the hand (thumb side) that facilitates the neurological connection with the pecs, biceps and anterior delts. When we press we don’t want to leave anything on the table, so we use the center grip.

The Neurology of Grip:

I’m sure many of you have heard about the studies that link grip strength to overall health and longevity. Because of how our bodies are wired, there is also a correlation to grip strength, shoulder health, and pressing strength.

If you’ve ever seen the picture of the Cortical Homunculus you can easily see how important the hands are. There are two particular “buttons” on the lower palm, one on the pinkie side of the fleshy palm and one on the thumb side.

The lateral side (pinkie) correlates to the triceps and lats. The medial side (thumb) relates to the pecs and biceps. When we press heavy kettlebells overhead, we want to “push all the buttons”. By grabbing the kettlebell in the center with the handle flat across the line of the calluses, we are able to activate both buttons.

Try this little exercise: Get down into a tall pushup position. Slowly lower yourself down while only contacting the ground on the outsides of your hands (pinkie), and then come back up. Next, try it again, but this time put the weight on your thumb/index side of the palm. If you listen closely to your body, the first time you tried the exercise, you should have felt more activation in your lats and triceps and the second time more muscles firing with your biceps and pecs.

Andrea Du Cane center grip rack hold

While we are on the subject of kettlebell grips, I’d like to touch on the different pressures we use:

Crush Grip: Used for heavy presses and bent presses.

Soft Grip: Used for get-ups, overhead carries, windmills. The fingers are closed around the handle and there is a light squeeze. This helps with shoulder stability and keeps control of the kettlebell on the forearm.

Closed Grip: Used for snatches and jerks. The fingers are closed around the handle with no pressure, to facilitate shoulder stability. It can also help with timing. When time is a factor as in the snatch test, keeping the fingers on the kettlebell handle will save time.

Open Grip: This is probably the most misused and misunderstood grip. There are certain populations of kettlebell lifters who will benefit from opening the fingers at the top of the snatch. When the fingers open at the top of a snatch, it allows the hand and grip to relax at the lockout. This is especially good for people with tight shoulders who need more mobility at the lockout and for high volume of snatching where the grip fatigues. And it can help while learning to snatch, for those having trouble over gripping the handle throughout the snatch.

Opening the hand at the top of a snatch rep can also help to slow people down if they are rushing through the lock-out. However, if someone is running out of time during a snatch test, make sure they keep their hands closed, as it will give back a second more for each rep.

As a side note, those who tend to over grip the kettlebell handle are often not using their hips and glutes to drive the movement, instead they are pulling with their arms and back. So fix the hips first, and that may alleviate the need to open the hand at the top of the snatch. In general, fix problems from the ground up!

Secondly, the open grip should only be used during high volume snatches, never for grinds like presses or get-ups, windmills or carries.

When pressing heavy and/or for reps, always keep the hand closed and with at least light pressure on the handle. If you open the hand at the top of a press, it signals the nervous system to relax–which we do NOT want to do during heavy presses!

The Diagonal Grip (or Corner Grip):

The diagonal grip is only used for cleans, or the combination of clean and squats together. Because there is no overhead holding, grinding or stability needed, the corner grip is fine—and in some cases preferred.

The corner grip is also encouraged for clean & jerks, since the triceps and lats are doing most of the overhead work to finish the lock out. For jerks and push presses, the lower body initiates the movement and drives the kettlebell overhead. You actually want the arms relaxed—because it is NOT a press.

Corner grip rack hold

Forearm Discomfort—the Causes and Solutions

Lastly, I’d like to discuss the issue of discomfort on the forearm. In some cases, depending on an individual’s build and structure, adjusting the kettlebell in the hand and adopting a slightly angled hold during presses etc., may be necessary. The intention should still be to grab the kettlebell in the middle, but also allow it to angle down toward the pinky-side of the hand. It is still important to try and feel the thumb side with a solid contact as described above.

A few populations often have sensitive forearms, but there are methods to help them stay as comfortable as possible while not sacrificing technique:

The first reason for forearm discomfort is being new to kettlebell lifting. It is a new sensation and takes a bit of time to get used to pressure on the forearm. Also, because beginners are typically using smaller, lighter kettlebells which sit higher on the forearm where it is more sensitive. We used to say “If it hurts your arm, get a bigger kettlebell”. That’s not a particularly sensitive thing to say, even though it is true. But, the bigger kettlebells really do sit lower on the forearm and are more comfortable to hold in the rack and overhead.

The problem is that you have to use the appropriate size kettlebell for a given client and a given exercise. Which means beginners, or other populations will still need to use the lighter kettlebells.

In this case, the best solution will be to have your clients use wrist guards to protect the wrist and forearm. The more experienced the person becomes, the more their technique improves—and the more likely they will find a comfortable position. At the same time, they will be working up to larger kettlebells and the problem will go away.

The second and most common reason for people to have problems holding kettlebells—especially in overhead positions—is a lack of shoulder and T-spine mobility. Remember, the more vertical that the arm holding the kettlebell is (either in the rack or locked out overhead), the less weight will be placed on the forearm.

If someone’s lock out is forward of the shoulder, then most of the weight of the kettlebell will go directly into the forearm. Shoulder flexibility and T-spine mobility should be addressed as part of their daily programming. Until the mobility issues are addressed, they will continue to feel the pressure from the kettlebell on their arm.

Big-chested men and women, powerlifters or bodybuilder physiques, might find it hard to hold a kettlebell in the rack position. There is not much that can be done, because it is a structural or body-type problem. They will need to move the kettlebell around until they find the most comfortable arm angle and kettlebell placement. In some cases, the rack position will never be comfortable for them and they should limit holding the rack position for any length of time.

In all these examples, using a wrist guard can help protect the forearm and make the kettlebell position safer and more comfortable. Shoulder mobility work should be done regularly. In some instances, adjusting the grip slightly to angle it off a sensitive point can help. However, keeping good exercise technique in mind, the correct form should be followed as much as possible for safety of the client and the effectiveness of the exercise.


***

Andrea Du Cane is a Master RKC Kettlebell Instructor, CK-FMS, CICS, and RIST, ZHealth certified, she has a BA in Psychology from the University of Minnesota and is also a Pilates instructor. She is the author of several books and dvds including The Ageless Body, The Kettlebell Boomer, and The Kettlebell Goddess Workout.  She has over twenty years of aerobics, weight training and fitness experience, with an additional background in… Read more here.

Filed Under: Kettlebell Training, Tutorial Tagged With: Andrea Du Cane, grip technique, kettlebell grip, kettlebell technique, kettlebell tutorial, Master RKC Andrea Du Cane, tutorial

Safely Applying the American Kettlebell Swing

August 31, 2016 By Angelo Gala 4 Comments


Angelo Gala American Swing

“The American Kettlebell Swing (AKBS) is the devil! You will get hurt if you practice this style of swing!” …at least that is what I have been told. Heck, I am guilty of muttering those words once or twice like countless other fitness enthusiasts. But, it’s generally not the tool or exercise selection that necessarily causes a problem. It is the misuse of the tool, and the poor application or inappropriate execution of the movement that can cause accumulated damage over time. When applied correctly, the American Kettlebell Swing can become an excellent addition to your movement catalogue!

In the RKC School of Strength, we teach a shoulder-height “Russian” style kettlebell swing (RKBS). The intent of our swing is to promote sustainable power production from the body’s drivetrain, the hips. We teach this style of swing since many competitive sports require athletes to propel their own bodies or an object forward. This is the direct application of the RKBS and its outwardly projecting force. In the sport of weightlifting or even in the “Sport of Fitness,” athletes are required to use their hips to propel a load overhead in movements like the clean and jerk, snatch and even a wall ball shot. Movements that finish with a load overhead utilize a more linear trajectory, and support the proper use of the AKBS.

Before we run over to the boy-toy (a 24kg kettlebell) and start ripping it over our heads with two hands, let’s review some details of the movement.

First, the AKBS is NOT A SWING. Yes, I know it is called a swing, but by definition a movement that travels from the ground to overhead in one continuous motion is a snatch. The overhead swing has a much more linear trajectory, similar to the clean. Just understanding the kettlebell path will help clean up some common errors with this movement.

Practicing a snatch with a barbell or kettlebell can be very demanding. But, most people possess the requisite mobility to learn the RKBS, even as a beginner in fitness. They may not work on full swings in the first training session, but can start working with light deadlifts. Low volume swings are realistic progressions after a few short training sessions with an RKC Certified Kettlebell Instructor. This is generally not the case for the AKBS.

There are several requirements to safely practice the AKBS:

  • A demonstration of gross motor control and coordination
  • Requisite range of motion in the thoracic region (rib cage)
  • Significant overhead shoulder mobility and stability
  • A negative test for shoulder impingement on both shoulders (Seek out a CK-FMS certified instructor to help screen for impingement)

After acknowledging these safety standards, we can decide if the AKBS is appropriate, or if any additional preparatory homework is needed before practicing this movement. Keep in mind that when performing an AKBS, the hands are placed only 3-6 inches apart on the handle (depending on the size of the kettlebell). This requires a much greater amount of thoracic and overhead mobility to safely perform the lift compared to the barbell counterpart.


Required Range of Motion

Overhead Lock Out: modified hollow body with arms in full flexion

To determine if you possess the requisite range of motion for the AKBS, bring yourself to a supine position on the floor (lay down on your back). Separate your legs into a swing/squat stance and go into a hollowed body position by flattening your lower back to the floor. This will feel like you are pulling the front of your ribcage down to your belt line. Be sure to keep your legs tight like in the Hardstyle RKBS!

Now, raise both arms overhead while clasping both hands together. For a green light to practice the AKBS, you must be able to bring your forearms, lower back, and head to the floor in a comfortable state. Your elbows must remain completely straight and your shoulders must stay depressed (sucked down to the ribs, away from your ears).

test

AngeloGalaBadHollow2 
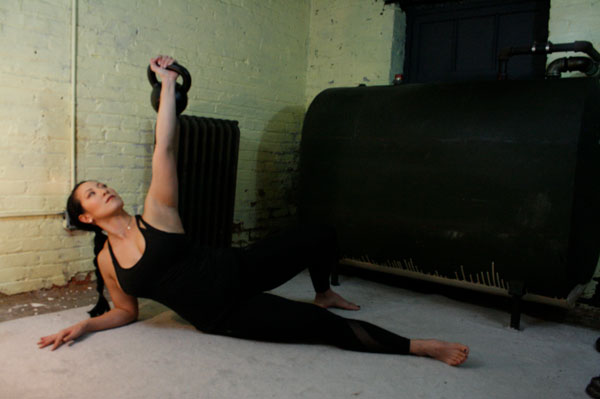
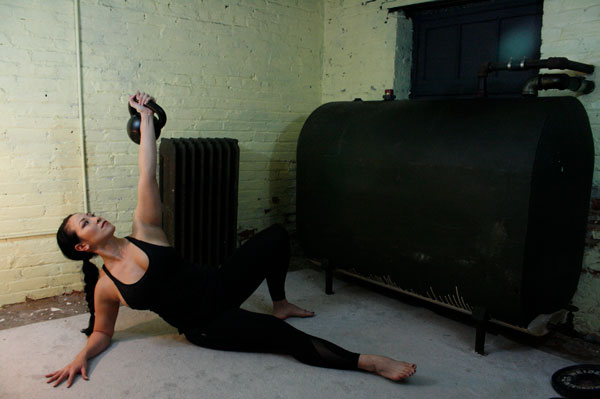
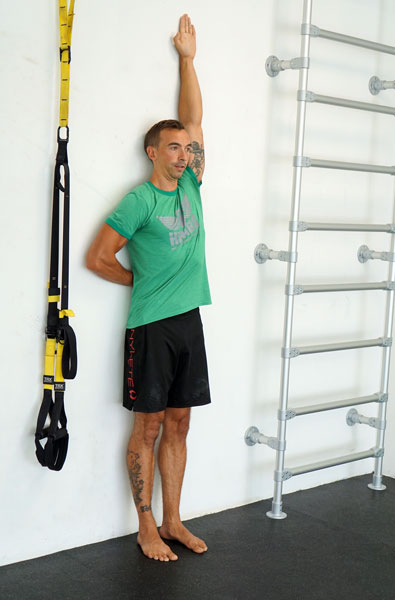
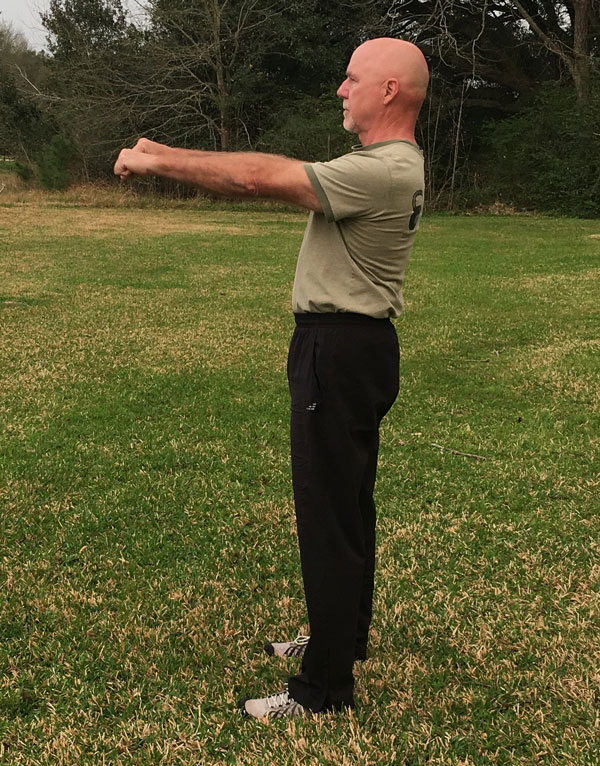
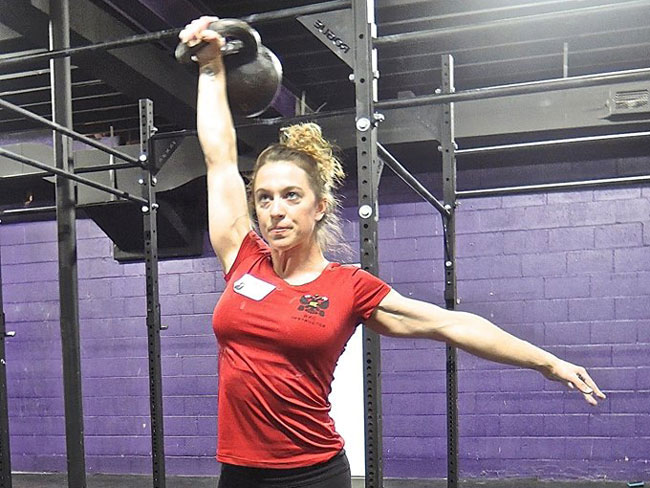
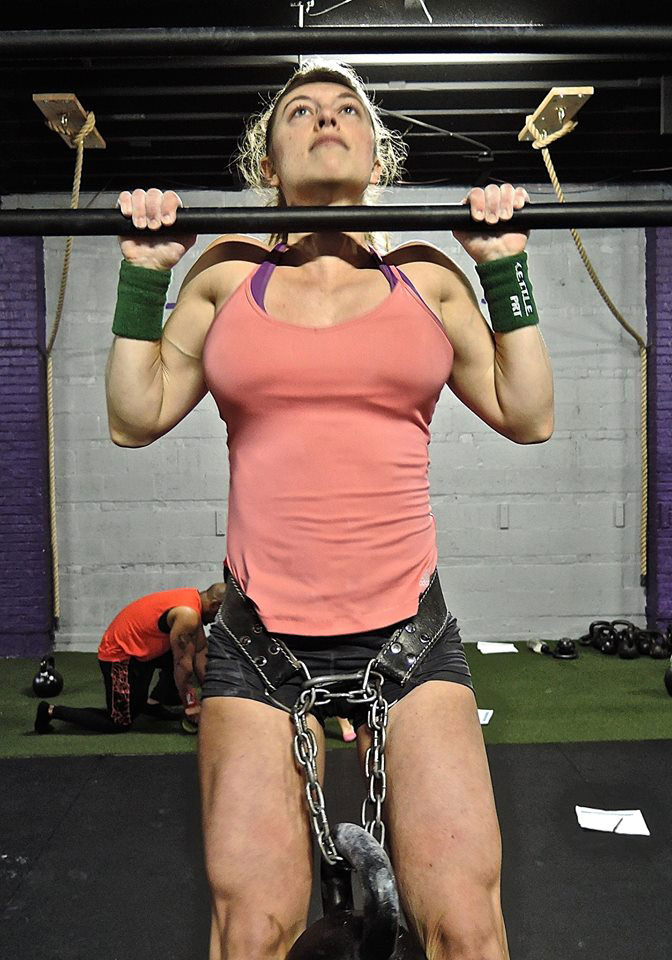
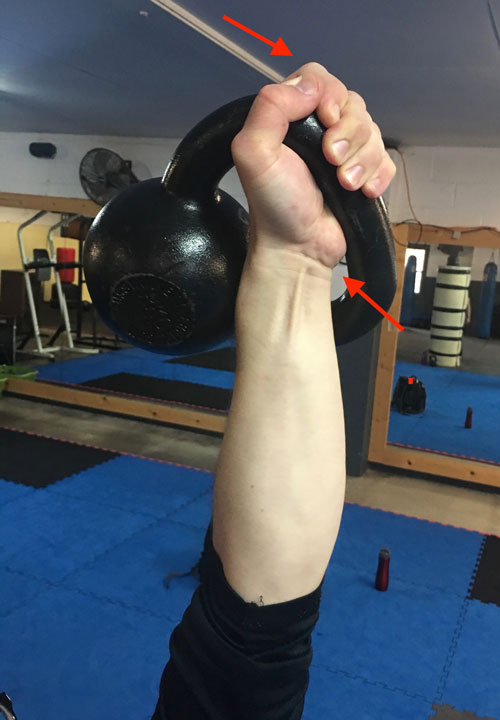
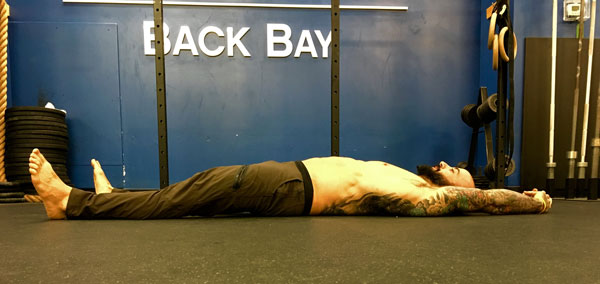
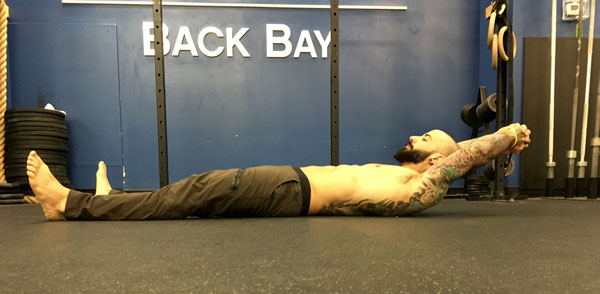
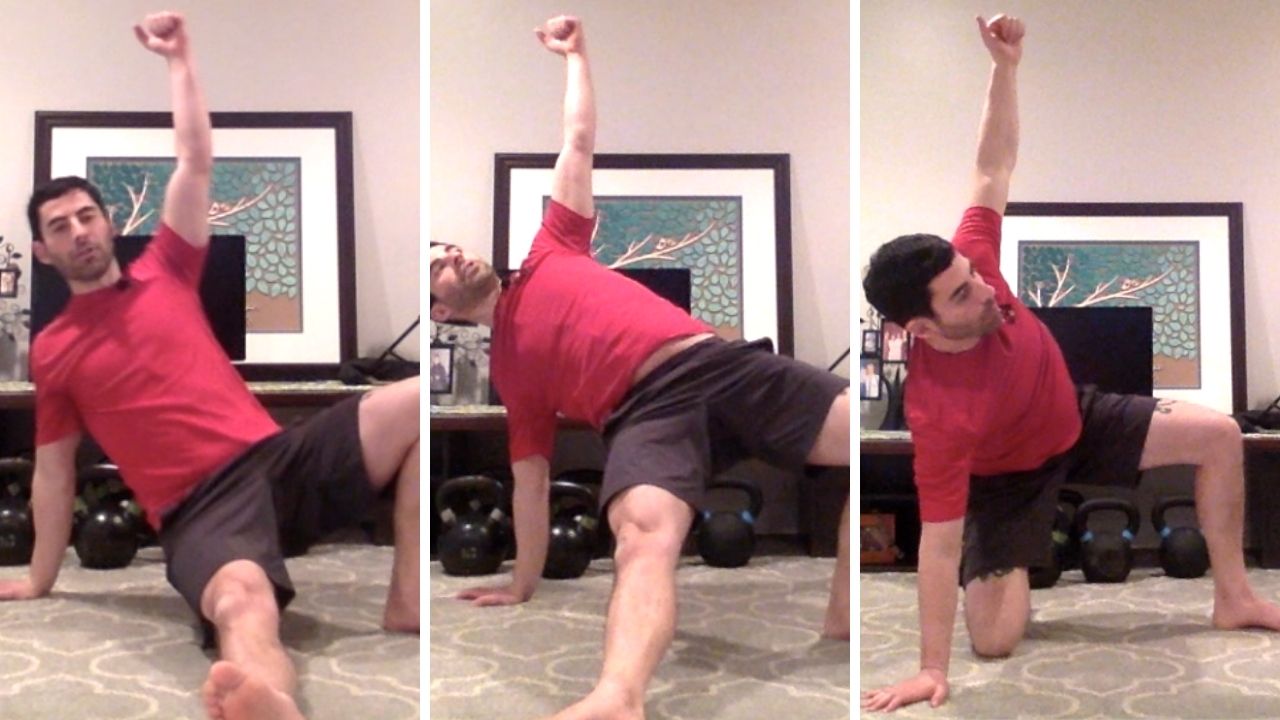
Both of these examples are failed overhead screens for the AKBS. Note: if you can see your arms in your peripheral vision, this indicates a failed overhead screen for the AKBS and more mobilization is required.

TIME TO SWING….. err snatch…….YES SWING!!

With both hands on the kettlebell, start in the athletic ready stance to prepare for the pre-swing or to “hike pass” the kettlebell through your legs. Nothing here deviates from the standards of the Russian kettlebell swing, yet. Your hips are lower than the shoulders. The spine is long and neutral. The hips and hamstrings are engaged.

Now, hike the kettlebell back through your legs. Explosively and simultaneously extend your knees and hips creating a solid lockout in your entire body below your neck. This will power the kettlebell out in front of your hips. Once the kettlebell reaches your belly button, use your arms to pull the kettlebell in towards your chest and up over your head to the overhead lockout. Stop the momentum of the kettlebell by squeezing the handle in the overhead lockout position. The AKBS is completed when the bottom of the kettlebell faces “up” directly overhead and the arms are in alignment with your ears.

How To Apply the American Kettlebell Swing:

The American Kettlebell Swing should be carefully applied to your programming as a compliment, not as a replacement for the Russian Kettlebell Swing. Instead of assuming the American Kettlebell Swing is harder, understand that there are two main reasons to purposely include the AKBS in your program design.

  1. Longer cycle time: When planning aerobic power intervals, a slower cycle speed due to a longer range of motion will simply eat up more time on the clock.
  1. Compounded shoulder and grip fatigue: Pulling the kettlebell through a longer ROM over the head adds a greater degree of shoulder flexion and sustained grip activation compared to the RKBS. The AKBS creates a significantly higher accumulation of shoulder and grip fatigue. In a mixed modal environment, this movement coupled with push-ups, reverse wall climbs or even handstand pushups can dramatically improve overhead work capacity when safely and progressively programmed.

Safe Modifications:

Just like most people have the ability to safely perform the RKBS after demonstrating proficiency of proper hinge patterning and full body bracing, all practitioners can utilize an abbreviated version of the AKBS by simply expressing a shorter range of motion. If you were unable to pass the overhead screen because of signs of shoulder impingement, a safe variation of the AKBS would be to simply pull the kettlebell just above forehead level without committing to a straight-arm lockout of the elbows. With this abbreviated ROM, you will still be able to create a longer cycle time as well as induce increased shoulder and grip fatigue.

Give this swing variation a go and let me know how things work out for you!!

Angelo Gala, Senior RKC, PCC Team Leader


***

Angelo Gala is both a Senior RKC and PCC Team Leader. He has been a fitness professional in the Boston area for greater than 15 years working day to day with a wide range of clientele.  He helps the average “Joe” get fit and out of pain and prepares athletes to qualify and compete at the CrossFit Games. His specialties include improving restricted movement, getting strong(er) and energy system development (anything that elevates the heart rate). Angelo is available for remote coaching and on-site workshops. For scheduling he can be reached at a.angelo.gala@gmail.com.

Filed Under: Kettlebell Training, Tutorial Tagged With: American Swing, Angelo Gala, CrossFit, mobility, Senior RKC Angelo Gala, tutorial

Why the Single-Leg Deadlift is a Go-To Leg Exercise

June 22, 2016 By Andrea Du Cane 2 Comments

Andrea Du Cane Single-Leg Deadlift

Why do I love single-leg deadlifts so much? For one thing, nothing works the butt and legs quite like it. Add the extra benefit to the back, core, lower legs and feet and you have a full body exercise. As Gray Cook likes to say, “Maintain your squat and TRAIN your deadlift.” I think this is especially true for the single-leg deadlift.

I have to share a personal story; I’ve had four patellar dislocations. Yes, FOUR! The first one happened after a two-hour ballet/pointe class. The second happened in the middle of a jazz dance class. The third happened when my tango partner hit my kneecap with his knee and the fourth happened when my shoe caught in an escalator and I fell. Yes, dance is a very dangerous sport!

The last two times, I popped it back in and rehabbed it myself. The single-leg deadlift was the most important exercise for strengthening and rehabbing my knee. So this is an exercise close to my heart!

Here’s why everyone should add this powerful exercise to their program:

The single-leg deadlift not only develops hip strength and power, but it also allows the muscles of the hips and legs to act as stabilizers. If you think about it, every time you stand on one leg, you’re using the same muscles for balance and stability that are generally used for force production.

Forcing the body to maintain stability on one leg allows the athlete and coach to see strength imbalances from left to right side. This is extremely important for athletes as well as special populations. And it can go a long way to help reduce injuries and improve performance.

Double Kettlebell Single-Leg Deadlifts:

Holding kettlebells in each hand is easier on your core because it balances out the load from side to side. This allows you to go heavy and train pure hip strength on one leg. You can then watch for and correct left/right strength asymmetries. The focus will be on initiating and driving forcefully with your glutes. This hip drive with stability is the same for both double kettlebells and single-arm kettlebell single-leg deadlifts.

Single-Arm Single-Leg Deadlifts:

Single-arm single-leg deadlifts have the advantage of requiring torso, pelvic, and hip stability as well as strength production. This exercise can be used as a corrective exercise because loading one size requires us to resist the rotational forces put on the body.

Holding the kettlebell on the opposite side of the working leg is the most common corrective use of the single-arm single-leg deadlift. However, holding a kettlebell on the same side as the working leg also has many benefits and challenges. Both versions of the single-arm single-leg deadlift challenge the body to restrict rotational forces from loading one side.

Interestingly, only half the people who try holding the kettlebell on the same side as the working leg will find it harder than holding it on the opposite side. And it may be different from left leg to right.

When using the single-leg deadlift as a corrective exercise, find your weakest link or most challenging combination and train the weak link 2-1.

Now let’s discuss how to perform single-leg deadlifts correctly. As I like to say, “Perfect Technique = Success”. Go to any gym and you’ll see lots of sloppy single-leg deadlifts. Are they getting the most from the exercise? Are they risking hurting themselves? The answer is “no” and “yes”, respectively.

These basics apply to both double and single arm single-leg deadlifts:

  1. The back MUST remain neutral throughout the lift. If your back rounds or flexes, you risk tweaking it. And if your back rounds or flexes, I guarantee you are not using your glutes.
  2. The hips HINGE and move back over your heels. This move is not about the torso bending forward, it’s about the hips moving backward.
  3. The front knee will bend, but it does not move forward excessively. Remember, we are deadlifting not squatting. Plus, this is not a straight-leg deadlift—straight-leg deadlifts shift the focus and load to the hamstrings and off the glutes. Think of the movement as an “elevator not a teeter-totter”.
  4. The shoulders and hips remain parallel to each other and the floor. Do not externally rotate your back leg, and don’t let your working hip sink or rise above parallel. The shoulders should also remain squared off and equal—for both the single or double arm variations.
  5. The arms move as a pendulum from the shoulders as the torso moves forward. The shoulders remain engaged at the lat, do not let your shoulders disconnect from your body as your torso moves forward. This helps the rotator cuff and shoulder stabilizers work during the movement. The elbows remain locked, no “pulling” with your biceps.
  6. The knee must track the toe; do not let the knee collapse inward or outward.
  7. The feet are active. The entire foot is loaded with a bit more weight towards the heel, with the big toe working and gripping the floor.
  8. The back foot is dorsiflexed and the toe is facing down to help keep the hips “closed”.
  9. The back leg is an extension of the spine, and the leg should not be higher or lower than the hips. The back leg should be in line with the hips, and active to help with balance.
  10. Squeeze your palms into the kettlebell handles, this increases shoulder and core stability and strength.
  11. Keep your eyes focused approximately 3-6 feet in front of you to help keep your head in alignment and to assist balance.
  12. Inhale as you stand back up. Power breathe as you drive your foot down into the ground and lift up.

All the elements listed above apply to both the two arm and single arm single-leg deadlift. For added focus, maintain level shoulders and torso at all times when performing single arm single-leg deadlift. You will need to fight the rotational pull with the weight.

A few other thoughts: If at all possible, perform your single-leg deadlifts barefoot. The proprioceptive, neurological information from your feet will assist your balance and make you stronger.

Modifications for Different Populations:

  • Use platforms to raise the kettlebell(s) so that they can be picked up safely AND with no spine flexion.
  • Start from the top instead of picking the kettlebells up from the ground. This way you are already loaded, instead of trying to find tension and stability at the bottom of the movement.
  • People with bad knees or balance issues can hold onto a wall or bar with one hand and hold the kettlebell in the other hand. They will not have to “fight” for balance and risking tweaking their knees or back.
  • Keep the back leg down as a “kick-stand”. This also helps with balance issues.
  • NEVER fight for balance! If you start to lose balance, simply place your back leg down on the ground and regroup.

When training, start with medium loads to get a feel for your weaknesses while developing single leg strength and balance. Try 6-8 reps 2-4 sets with this medium load. Then go heavy, especially with double arm single-leg deadlifts and drop the reps to 3-5.

This exercise should be performed slow and controlled—NOT fast and bouncy. If you’re bouncing up and down, you are either hiding weaknesses or you chose a kettlebell that is too light!

Here’s a short demo of a two-arm single-leg deadlift. As stated above, all points apply to using one kettlebell:

***

Andrea Du Cane is a Master RKC Kettlebell Instructor, CK-FMS, CICS, and RIST, ZHealth certified, she has a BA in Psychology from the University of Minnesota and is also a Pilates instructor. She is the author of several books and dvds including The Ageless Body, The Kettlebell Boomer, and The Kettlebell Goddess Workout.  She has over twenty years of aerobics, weight training and fitness experience, with an additional background in… Read more here.

Filed Under: Kettlebell Training, Tutorial Tagged With: Andrea Du Cane, how to do a single-leg deadlift, how-to, kettlebell exercise, kettlebell tutorial, kettlebells, One leg deadlift, single leg deadlift, tutorial

Two Quick, Easy and Effective Kettlebell Exercises for Any Population

May 4, 2016 By Andrea Du Cane Leave a Comment

Andrea Du Cane, Master RKC

There is something to be said about simplicity of movement and reinforcing the fundamental patterns of our kettlebell lifting.

I’ve taken two basic exercises and by using two kettlebells and focusing on the correct alignment and movement, I have turned them into simple and effective exercises for all populations—including your brand new clients, older clients and those recovering from certain injuries.

Double Kettlebell Deadlift Drag

The first drill is a double kettlebell deadlift drag. Normally we do this exercise with one heavy kettlebell. By using two medium to heavy kettlebells (heavy enough to complete the movement correctly with each arm), you open up the upper body kinetic chain. This will illuminate asymmetries from one side of the body to the other. It also allows you to strengthen the weaker side. Start with the same size kettlebell in each hand and then use a kettlebell one size larger on the weaker side.

For the purposes of this article and video, I will be using the same size kettlebell.

Get into the set up position. The kettlebells are approximately an arm’s length in front of you. Grab the kettlebells and pull yourself back toward your heels. You should feel as though you would fall back on your butt if you let go of the kettlebells. Lock your lats down into a packed position and maintain a long and neutral spine. SLOWLY drag the kettlebells back towards your heels with your elbows straight. Feel how the movement is initiated by the lats and the triceps. Do not let your hips drop below your knees, and do not let your spine flex at all!

The key is to not use any momentum. In fact, it is best if the floor you are using is sticky or rubber—the more resistance the floor offers the better.

If you feel most of the tension in the quads, then you are not getting your hips back far enough and are trying to hold your position with your quads instead of your glutes and hammies. The abs must be braced the entire time, and you should use a long firm exhale as you drag the kettlebells back. Release, step back, and re-set for the next rep.

I go the length of my gym, or at least 8-10 drags. Repeat for 1 or 2 more sets as desired. Remember, never let your back round into flexion at any time during this exercise!

Double Kettlebell Straight-Leg Deadlift

The double kettlebell straight-leg deadlift, is another simple but effective exercise to challenge the posterior chain. It is an excellent exercise for the hamstrings and glutes. And as in the deadlift drag above, it utilizes the lats.

There is an interesting difference between these two exercises. The deadlift drag uses the lats to do the work by pulling the kettlebells back toward the heels, while the hips and legs maintain stable strength. With the straight-leg deadlift, the lats are held stable while the hips and hammies initiate the movement through hinging. In other words, the movements and stabilization are reversed, but both are working the same muscles. Pretty cool huh!

Here’s how to do the double kettlebell straight-leg deadlift:

Pick up two moderately heavy kettlebells using good deadlift technique. Stand with your feet between hip and shoulder width apart. Keep your elbows straight and locked, and your lats retracted and contracted. Begin to send your hips back into a hinge. Keep your knees as straight as you can manage while maintaining a neutral spine at all times.

The amount of knee flexion and the depth of your torso forward relate to your hamstring flexibility. The more flexible you are, the straighter you can keep your knees and the lower you can fold forward without any flexion in your spine.

Inhale into your belly as your chest comes forward. Pause briefly at the bottom, keeping the glutes and hamstrings contracted. Tighten a little more and then exhale as you come back up to the starting position.

You will feel a deep stretch/contraction from your glutes down through your hamstrings. This exercise can be considered a loaded stretch for the glutes and hamstrings. It is a very powerful hamstring developer.

As usual, there should be NO flexion in the spine. Start with a limited range of motion until you can use the full range of motion with a neutral spine. You can adjust the amount of knee flexion as well—just don’t allow yourself to turn it into a regular deadlift, you’ll be cheating yourself out of the main benefit of this exercise.

As I mentioned above, the lats, back and core are working very hard to stabilize during this exercise, so they are benefiting too!

Start with 3 sets of 8 moving slow and controlled.


****

Andrea Du Cane is a Master RKC Kettlebell Instructor, CK-FMS, CICS, and RIST, ZHealth certified, she has a BA in Psychology from the University of Minnesota and is also a Pilates instructor. She is the author of several books and dvds including The Ageless Body, The Kettlebell Boomer, and The Kettlebell Goddess Workout.  She has over twenty years of aerobics, weight training and fitness experience, with an additional background in… Read more here.

Filed Under: Kettlebell Training, Tutorial Tagged With: Andrea Du Cane, deadlift, deadlift drag, double kettlebell, kettlebell drills, kettlebells, master rkc, Master RKC Andrea Du Cane, straight leg deadlift, tutorial, video

Don’t Ignore These Two Common but Crucial Kettlebell Mistakes

February 3, 2016 By Keira Newton 8 Comments

Two Kettlebell Mistakes Keira Newton

As a Master RKC, I travel a lot. I love my job because I get to visit other gyms and teach people how to teach kettlebell technique according to the highest standards in the industry—RKC standards. In the past few years of teaching, I have noticed two commonly missed mistakes. These are simple fixes in my eyes, and easy to teach. So lets get started.

The Deadlift:

The deadlift is the basis of almost every kettlebell lift. It IS the foundation of what we do. However, I have seen people skip the deadlift altogether… (How will they learn the swing? How will that work?) Or they simply miss the most important part of the deadlift: the set up and how to work underneath the kettlebell.

In my experience, I’ve observed that people who are given a small kettlebell, are tall, tight in the hamstrings, or tight in the hips will round the low back to pick up the kettlebell. The cure for this? RAISE THE FLOOR. It’s such a simple fix, but it will help 99% of your students. I use it with almost all of my new students. The video below includes a short demo of this technique. Give it a try.

The Swing:

I think it is safe to assume we all know the kettlebell swing can be fantastic if performed correctly—and deadly if not. This is no joke. When training a client, or in your own training, you must know exactly what happens with this ballistic lift. The most common mistake I see from my clients and students (which is also the most missed among new trainers) is in the TIMING of the swing. While watching someone’s swing, if it looks like they are moving to the toes, swinging below the knees, or lifting the kettlebell with their arms, then their timing is off.

To fix the timing, tell your client to wait until the kettlebell has passed below the belly button, or their arms have touched their ribs after swinging the kettlebell forward before moving their hips back. It will seem almost as if the kettlebell will hit you where it hurts, and you get out of the way just in time. But, let’s make sure that happens okay? 🙂

Hope the video below helps you understand. Enjoy!


***

Kiera Newton, Master RKC, Level 3 Z-Health, MCT, PCC. Keira first picked up a kettlebell in 2005 when her husband challenged her to stop laughing and start swinging. She stuck with the challenge when she realized that she could get an all-in-one workout in a fraction of the time she spent at the gym. Keira was convinced… Read more here.

Filed Under: Kettlebell Training, Tutorial Tagged With: Keira Newton, kettlebell swing, kettlebell swings, kettlebell technique, kettlebell training, kettlebell troubleshooting, kettlebell tutorial, Master RKC Keira Newton, swings, tutorial

  • Go to page 1
  • Go to page 2
  • Go to page 3
  • Go to Next Page »

Primary Sidebar

Featured Products

previous arrow
BOOK-RKCBookofSnC
HardStyleKettlebellChallegeDanJohn700
BookCoverMasterTheKettlebell1
RKCiconKettlebell512
KettlebellGoddessdv040
next arrow

Recent Posts

  • Key Kettlebell Exercises To Help You Create Better Balance
  • How to Most Effectively Use Kettlebells to Meet Your New Year Goals
  • 1 Exercise That Checks All The Boxes
  • Kettlebells in the Clinic
  • How Breathing Can Improve Your Kettlebell Training
FOLLOW US ON TWITTER!

Archives

Copyright © 2023

Dragon Door Publications / The author(s) and publisher of this material are not responsible in any manner whatsoever for any injury that may occur through following the instructions or opinions contained in this material. The activities, physical and otherwise, described herein for informational purposes only, may be too strenuous or dangerous for some people, and the reader(s) should consult a physician before engaging in them.