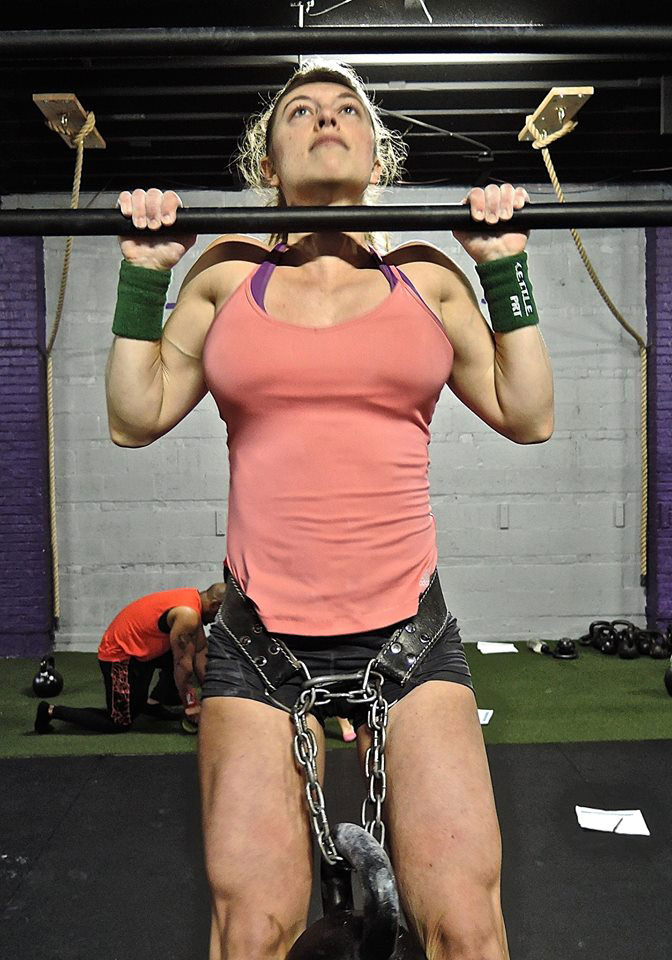
I did it! I finally did it! This was all I could think for at least a month after completing the Iron Maiden Challenge. For anyone unfamiliar with this challenge, an Iron Maiden must complete a pistol, pull up, and strict press with the 24kg kettlebell (Beast Tamer: 48kg). I struggled with each of the lifts in different ways over the years; but did not understand my greatest obstacle until the day of reckoning, when I missed my first pull up. When all the training was done, I had one more beast to defeat and it was not in the shape of a kettlebell. It was the voice inside my head…the mean one…the one that self-sabotages, doubts, and makes me feel small. As defeat loomed, I had to find a way to cross over the dark swamp of uncertainty holding me back from everything I had worked toward. I had to rewrite my belief system; to accept my own moment of greatness; to open my heart to myself and let it shine brightly in the world. Here is my story.
In April 2013, I was doing a kettlebell workout with Rob Miller in a Chicago park. I performed a 24kg get-up for the second time ever, precariously balanced on uneven terrain as the sun’s blinding rays sealed my eyes shut. Ecstatic, I expected to revel in my unprecedented success and call it a day. Instead, Rob says “nice” and “you will have to do the Iron Maiden in October.” Excuse me? A pull up, one-arm press and pistol with a 24kg? I barely got a get-up with the 24kg, which took every ounce of effort I could muster. Was he serious? My final figure competition season had just closed and left me extremely depleted. I was not at all confident that I would regain the strength I’d lost, let alone surpass it. To give you an idea of where I started, I had just worked back up to 5 bodyweight pull ups; was very new to the pistol; had I not pressed anything heavier than the 16kg kettlebell.
My Iron Maiden trajectory began on a slippery slope of disbelief, intrigue, and dare I say, annoyance. Yep, annoyance was probably the biggest driver: annoyance that Rob thought it could be so easy for me; annoyance that there were 4 or 5 women out there who had done it and here I was doubting myself; annoyance at how incredibly far-off this goal felt. And Rob just decided I would do it at an RKC Workshop in the next 6 months. Most of all though, I felt annoyance at my annoyance…who was I if I wasn’t willing to become greater than this moment? Those questions spun me down a path I did not expect. And so the journey began.
October 2013 simply was not a realistic goal date. But I did step forward with a new sense of discipline. That Summer/Fall I followed a Triphasic program focused around barbell squats and deadlifts to rebuild my strength base. About 4x/week, I worked on my kettlebell technique to prepare for the RKC.
By October, 2013 I attained the following:
Although my baseline was a far cry from a 24kg, it was progress. It didn’t matter how long it would take. After five years of grueling off-season training, an unapologetic in-season diet, endless travel to national stages only to come within two places of professional IFBB status, I desperately needed a goal to fill! I had just gone fifteen months without entering so much as a 5k and had all of this pent up competitive-energy stirring. I was not going to quit until it was done.
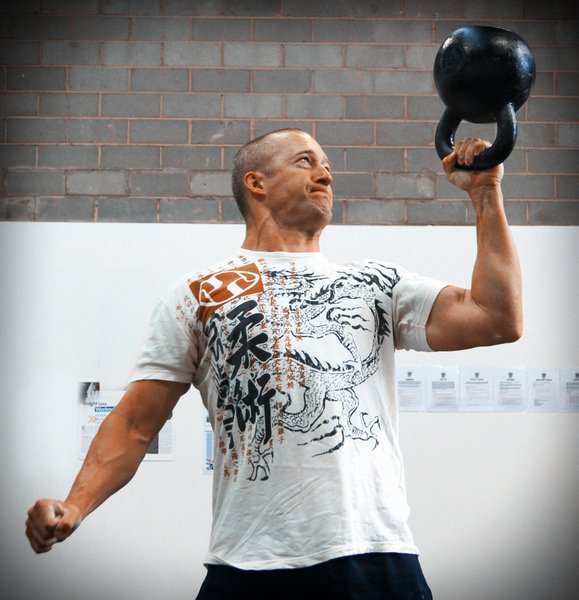
I began learning from every blog post I could find about achieving the Iron Maiden or Beast Tamer and/or improving 1RM’s in these movements. Unsure of my next steps, I read Andrew Read’s Beast Tamer, which offered an excellent jumping off point with tips and routines. I discovered much of the material in the book roots from the RKC Level II curriculum. As intelligent and well-written as the book is, mastery of these movements meant experiencing the education for myself. My next move was crystal clear. I signed up for the RKC II in April 2014. After going through the certification, my body awareness and neuromuscular connection around the pistol, press, and strict pull up grew exponentially. If you have any desire to be stronger these movements (especially if you want to be an Iron Maiden/Beast Tamer), learn from the countless months I spun my wheels with far less progress than I was capable of achieving.
From the beginning, the pull up was my toughest lift. Every week was jam-packed with heavy lifting and a consistent yoga practice—yet, I still managed to avoid my weakest link and didn’t even know it. Sounds naïve, I know, but I was doing them every week with negligible progress. As I look back, though, I can see how they were grossly deprioritized.
I overvalued how much deadlifts and ancillary back exercises would contribute to my pull up game. They inarguably help with strength; but the truth about getting better at pull ups is that you have to do more pull ups. After 8 months, doing low volume/heavy weight (2x/week) increased my 1RM to a 16kg; but I hadn’t added a single measly rep to my bodyweight max. My nervous system was missing literally hundreds of reps needed to genuinely fortify enough pull up strength for a 24kg.
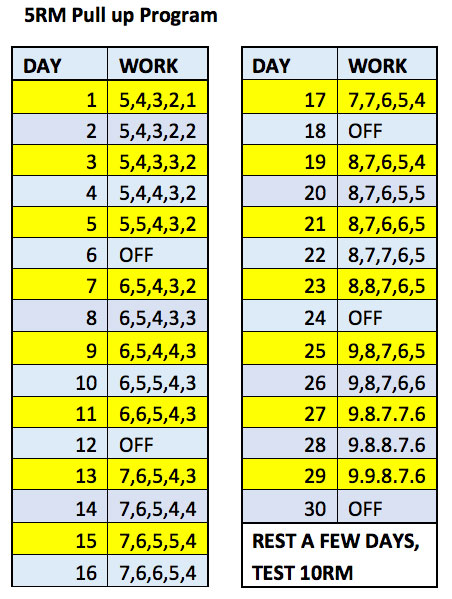
I dug through the Dragon Door forum and found a plan that looked incredibly smart. I later found out, this program is actually in the RKC II manual! It was time to ramp up the volume and get my baseline strength in order. This plan promised to bring a 5RM (bodyweight) to a 10RM in 1 month…sold! As you can see in the Pull-up Program below, you are supposed to attain a new max rep set every 6 days. It seems like such a tall order that I was shocked and impressed by how well the plan worked. About half-way through, a wrist injury sent me on a 2 week hiatus and I feared major regression. Not a single rep was lost. I saw clear evidence on how much better a 10-15 min daily practice could preserve my strength than hitting it once or twice a week.
Over a 6 week period, I glided from a 6RM to an 11RM. After a small recovery period, I attempted my first weighted pull up in 2 months. The 16kg max moved up to an easy 3 reps, as well as earning a new 1RM with the 20kg. Huge progress! I began reintroducing weighted pull-ups in a variety of routines; but gravitated most toward a 5-3-1 model. After years of dreading the pull up, I flipped the script on my “weakest lift” and it has remained one of my most proficient movements.
One of the greatest lessons I learned was to not get bullied by my own limiting beliefs. I didn’t feel strong doing the pull up so I unconsciously avoided them. I had become fixated on feeling strong in every workout. That sticking point with my ego had me devoting more time, attention, and planning toward the movements eliciting more progress. Physical weakness is just like any shadow inside–we might ignore it, justify it, or worse yet, accept it–but it will relentlessly beg for awareness in one way or another. Those weaknesses are here to teach us something, not to break us down. Ignoring the hard stuff just equates to a more strenuous lesson down the road, in far more areas than just training. Some of my best advice roots from this realization.
As it applies to training, if you are preparing for the Iron Maiden or any goal, pick your worst/least favorite movement and begin there. Do it every day. Nurture the movement. I no longer viewed the pull-up as part of my workout, the meat of my workout, or as a workout at all. For a measured amount of time, they became a daily practice that needed to feel as routine in my awareness as brushing my teeth. My body began to feel “off”, like I was missing something, on the days I rested. This created a higher degree of “habit” that was needed to groove the movement pattern deeply into the brain synapses, let alone muscle fibers.
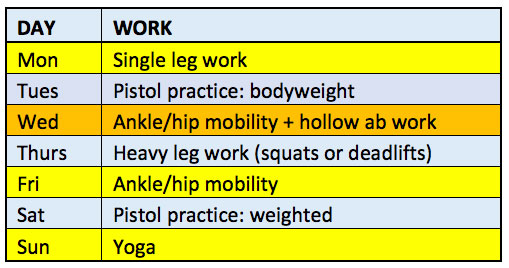
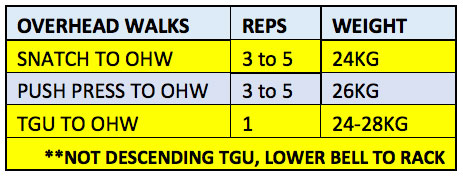
Practicing everyday does not mean over-training, however; it also does not need to be a progressive-overload like this pull-up program. It does mean organizing and prioritizing around the goal. For example, if I was struggling with the pistol, I might follow something like this:
In order to follow the pull up program, I had to face down another ego-check. I was accustomed to using weight in every pull-up session and didn’t want to be seen doing only bodyweight reps. That little brush of arrogance zapped pretty quickly as the daily work began. I couldn’t have managed weighted reps with the volume each week required. The beauty of de-loading is an allowance to drastically intensify volume and frequency without getting injured. Every rep is done to perfection or not counted. I can’t emphasize enough how beneficial it was to revisit the proverbial baseline, a.k.a. bodyweight reps vs. weighted reps. If you are stuck on a 1RM, re-programming in a similar system may just blow you away. Take yourself back to the oh-so-humbling 60% max and practice with it. Train with it regularly throughout the week rather than max out every set or every workout. Do something to improve the movement daily, including mobility drills and rest.
I practiced mobility not only on “off” days but also between every pull-up set (scapular pulls, wheel pose, foam rolling, crow pose, wall glides, pec stretches, etc.). In this way, everything I did spoke to my goal. Boldly set your intention: write it down, live it, know the outcome is already happening, and don’t let anything get in its way.
Now let’s talk about the other two lifts. Presses probably got the most attention in my Iron Maiden training. The press wasn’t as defeating as the pull up but it was a greater challenge than the pistol; so it made for the most fun in “seeing progress”.
I approached the press with a three part awareness of the movement:
- The body has to sense the pattern of movement with total automation
- The body has to sense the intensity of the goal load to lockout overhead (2nd half of press)
- The body has to sense the intensity of the goal load to initiate out of rack (1st half of press)
Here’s how these three parts translated unto my training:
A. Patterning/Volume for Automation
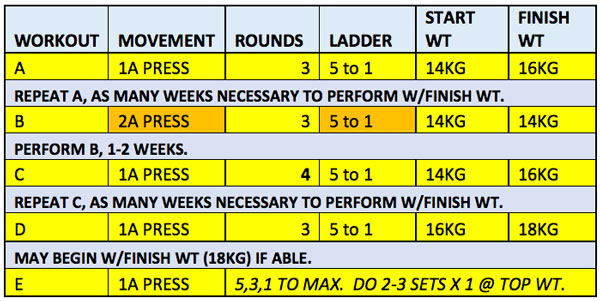
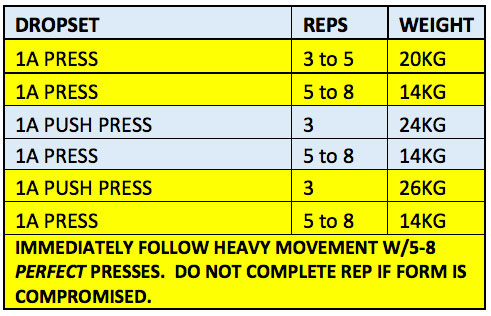
Similar to my advice with the pull up, automation requires the pattern of movement to be a deeply rooted habit. With a max rep, not a nanosecond can be wasted for the body to “think” about what’s next. It just fires. Ladders are a perfect way to pick up volume in a short period of time and jump start strength gains. Below is an example ladder. I followed something similar to this pressing routine 1x/week up until about 6 months out.
B. Desensitizing Goal Load+ at Lockout
Drilling familiarity, stability, and strength with a 24kg+ in the overhead lockout. Below are some ways to make it fun. Adjust the weight according to your current state and goals. As a reference point for the tables listed, goal: 24kg, current max: 20-22kg, snatch test kettlebell: 14kg.
Getting up the Ladder
Each time I did the set of presses, it felt much lighter than expected after holding the heavier load for the duration of a get-up. You can skip rungs on the ladder if you are not making this the core of your workout.
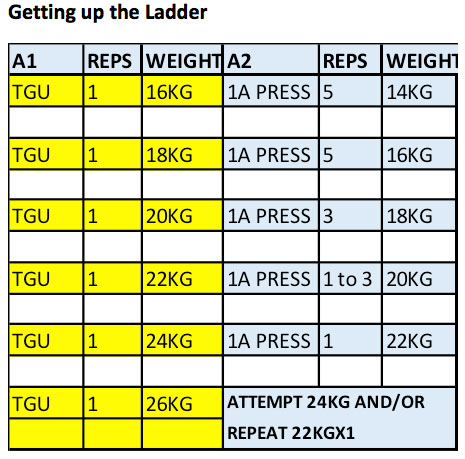
Each time I did the set of presses, it felt much lighter than expected after holding the heavier load for the duration of a TGU. You can skip rungs on the ladder if you are not making this the core of your workout.
C1. Desensitizing Goal Load+ into RACK
This speaks to improving the proficiency and load with the clean. The clean bottles all the potential energy necessary to explode into a press. When I am maxing out, there is not a moment’s pause transitioning from clean to press. They blend into one fluid movement. Under this technique, if the clean is sloppy at a max load, the press isn’t going to happen. The practice is to clean heavier than necessary to convince the body of competence at the goal load.
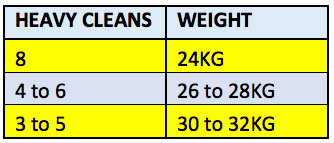
Heavy push presses helps link the transition from rack to press, even with the use of momentum. I would often pair both the heavy cleans and heavy push presses into the same workout.
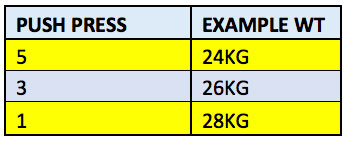
C2. Enhance firing out of RACK
Continuing the current from the clean into a press relies on whole body linkage. Squeeze your quads tighter then tight and push the floor away with your feet immediately upon pressing the bell. Do not let go of the legs. On a 1RM, my quads fatigue, not my shoulder. Below are two ways to practice speed out of the rack position, as well as leg/hip power production:
- Hold kettlebell or barbell in the rack for 5 counts, then explosively press, singles @ 80%
- Speed presses with 2 count pause in rack AMRAP @ 60%
I find an explosive clean and press technique can leave the bottom range of the press remarkably weak if slowed down. This is not to be overlooked and can be acknowledged by “revisiting baseline” and grabbing those lighter weights. Here are a few creative ways to pick up strength awareness through that first half of the press:
- Bottoms up clean and press
- 1 ½ reps: press halfway up, pause 2 counts, lower to rack; then press all the way up and lower to rack—this is one rep. Move SLOWLY through all portions of the rep.
I incorporate barbell presses to assist with A-C. While it is not an exact match to kettlebell pressing, the pattern is similar. In this way, you can train your body’s leg power, press initiation and lockout under a much heavier load than possible with double bells.
The final piece of the puzzle for both presses and pulls, is to consistently work on shoulder stability and mobility. This includes all the same stretches from the pull up section and adds the following:
- Bottoms up cleans, racked carry, overhead walk, press, squat, pistol (single and double kettlebells)
- Arm bar
- Broken arm bar
- Get-ups + shoulder circles
- Windmill
- Farmer’s walks
- Racked carry
Once again, so many of the mobility drills, desensitizing techniques, and understanding of body linkage are attributed to the wisdom shared in an RKC-II Workshop.
The final lift, the pistol, was not as difficult to attain but absolutely needed work. I mostly needed to increase strength in the bottom range, as this is where I teetered most. The Beast Tamer book offered useful guidance in this area, too. A few of my favorite tricks:
- Descend into pistol, hold for 10 seconds; replace the other foot to ground and stand from a close stance squat. Advance to stand up from 1 leg after the 10 sec hold.
- 1 ½ reps: lower to bottom of pistol, rise halfway, lower back down, stand all the way up. This = 1 rep. Alternate sides at first, and work up to 3-5 consecutive reps each leg.
- Bottom range reps: lower to bottom of pistol, rise several inches; lower again to repeat for reps.
I had achieved the 24kg pistol but was not rock solid. Back to baseline. Just like pull ups, I set a goal to achieve 10 unbroken bodyweight pistols before returning to weight. I purchased Paul Wade’s Convict Conditioning, which was equally entertaining as it was intelligent. Even though I felt skilled in this movement, I didn’t want to skip any steps only to reveal a weak point under heavier load. The book lays out a tier system of movements that must be completed to advance into the next tier. I followed his pistol progressions from beginning to end and the so-called regression work proved unexpectedly challenging!
Once I added weight back to the pistol, I followed a 5-3-1 or 3-2-1 sequence with at the finish of deadlift days. One other day/week, I continued to do a few high rep sets at bodyweight and the bottom range drills listed above.
For many people the difficulty of the movement begins with the mobility. Luckily, I have had a regular yoga practice for over 15 years and did not need to condition this area. If you cannot easily squat below parallel with your feet touching together, focus on mobilizing. You don’t have to do yoga, but you will need to put calculated effort into improving hip and ankle mobility. It is also important to get comfortable with spinal flexion (practice plough pose + related variations in the side bar). On the other side of that flexion is creating and maintaining a strong, hollow ab position. The RKC II dissects how to conjure maximum cores strength and introduces many unique variations. I strongly recommend attending the Level II; but if you haven’t made it yet, Keira Newton delivers a helpful hollow plank series in this 5-Part Video Blog.
When accomplishing a long sought after goal, in this case about 2 ½ years, I almost forget where I started–the programming, the “un-programming”, the books, advice, practice, injuries, frustration, and oh yeah, life itself getting in the way. My journey was not a straight and narrow path, but I can say one thing for sure; if it was, I would have learned nothing. I ran into many walls and gained insight from each. As lengthy as this article has become, I believe the most valuable part of my achieving the Iron Maiden is the ability to share the inner intricacies of my experience.
So how did my story end? After all of this preparation, I unmistakably veered toward failure and had to conquer one last lesson…
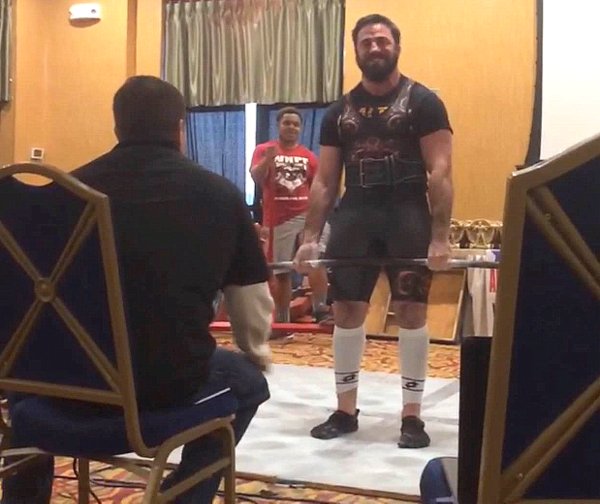
I am staring down defeat, once again. What is it about this moment? It keeps showing up as if I have a choice. There it is…don’t I have a choice? I have just failed my first pull up attempt in the Iron Maiden Challenge and panic is rising in my chest. I gave it EVERYTHING I have and barely got my nose to the bar. I can’t begin to explain how shocked I felt in this moment. I had effectively turned the 24kg pull-up from my most challenging adversary into my most certain lift. The press, on the other hand, had been tormenting me with a come-and-go as it pleases reliability along with a very fresh trap strain. Yet, somehow, I easily speared that kettlebell overhead several minutes earlier. I was literally in a state of confusion. How did I not do that? I hear an echo of John Du Cane’s voice, “You have two more attempts. Take as much time as you need.” Half-dazed, I nod and crouch back to the ground, as if to clean my wounds.
Hovering above that bell, the faces, voices, and objects began to fade from the room. In one mosaic flash, 5 years of national figure competitions flooded my mind…predicted to win by national judges, websites, even myself…and year after year, defeat. I could hear my coach’s pep talk, telling me I gave it everything I could; it just wasn’t “my time”; it wasn’t “my turn to be on top”. Maybe it’s like that today…it’s just not “my time”. It’s OK if I don’t have it today. I can do it at the next RKC… There I was again, feeding it, accepting the failure. Was it really that easy to let it all go? Those once comforting words of the past were now freezing me in time. In all those years of competing, maybe it was me who wasn’t ready to win; maybe it was me who kept myself flying below the radar; and today, maybe it was me who kept my chin below that pull up bar. The moment staring me down wasn’t defeat. It was opportunity. This pull up will decide whether or not I become an Iron Maiden today. You only have one attempt….that’s all you have, that’s all you need. Pull it together NOW…an unwavering confidence rushed over me… It IS my time to shine. And as it turned out, I did have a choice that day.
The whole world is you vs. you. When I look back to where it all began, standing in the park, shaking my head ‘no’ to Rob’s seemingly absurd suggestion, I knew I was losing. That frustration powerfully transmuted into passion and determination. I have much gratitude for Rob stoking this fire and Dragon Door presenting this intensely rewarding challenge. Ultimately, I want to relay that anything is possible. Cliché? Maybe. I’ll say it again. ANYTHING you DESIRE and CHOOSE to stay COMMITTED to achieving, no matter what the obstacle, is possible. The seed was planted when I first heard about the Iron Maiden. Though, it took days to feel, weeks to want, months to believe, and years to harvest. For me, the road to the Iron Maiden is about so much more than building strength or staying devoted to a goal. Whether you are going after a max lift or simply looking for some motivation, remember that you are infinitely more powerful than your strongest moment and called to learn from your weakest. I hope something written here might resonate with you and reflect your own inner strength. Like any worthwhile journey, when you stand up to the struggle, you stand in your truth to embrace everything you can become. And somewhere in this space, you learn that you are becoming everything you always were…a star in your own story. I walked a long road of competitive endeavors in order to finally “see” that greatness is a part of me. It is a part of all of us. Now go out there and shine brightly in the world!
***
Katie Petersen is an RKC Team Leader, PCC Instructor, and also holds nutrition/training certifications with Poliquin, Precision Nutrition, and NASM. She owns Active Evolution, a successful training and nutrition counseling business in Chicago, working with both online and local clients. Katie also has a niche clientele of fitness competitors (bodybuilding, bikini, figure), as she has several years experience as an nationally ranked NPC Figure Athlete. For online or personal training, visit her website, www.activeevolution.net or email Katie directly at petersenkatie1@gmail.com. Subscribe to her YouTube channels, Katie Petersen RKC and We Train Chicago to follow her training videos and tips.