• Skip to main content
  • Skip to primary sidebar
  • Home
  • Contributors
    • Matt Beecroft, Master RKC
    • Martijn Bos, Master RKC
    • Andrea Du Cane, Master RKC
    • Angelo Gala, Master RKC
    • Chris Holder, Master RKC
    • Steve Holiner, Master RKC
    • Dan John, Master RKC
    • Mike Krivka, Master RKC
    • Thomas Phillips, Master RKC
    • Robert Rimoczi, Master RKC
    • Phil Ross, Master RKC
    • Max Shank, Master RKC
  • Workshops
    • HKC Workshops
    • RKC Workshops
    • RKC-II Workshops
  • Find an RKC Instructor
  • Resources
    • Articles
    • Forums
    • Kettlebells
    • Products
  • Blogs
    • PCC Blog
    • Strong Medicine Blog
  • Archives

RKC School of Strength

Official blog of the RKC

mobility

How and Why to Practice Slow Motion Kettlebell Get-Ups

June 13, 2018 By Shari Wagner Leave a Comment

Shari Wagner Slow Motion Get-up

At a Dragon Door workshop back in 2010, a Senior RKC taught us how to do slow motion get-ups and my life was forever changed!

In theory, slowing down a get-up sounds simple enough—but you know what they say about “simple but not easy”! When I tried a slow motion get up for the first time, I noticed that I wanted to go through it way too fast. At the workshop, we were instructed to try and take a full minute to get from the floor to standing, and then another full minute to get back to the floor.

I was amazed. Simply slowing down the pace of the get-up amplified every nuance of each step and each movement. The weight is also amplified. At the time, I was able to do a solid get-up with a 16g kettlebell—and sometimes a 20kg. I scoffed when they told the women to use an 8kg kettlebell. Quickly, I realized that when moving slowly, an 8kg kettlebell is no joke! Time under tension is increased—and the whole move is much more difficult.

I found that certain parts of the get-up were excruciatingly had to do slowly—and that the steps requiring mobility in areas where I was tight were the most difficult of all. This slow motion drill was a great lesson. It taught me where I needed to improve my mobility, and where my strength and movement quality needed help.
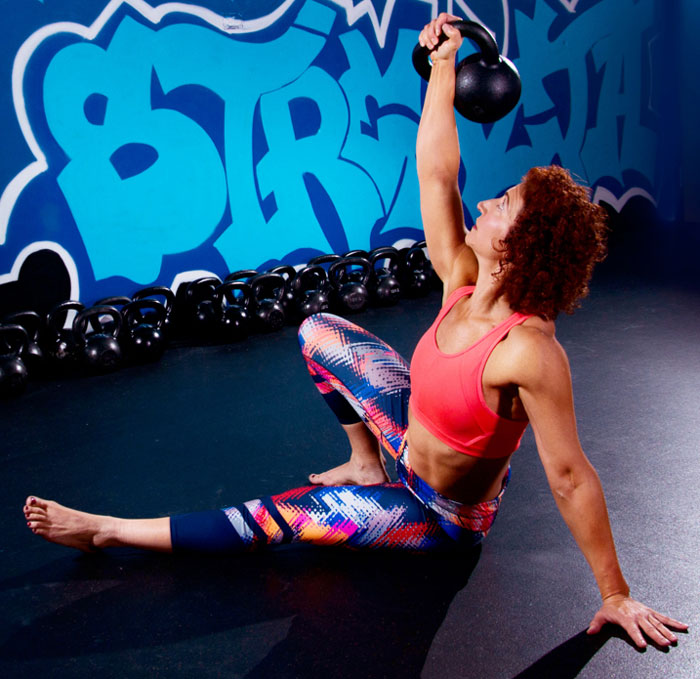
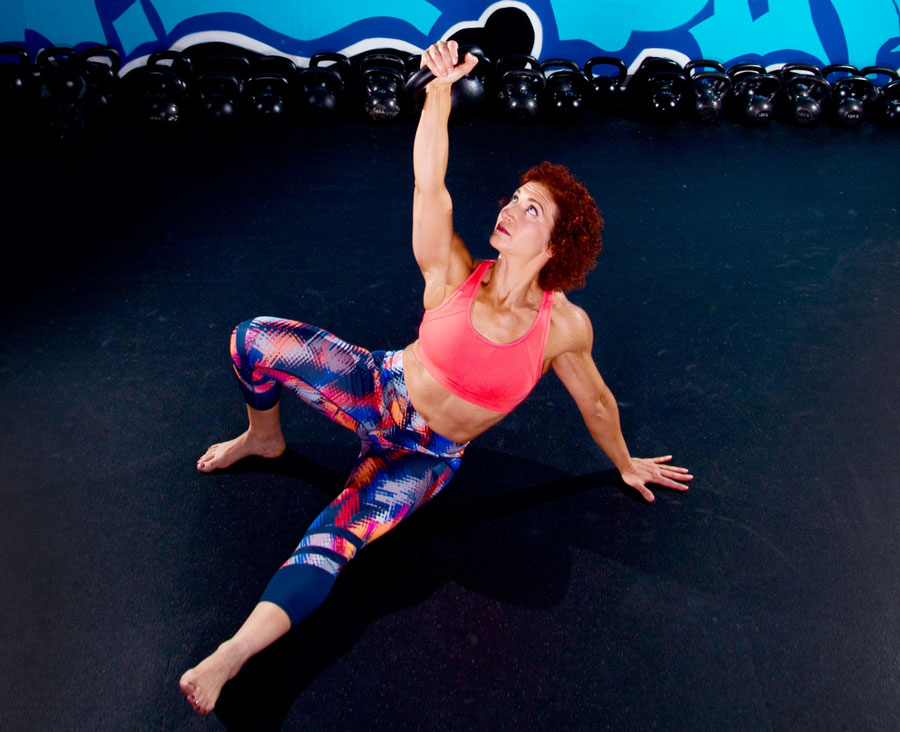
Shari Wagner kettlebell Get-upSlow motion get-ups are different than doing a get-up at a regular pace and pausing at each step. Perform a slow motion get-up as though you’re watching yourself on video, frame by frame. Definitely pause at each step to check yourself (just as you would in a regular get-up) but move in super slow motion from one step to the next. At first, you may want to try slow motion get-ups with no weight. It’s surprising how challenging this drill can be!

If you find a step where you aren’t able to move in slow motion or where you naturally speed up, then that’s an area that needs some work. You may need to mobilize your hips, shoulders, and/or your thoracic spine. Or, it may be that an area needs more strength and stability. Attack the issue from all angles, but if you feel like your body is stuck, then it’s usually because of a mobility issue.

Another way to improve your technique is to take note of asymmetries in your movements from left to right. These movement asymmetries can also be caused by immobility or lack of strength and/or stability.

Improve Mobility Challenges With These Drills:

When practicing the half get-up (at the elbow or posting to the hand) insufficient thoracic mobility can cause people to slump forward or be unable to get into a tight position with the shoulders packed and the side of the body straight. Another compensation for poor thoracic mobility is compensating by arching the lower back.

Here’s one of my favorite drills to improve thoracic mobility:

Rotational thoracic mobility is also important for the get-up, since the half get-up and half windmill phases are in the transverse plane. Here’s a helpful drill:

For shoulder stability, I love the simplicity of a good waiter’s walk. During the drill, really focus on using your lats to hold your arm overhead. Think about drawing your entire arm and shoulder down into the socket.

The “standing bird dog” is a great drill that delivers a double whammy of shoulder stability, core stability and strength in both areas. Dan John describes it in detail in the Hardstyle Kettlebell Challenge. Start by pressing the kettlebell overhead. Set the arm and shoulder in place, as in a waiter’s walk. Then, lift the leg on the same side (raising the knee up) and hold. When you can no longer keep your balance, put your foot back on the ground and then raise the other leg. Hold then switch the kettlebell to your other arm and repeat the drill.

Good luck with the slow motion get-up and these mobility drills. Please leave your comments below if you’ve tried them before, or if you try the drills for the first time now!

****

RKC Team Leader Shari Wagner, RKC-II, PCC, CK-FMS owns Iron Clad Fitness in Denver, Colorado. She can be contacted through her website at IronCladFit.com, email: info@ironcladfit.com or by phone 720-900-4766. Follow her on Facebook: facebook.com/IronCladFitness and Twitter: twitter.com/IronCladFitness.
Filed Under: Kettlebell Training, Mobility and Flexibility Tagged With: core stability, get up, get ups, kettlebell training, mobility, Shari Wagner, stability

How Well Do You Move?

April 19, 2017 By Phil Ross 4 Comments

Master RKC Phil Ross, Kettlebell Pullover

How well do we—as humans—move? When we move are we trying to avoid or minimize pain? There seem to be three major areas of pain, have you wondered why these areas are so afflicted, even with people who are “in shape”?

The low back (lumbar region), the knees (distal femur, proximal tibia, fibula and patella) and the shoulders (glenohumeral and sterno-clavicular joints) are the pain points for many people. Why?

Two words need to be considered: stability and mobility. Certain joints of the body prefer stability and others favor mobility. Feet, knees, the low back and scapular regions favor stability. Ankles, hips, the thoracic spine (middle back) and glenohumeral joints (shoulders) flourish with mobility. The joints need to do what they are designed to do. If not, then asymmetries and injuries occur. And here’s the double whammy—not only will the misaligned joint be affected, the ones above and below it will too! For example, if a person has tight hips, their hip movement will be compromised. The movement will need to take place in other parts of the body, usually the knees and low back, both of which are stability-favoring joints above and below the hips. This creates instability in these joints, resulting in pain and anomalies.

Many people have low back pain. They might stretch their backs, get chiropractic adjustments, or take pain pills, but the issue will still not be addressed. The real issue be that the hips are tight and immobile, and/or the hamstrings are too tight. They may also have immobility issues if their thoracic spine (t-spine) is not strong enough or mobile enough to move safely. Are the erector spinea and the multifidi muscles (muscles that connect the vertebra) strong and engaged? Are the rhomboids, trapezius and other muscles of the scapula developed? Does the individual know how to keep them engaged? On many occasions, low back issues really lie in the areas above and below. Addressing the strength and flexibility of these major joints often significantly relieves back pain.

How do we address and avoid these issues? First, if you are not training, start. You’ll move better, feel better and live a longer (and often more productive) life. Next, consider that type of training, is it cardio, mobility or strength based? Are you getting the correct balance for optimal health? With your strength training or resistance training, are you using closed chain or open chain exercises? Closed chain movements involve more joints of the body and tend to be better for you. Open chain movements are more isolated and can have a shearing effect on the joint.

For example, let’s compare bodyweight squats and leg extensions. Bodyweight (or weighted for that matter) squats are a closed chain movement. The major joints and muscle groups addressed are the hips, knees and ankles, and the glutes, quadriceps, hamstrings and gastrocs (calves) are on the muscle side of the equation. Other muscles and stabilizers are involved at lesser degrees along with a good deal of core engagement for bracing. When performing squats, the feet are firmly planted and positive joint compression is employed. In contrast, leg extensions only address the quadriceps with concentric and eccentric contractions. The other leg muscles are virtually dormant and only the knee joint is involved. There is a shearing effect on the knee joint which may cause injury over time. In my estimation, this machine should be disassembled, melted down and repurposed as something useful, like a kettlebell! Just ask yourself, when you walk, run or jump, do you isolate a muscle or use your whole limbs and torso? In a rehabilitation situation or in bodybuilding, then muscle isolation may be appropriate, but otherwise multi-joint movements are superior.

There are many reasons why kettlebell training is my central mode of training. With kettlebells, all of the facets of fitness are addressed: strength, explosive power, flexibility, durability, muscular endurance, cardiovascular training, and mobility. Let’s consider mobility. Outsiders (I’m referring to those not acquainted with bonafide kettlebell training), only view kettlebell training as strength, explosive power and muscular endurance, but not necessarily promoting healthy mobility.

Along with the bo staff, freehand mobility and calisthenics I lead on a daily basis in my classes, there are three kettlebell based complexes we use to prepare for the rigors of the training session. We execute 10 repetitions of each movement on each side, or in each direction where applicable. The first complex is figure-8, then low, middle, and high halos. The second complex is bottoms-up crescent swings, kettlebell good mornings, and goblet squats. The third complex is the RKC armbar, lying side swings, and kettlebell pullovers.

Let’s discuss the third complex: the RKC armbar, lying side press and the kettlebell pullover. Generally, we do 10 repetitions of the armbar, 10 reps of the lying side press on both sides, and then 10 reps of the kettlebell pullover. Two sets of each.

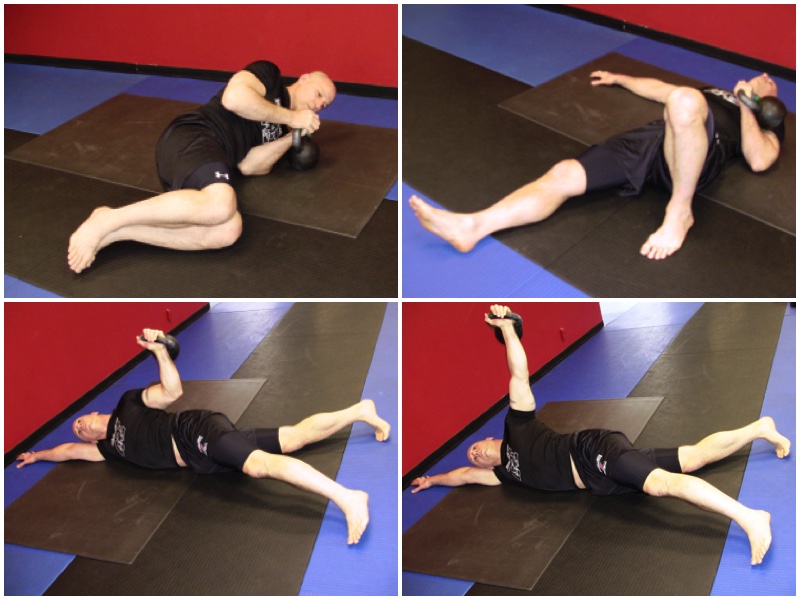
The Armbar packs the shoulder and prepares the participant for overhead work. Lie on your side in the fetal position as if you were starting a get-up. Grasp the kettlebell by the handle, bring it to your shoulder, then roll onto your back. With two hands, press the kettlebell upward. Make sure that your wrist is straight, your elbow is locked, and your shoulder is packed. If the kettlebell is in your right hand, take your right leg and bring it to the other side of your body so that your hip is facing the floor and most of your anterior is in the prone position. Do all of this while maintaining a relaxed neck and while rotating kettlebell in space. Attempt to bring your right hip as close to the floor as possible as you keep your arm and wrist locked. Once you’ve settled into the bottom of this movement, bring your right leg across the body until you are supine with the kettlebell above. This movement needs to be performed slowly, to maximize the opening of the hips and packing of the shoulders. Relish the time under the kettlebell as your thoracic region savors the mobility!

The Lying Side Press is to be done as soon as you have completed the armbar. As you are on your side, press the kettlebell upward. It is imperative to maintain a straight wrist and vertical forearm throughout this exercise. Pull the kettlebell down so that your elbow is slightly behind your hip. Keep the kettlebell steady and feel your rhomboids working. If you feel stress in your anterior deltoid, you are doing the movement incorrectly and most likely not keeping your forearm vertical.

Phil Ross Lying Side Press Sequence

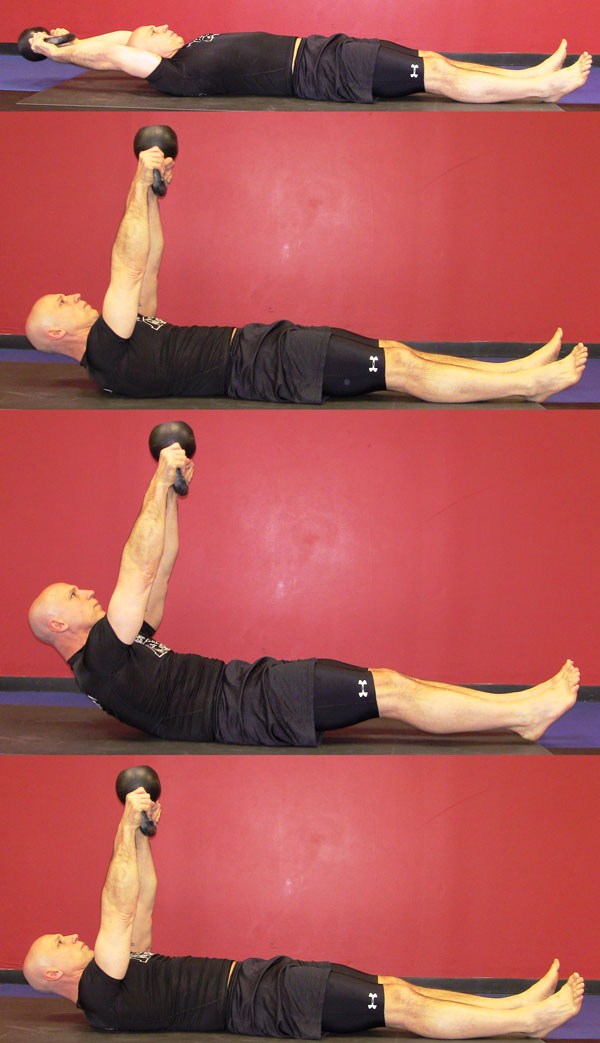
The Kettlebell Pullover is a movement that’s very easy to cheat! Don’t be “that guy” or “that girl”. The kettlebell is on the ground above your head as you lie in the supine position. Grasp the kettlebell in both hands at the horns and bring it overhead. Now, lock your arms. While you lower the kettlebell, remember the phrase “sometimes, always, never”. Sometimes your thoracic region comes off of the ground, Always have your head and cervical spine off of the ground and Never let your lumbar spine or hips come off of the ground. So, lower the bell with your head off of the mat and do not allow the kettlebell to touch the ground. As you keep the bottom of the kettlebell facing away from you, raise it so that it is perpendicular to the floor. Pause. Next, contract your abdominals as you bring the kettlebell straight upward while keeping your lumbar spine on the floor. Repeat this process for 10 repetitions.

PhilRoss Kettlebell Pullover Sequence

If you have any questions regarding this RKC blog post or any other kettlebell or fitness related matter, please feel free to contact me.

Strength and Honor!

Coach Phil 


***

Phil Ross Master RKC, 8th Degree Black Belt, CK-FMS, PCC and ACE Certified. Author of Ferocious Fitness and Survival Strong, producer of The Kettlebell Workout Library. He is also the Chief Instructor at American Eagle MMA & Kettlebells

Filed Under: Kettlebell Training, Mobility and Flexibility Tagged With: kettlebell training, Master RKC Phil Ross, mobility, mobility training, mobility warmup, phil ross, warmups

Warm Up and Cool Down Flow

March 22, 2017 By Paul Britt, DC 10 Comments

Senior RKC Paul Britt

How do you warm up for training? Is there a flow and/or pattern to it? How about the cool down afterwards? I like to consider economy of movement in my warm-ups because it tends to speed up my prep and my cool down. I want the warm-up to systematically prepare me for the session ahead—and I have designed it to work on my mobility and stability issues. In our modern society, we all seem to have similar thoracic restrictions, core stability, active straight leg raise restriction, and toe touch difficulties.

I perform the warm-up in a circuit for one or two sets. Even though one set is typically enough, if I am not warmed up appropriately when I get to the end of the first set, I will add a second. I want to make sure that nothing is left out of my full-body warm-up. The same goes for the cool down—I want to make sure that I hit all my issues that need work. I use this particular flow because my issues are thoracic mobility restriction, ankle mobility. Since I am sitting a lot in class, those are the areas where I concentrate at the start and finish of my workout session.

I start my warm-up with a minute or two on the foam roller. If you have to spend a lot of time on your foam roller or if you’ve named it, get checked out by a professional of some type. I really do a quick run through with it to scan and work through any major trigger points. After the roller, it is time to start moving and warming up.

Perform the following in a circuit:

  • Tall kneeling halo x 10 each way with a light kettlebell
  • 1 RKC armbar on each side
  • Bretzel left and right
  • Pump stretch x 10
  • 1 Get-up on each side
  • 5 Prying goblet squats with same weight as the Halo

After one or two times through my warm-up circuit, I perform five kettlebell deadlifts. I stand up and reset on each lift to perfectly set the groove. In general with my warm-up, everything starts on the ground and moves upward. It is easy to transition from tall kneeling to lying to the deadlifts at the end. It tends to flow well for me.

My cool down follows the same progression, and also moves from the ground up:

  • Supine piriformis stretch, 10 seconds left and right
  • Bretzel left and right
  • Shin box stretch (video)
  • Heel sit stretch
  • Child pose
  • Frog stretch
  • RKC hip flexor stretch
  • Hip flexor stretch with a twist
  • Elongated hip flexor stretch
  • Standing hamstring stretch
  • Cossack stretch
  • Shoulder stretch left and right
  • Pull-up bar hang

Just like the warm-up, I like to move in a flow from the ground up. I did not specify any particular reps for the cool down, instead I typically use my breath to move through the stretches. I find that 3-5 diaphragmatic breaths will safely move me to the edge of my range of motion. I designed the warm-up and the cool down to flow from one position to the next with economy, this makes it faster than if I just did random stretches and warm-ups. Find out the issues you need to address and create a flow that allows you to move smoothly and quickly through the series.

If you are pinched for time, for a workout you could actually load the get-up and squat with a kettlebell and move through the circuit several times. You will benefit from the mobility work and build strength on an open frame. But only load those two exercises in the series. The kettlebell halo and RKC armbar are not strength exercises, they are movement prep and mobility/stability work, so a heavy load is not appropriate or safe.


***

Senior RKC Paul Britt has been an RKC kettlebell instructor since 2006. Paul trains people at workshops and privately. Paul is currently attending Parker University working on his Doctor of Chiropractic degree Paul has served as an assistant instructor at many RKC and HKC Courses, is a Certified Kettlebell Functional Movement Specialist (CK-FMS) and works with some of the top Chiropractors in North Texas. Please visit his website for more information or to contact him

Filed Under: Kettlebell Training, Mobility and Flexibility Tagged With: cooldown, flexibility, flow, mobility, movement prep, Paul Britt, RKC, warm-up

My “Body” of Work: Part 1

December 2, 2016 By Phil Ross 5 Comments

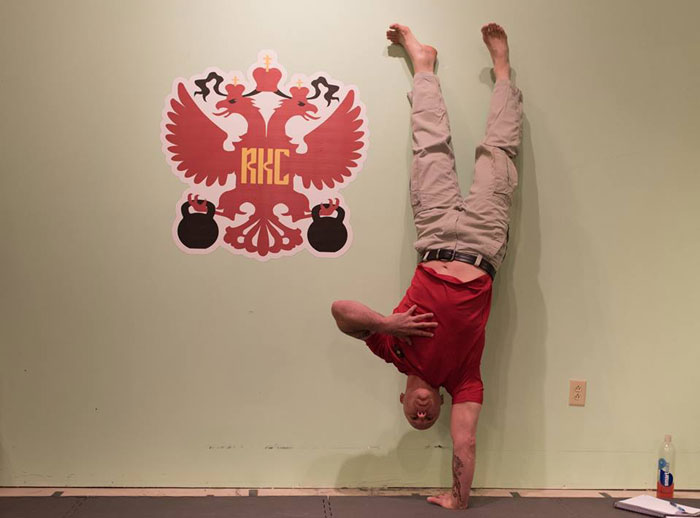
Phil Ross One Arm Handstand

Having recently hit my 54th birthday, I can’t help but reflect on what I’ve put my body through and how lucky I was to find the RKC‘s incredible strength and mobility training. The system is truly remarkable. This is a long post, but I strongly feel that many people will benefit from this information. I also want to give hope and inspiration to those who are in pain, struggle with immobility and injuries from their “sins of the past”. More importantly, I want to help instructors, trainers, and their students (or clients) avoid injuries and set-backs. Enjoy!

For most of my life, I was a competitive combat athlete. I played contact football at age 9 and at age 13, had my first combat competition. There weren’t many junior wrestling leagues or martial arts schools around in 1975. I still spar (stand-up kickboxing) and roll (ground fighting in Jiu Jitsu), but not nearly as intensely or as often as I did from 1976 to 2011. However, I keep my skills sharp by doing a great deal of drilling and bag work. Scaling down from that level of training and giving up competition was–and still is–a difficult thing for me. But, my current situation allows me to focus my professional energies on other challenges: developing my students, growing my business, producing videos, writing books and furthering my education. I also get to spend a little more time with my family, coaching my little one and helping my older children reach their goals. This is something I cherish very much.

A couple of years ago, John Du Cane and I were talking. I told him how my kettlebell training and the other movement training I’ve learned since I started with the RKC has enabled me to move much more effectively and overcome the many injuries sustained during a lifetime of contact activities. The many years of football, wrestling and combat sports training and competition took their toll on my body, but I still workout virtually every day. I’m only able to do this is because of my kettlebell and bodyweight training regimen. John said that I should write a blog post and list all of the injuries. I agreed, and while some of the injuries haven’t had any effect on my ability to train, I’ll furnish the list of the most significant. I’ll also put forth the movements that have helped me the most.

Here’s my “Body of Work”

I won’t bore you with all the times that I’ve cracked a toe or broken a finger. I’ve had so many jams, sprains, minor dislocations, and stitches that I can’t remember them all. Many times, I’d simply pop my finger, toe–and once even my knee–back in place, throw on some tape and go back to training or back in the fight. At 17, I broke my thumb in two places while wrestling in the NJ State Freestyle Championships. But I taped it up, finished that match and wrestled in the finals. In my mind, that was “just another day at the office”.

So, we’ll start from the top…

Head:

I have had four diagnosed concussions, and several minor ones that I just shook off and either went back on the field, got back on the mat or went out for the next round. Since most of them occurred in the 70’s and 80’s, there was no real treatment, and not much time off. I took a week off when I had my worst concussion, but my eye was also swollen shut at the time and I had 17 stitches in my head and 5 more in my arm. I wasn’t going to be doing much for a few weeks anyway.

I also had my nose broken four times and had it repaired twice. This has had an adverse effect on breathing while training. At one point, one nostril was fully closed and the other operating at 50%. It was difficult not to be a “mouth breather” at that point. Getting enough oxygen into my lungs was tough for a while until my second nose operation. I still use saline spray (Xlear with xylitol) and a nasal inhaler (Oblas with menthol, and oils of peppermint, cajeput, eucalyptol) several times a day. Incidentally, this practice has also helped me avoid many colds and sinus infections. I haven’t had or needed antibiotics in years, which has further bolstered my immune system.

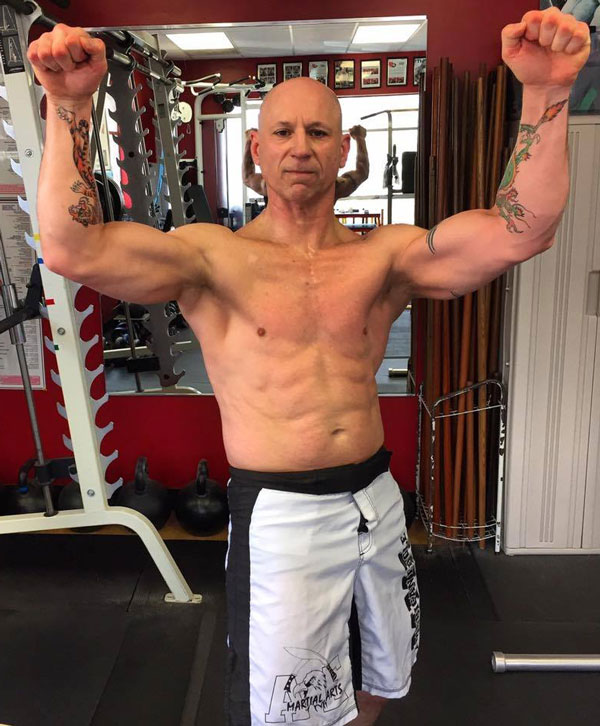
philrossarms

Neck:

I’ve had three memorable injuries to my neck and have experienced countless “burners” during competition or fight training. For those of you who don’t know what a “burner” or “stinger” is, it’s when your neck (or head) gets twisted, jammed or otherwise forced into a compromising position, usually very quickly and a “hot”, “shocking” or “burning” sensation runs from your neck down your arm. Generally, you experience a “flash of light” in your eyes, pain, and temporary lose the use of your arm. I’ve had this happen more than once in actual combat and had to just deal with it. I’ve experienced so many of these in training and competition that I can’t even try to remember how many times it has happened.

One of my major neck injuries occurred in a football game, and another during a wrestling match. But, the most notable injury required surgery on four levels of my neck. This injury occurred during fight training at the end of 2011, but the situation was acerbated from years of abuse. The MRI revealed two herniated and five bulging discs in my neck, spinal stenosis in many of my foramen, and an osteophyte on the inside of my spinal canal. This caused an edema (bruising/scarring) on my spinal cord, resulting in a permanent spinal cord injury. Four levels of my vertebra had their foramen removed, “windows” were put in the vertebra, and the osteophyte was removed. But, the damage had already been done.

I started my rehabilitation a little less than two weeks after the operation. For the first week, I could only do planks. I progressed to plank pull-ups (Aussie pull-ups) and incline push-ups for sets of five reps. Within five months, I was able to perform most of my movements again, and began to film The Kettlebell Workout Library. Prior to my operation, I was unable to press a 10kg kettlebell overhead. After only four months of training I was able to press a 20kg kettlebell bottoms-up. I attribute my speedy recovery to my strength and conditioning practice both prior to the operation and the RKC methodology employed afterward.

Shoulders:

I have a torn labrum (slap tear) in my right shoulder. Prior to 2006, it used to slide out on a regular basis. At that time, I had just gotten into kettlebell training–my first set of kettlebells was delivered in December 2005. I hadn’t quite developed the ability to engage my lats and pack my shoulders properly at this point. In June of 2006, I was set to shoot 3 DVDs: Fit 2 Fight, Combat Ready and Let’s Sweat. Five days before the shoot, my shoulder popped out–and stayed out. I drove myself to the hospital and they couldn’t get it to stay in. The next day, I got an ART (Active Release Technique) treatment from Dr. Michael Dworkin and my shoulder slid back into place. At first, I rehabbed it with swings while only focusing on packing my shoulders and engaging my lats. My shoulder hasn’t slid out in over 10 years!  Not only was I able to complete shooting the videos, but the new strength permitted me to get back to live grappling. I was also able to successfully compete through 2010 in submission fighting. Kettlebell training changed my life and extended my competitive career to span four decades. Very cool!

Elbows:

I’ve had an ongoing battle with my elbows. Back in the day, I used to spend endless hours pounding on the Makawara affixed to the concrete wall in my garage. As a fighter in my early twenties, I didn’t consider the long term repercussions of sending force into an object that could not give way. I just wanted to toughen my hands and hit hard. By hitting the wall-mounted striking surface, all the force that I put into the punches came back at me. All of the years spent fighting, sparring, grappling, and getting armbars finally caught up to me in 2005. I was doing heavy cable curls and the next day my forearms, particularly my brachial radiali were screaming in pain. I could barely turn a door knob, walk my dog, shovel snow off of my driveway or even start my car without an excruciating pain shooting through my arm. It was so bad that one day in 2005, I was training with Frank Shamrock and I couldn’t move my arm at all. He said, “Bro, I’d get that taken care of ASAP”. Good advice. He told me about ART and that’s how I found Dr. Mike Dworkin (the guy who fixed my shoulder).

Kettlebell training taxes your grip. Doing pull-ups and hanging abs wreaks havoc on your grip and elbows. Not to mention BJJ (Brazilian Jiu Jitsu), grappling, kickboxing and weapons training. All of the activities I love were adding to and were the root cause of my elbow pain. I tried all of the standard and non-standard treatments. Here’s what didn’t work: cortisone injections, acupuncture, prescription and a myriad of useless bands, straps and sleeves. Don’t waste your time or money. Here’s what worked: ART and Graston Technique, dry needling, oblique activation and a sound stretching regimen. I leveraged my relationships with the many professionals that I met through the RKC and put together a stretching routine for my forearms/elbows.

These are the best exercises I have found to maintain elbow and forearm health:

This first exercise is a stretch. I place my palm, fingers down, against the wall and keep my arm straight while pressing against the wall for 30 to 60 seconds. Now, I also do this stretch against a suspended, supported horizontal bar for a greater range of motion.

Back of the wrist push-ups: start on your knees if necessary, turn your hands inward and make sure that your arms are completely straight. After you become more advanced, ball your fists and press your knuckles together as you press up to full extension.

Handstands, wall handstands, crow stands, and toad stools: these movements build strength in the shoulders, arms, and core. More importantly, they de-load the the forearms. Practice these strength movements with your hands completely open and gripping the floor will do wonders to counterbalance the effects of a great deal of clenched-fist work.

For the last exercise, stand tall, pack your shoulders, and keep your neck, shoulder and arm in the same vertical plane. Grasp a small kettlebell, nothing heavier than 16kg, with your thumb facing forward. Rotate your palm so it faces forward, then bring your opposite ear to your shoulder. Be sure to maintain the same plane. For example, if you have the kettlebell in your left hand, bring your right ear toward your right shoulder while keeping all your moving parts in the same plane.

Hands:

My hands are crucial to my work, activities and life. I’ve had many fractures, jams, sprains and dislocations. Strong hands are critical. There was a time when one of my hands was so weak that I couldn’t even military press a 10kg (22lb) kettlebell. This is coming from guy who had to strict press the Bulldog (44kg – 97lbs) to attain my RKC Level-II! Yes, I was a little down.

The main exercises that helped me regain my strength are: single kettlebell deadlifts, kettlebell wrist twists, pitcher curls, bottoms-up presses, bottoms-up carries, farmers walks, Neuro-Grip push-ups and kettlebell snatches.

Single kettlebell deadlifts: keep your shoulders and hips in prefect alignment, pack your shoulders, engage your lats, grasp the kettlebell handle firmly, and lift. It’s important not to “dip” your shoulder or twist your hips. I am now up to using a 150 pound kettlebell for sets of five reps.

Kettlebell wrist twists: lay the back of your hand against the floor as you grab the kettlebell by the handle. Twist the kettlebell back and forth as you “kiss” the ground with the bell. Repeat for 5 to 10 repetitions.

Pitcher curls: grasp one or two kettlebells by the handle(s) and start with them at your thighs. Maintain a straight back with your arms held at your sides. Keep your elbows in the same position, move the kettlebell(s) upward to the bottoms up position. Repeat the movement for 5 to 10 repetitions.

Bottoms-up press: this movement is the most effective pressing motion to engage your lats and improve your overall overhead press, and it’s incredible for grip development. On a good day, I can do it with a 28kg kettlebell, but I can invariably perform this movement with a 24kg kettlebell, even on my worst day.

Bottoms-up carries: this exercise forces the recruitment of additional stabilizers, not only in the forearms, but in the whole body, and aids in discovering new neural pathways for the hands. Since several muscles in my hand not longer had a signal coming form my brain, I had to find new pathways and develop additional strength in other, previously ancillary muscles and stabilizers. This movement also creates greater muscular endurance.

Farmer’s walks: grip strength development is one of the many benefits of the farmer’s walk. I will typically do 4 to 6 minutes of farmer’s walks as the last part of my workout–as a finisher. In contrast, I generally perform the bottoms-up carries in the beginning of the session.

Neuro-Grip push-ups: I have to thank my buddy Jon Bruney for inventing this device and bringing it to Dragon Door. I love this device and use it a great deal! Grip strength, wrist strength, balance, and core recruitment are developed to such a high level with this little tool. When I first got them in, I could only do about 20 repetitions. Fast forward a year later, my PR is 57 on two hands and 5 with the one armed version. My best is two in a row on my damaged (right) side. I recommend that everyone get Neuro-Grips.

Snatches: snatches tax the grip. Even if you pop the kettlebell in your hand from palm to fingers on the downward movement, spear your hand at the top and rotate your thumb inward at the bottom. The grip will be the first thing that goes, check out people’s hands after doing their first RKC Snatch Test or after executing the V02 protocol, if you have any doubt.

There are a few other practices I employ. I use a thumbless grip whenever possible, and I focus on squeezing my pinky when I’m doing grinds with my full grip. These two variations have helped me avoid recurring elbow problems. The thumbless grip forces you to use your lats more.

There are many other exercises: hanging from a pull-up bar, rows, bottoms-up cleans. I’m not back up to pressing the 44kg yet, but I can get the 40 up on a good day and recently did a get-up with the 44kg. So four and 1/2 years after my surgery, I continue to improve!

Strength and Honor!

Coach Phil

Stay tuned for Part 2!

****

Master RKC Phil Ross is the creator of many strength and conditioning programs, including The Kettlebell Workout Library. Visit www.philross.com to learn about his programs, classes, and workshops. Subscribe to his YouTube channel for more workout and exercise info.

Filed Under: Kettlebell Training, Tutorial Tagged With: kettlebell training, Master RKC Phil Ross, mobility, phil ross, training around injuries, wellness

Safely Applying the American Kettlebell Swing

August 31, 2016 By Angelo Gala 4 Comments


Angelo Gala American Swing

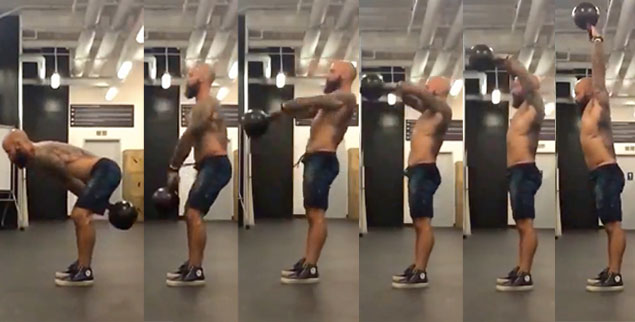
“The American Kettlebell Swing (AKBS) is the devil! You will get hurt if you practice this style of swing!” …at least that is what I have been told. Heck, I am guilty of muttering those words once or twice like countless other fitness enthusiasts. But, it’s generally not the tool or exercise selection that necessarily causes a problem. It is the misuse of the tool, and the poor application or inappropriate execution of the movement that can cause accumulated damage over time. When applied correctly, the American Kettlebell Swing can become an excellent addition to your movement catalogue!

In the RKC School of Strength, we teach a shoulder-height “Russian” style kettlebell swing (RKBS). The intent of our swing is to promote sustainable power production from the body’s drivetrain, the hips. We teach this style of swing since many competitive sports require athletes to propel their own bodies or an object forward. This is the direct application of the RKBS and its outwardly projecting force. In the sport of weightlifting or even in the “Sport of Fitness,” athletes are required to use their hips to propel a load overhead in movements like the clean and jerk, snatch and even a wall ball shot. Movements that finish with a load overhead utilize a more linear trajectory, and support the proper use of the AKBS.

Before we run over to the boy-toy (a 24kg kettlebell) and start ripping it over our heads with two hands, let’s review some details of the movement.

First, the AKBS is NOT A SWING. Yes, I know it is called a swing, but by definition a movement that travels from the ground to overhead in one continuous motion is a snatch. The overhead swing has a much more linear trajectory, similar to the clean. Just understanding the kettlebell path will help clean up some common errors with this movement.

Practicing a snatch with a barbell or kettlebell can be very demanding. But, most people possess the requisite mobility to learn the RKBS, even as a beginner in fitness. They may not work on full swings in the first training session, but can start working with light deadlifts. Low volume swings are realistic progressions after a few short training sessions with an RKC Certified Kettlebell Instructor. This is generally not the case for the AKBS.

There are several requirements to safely practice the AKBS:

  • A demonstration of gross motor control and coordination
  • Requisite range of motion in the thoracic region (rib cage)
  • Significant overhead shoulder mobility and stability
  • A negative test for shoulder impingement on both shoulders (Seek out a CK-FMS certified instructor to help screen for impingement)

After acknowledging these safety standards, we can decide if the AKBS is appropriate, or if any additional preparatory homework is needed before practicing this movement. Keep in mind that when performing an AKBS, the hands are placed only 3-6 inches apart on the handle (depending on the size of the kettlebell). This requires a much greater amount of thoracic and overhead mobility to safely perform the lift compared to the barbell counterpart.


Required Range of Motion

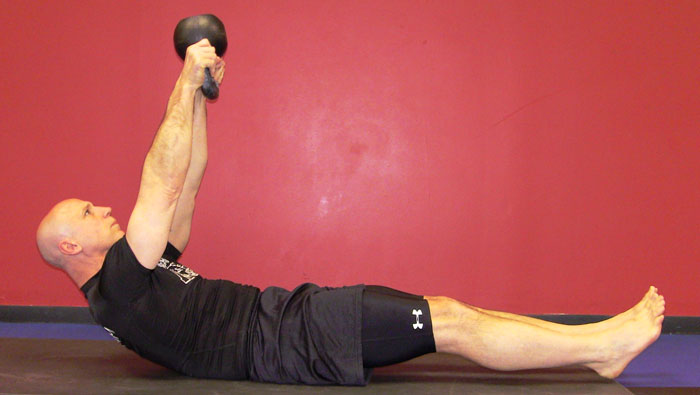
Overhead Lock Out: modified hollow body with arms in full flexion

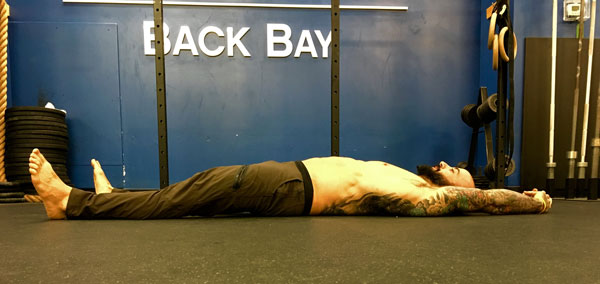
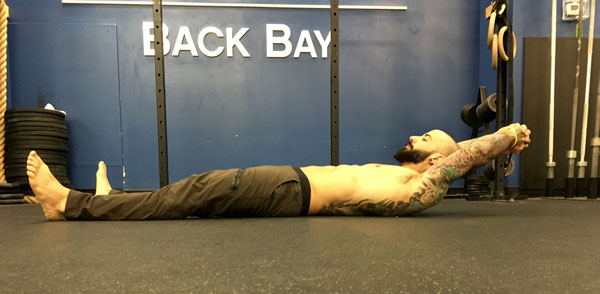
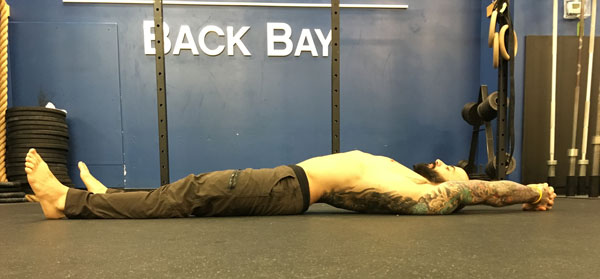
To determine if you possess the requisite range of motion for the AKBS, bring yourself to a supine position on the floor (lay down on your back). Separate your legs into a swing/squat stance and go into a hollowed body position by flattening your lower back to the floor. This will feel like you are pulling the front of your ribcage down to your belt line. Be sure to keep your legs tight like in the Hardstyle RKBS!

Now, raise both arms overhead while clasping both hands together. For a green light to practice the AKBS, you must be able to bring your forearms, lower back, and head to the floor in a comfortable state. Your elbows must remain completely straight and your shoulders must stay depressed (sucked down to the ribs, away from your ears).

test

AngeloGalaBadHollow2 Both of these examples are failed overhead screens for the AKBS. Note: if you can see your arms in your peripheral vision, this indicates a failed overhead screen for the AKBS and more mobilization is required.
TIME TO SWING….. err snatch…….YES SWING!!

With both hands on the kettlebell, start in the athletic ready stance to prepare for the pre-swing or to “hike pass” the kettlebell through your legs. Nothing here deviates from the standards of the Russian kettlebell swing, yet. Your hips are lower than the shoulders. The spine is long and neutral. The hips and hamstrings are engaged.

Now, hike the kettlebell back through your legs. Explosively and simultaneously extend your knees and hips creating a solid lockout in your entire body below your neck. This will power the kettlebell out in front of your hips. Once the kettlebell reaches your belly button, use your arms to pull the kettlebell in towards your chest and up over your head to the overhead lockout. Stop the momentum of the kettlebell by squeezing the handle in the overhead lockout position. The AKBS is completed when the bottom of the kettlebell faces “up” directly overhead and the arms are in alignment with your ears.

How To Apply the American Kettlebell Swing:

The American Kettlebell Swing should be carefully applied to your programming as a compliment, not as a replacement for the Russian Kettlebell Swing. Instead of assuming the American Kettlebell Swing is harder, understand that there are two main reasons to purposely include the AKBS in your program design.

  1. Longer cycle time: When planning aerobic power intervals, a slower cycle speed due to a longer range of motion will simply eat up more time on the clock.
  1. Compounded shoulder and grip fatigue: Pulling the kettlebell through a longer ROM over the head adds a greater degree of shoulder flexion and sustained grip activation compared to the RKBS. The AKBS creates a significantly higher accumulation of shoulder and grip fatigue. In a mixed modal environment, this movement coupled with push-ups, reverse wall climbs or even handstand pushups can dramatically improve overhead work capacity when safely and progressively programmed.

Safe Modifications:

Just like most people have the ability to safely perform the RKBS after demonstrating proficiency of proper hinge patterning and full body bracing, all practitioners can utilize an abbreviated version of the AKBS by simply expressing a shorter range of motion. If you were unable to pass the overhead screen because of signs of shoulder impingement, a safe variation of the AKBS would be to simply pull the kettlebell just above forehead level without committing to a straight-arm lockout of the elbows. With this abbreviated ROM, you will still be able to create a longer cycle time as well as induce increased shoulder and grip fatigue.

Give this swing variation a go and let me know how things work out for you!!

Angelo Gala, Senior RKC, PCC Team Leader


***

Angelo Gala is both a Senior RKC and PCC Team Leader. He has been a fitness professional in the Boston area for greater than 15 years working day to day with a wide range of clientele.  He helps the average “Joe” get fit and out of pain and prepares athletes to qualify and compete at the CrossFit Games. His specialties include improving restricted movement, getting strong(er) and energy system development (anything that elevates the heart rate). Angelo is available for remote coaching and on-site workshops. For scheduling he can be reached at a.angelo.gala@gmail.com.

Filed Under: Kettlebell Training, Tutorial Tagged With: American Swing, Angelo Gala, CrossFit, mobility, Senior RKC Angelo Gala, tutorial

It Isn’t Sitting, It’s the Chair

March 9, 2016 By Jay Armstrong 10 Comments

Jay Armstrong Sitting Stretching

We have all heard about the bad things that happen to our bodies as a result of sitting in a chair—slumped shoulders, collapsed ribcages, tight hip flexors, weak abs, etc. Yet, if you want to improve your flexibility, I recommend you sit down. However, instead of sitting on your soft, comfy couch with a tv remote in one hand, your assignment is to sit on the floor.

The typical armchair encourages you to pour yourself into the seat, completely disengaging your glutes and abs. Then, a pair of armrests beg you to round your shoulders forward and flare your elbows outward—all while collapsing your ribcage. With your ribcage collapsed, your breathing will be compromised. In this position, your head will jut in front of your shoulders, and stress will begin to creep into your neck.

Nothing about the “armchair seated position” resembles quality postural alignment.

Prior to the invention of these cushy posture-destroying chairs, human beings were forced to sit differently. If, after miles of walking, you decided to rest on the side of the trail, you probably would have looked to rest your buns on a rock. In this position, you still need to maintain control to keep from falling off the rock. You’ll probably need to sit with a relatively erect posture, while keeping your head over your shoulders. After all, you are simply resting your legs and not your entire body. The only time you are supposed to be completely relaxed is while lying down.

Sitting Cross-LeggedIn our convenient Western lifestyle, we tend to stay further and further away from the ground. We don’t lie down or sit on the ground. However, sitting on the ground will potentially improve your flexibility for many other movements. I’ve outlined several ways to sit which can help improve posture, flexibility, and overall fitness.
Sitting Cross-Legged

When we sit in the cross-legged position, the femurs of upper legs are moved into external rotation. Sitting this way may also automatically encourage you to open your chest and properly align your spine.

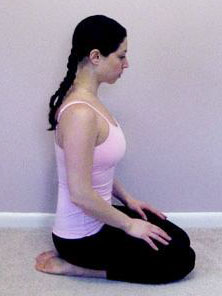
Sitting On HeelsSitting on Your Heels

When we sit on our heels, we’re obviously putting our knees into maximum flexion. Simultaneously, our feet will usually move into complete plantar flexion. Once again this position automatically encourages us to sit with an erect posture, activating the muscles which stabilize the spine.

Sitting with Internal Leg Rotation

Most people have a tough time moving their upper legs into significant internal rotation. However, if you can flex your knees, move your knees apart and sit between them, you will greatly improve your ability to internally rotate your hip joints. The little guy in the picture has a rather extreme range of motion and may actually prefer to sit in this position.

Sitting With Internal Rotation

Sitting with Your Arms Behind You

The soft, cushy armchair combined with computer work constantly places our shoulders in front of our chest or sternum—encouraging internal rotation of the shoulder joint. When we sit on the floor and place one or both arms behind us, we externally rotate the upper arm and open the chest. This is an excellent corrective position.

Sitting With Arms Behind

Sitting with One or Both Legs Straight

If you want to improve your hamstring flexibility, or desire to do the splits, sitting with one or both legs straight is the ticket. Any method of sitting with one or both legs straight (see photo at the beginning of this post) will provide at least a little stretching of the straight leg. So, “stretching” doesn’t need to be just an activity within your kettlebell workout. You can just sit on the floor while working or watching television. More time spent in these positions will make them feel more natural. If you watch television—and I encourage you to find something else to do with your valuable time—start by sitting on the floor from one commercial break to the next. While you’re seated on the floor, increase your awareness of the position of your ribcage, head, and spine. You may be surprised by the intensity of the stretching sensations you feel from just spending time close to the earth.

***

Jay Armstrong is a Senior RKC, 6 Degree Black Belt TKD, and Master Z-Health Trainer.  The past 30 years have been dedicated to helping others develop confidence through increased strength and pain-free, exceptional mobility.  His quest for knowledge continues.  He runs The Kettlebell Club in Houston, Texas.

Filed Under: Mobility and Flexibility, Tutorial Tagged With: flexibility, Jay Armstrong, lower body, mobility, sitting

From Broken to Team Leader

December 17, 2014 By Paul Britt, DC 2 Comments

Paul Britt Double Press At RKC

I was broken in October 2012 at the RKC-II. It happened because I was stupid and I let my ego get the best of me at the certification. I thought that I only had a minor training injury prior to arriving in St. Paul for the workshop. I had been working on heavy double presses on a day that I was tired, but due to having to attend this particular cert, I stayed with my “program”. In the middle of my final set, I felt a sharp pain on my left hip and back. I dropped the kettlebells and decided to take a few days off. It was still bugging me a few days later, so I went to a chiropractor. The consensus was that it was just a minor strain and that I would be okay to attend the certification. So off I went, with some kineseo tape to hold me together for the three days ahead of me.

I knew the snatch test would probably put too much stress on my back, so decided that I would wait till the last day to take it. I was able to get through all of my Level 1 skills and the half-body weight press on day 1 without too much trouble. But, I had a few problems with stability that I should have paid more attention to during the skills test. I noticed that I struggled with my foot on the left side for the get-up as it did not want to stay locked down as I moved through the different parts of the movement.

I initially started out with lighter weights than normal, just to allow me to get through the certification. I had a past Master RKC give me a hard time about the weight and I let my ego override what little sense I had and I bumped my weights up. Sometime during the day, I felt a pop in my back on the left side. I did not really feel a lot of pain at the time, so I kept on training. I got back to the hotel in a lot of pain and barely slept. When I got up the next morning, I literally had to drag my leg as I walked down the hall to find some Advil. I ended up buying eight packages and using four to get to breakfast and the first half of the cert. I had to take the other four to get through the rest of the day. The last day was even worse, I thought about just quitting, and I should have. Unfortunately, I am a little stubborn and hate to give up. At that point, nobody really knew what was going to happen to the RKC after that weekend, so in my head, I had to get through the weekend and earn what could possibly be the last RKC-II certification. So I pushed through and passed all of the tests except for the Jerk and the Snatch test. I knew that I had 90 days to send the video into someone to pass those two skills. Turns out that was not going to happen for a long time.

I knew as soon as I got off the airplane in Dallas that I was not right. I struggled to get out of the seat, get to my bags and walk to my car. I ended up getting home and telling my wife that I had screwed up and was badly injured. The pain was pretty constant, so I took off from all training for what was supposed to just be November, but it ended up being a nine month break. I had to train my lead coach, Justine Deets RKC, to pass her HKC and RKC skills without being able to perform them myself. She was my gym replacement while I was recovering. I hosted an HKC in January, but was unable to assist because even picking up 12kgs caused me a lot of pain.

I was not healing, so after the first of the year, it was time to see someone about it. I ended up being referred to the top spine doctor in the area. At my appointment he told me that I had herniated discs at L4-L5 and L5-S1, both on the left side. He informed me that it was a lifelong injury and that my days of heavy lifting were over. To say that I was not thrilled by that was an understatement, so I decided to show him that I would be back to heavy lifting again. I went with a non-surgical solution for the problem and had a series of injections into my back that gave some minor relief. While the injections did not allow me to start lifting again, they did allow me regain some everyday quality of life. It was at that time I met Dr. Steve Horwitz, DC (and now RKC instructor). Dr. Horwitz worked with me on my nutrition and showed me how to ease the inflammation and pain with proper supplementation. Once my nutrition was dealt with, I was able to start healing and training again.

I had scheduled an HKC/Primal Move Certification Weekend with Master RKC, Andrea Du Cane and Senior RKC Jay Armstrong, but was not really doing much in the way of training yet. Andrea knew about the injury, so she would not let me do much during the HKC. I was the ‘go-fer.” While I was finally moving better, I was still in pain with bad movement patterns most of the time. I was able to participate in the Primal Move Certification that weekend and found that it was life changing for me. I was able to go through the workshop pain free. It was amazing how much better I felt just going through the workshop. The one day workshop was like a reset button. It was the first time I was pain free during my day to day activities of living. It improved my movement, eased my pain and that definitely helped my outlook. I had been in a depression since being injured because I was unable to train and burn through my day to day frustrations.

Andrea and Jay also showed me a few drills, including pendulum swings. I also started playing with Figure 8’s as they allowed me to strengthen my posterior chain without moving through painful patterns and positions. I also went to town with Primal Move and added in Convict Conditioning on a daily basis. I would train something every day, but never to failure or into pain. That was my training program for about 3 months and every day I felt better, moved better and got stronger. My focus was on healing and avoiding pain. I spent lots of time on the pullup bar, doing handstand pushups and Convict Conditioning skills on top of daily Primal Move work.

In October of 2013, I hosted an RKC with Andrea Du Cane, Master RKC leading the workshop. She asked to see my skills as an Assistant. I hadn’t trained with any weight over 16kgs in any of the RKC Basics prior to the certification weekend. This was one year after blowing out my back and I figured that it would be ugly. I had not even attempted any of the skills with my snatch test weight prior to this attempt. I was actually scared when I was asked to do it as I knew it was going to be a hot mess. I was pain free and nailed my skills test. After that it was as if I had been freed from a dark hole. Andrea had to keep me reined in all weekend because I was so excited that I was able to train again. She told Shane England RKC, that they had “unleashed a monster”, I could not stop playing around with the kettlebells. I participated in as many of the drills as the attendees did as I tried to fix the bad habits that got me into the position I was in.

After that weekend I continued to train and work on a lot of rehab style work to get back to a decent level of strength. In that time, I was able to host and assist at several HKC’s and RKC’s. I improved my skills and movement at every event I attended. Andrea let me assist at every event and she helped me improve my skills at every certification. If it had not been for her friendship and mentoring, I would not have been able to train or teach at the level I am at now. In July, I was promoted to RKC Team Leader, based in part on my ability to come back as a better instructor because of my injury. It forced me to re-evaluate everything that I was doing as an RKC. Prior to this, my skills were not as good as they should have been. The injury made me a better coach, and I became stronger because of it. I have to use the RKC Principles correctly to avoid being injured again.

Paul Britt Coaching

I was able to get to the point where I was able to press half bodyweight again and knew that I had to try RKC-II again. In October, I hosted the RKC-II at my gym. We had a great group of strong people in attendance. Like the last time, Day 1 was RKC I and our strength requirement test. I felt that it was the easiest and best RKC recert test that I have ever performed. My skills were dialed in and the snatch test was by far my best one that I have ever completed, it was almost easy (the snatch test is never really easy). I passed RKC-II after a long weekend of heavy lifting. I had gone into the weekend with some trepidation, because I had been hurt. It was probably harder for me mentally than physically due to my last attempt ending so badly. I was nervous going into the testing as I did not fully believe that I could get through it without being injured, but I only had a slight issue with my left side pistol stability.

RKC-II Group Photo in Texas

What did I learn from all of this? I learned a lot, though I wish I had learned it without being injured. I was once taught that experience came after you needed it. I hope that someone uses mine to avoid taking the same path. Do not terrain into pain. If you are injured and your life is not in danger, take a break and heal. Do not let your ego cause you to do stupid stuff. There is no certification that is worth permanent injury and we hold a lot of certifications during the year. That is why I am glad that I chose to stay with the RKC. Dragon Door and the RKC’s focus on being a great instructor and their focus on the safe building of your skills is why I am proud to be a part of this community.

What’s next? I am training for the Beast Tamer. The plan is to do it for my 48th birthday at the October 2015 RKC led by Master RKC Andrew Read. There is still room and time to sign up for that certification.

***
RKC Team Leader Paul Britt has been an RKC kettlebell instructor since 2006. He trains clients at Britt’s Training Systems, his award-winning Hardstyle Kettlebell Training Facility in Rockwall, Texas. Paul has served as an assistant instructor at many RKC and HKC Courses, is a Certified Kettlebell Functional Movement Specialist (CK-FMS) and works with some of the top Chiroprators in North Texas. Please visit his website brittstrainingsystems.com for more information.

Filed Under: Kettlebell Training Tagged With: hosting workshop, injury recovery, kettlebell training, mobility, Paul Britt, recovery, RKC, RKC Principles, RKC Team Leader, RKC-II, Texas, workshop experience

Stumped on Warm-ups?

April 16, 2014 By Laurel Blackburn 5 Comments

Laurel Blackburn StretchI remember being a newly minted RKC back in 2009. I couldn’t wait to get back and start training clients. I had a head full of knowledge and a heart full of pride and excitement.
One of the things that stumped me a bit was doing warm ups and movement prep for my classes. Yes, we learned some basics such as the pumps and hip flexor stretches, but after doing that class after class, I was looking for something more. Something my clients and I wouldn’t get bored with doing before every class.

As I continued with my education through Dragon Door and the RKC, I was able to add to my knowledge and my toolbox. By taking the CK-FMS in 2010, I learned about compensations for proper movement, and how to correct them. I added many of the correctives to my own movement prep/warm up as well as my classes.

I noticed that my client’s movement improved and their performance skyrocketed. The workouts that followed a good movement prep helped them perform the Kettlebell exercises with much better form. The better the form, the more they got out of our workouts.

My classes are thirty minutes and many of my personal training sessions are thirty to forty minutes, so I was looking for something that I could do with them that didn’t take a lot of time. The movement prep had to hit all of the areas that are crucial to getting the most out of their workouts. The movement prep also had to give me the most “bang for my buck” in addressing some of the most common problems I see in many of my clients such as ankle, thoracic spine mobility and proper breathing techniques.  Again, I added to my arsenal by continuing my education by taking the Primal Move certification. This certification was the final piece of the puzzle in providing my clients and myself with everything needed to address the biggest movement and mobility issues.

I took everything I’ve learned through certifications and workshops and came up with my own movement flows. They are quick and easy and my clients enjoy them.

I’ve included one of my favorites and I will be posting a lot more in the near future. I hope you enjoy this, more importantly, I hope your clients enjoy them. Let me know what you think and please let me know if you have any special cases or issues with your clients that need specific drills. Chances are I have a movement flow that will address these issues.

Have fun and get moving!

***

 Laurel Blackburn is an RKC Team Leader and owner of Boot Camp Fitness and Training and Tallahassee Kettlebells.  Look for Laurel at www.bootcampstogo.com or www.tallahasseekettlebells.com.

At 51, she is out to prove that age is just a number. Her goal is to motivate and inspire people everywhere, both young and old that strength, flexibility and mobility can get better with age. Follow her adventures on her blog: www.SuperStrongNana.com.

Filed Under: Workout of the Week Tagged With: bootcamp, group fitness, Laurel Blackburn, mobility, RKC, self-esteem, senior, trainer, tutorial, video, warm-up, women

What is the most versatile RKC movement?

February 19, 2014 By Shannon Scullin 1 Comment

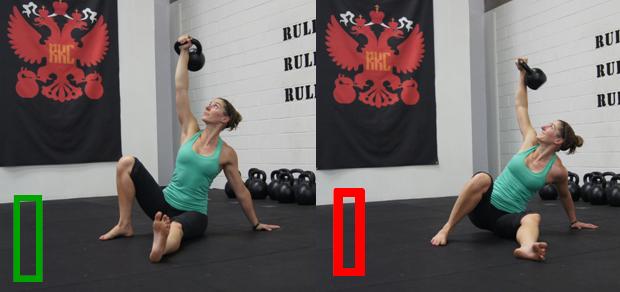
Good and bad getupShannon demonstrates a good and a bad Get Up stance

The Turkish Get Up is the most versatile movement in the RKC system. It incorporates all seven of the FMS movement patterns  – squat, hurdle step, in line lunge, shoulder mobility, active straight leg raise, trunk and rotary stability – allowing us to utilise it as not only a strength building exercise but as a screening and rehab tool, making it the most valuable exercise to have in your arsenal of training drills.

I’ve been known to be a little bit of a perfectionist when it comes to teaching people how to do a get up.  I firmly believe that one repetition completed with good form is far more beneficial to you than completing ten reps with a half arsed attempt at the movement. But I am pedantic about technique for a very good reason…

I train and have taught a large number of people how to use kettlebells during my time as a trainer. From personal trainers to the self-taught and those who have never touched a weight before in their life. All of these people have one thing in common… As their get up improves, their mobility and stability improves. As their mobility and stability improves their coordination improves. As their coordination improves their strength improves and as their strength improves so does the rest of their training.

The get up is not a “simple” movement to teach or to learn. In fact as well as being the most versatile it’s actually one of the most complex of all the kettlebell exercises.

There are a few books on the market that delve deep into the get up, its technique and corrective drills to help you improve your form, the most famous being “Kalos Sthenos – Kettlebells From the Ground Up”. However, most people’s get up can be greatly improved by simply doing the following:

1)    Thoracic mobility and hamstring flexibility drills.

Two of the most common issues we see in the get up are caused by poor thoracic mobility (hunching forward or shoulder unpacking during the seated position) and hamstring flexibility (inability to keep the down leg straight or allowing the foot to rotate outward).

Often I see people grinding their way through the movement with bad posture in an attempt to improve. But why continue beating your head against a brick wall when there is an easier way.…

There are a number of drills that you can perform to help improve your mobility and flexibility in these areas, thus improving your get up and posture in general.

My favourite drills, and the ones I have found achieve the best results are all incorporated in to one simple mobility workout called the “Daily Dozen”.  This simple eight minutes of mobility, done consistently in conjunction with the get up, will not only vastly improve your movement and posture but they are the perfect way to prepare your body for the workout ahead.

I recommend starting your warm up by “testing” a get up on each side. Once you have completed your get up perform one round of the “Daily Dozen” and then perform another get up on each side. Repeat this process three times.

Pay attention to how your get up feels after performing the first round of mobility drills. If you are particularly tight in the thoracic region you may choose to focus solely on the armbar, bent armbar and kettlebell brettzel for the next round of mobility. Likewise, if you are feeling particularly tight from the hips down, you may choose to focus on the Cossack, can opener and lower limb drills.

For those of you who are beginners or may be a little daunted at the thought of doing a bent armbar or the kettlebell brettzel you can replace both of these movements with the “Brettzel” which will achieve the same results.

2)    Shift your weight.

From the moment you are born you commence a journey of movement. You learn how to shift your weight in order to roll over on to your belly, rock back and forth, crawl, stand and walk. Without this shift in weight movement becomes very difficult.

The get up is a similar journey of movement. Each stage you move to has a different centre of gravity. In order to perform the get up efficiently and gain maximum results you need to learn how and where to shift your weight in order to take the kettlebell from lying to standing position and back down again.

The easiest way to remember where the weight should be felt is to follow this zig zag pattern – elbow, hip, hand, knee.

As you roll to your elbow you should feel all the weight of your body and the bell going through your elbow in to the floor. As you straighten your arm out and progress to the seated position this weight should shift and be felt through your glute, where your femur meets your hip. As you progress to the bridge/low sweep, your arms should form a straight line from the kettlebell, through your shoulders and the weight should be felt through the hand that is connected to the ground. And finally, as you transition from the knee to hand through to the lunge position the weight should be felt through the knee that is connected to the ground. On the descent the weight shift works in the opposite order – knee, hand, hip, elbow.

3)    Do more reps.

This is important. In order to get better at something you need to practice it over and over again.

In an average workout you may complete anywhere between 25 to 100 repetitions of exercises such as swings, snatches, presses, deadlifts and squats however, the get up seems to get neglected when it comes to getting our repetitions in.

Instead of lumping the get up in with your warm up every time you train, why not try changing it up a little? Try spending an entire session focusing solely on the get up every now and then.

Mid last year I started using the get up as my recovery workout. Twice a week I would take a light kettlebell (nothing heavier than 14kg), set the Gymboss on sixty second intervals and then proceed to perform get ups for the next 100 minutes. One get up on the minute, every minute. The get up was to be slow and controlled, focusing on good form throughout the movement.  By the time I had completed twenty get ups all tightness had washed away from my body and any aches and pains that were rearing their ugly little heads prior to the session had retreated with tails between their legs. My movement felt strong, natural and effortless and the more repetitions I did the better everything felt.

Coincidentally, after incorporating the 100 get up recovery workout in to my routine, not only did I hit a new get up PR but I saw gains in all other areas of my training too.

Work on your mobility, shifting your weight and getting more reps in and I guarantee that your get up will not only get better but you will get stronger too!

***

Shannon Scullin is an RKC Team Leader and PCC Instructor based out of Dragon Door Australia.  As Australia’s first, and highest ranked female RKC Shannon brings a keen eye for technique to training and is renowned for being very focused on form ensuring that clients with previous injuries are able to train safely. As the head of Personal Training at Read Performance Training she uses the CK FMS to test and evaluate all clients before training, ensuring that not only will they look better from training, but they will also move better too. With a background in triathlon, adventure racing, rock climbing, cycling, hockey and running Shannon fell in love with kettlebells and the FMS system when she saw the immediate result that improving mobility, stability and strength has on sporting performance. She can be reached through: www.readpt.com

Filed Under: Uncategorized Tagged With: athletes, coordination, get up, ketllebells, kettlebells, mobility, RKC, stability, strength, turkish get up, women

Primary Sidebar

Featured Products

previous arrow
BOOK-RKCBookofSnC
HardStyleKettlebellChallegeDanJohn700
BookCoverMasterTheKettlebell1
RKCiconKettlebell512
KettlebellGoddessdv040
next arrow

Recent Posts

  • Key Kettlebell Exercises To Help You Create Better Balance
  • How to Most Effectively Use Kettlebells to Meet Your New Year Goals
  • 1 Exercise That Checks All The Boxes
  • Kettlebells in the Clinic
  • How Breathing Can Improve Your Kettlebell Training
FOLLOW US ON TWITTER!

Archives

Copyright © 2023

Dragon Door Publications / The author(s) and publisher of this material are not responsible in any manner whatsoever for any injury that may occur through following the instructions or opinions contained in this material. The activities, physical and otherwise, described herein for informational purposes only, may be too strenuous or dangerous for some people, and the reader(s) should consult a physician before engaging in them.