• Skip to main content
  • Skip to primary sidebar
  • Home
  • Contributors
    • Matt Beecroft, Master RKC
    • Martijn Bos, Master RKC
    • Andrea Du Cane, Master RKC
    • Angelo Gala, Master RKC
    • Chris Holder, Master RKC
    • Steve Holiner, Master RKC
    • Dan John, Master RKC
    • Mike Krivka, Master RKC
    • Thomas Phillips, Master RKC
    • Robert Rimoczi, Master RKC
    • Phil Ross, Master RKC
    • Max Shank, Master RKC
  • Workshops
    • HKC Workshops
    • RKC Workshops
    • RKC-II Workshops
  • Find an RKC Instructor
  • Resources
    • Articles
    • Forums
    • Kettlebells
    • Products
  • Blogs
    • PCC Blog
    • Strong Medicine Blog
  • Archives

RKC School of Strength

Official blog of the RKC

Athletic Training

How To Improve Your Golf Game With Kettlebell Training

April 11, 2018 By William Sturgeon Leave a Comment

William Sturgeon Kettlebell Get-Up Kettlebells for golf

Whether you’re a golf athlete or enthusiast, there’s always room for improvement in your sport. While there are plenty of things you can do to improve your golf game, nothing is as powerful as strengthening your body. Strengthening and mobilizing your body will improve the quality and power of your swing. Kettlebell training can take your golf game to a new level!

Why Kettlebell Strength Training Can Improve Your Golf:

Kettlebell training has the ability to improve sports performance in many ways. Increasing your overall strength can lead to greater power for your golf swing. Strength training can help you achieve greater speed and more control over your swing. Training with kettlebells also helps you manage fatigue. Since golfers are typically in a fixed bent-over position for many hours at a time, they are at risk for a lot of stress on the lumbar spine. Lastly, kettlebell training can reduce the risk of injury and increase your playing longevity.

Common Golf Injuries:

Low Back Pain

Golfers commonly deal with low back pain. The repetitive rotational motion through the lumbar spine is often a major cause of low back pain in golfers. Having a weak low back can be dangerous since golf requires a lot of flexion and rotation through the lumbar spine. Mobilizing and strengthening the low back can reduce the risk of injury in this area.

Rotator Cuff

The rotator cuff is located within the shoulder and consists of four small muscles—the supraspinatus, infraspinatus, teres minor, and subscapularis—which stabilize the shoulders. Shoulder impingement is a common injury amongst golfers. Shoulder impingement occurs when the tendons of the rotator cuff become inflamed and irritated as they move through the subacromial space. If the shoulders are not mobilized or strong enough for the repetitive motion of the swing, then compensational movement patterns will occur. These compensational patterns cause weak, immobile shoulders and injury.

Elbow Tendonitis

The two most common instances of elbow tendonitis with golfers are tennis elbow (the outer tendon is irritated and inflamed) and golf elbow (the inflammation and irritation of the inner tendon). These injuries can be caused by the repetitive swinging motion in golf. To heal these injuries you will need to hang up the clubs for a little while to allow for a quicker recovery. But, by adding kettlebell training to your routine, you will be able to help strengthen and mobilize the shoulders and the thoracic spine to help reduce the risk of this injury.

Why Kettlebell Training?

Kettlebell training has been shown time and time again to be a very effective training modality. A single kettlebell can be used for strength training, mobility training, rehabbing injuries, and conditioning. You can even train with kettlebells at home, and at any time that fits with your schedule.

Kettlebell training for improved performance in golf does not have to be complicated or rigorous. Strength training is best kept simple and effective. At my facility, we train our “7 big rocks”: single leg, squat, hinge, trunk, mobility, upper push, and upper pull. These movement categories cover a full body approach and ensure we cover every plane of motion in our training. Full body training with kettlebells allows you to utilize your time more effectively and basically train anywhere.

Kettlebell Swings for Golf William SturgeonMy Top Five Kettlebell Exercises for Golf:
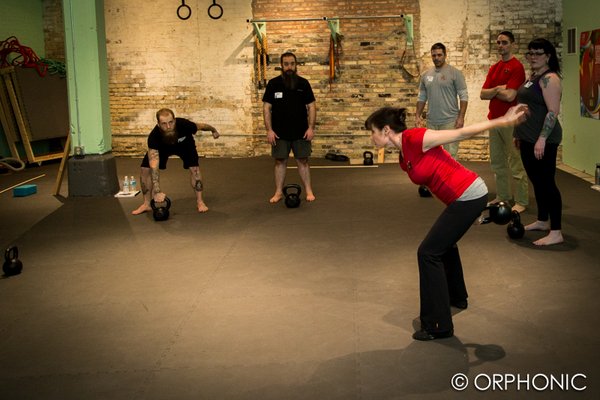
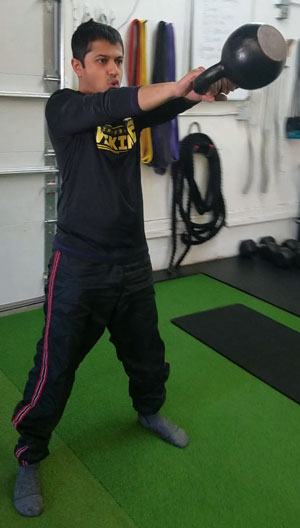
Swing

The kettlebell swing creates powerful and explosive hips. It has been known to aid in reducing low back pain. The swing strengthens the low back and increases the strength of the glutes–the powerhouse of the hips when applied to your golf swing. Stronger, more explosive hips will aid in a stronger swing with greater distance potential.
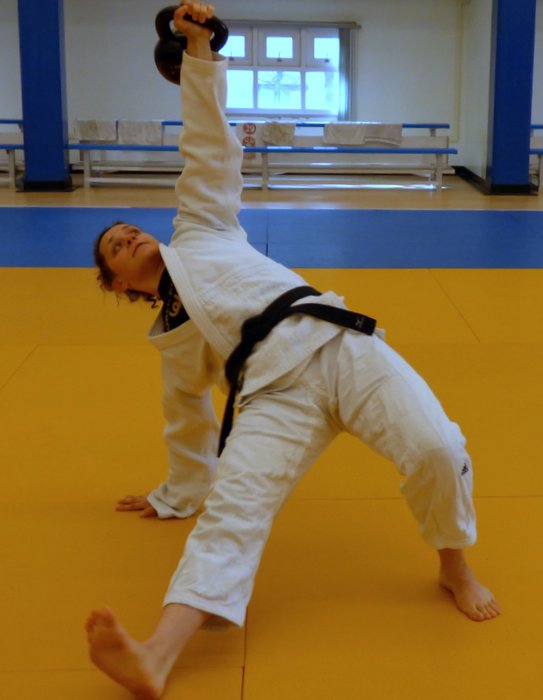
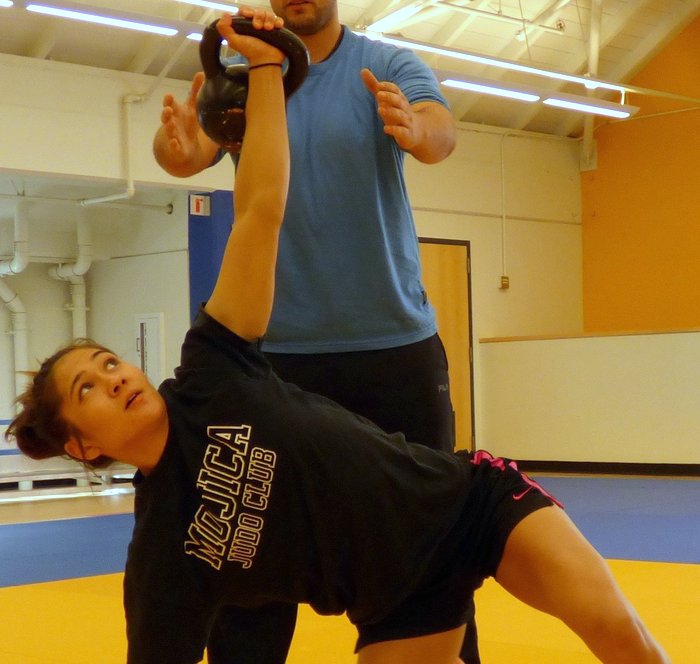
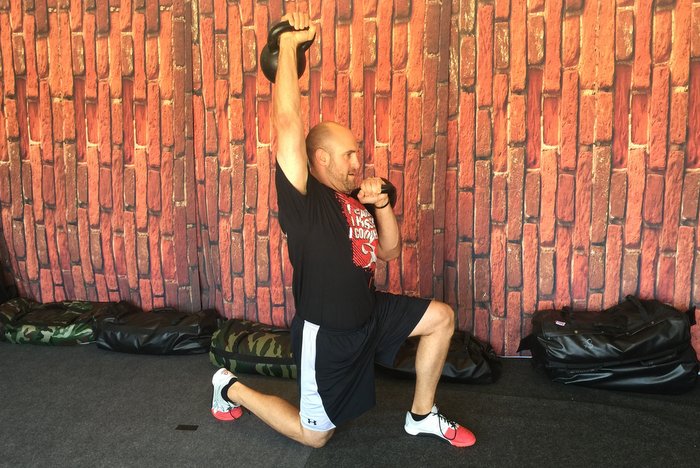
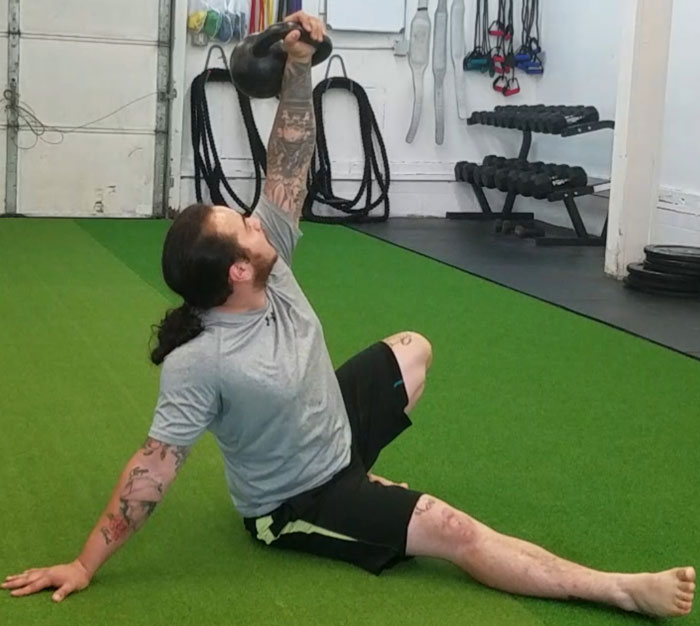
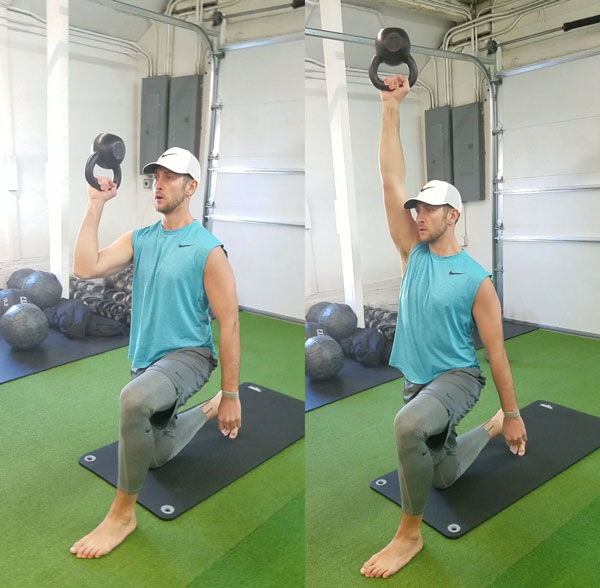
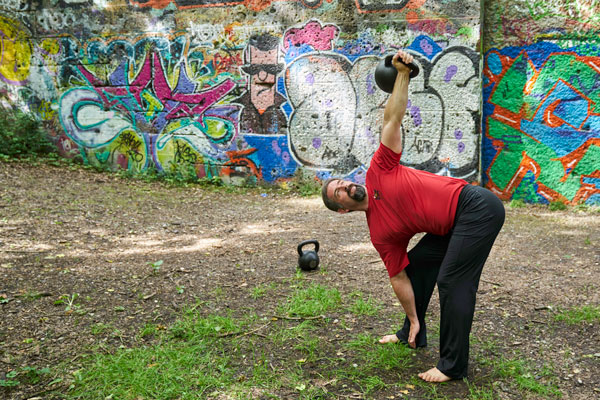
Get-Up

The get-up is a powerful exercise that serves many purposes at once. Benefits of practicing the get-up include: scapular stability, trunk stability, cervical and thoracic mobility, upper and lower body strength, and grip strength. The get-up teaches you how to control yourself under the weight of a kettlebell, move through different ranges of motion, and gain greater stability. The get-up is great for strengthening the shoulders and trunk while mobilizing the whole body.
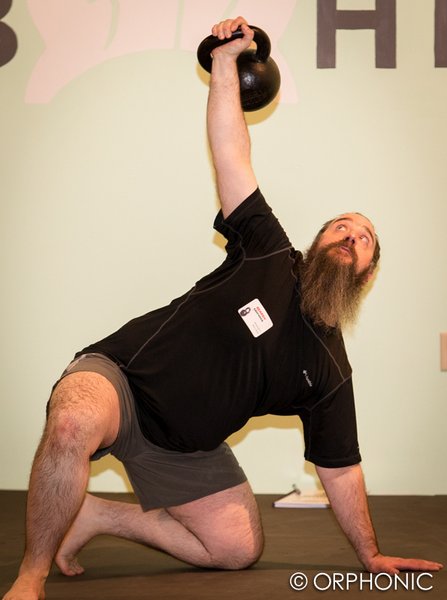
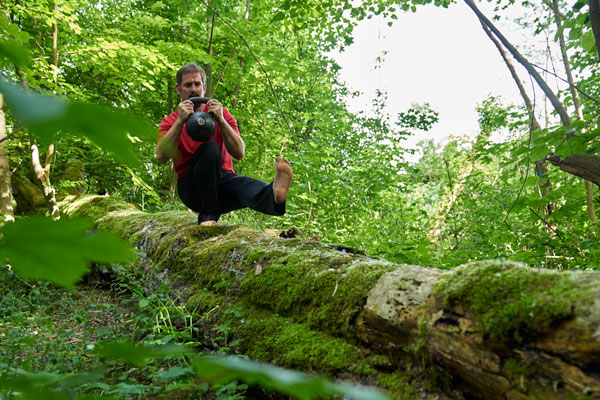
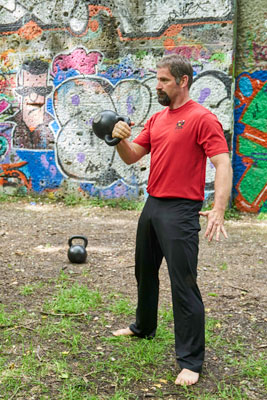
Bottom-Up Press

The bottom-up press is great for repairing and strengthening the shoulders and rotator cuff. When the kettlebell is in the bottom-up position, a majority of the pressure is held within the palm. This takes tension away from the shoulder and places the elbow in a better position. The challenging bottom-up press forces you to have greater core stability throughout the movement. During this press, the scapula moves through its full range of motion while requiring great control throughout the exercise.
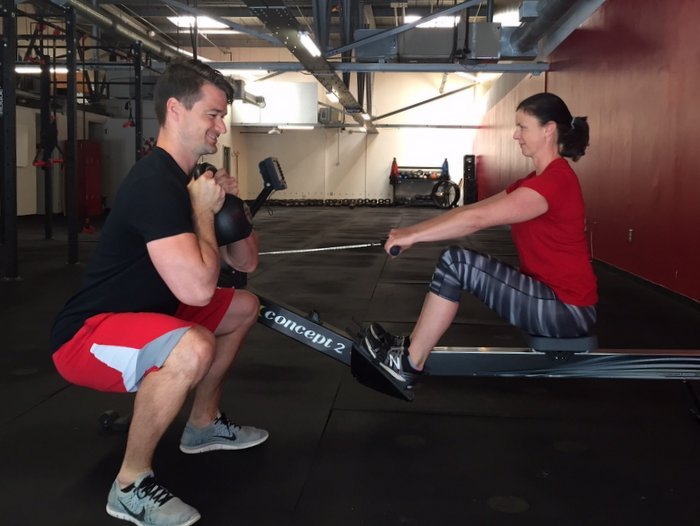
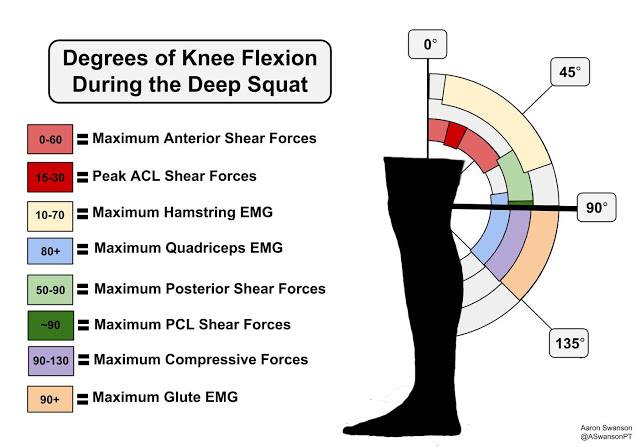
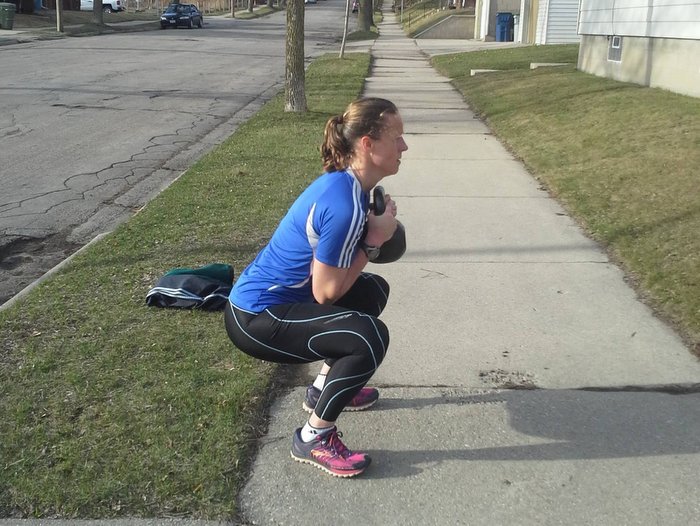
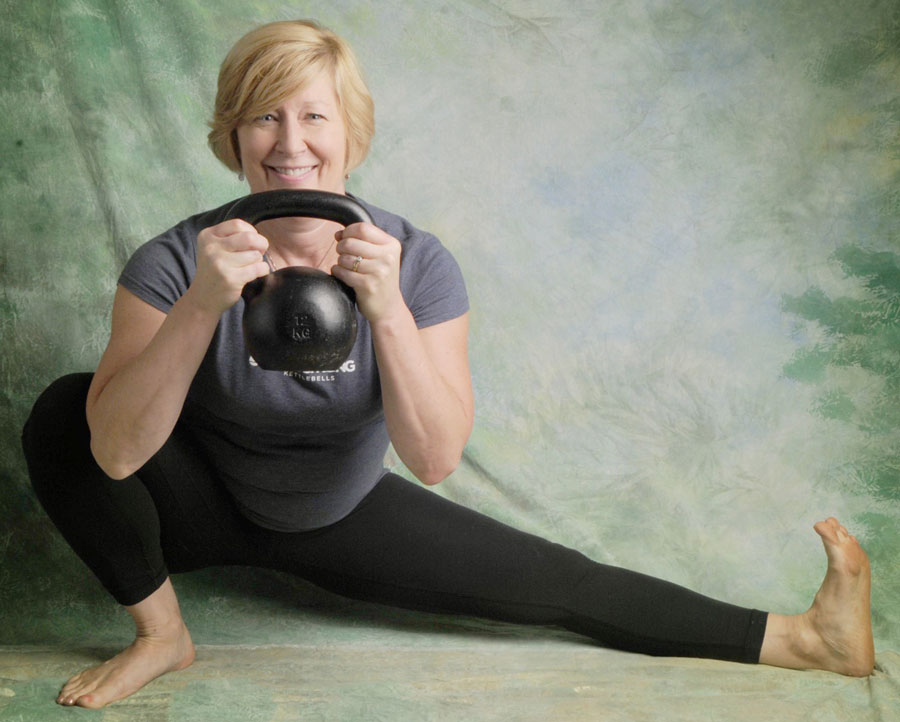
Bottom Up Half Kneeling Kettlebell Press

Goblet Squat

The goblet squat is the best way to load the squat if you are a novice lifter. The goblet squat is user-friendly because it doesn’t force the lifter into a fixed position. By comparison, the barbell back squat requires a lot of mobility. The goblet squat strengthens the glutes, and quads along with the core. The goblet squat can benefit the golfer by strengthening the tendons and joints in the lower body which can get irritated or injured in golf.
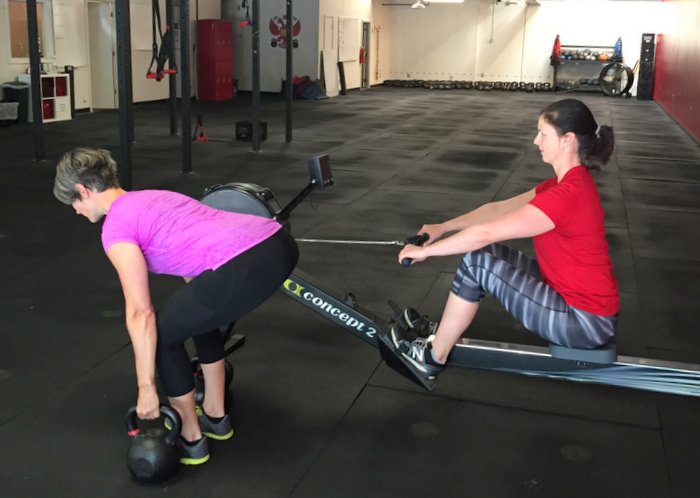
Farmers Carries

Farmers carries build grip strength, trunk strength, and create better posture. Golf involves a lot of flexion throughout the spine. Farmers carries require extension from the spine and shoulder retraction. With the head in a neutral position, the trunk is engaged, and the kettlebells are carried at the side in neutral position as well. Practicing farmers carries can offset the typical positions required for playing golf.

A Final Word…

If you are an avid golfer who wants to increase your athleticism, begin to learn and use kettlebells in your strength training sessions. Not only will this improve your ability as a golfer, it will allow you to keep playing long term. If you are considering training with kettlebells make sure to find the nearest RKC instructor in your area to show you how to properly and effectively use them.


****

William Sturgeon, RKC II trains clients at his gym, Restored Strength. Contact him through his website at RestoredStrength.com or follow him on Facebook: facebook.com/restoredstrength

Filed Under: Kettlebell Training Tagged With: Athletic Training, bottom-up press, get up, goblet squat, golf, improve golf swing, improve your golf game, kettlebell training, kettlebell training for golf, kettlebells for golfers, William Sturgeon

Kettlebells for Life

March 28, 2018 By Lori Crock 1 Comment

Lori Crock Kettlebell cossack squat

Every Spring, I enjoy looking back and reflecting on what I am grateful for over the last year. One of those things is the RKC School of Strength and my students who enjoy using kettlebells as much as I do.

As I reflect on seven years of teaching strength and conditioning (and a dozen certifications and workshops later) I can honestly say that what has prepared me best to be a strength coach is the RKC School of Strength.

Here’s why: I don’t have to struggle to plan programming for my students. It’s all here—a way to train students to become stable, mobile, strong and flexible for life. This system is safe, interesting to the mind and body, and accessible to all fitness levels. It’s fun, time-efficient and truly a system of health that promotes longevity.

I’m grateful for my students who keep coming back for more…

At my gym, our programming is 80% kettlebells and 20% bodyweight. It’s based on both the RKC and PCC (Progressive Calisthenics) fitness systems.

Many of the students have been training with me since the beginning of my kettlebell journey more than five years ago. They keep coming back for more because the RKC School of Strength challenges both the brain and the body.

I find that students can continue to train this way for life. We can easily adapt the training to their changing personal health and fitness levels. Wherever my students are in the moment—and this true for D1 athletes, everyday working folks, or retirees—they can train optimally.

Lori Crock assisting at an RKC Workshop

The RKC system is inexhaustible—there’s always more to learn about our bodies, the movements, and kettlebells to make us better for life and sport.

The physical and mental stimulation from our training applies to everything we do: lifting, carrying, reaching, bending, sitting, getting up and down off the floor, standing, walking, running and resting. All aspects of our lives can benefit from what we learn about our bodies using the RKC system.

We do not entertain our students with workouts. The challenge of moving well under load is entertaining in itself.

Our system is a way, not a workout. Those who understand this concept can’t get enough of it! I feel blessed and grateful to retain so many students for years.

I’ll be honest. It can take time to find people who appreciate our somewhat “counter-culture” methods. We don’t promise visible abs in six weeks or make other outlandish marketing claims.

First and foremost, the student has to show up and work under the leadership of an RKC certified coach. Both parties—the coach and the student—must make a commitment to see results.

Students who commit to learning our methods stay and flourish. As a teacher, it’s exciting and incredibly rewarding to build long-term relationships with my students and help them achieve what they never dreamed possible.

Theda and Al Training Mobility

An Example Close to Home:

Before training with me and using the RKC system, my husband Al trained on his own or with his buddies. Three shoulder surgeries later—including two surgeries on one shoulder—I told him he needed to start training with me.

Now, he hasn’t had any more injuries and his shoulders are strong and stable. He consistently trains three days each week, and he improves in some way each session. Believe it or not, the strict press has become his strongest movement!

It isn’t easy to coach your own spouse, but it is a joy to watch him to lift while moving with ease and strength—especially since he’s been pain and injury free for the past five years. We both hope to train with this system for the rest of our lives.

Kettlebell Training for Life

I could share a story about each of my students and how the RKC School of Strength has helped them achieve something in their lives that they never imagined—in and outside the gym. I’m sure you can too, if you use the RKC system.

It’s a privilege to train people with a system I’m confident in—and to use honorable, time-tested methods that make people better and more courageous athletes for life and sport, at every age.

Feel free to share your “kettlebells for life” story in the comments below.


***

Lori Crock, RKC Team Leader, FMS II and MovNat MCT II. Lori owns MoveStrong Kettlebells in Dublin, Ohio where she teaches small group kettlebell classes to all ages and fitness levels and continues to be amazed, inspired and educated by her students. Her email address is lori@movestrongkbs.com

Filed Under: Kettlebell Training, Motivation Tagged With: all ages training, Athletic Training, consistent kettlebell training, group fitness, lifetime training, Lori Crock

Why I Like Hardstyle Kettlebell Training

June 14, 2017 By Florian Kiendl 1 Comment

Florian Kiendl RKC Kettlebell Pistol

Whenever I use the phrase “Hardstyle kettlebell”, I find it funny that it is very descriptive if you know the style of training, but at the same time it’s very confusing for someone new to kettlebell training.

An outsider might infer that Hardstyle is a very harsh and intense style of kettlebell training. But, this is not the case. Obviously, any kettlebell work is relatively intense—and the only limit to that intensity is your own physical ability. But, that’s not the point of Hardstyle.

Hardstyle doesn’t defined how hard we train, instead it describes how hard we move. How hard a given workout seems will depend on the volume (total reps), density (time) and intensity (weight or variation) you choose. On the other hand, how hard you execute every single movement does not describe the overall intensity of your training session. A single Hardstyle swing feels more intense than its competition style counterpart, but that still does not depict the whole training session. In the Hardstyle community, we frequently joke about “being lazy” since we do fewer reps harder instead of more reps with lower intensity.

There Are No Hardstyle Kettlebell Competitions…

With Hardstyle technique, it is difficult to compare one athlete with another. For example, performing 100 true Hardstyle swings is a challenging workout, while doing the same number of 90% less than Hardstyle swings will feel much easier. An athlete using competition style technique might choose the same 100 swings as warm-up because his movements are intended to conserve energy.

Even in our well known and feared RKC snatch test, we do not ask for 100 true Hardstyle reps. This is not because it’s nearly impossible to work at the required pace with 100 % pure Hardstyle technique, but because it takes a very experienced referee to see the difference between 90 % snatches and 100 % snatches. The test is still hard enough—believe me. You can’t “win” the snatch test, it’s pass or fail only.

Florian Kiendl RKC Kettlebell Windmill

Why I Like Hardstyle Kettlebell Training

As Max Shank regularly says, “We are all unique little snowflakes and therefore everyone is different.” Some people can work with the same three exercises for years and make incredible progress, while others need to switch their program every four weeks to stay on track. Some people will need a clearly defined goal to work towards, while others work like mules day in and day out. Competitions can be a strong motivation for training, but that same motivation can come at a high price. Whenever you compare yourself with others (who naturally may be younger, bigger, faster, etc.) you will need to overcome your own limitations to defeat them. It is one thing to move past your limits through dedicated training as opposed to working past them by sheer will, or guts to win a competition. It all gets easier with practice, but you must pay your dues. Considering that most elite athletes quit competing before age thirty, the physical price must be high.

Florian Kiendl RKC Kettlebell CleanIn my opinion, it is wiser to train in a way that gradually builds you up over time. Work for your health while prepare yourself for whatever might come.

Are You Against All Competitions?

No. If you are motivated by competition, then you should definitely make that personality trait work for you. And even if you don’t like competing, it is still a good idea to try it now and then to gain a better understanding of your strengths and weaknesses. But don’t compete in your training. Hardstyle kettlebell training can provide you with the physical and mental fortitude to succeed in almost any athletic discipline. Use it to prepare yourself for competing in your chosen sport. Obviously, you will also need to train the skills of your sport, but be careful not to mix skill training and physical preparedness. To improve your skills, you should always try to train when you are relatively fresh. When physical preparedness is the goal, you will need more load to force your body to adapt.

Have fun, train safely, and compete wisely!

***

RKC Team Leader Florian Kiendl is a second degree black belt in Tae Kwon Do and runs a Martial Arts Gym in a small town close to Munich (Germany). He made it his mission to help his students to improve their movement and overall health. In his search for ways to overcome the movement restrictions of his students (and his own) he found the RKC and now works together with Master RKC Robert Rimoczi and others to help as many people as possible to gain back their Strength and Agility. He writes a regular Blog at blog.kettlebellgermany.de and offers workshops all over Germany teaching the RKC kettlebell exercises: KettlebellGermany.de. If you have questions or comments on the article feel free to email him at florian@kettlebellgermany.de. 

Filed Under: Kettlebell Training Tagged With: Athletic Training, competition, Florian Kiendl, Hardstyle, Hardstyle kettlebell, Hardstyle kettlebell training, kettlebell training, kettlebells

The Get-Up—The Ultimate Triplanar Exercise

December 7, 2016 By Ashoka McCormick 3 Comments

training get-ups for judo athletes

When we think of Bruce Lee throwing a kick, Muhammad Ali dodging a punch, or a great wrestler like Dan Gable swiftly shooting in for a double-leg takedown and dumping his opponent on the mat, we can easily imagine strength exerted on multiple planes.  This multi-dimensional strength and stability is achieved through specific strength conditioning. It is the key for optimizing body movement and power for a combat athlete’s knock-out punch. It also provides incomparable groundwork for other athletes, too.

The majority of today’s programs favor traditional strength and conditioning approaches which are often heavily biased towards sagittal plane (forward and backward) movements. We definitely need strength in the sagittal plane, and many of the big-bang-for-the-buck exercises like squats and deadlifts occur in this plane.

But in designing our training, it is important to understand that the human body does not move in just one direction. We can also move side-to-side, forward, backward, and in rotation. Training in multiple planes, or multiple directions, helps us achieve higher levels of body awareness, balance, and coordination. This improved programing allows for quicker reaction times and more efficient neuro-motor function. Training in all the planes can help athletes and clients avoid injury and enhance their performance. It’s a required practice for any athlete determined to consistently perform on an elite level.


The Three Planes:

Sagittal Plane:

Movements in the sagittal plan move forward and back, or through the mid-line of the body. Common examples of sagittal plane movements are a biceps curl or a sit-up.

Frontal Plane:

Movements along the frontal plan can be described as side-to-side, such as abduction and adduction. Exercises that work through the frontal plane are side lunges and jumping jacks.

Transverse Plane:

Movements in the transverse plane include horizontal abduction, adduction or rotational actions. Exercise examples include the Russian twist or a cable woodchop.

One major reason most sports injuries occur in the frontal and transverse planes is that most athletes are only training in the sagittal plane. Athleticism depends on a tremendous amount of movement in different planes of action. Strength and conditioning programs for athletes should strive to include as many variations of movement as possible to train muscles in as many planes as possible (Kenn, 2003).

As trainers and coaches, we must prepare our athletes by strengthening their bodies in all three planes. If your athletes understand the difference between these three planes of movement and can develop their ability to efficiently weave their movements together, then they will be well-rounded and less prone to injury.  For example a fighter in the ring or cage spins, moves left and right, dodges kicks, pivots, punches, and is constantly tackled.  If his or her body is weak in a particular plane, the likelihood of an injury is much greater.

Most popular training methods do not use multi-planar movements. Powerlifting, Olympic lifting, CrossFit training, and bodybuilding tend to primarily work in the sagittal plane. Very few movements are in the transverse or frontal planes. Additionally, most of these training methods do not include multi-planar movements—combinations of frontal, sagittal, and transverse planes of motion. These popular training methods are still valid for training athletes, but coaches should also consider ways to train sport-specific movements that athletes will perform on the field of play (Brown, 2013).

Ashoka McCormick at the whiteboard

As strength coaches and trainers, we can create workouts that hit all of these planes, or we can select compound exercises—triplaner movements—that hit all three planes in one rep. One of the best triplanar movements of all is already a staple among RKC and HKC Instructors: the get-up

In the kettlebell community and the strength and conditioning world, the get-up is highly regarded, and with very good reason. It’s a highly functional movement and total body exercise. Its benefits include improved shoulder stability and strength, correction of left-right asymmetries, overall mobility, core strength, improved movement skills, overall proprioception / coordination, and time under tension. The get-up also teaches athletes to stabilize themselves and create whole body tension in a variety of positions.


Truly Triplanar

The above-mentioned list of benefits is more than enough justification to include the get-up in our workouts. But, I think that one of the most valuable benefits provided by the get-up is that it passes through all three movement planes from the ground up, and again on the way back down to the ground. For that reason alone, the kettlebell get-up is one of my favorite options—it forces you to work in EVERY plane of motion.

Body Awareness

The get-up provides a variety of functional movement patterns and an unmatched stimulation to our vestibular and nervous systems. Once they have mastered all the steps of the get-up, you can even lead your clients and athletes through the movement with their eyes closed for a greater nervous system challenge. The body awareness developed from practicing get-ups provides tremendous value for athletes and the general population.

Ashoka McCormick spotting kettlebell get-up

Five Minute Get-Ups

At my HKC certification in April, RKC Team Leader Chris White mentioned doing “Five Minute Get-Ups.” Since then I have added this drill into many of my programs for Judo athletes. At first, they should be practiced without weight, then balance a shoe on the fist for added challenge.  I tend to use the “Five Minute Get-Up” protocol at the beginning of our workouts, it serves as a good warm-up, and a great opportunity for skill development.

During the drill, we focus on one quality rep at a time. I encourage the athletes to take their time. You can incorporate “Five Minute Get-Ups” at the beginning of your workout, on a recovery day, or even as a stand-alone skill practice session. Advanced athletes can try it with weight. But, with or without a kettlebell, the main focus is on the fluidity of the movement.

When designing a strength and conditioning program, we need to include multi-planar movements, multi-directional movements, and various stances which are appropriate for our athletes. Exercises like the get-up will help athletes move more efficiently and will decrease their chances of injury while increasing their overall functional strength.

Winning Athletes At the podium

References:
Brown, T. (2013, September). NSCA’s Performance Training Journal, Issue 12. Retrieved November 18, 2016
Kenn, J. (2003). The Coach’s Strength Training Playbook. Monterey, CA: Coaches Choice.

****

Ashoka McCormick, HKC is a performance coach in Santa Cruz, California.

Filed Under: Coaching, Kettlebell Training Tagged With: Ashoka McCormick, Athletic Training, fitness training, get up, hkc, kettlebell get-up, kettlebell training, stength and conditioning for sports, tri-planer training, triplanar exercises, triplanar movement, triplanar training

Rowing and Kettlebells

June 1, 2016 By Kathryn Taylor 2 Comments

Kathryn Taylor Kettlebells and Rowing

Indoor rowing is one of the fastest growing fitness trends in the US. Head to any major city and you’ll find rowing gyms. Even the local YMCAs are taking the rowing machines out of the corner and moving them to a prominent spot. But, with the rise of rowing, we also find many people rowing with poor technique. In addition to holding an RKC certification and regularly teaching kettlebells at FitWit Studio, I also started to teach rowing this past year and became a certified rowing instructor through UCanRow2. Many of my clients already have a background in kettlebells, and I’ve found that kettlebells can be a highly effective method to teach rowing.

First, a little bit about rowing… You may have seen athletes at the gym leaning all the way back at the end of a stroke and moving with lightning speed up and down the slide. For the most part, you’ve probably observed very poor form. Rowing, like kettlebell training, is highly technical. The power of the stroke comes from the push-back (legs) and the movement forward is all recovery. A goal is to set up for a strong push during the recovery. Basically, the movement pattern starting from the front of the erg is to push back with the legs, then the body goes back at a “one o’clock” position while the arms pull in. Return to the front of the erg by straightening the arms, hinging at the hips to the “eleven o’clock” position, before moving forward on the erg to the start or “catch” position. The order of the movement: legs, body, arms, arms, body, legs. Repeat this pattern one million times and you are rowing!

As I began to teach clients the rowing technique, I found myself moving them off the erg and over to the kettlebell so they could really learn how to properly row using the deadlift, goblet squat, and swing.

Kettlebell Deadlift: Hinge

When rowing, the body closely mimics the deadlift position. But, since it’s often difficult for clients to understand the concept of the hinge while on the machine, we practice our kettlebell deadlift set-up. We work on the hinge, and use the power of the legs to drive the kettlebell up. Then we get back on the erg and mimic the same position. The deadlift also helps clients really understand the correct shoulder position—rather than allowing the shoulders to round forward at the end of each stroke, they learn to keep their back in a strong position.

Kathryn Taylor Goblet Squat and Rowing

The Goblet Squat: Drive

Because most new rowers think that the power comes from the arms, it’s really important to teach them how to drive from their feet, and engage their glutes to push themselves back. I’ve used the goblet squat to reinforce this idea. My clients start with a fairly light kettlebell, and go deep into a goblet squat. They pause for 2-3 seconds at the bottom before standing up by driving hard thorough their feet. They do 5 reps, then do the next set with a heavier kettlebell. We repeat this process 2-3 times. The goal for this drill is to teach them that with heavier weight, they need to drive harder into the ground to stand up. After this drill, we get on the erg and practice the drive.

The Kettlebell Swing: Rhythm

Rowing has a certain rhythm to the stroke. You press back hard and fast, then recover slowly. Each individual has to find the right rhythm (stroke rate) for their most efficient row. If you go too quickly, your heart rate will spike too high. But if you go too slowly, you’ll burn out your legs. The kettlebell swing mimics the same rhythm that we are trying to find on the erg. A hard, fast drive gets the kettlebell up, before we allow the kettlebell to fall back down as we recover. All of the work happens on the way up. The swing has the additional benefit of reinforcing the hip hinge of the deadlift.

I’ve found that people who have practiced kettlebell training for a year or more tend to pick up rowing technique faster than those who haven’t. If you’re looking for a new cardio workout to add to your routine, I suggest trying rowing.

****

Kathryn Taylor, RKC, ACE-CPT, Oh Baby Fitness!, UcanRow2, TRX Level 1, is Studio Manager of FitWit Studio in Kirkwood/Decatur, Georgia.

Filed Under: Kettlebell Training, Tutorial Tagged With: Athletic Training, erg rowing, indoor rowing, Kathryn Taylor, kettlebell deadlift, kettlebell technique, kettlebell training, rowing

Kettlebell Training, the Secret to an All American Distance Runner’s Success

September 9, 2015 By Phil Ross 3 Comments

Carleen Jeffers Running Track

Over the past 22 months, Carleen Jeffers has amassed an incredible amount of championships—and has set distance running high school and county records that were previously unbroken for decades. Brown University bound, Jeffers didn’t even consider long distance running until the summer of 2013. But in the fall of that same year, she earned the honor of First Team All County for Cross Country in the incredibly competitive county of Bergen, NJ—population, one million. During her first season, she went from not running track to First Team All County! Some top-shelf athletes train their whole lives and never achieve that level of success in our county. Prior to running, Carleen played softball, trained in the martial arts for many years, and began swinging kettlebells about a year before track.

Many distance runners don’t like the idea of resistance training, but they need strength! While bodybuilding routines or powerlifting will usually be counter-productive, kettlebells and bodyweight training can also provide relief from the repetitive movements of running. Tendons and ligaments will also become stronger which can prevent injuries and/or lessen their severity. Diaphragm strength also increases, and will supply the muscles with more oxygen. The body will process lactic acid more efficiently, allowing an athlete to have a stronger kick at the end of a race. Becoming stronger also has psychological advantages. Obviously, kettlebell and bodyweight training makes a lot of sense for runners.

Even during her highest mileage training of more than 60 miles a week, Carleen was able to maintain her muscle mass and avoid injury. While teammates suffered from stress fractures, shin splits and other common overuse injuries, her season was uninterrupted.

Carleen Jeffers With Kettlebell

She completed her senior year by placing 4th in the New Balance National High School track meet on June 19th, 2015, earning her High School All American status. Her performance of 16.58 in the 5K smashed both the former Bergen County and Ridgewood High School records and earned her Track Athlete of the Year for Northern New Jersey. That’s quite a few accomplishments for an athlete in a sport for only 22 months.

Carleen’s coach, Jacob C. Brown, of Ridgewood High School, is a coaching legend in the world of women’s track. He’s coached more champions and championship teams than virtually any other coach in the state of New Jersey. He advised her to keep training with kettlebells while she is in college—even if the college strength program doesn’t call for it. Coach Brown and I agree that that Carleen’s kettlebell training was the major differentiator in her success as a runner.

How did a 97 pound, 5’ 4” high school distance runner quickly achieve such a high level of success? Normally in track and field, athletes rarely improve from one contest to another, especially at higher levels of competition. The goal is to stay healthy while peaking for the States, Nationals or Worlds.

Carleen Jeffers Trail Running

Many runners—along with many in the general population—have rounded shoulders and poor thoracic mobility. And this situation is acerbated by the form these athletes adopt while running. Instead, they need to open up their chests to expand their lung capacity and increase blood flow.

The following are examples of Carleen’s training with kettlebells as a track athlete. We generally cycle our weekly training.

Warm-Up and Mobility:
Each session includes a warm up of jumping rope for 3-5 minutes, and a mobility sequence. The mobility portion includes six posterior chain and shoulder mobility exercises performed with a bo staff or dowel, armbars, thoracic bridges, deck squats or some other squat, hip opening movements, zombie rolls, and push-ups, to name a few. We also employed crawling movements along with quad and hamstring stretching.

Power Days:
Heavy lifting with sets of 5 to 10 reps. We have Power Days within three or more days before an event. If it’s a major event, we’ll leave a week between power sessions. These sessions include heavy swings, sumo squats, double kettlebell squats and heavy presses, bottoms-up presses, heavy get-ups, floor presses, heavy rows, kettlebell carries, and complexes. We also perform low rep plyometric versions of some of these movements.

Endurance Days:
Endurance days include chains with 30 to 40 reps, and weighted plyometrics of 10 to 20 reps per set. With kettlebells, we perform walking figure-8 lunges, walking swings, over-speed eccentric swings, ladders, and VO2Max snatch workouts. If we don’t do a VO2Max workout, we’ll end with “6 Minutes of Hell” or 5 minutes of kettlebell snatches (similar to part of the RKC Workshop testing requirements).

An example of a “6 Minutes of Hell” variation: Perform a clean, press, and a squat as a chain for one minute on one side, then change to the other side for the next minute. Repeat this for 6 minutes.

After an endurance day, we would make sure to have at least two days of rest before an event. Sometimes we might do an endurance day workout the day before an event, but with reduced weights, so the athletes would not be too sore to compete. However, we wouldn’t have an endurance day before a big meet.

PowerDure Days:
A good 40 to 50% of our weekly workouts are based on the PowerDure method. We perform the first half of the workout using mid-range power sets. We’ll do 3 to 4 sets of a mobility exercise along with an upper body push and pull, and lower body push and pull. 8 to 10 reps per set. Sometimes unilateral, other times bilateral.

In PowerDure, grinds are our primary focus. The second half of the session is dedicated to muscular endurance, while maintaining our bracing and the lock and pop of our ballistic movements. We focus on chains and circuits using workouts like our “Warrior’s Challenge”, “Scrambled Eggs” (see example below), and Tabatas. Heart rates are high and so is the sweat production! Afterwards, we cool down with mobility and flexibility training. I have a pool of several hundred workouts in the PowerDure category.

Bodyweight Days: These are performed once a week, especially close to the meets and sometimes the day before. We will either train with low reps (1 to 5) for strength or we will use timed circuits, moving from one exercise to the next while trying to hit 80% of our max reps. Generally, our bodyweight circuits are timed at 50 seconds on, 10 seconds off. We usually do 9 exercises for 5 rotations. During strength (low rep) days, we’ll challenge ourselves with the most difficult exercises. On bodyweight days, we always revert to regressions when the reps of the more difficult movements are no longer achievable. I find the bodyweight-only days round out the training since bodyweight exercises also improve balance and overall coordination.

Bergen County Track Stars 2014
Bergen County Track Stars

Example PowerDure workout with an intermediate variation of “Scrambled Eggs”

Our “Scrambled Eggs” circuit requires anywhere from 6 to 8 minutes to complete prior to the 1 minute rest between sets. There is no rest between the exercises, only one minute rest at the end of each set. This type of training prepares the body to deal with the lactic acid produced during sports or other strenuous activities.

Circuit 1: 2 sets

  • Two-hand kettlebell swings: 50 reps
  • Armbars: 10 each side
  • Side Press: 10 each side

Scrambled Eggs (1 kettlebell): 3 sets

  • Two-hand swings: 20 reps
  • Hand-to-hand swing: 10 reps each side
  • Snatches: 10 each side
  • High pulls: 10 each side
  • Swing squats: 10 reps
  • Waiter press: 5 each side
  • Single-leg deadlift: 5 reps each side
  • Bottoms-up press: 5 reps each side
  • One minute of rest


Strength and Honor!
Coach Phil

****

For more information on Master RKC Phil Ross’s strength and conditioning programs, videos (including The Kettlebell Workout Library), and workshops, please visit www.philross.com. Coach Jacob Brown’s website is available at jacobbrown.com. View Carleen Jeffers’ MileSplit profile.

Filed Under: Kettlebell Training, Workout of the Week Tagged With: Athletic Training, endurance athletes, fitness, Kettlebell, kettlebell workout, kettlebell workouts, phil ross, track and field, workout

Squat Controversies

August 26, 2015 By Felix Sempf 4 Comments

RKC Instructor Felix Sempf

Although many good articles have been written about squatting, coaches are still frequently confronted with “do not go below parallel or 90°”, “you shouldn’t bring your knees past your toes”, or “squats are bad for your back”. Given these controversies and the fact that the squat is one of the fundamental exercises for RKC kettlebell training, the purpose of this article is to review the most important aspects of this exercise.

The squat is versatile—it has been shown that a 1RM squat is highly correlated to jump and sprint performance (Wisløff et al., 2004) and it can improve knee stability through a development of tighter joint capsules (Chandler et al., 1989). It is particularly useful for training athletes, but can also help improve strength and functionality in non-athletic populations. Squats improve the function of the gluteal muscles which will prevent injury or decrease back pain. Squats can also help everyone with daily tasks such as lifting items from the ground, or climbing stairs. It is important to note that research has not been able to establish a relationship between (deep) squatting and a greater risk of knee and back injuries, given that the exercise is performed with proper technique (Meyers, 1971; Panariello et al., 1994; Steiner et al., 1986; Hartmann & Wirth, 2014).

Squat Depth

Li et al. (2004) showed that the greatest stress on the posterior cruciate ligament during squatting occurs at around 90° of knee flexion. The authors further stated that deep squats help to constrain the knee joint and significantly reduce anterior and posterior tibial translation as well as tibial rotation compared to smaller flexion angles, thereby reducing the stress on the cruciate ligaments. Li et al. (2004) also found “the tolerance to load is enhanced in the deepest portion of the squat with a protective effect conferred to ligamentous structures”. This is in accordance with other researchers (Kanamori et al., 2000; Li et al. 1999; Sakane et al. 1997) who observed reduced stress on the crucial ligaments for knee flexion at angles greater than 90˚.

Caterisano, et al. (2002) looked at the relationship between squat depth and activation of the gluteus maximus and found no difference between partial and parallel squats. However, they reported significant increases in gluteus maximus activity during the deep squat. Given the high incidence of hip osteoarthritis in former elite athletes, and the correlation with reduced passive ROM in hip-flexion (L’Hermette et al., 2004), deep squats may be a useful tool in the prevention of hip-osteoarthritis by improving hip flexion. In summary, there is evidence to suggest that squatting below 90° with proper technique reduces stress on passive structures such as the cruciate ligaments and can have a protective effect in regard to hip and lower back health.

(Source: http://www.aaronswansonpt.com)

Squats and Injuries

Tibiofemoral compressive peak occurs at 130° of knee flexion and the menisci and articular cartilage will bear significant amounts of stress (Nisell & Ekholm, 1986). As peak patellofemoral compressive forces occur at or near maximum knee flexion, those with patellofemoral disorders or acute injured menisci should avoid high degrees of knee flexion (Sakane et al., 1997; Escamilla et al., 2001). With regard to the cruciate ligaments, Li et al. (2004) concluded, “For those with existing injury or previous reconstruction of the PCL, it is best to restrict flexion to 50° to 60° so that posterior shear is minimized”. “However, there is little evidence to show a cause-effect relationship implicating an increased squat depth with injury to these structures in healthy subjects” (Schoenfeld, 2010).

Knees Over Toes

List et al. (2013) showed that restricting the amount of ankle motion (knees not allowed over toes) led to a smaller ROM at the knee, higher changes in the curvature of the thoracic spine, and higher segmental motions within the trunk. Consequently, the stress placed on the back increased when ankle motion was restricted. This is in agreement with other research, “Although restricting forward movement of the knees may minimize stress on the knees, it is likely that forces are inappropriately transferred to the hips and low-back region. Thus, appropriate joint loading during this exercise may require the knees to move slightly past the toes” (Fry et al., 2003). Escamilla (2001) came to the conclusion that significant strength and sagittal plane mobility is required at the ankle for proper squat performance.

****

Felix Sempf, RKC, PhD Candidate, M.A. Sportscience, trains and instructs at the FIZ in Göttingen, Germany. He can be contacted by email at: felix.sempf@sport.uni-goettingen.de and his website: kettlebellperformance.de

Filed Under: Kettlebell Training Tagged With: Athletic Training, biomechanics, Felix Sempf, injury prevention, kettlebell training, squat below parallel, squat controversy, squat depth, squats

Kettlebells and Moving Planks

June 10, 2015 By Josh Henkin Leave a Comment

Josh Henkin Half Kneeling Kettlebell Press

If you want core strength, the “Fitness 101” answer is that you must do planks. While the plank is a great starting point and should be well established in any fitness program, it is not nearly the end of smart core conditioning. That’s is why there’s a plethora of plank variations—from the innovative to flat-out goofy!

The biggest problem with the plank is that when practicing it, you CANNOT MOVE! The whole point of the plank in the foundational phases of training is to teach the body how to resist movement by integrating the body’s entire chain. But, MOST of the things my clients and I do require movement.

Think of the plank as a reference point. Of course we want to establish strength in the plank, but we also want to use it as a reminder of concepts we want to use in other movement patterns. The beautiful thing about kettlebells is that they allow us to create many different functional variations of moving planks. We need to produce and resist forces at the same time. I will describe three easy ways to use kettlebells to create extremely functional plank variations.

Overhead Pressing

I love overhead pressing because it is basically an extended plank. If we start on the ground and assume a standard push-up position, we have the beginnings of overhead pressing. By simply walking the hands further and further forward, this straight arm plank variation becomes more difficult. And the problem with continuing on the ground is that we will eventually fall on our faces! Instead, by standing and pressing kettlebells overhead we can train that extended plank.

Of course the other beautiful thing about overhead pressing is that it points out any lack of mobility. Both the hips and upper body can cause us to have major compensations because places which lack mobility will usually cause us to recruit stability from an inefficient place. In other words, mobility issues cause compromised movement.

Assuming we have good mobility, there are so many awesome ways to use kettlebells with overhead pressing. I think of these progressions as similar to moving from a standard front plank before adding more side plank elements over time. You will see this progression in how we lift the kettlebells, and how we stand when we lift the kettlebell—or both! Here is a series you can use to progress from easiest to most challenging variation.

Overhead Pressing Variations Positional Emphasis Type of Plank
Standing Double KB Press KB movement Front Plank
Loaded KB Press KB movement Front/Side Plank
Alternating KB Press KB movement Front/Side Plank
One Arm Press KB movement Front/Side Plank
Military Double KB Press Body Position Front/Side Plank
Half Kneeling Alternating Press KB Movement/Body Position Front/Side Plank


Frequently Asked Questions:

  1. What about the Turkish get-up? It’s very different from a plank and emphasizes rolling patterns instead.
  2. Where is the bottoms-up press? It’s a personal preference, but I find that the progressions listed above are accessible for more people.
  3. Where are drills like push presses and jerks? These are all further progressions of plank training. When you add speed, you must have a more reactive core—which is definitely more advanced training.

One more note about pressing overhead. Some people may be wondering about the side lean that some trainees seem to use with kettlebell pressing. While I understand the idea of using leverage to help press the weight overhead, this approach does not build the core strength we can develop with the overhead press and may explain the lack of carryover these same trainees experience with other exercises or implements.

Hip Hinge

I have to credit kettlebell training for raising the awareness of the hip hinge pattern. While I had performed deadlifts and cleans in the past, the emphasis on quality of motion was something I really took home from my first RKC way back in 2003.

The hip hinge is actually a more complex plank variation than an overhead press. We can use it to create the pelvic “lock” used in overhead pressing in the beginning phase of the hip hinge. Because the torso changes angles during the hip hinge, the stress on the core constantly changes.

While most people might think kettlebell hip hinging is only for deadlifts, swings, cleans, and snatches, I am really happy to see the re-birth of bent rows with kettlebells! While it’s not nearly as sexy as many of the other kettlebell lifts, it’s probably one of the most important!

The bent row really challenges our core strength and endurance! Most people can’t maintain the proper hip hinge in the bent row without altering their posture. It’s pretty common for people to creep upwards and end their set more upright, or to speed through their bent rows because they don’t have the core integrity to perform them well.

The bent row should be a cornerstone drill for anyone progressing towards ballistic kettlebell exercises. Having the capacity to tolerate multiple sets of the bent row while maintaining the same hip hinge is a great indicator that the lifter really has excellent core strength and endurance.

Having said that, most people will fatigue in the bent row, so combining the bent row and kettlebell deadlift will allow us to introduce more time under tension without causing bad form from exhaustion.

Here is a series of big “bang for your buck” row and deadlift variations for the hips and plank. Again, move from least to most complex…

Bent Row & Deadlift Variations
Bilateral Deadlift and Row
Bilateral Deadlift with Alternating Row
Suitcase Deadlift with Row
Sprinter Stance Deadlift and Row
Sprinter Stance Deadlift with Inside Row
Sprinter Stance Deadlift with Outside Row
Rear Step Deadlift and Row
Rear Step Deadlift with Inside Row
Rear Step Deadlift with Outside Row


Manipulating the body position and which side the kettlebell is on allows us to challenge ourselves beyond just loading. These variations introduce anti-rotational forces, lower leg stability, and many more benefits as we progress. These kettlebell variations allow you to eventually progress and succeed with familiar but advanced drills like renegade rows.

Lunges

You may have expected me address squats next, but I find so much more value in the vital role lunges play in core strength. I know, you HATE lunges, but that’s all the more reason we need to use them. So many of us need MORE lunges in our training. Lunging is much closer to everyday movements like walking, running, etc. than almost anything else we do in the gym. The lunge is a very functional drill!

As soon as we go into the split position, we can almost instantly see where people lose their plank. Remember, the core is not just a fancy word for your abs, but an integration of your hips, and even your feet—one reason that barefoot training became popular.

The popularity of the half kneeling position for overhead pressing should tell us how important lunges are to real core stability and strength. For the sake of this blog post, we will keep things simple and focus on the reverse lunge which is the easiest to progress people. With lunges, we can vary load placement, and direction of the lunge to challenge the movement. For now, we will focus on using different kettlebell loading positions to build some incredibly strong moving planks!

Lunge Loading Progressions
Suitcase Double Lunge
Double KB Rack Lunges
Off-Set Loaded Suitcase Kettlebells
Suitcase Contralateral
Suitcase Ipsilateral
Off-Set Rack Kettlebells
Rack Contralateral
Rack Ipsilateral
Tactical Lunge
Double Overhead Lunge
Overhead Contralateral
Overhead Ipsilateral


This is the REALLY cool part—we are not just building MANY more kettlebell movement variations, but increasingly more meaningful progressions. Changing the intent of familiar, and often underestimated movements gives them new meaning and value.

You will never really outgrow the plank, it evolves over time just like kettlebell training. The purpose of the HKC and RKC are to give you a very strong foundation to kettlebell training. Most people underestimate the incredible value and versatility of kettlebells if they get stuck in the habit of just performing a few movements. But, if you understand that gaining proficiency in one drill opens the door to another, you will find infinite uses and benefits to every drill in your kettlebell toolkit.

***

Josh Henkin, Master RKC, CSCS has been a RKC instructor since 2003 and has implemented kettlebell programs for major Division I programs, SWAT teams, and many different general fitness programs. Josh is also the creator of the DVRT Ultimate Sandbag Training system where he is a highly sought after presenter worldwide. He can be reached at info@ultimatesandbagtraining.com or http://DVRTFitness.com. Josh Henkin is also the author of DVRT, The Ultimate Sandbag Training System now available in paperback and ebook format.

Filed Under: Kettlebell Training, Tutorial Tagged With: advanced training, Athletic Training, core strength, core training, fitness, functional movements, functional training, Josh Henkin, kettlebell drills, kettlebell training, progressions, tutorial, unusual progressions, variations

The Who, What, Where, When and Whys of the Hinge and Wedge

April 15, 2015 By Nick Lynch 6 Comments

Margaret Domka Goblet Squat
Margaret Domka, 2015 Women’s World Cup utilizing the Goblet Squat

Three Examples of World Class Athletes Who Hinge and Wedge:

  • As seen above, Margaret Domka is performing a kettlebell goblet squat in her training for the 2015 Women’s World Cup. Goblet squats and hill sprints. She sprints when the goblet squat is correct, but not until then. First one must obtain the wedge and a proper hinge before sprinting. Margaret has shown a proper hinge and wedge which is why she’s fast and strong and therefore, going to the 2015 Women’s World Cup. Hurrah!
  • Nathan Mackinnon is ranked as the fastest skater in the NHL. Chris Hamelin is a gold medalist in speed skating. Both of these world-class athletes faced off in a short race. Both utilize a very strong and present hip hinge. To actually see what I’m talking about, take a second to search “Nathan Mackinnon vs. Chris Hamelin”. Pause the video when both athletes are in their starting stance. Take note of the hinge!
  • Nine-time gold medalist in sprinting, Carl Lewis, clearly utilizes both the hinge and wedge. His body is connected as one. Take a second to Google Carl Lewis and you’ll see a 0:54-second video. Watch how Carl moves his lower body without breaking the hinge. Carl runs like a 9-time gold medalist, not like a bulldog.

Carl Lewis, Margaret Domka and Nathan MacKinnon are not the only great athletes to have utilized a powerful hip hinge and wedge technique. Spend a few minutes watching the greats such as Michael Jordan in his defensive position, 2014 #1 center in the NFL Alex Mack, and so on. There is a secret which has been exposed thanks to all of us and you within the RKC community and that is this; Hardstyle training works for both high level athletes and pretty much everyone else too!

What is the Hinge and Wedge?

Hinge: move through your hips with minimal flexion through the knees. Stand on your right leg and raise your left knee up to 90 degrees–that left hip would now be hinged. Optimal hinge is approximately 80 degrees as seen on the image below. We hinge to load the largest and most primary muscle groups in the body, the gluteal muscles. Because we’re utilizing primary muscle groups during a hip hinge, our explosive power is greater. Bigger muscles provide bigger output. This is also the main reason why people who use Hardstyle kettlebell training techniques burn so many calories per minute. “They were burning at least 20.2 calories per minute, which is off the charts. That’s’ equivalent to running a 6-minute mile pace.” -Dr. John Pocari, UW-Lacrosse. These large muscle groups require much higher caloric output to function.

Andrea Du Cane, the longest standing and first female Master RKC is showing an approximate 80-degrees hip hinge with the single arm swing.

Wedging: is tensing the whole body while in a standing position. Your shoulders are packed, hips and knees are locked out, and abdominals are at maximum tension. We wedge to connect our lower body with our upper body. When the lats are contracted they pull down on the shoulders and bring our upper body closer to our center of gravity and hips. Wedging connects the upper and lower body as one! Think of a standing Hardstyle plank. It’s possible to achieve an almost constant wedge-like posture throughout the movement with enough practice. You know who utilizes such a posture with sports? Only the best!

Two Awesome Exercises for Hinge and Wedge

Two exercises which enhance the hinge and wedge are the Hardstyle swing and Turkish get-up. Regardless of your skill level with kettlebells, the Hardstyle technique will enhance your overall athleticism. With 8/10 runners in America injured, it’s clear we have some serious imbalances which need fixing. First we’ll need to get strong enough to hold the wedge while running and performing other physical activities. Ever seen a bulldog walk? Ever noticed the similarities between a bulldog’s stride and someone jogging down the street? Arms are crossing over the torso while the legs are flopping all over the place. Not good!

3 Tips for Enhancing the Wedge and Hinge in the Turkish Get-up

  • Hold the each stage for 5-10 seconds while packing the shoulders and pushing your knee out
  • Shrug and re-pack each stage of the get-up
  • Squeeze the handle as hard as you can at the pause in each stage of the get-up

TGU at Milwaukee RKC Workshop

If hinging your hips and wedging your torso is good enough for the best athletes in the world, I think it’s safe to say it’s good enough for you, me and our loved ones. When I get a room full of athletes at the start of another season and tell them we’re not touching any weights until we get the hinge and wedge down they look at me like I’m nuts. But after 4-6 weeks of hinge and wedge practice they double their mobility, speed and strength. Although they still look at me like I’m nuts they’re happy with their gains. Start simple; train simple and the results will be simply amazing!

I’ll leave you with a picture from the 2014-2015 MSOE (Milwaukee School of Engineering) Men’s Hockey Team. We started the season with loads of injuries, a losing record and 14 freshmen. We’ve finished the season nationally ranked, zero injuries, beat the #1 team in the country and went to the semi-finals in the toughest conference in the country. We hinge and wedge!

MSOE Hockey Team

***

RKC Team Leader Nick Lynch is a Strength and Conditioning Coach at Milwaukee School of Engineering University (MSOE). He owns Superb Health Milwaukee, a kettlebell studio in Milwaukee, WI. Most recently, he became an RKC Team Leader. He has 13 years of full-time training and coaching experience and a lifetime of wellness education. Nick lives in Milwaukee, WI with his wife Natalie and son Weston.

Filed Under: Kettlebell Training Tagged With: athlete examples, athletes, Athletic Training, hinge, hinge and wedge, hip hinge, Kettlebell, kettlebell swing, kettlebell technique, Nick Lynch, wedge

Kettlebells and Mountain Marathons

April 8, 2015 By Michael Kruse 4 Comments

Michael Kruse Mountain Marathon
Soon I will be 55 years old, and have decided to step out of my “comfort zone” in my training. Unfortunately an old shoulder injury prevents me from choosing some of the most daring adventures. After some thinking, I decided to choose a Spartan Race or a mountain marathon. Since I love being out in nature, I decided to train for a mountain marathon.

What is a Mountain Marathon?

As the name implies, it is a run of a marathon or longer in a mountainous environment. Around the world there are many of these races. The oldest and most famous one in Sweden is Björkliden Arctic Mountain Marathon (BAMM).

The BAMM competition is special because it is a two day event—and you must carry all the gear and food needed for surviving those two days on the mountain. Teams of two people compete and run nearly 25 miles each day while climbing approximately 4,900 feet in altitude—each day.

To prepare mentally and physically while testing equipment, I will also participate in a tour around Sweden´s highest mountain, Kebnekaise. The Keb Classic Summer contest is Sweden’s slowest marathon, but perhaps the toughest. Running a marathon with a large part of the race in rocky terrain with a climb of more than 4,600 feet requires a lot of preparation.

Requirements for the Challenges

I will be running in two different types of competitions, one with a backpack and one without. Mountain races place the most strain on the ankle, knee and hip. You must be strong from many different angles due to the substrate, and obviously have tremendous endurance. I will also need to train and practice running on flat land and inclines.

Training Examples

A normal week of training from March:
Monday morning: Running 1 hour
Monday evening: Kettlebell training 1 hour
Tuesday: Interval uphill running 1 hour
Wednesday: Kettlebell training 1 hour
Thursday: Downhill running 1 hour
Friday: Kettlebell training 1 hour
Saturday: Rest
Sunday: Long run with backpack 2-3 hours

Kettlebell Training

All strength training is done with kettlebells or bodyweight exercises only. Since I will constantly be in motion, except when reading maps, it is important to choose the right exercises.

Here are my three areas of focus and kettlebell exercise choices:

  • Endurance: One arm swing, two arm swing and snatch
  • Unilateral Stability: Single leg deadlift, airborne lunge, front squat, single arm row, reverse lunges
  • Whole body: Turkish get-up, carry

Example Session:

Warm up 10-20 min
Mobility + TGU

Block 1: 15 minutes
Single leg deadlift 5 reps (posterior strength)
Bottom up press 5 reps

Block 2: 15 minutes (on the minute)
One arm swing (posterior explosivity)
Thoracic bridge

Block 3: 10 minutes
Different types of carries

Depending on how my body feels, I will run various types of workouts with unilateral training. If I feel a bit tired, I extend the warm-up and run a pure endurance workout in 15-20min instead.

Workout 2 for Triathletes and Runners 15 Twoarmsving 10 Front Squat left 5 KB Row left switch side 1 min rest, 3-6 rounds

A video posted by Kettlebellspecialisten (@kettlebellspecialisten) on Feb 20, 2015 at 1:37pm PST

To avoid injuries, I almost never go “all out” when doing any of my workouts. The closer you are to your 1 rep max, the higher the risk of injury. A suitable load for the strength training exercises listed above is around 75% -80% of 1RM.

Recovery

For the training to have its maximum effect, you must know the importance of recovery. I can also attest that recovery is even more important as you get older. To tolerate a workout volume of 8-10 hours a week, I have to make sure that my sleep and diet is as good as possible.

Wish me luck with the mountain marathons, I will need it ☺
Michael Kruse

****

Michael Kruse, RKC, PCC instructor believes that age is just a number ☺ he can be contacted by email at kettlebellspecialisten@gmail.com, follow him on Instagram @kettlebellspecialisten

Filed Under: Kettlebell Training, Motivation Tagged With: Athletic Training, Distance Running, fitness goals, goals, kettlebelll training, Michael Kruse, mountain marathon, performance goals, recovery, running, training programs

  • Page 1
  • Page 2
  • Go to Next Page »

Primary Sidebar

Featured Products

previous arrow
BOOK-RKCBookofSnC
HardStyleKettlebellChallegeDanJohn700
BookCoverMasterTheKettlebell1
RKCiconKettlebell512
KettlebellGoddessdv040
next arrow

Recent Posts

  • RKC Big Six Workout
  • The Kettlebell Swing & Low Back Pain
  • Key Kettlebell Exercises To Help You Create Better Balance
  • How to Most Effectively Use Kettlebells to Meet Your New Year Goals
  • 1 Exercise That Checks All The Boxes
FOLLOW US ON TWITTER!

Archives

Copyright © 2025

Dragon Door Publications / The author(s) and publisher of this material are not responsible in any manner whatsoever for any injury that may occur through following the instructions or opinions contained in this material. The activities, physical and otherwise, described herein for informational purposes only, may be too strenuous or dangerous for some people, and the reader(s) should consult a physician before engaging in them.