• Skip to main content
  • Skip to primary sidebar
  • Home
  • Contributors
    • Matt Beecroft, Master RKC
    • Martijn Bos, Master RKC
    • Andrea Du Cane, Master RKC
    • Angelo Gala, Master RKC
    • Chris Holder, Master RKC
    • Steve Holiner, Master RKC
    • Dan John, Master RKC
    • Mike Krivka, Master RKC
    • Thomas Phillips, Master RKC
    • Robert Rimoczi, Master RKC
    • Phil Ross, Master RKC
    • Max Shank, Master RKC
  • Workshops
    • HKC Workshops
    • RKC Workshops
    • RKC-II Workshops
  • Find an RKC Instructor
  • Resources
    • Articles
    • Forums
    • Kettlebells
    • Products
  • Blogs
    • PCC Blog
    • Strong Medicine Blog
  • Archives

RKC School of Strength

Official blog of the RKC

phil ross

How Well Do You Move?

April 19, 2017 By Phil Ross 4 Comments

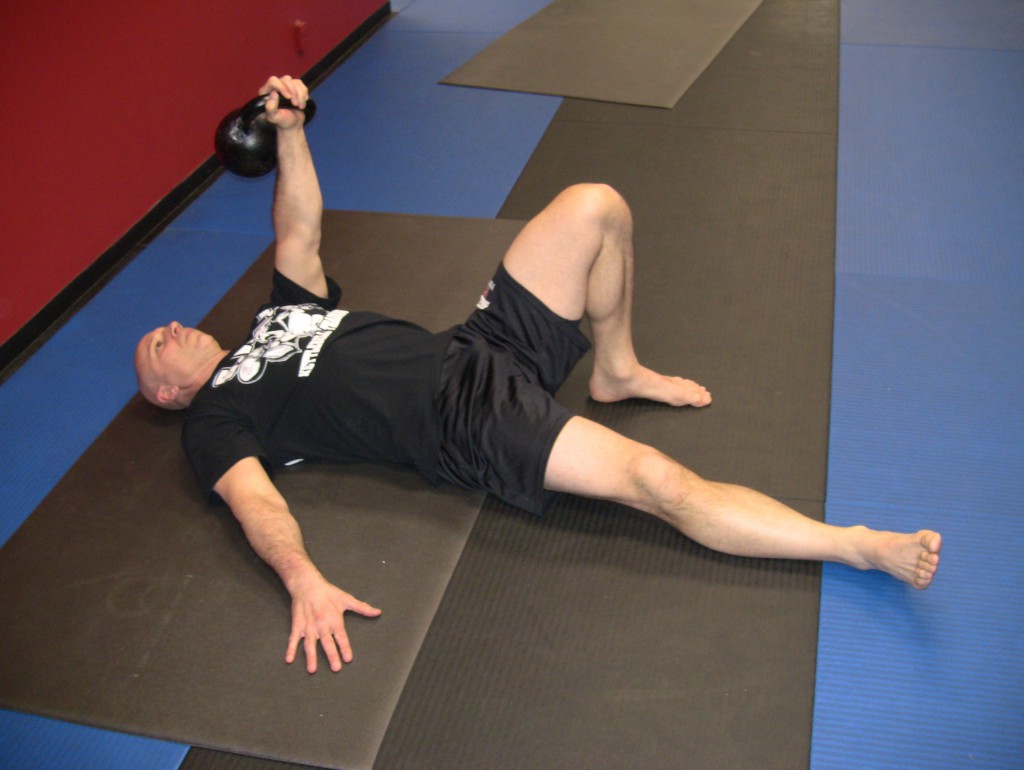
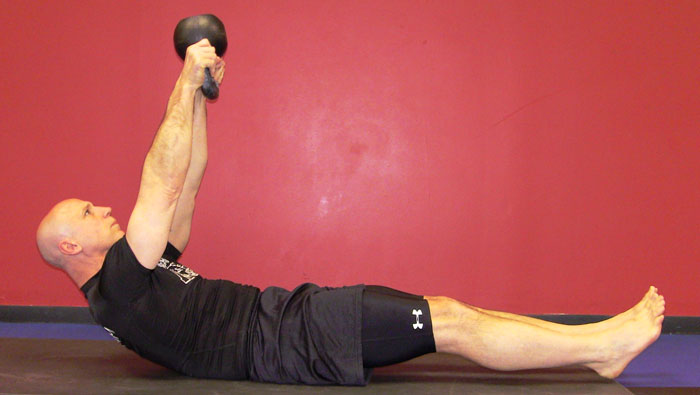
Master RKC Phil Ross, Kettlebell Pullover

How well do we—as humans—move? When we move are we trying to avoid or minimize pain? There seem to be three major areas of pain, have you wondered why these areas are so afflicted, even with people who are “in shape”?

The low back (lumbar region), the knees (distal femur, proximal tibia, fibula and patella) and the shoulders (glenohumeral and sterno-clavicular joints) are the pain points for many people. Why?

Two words need to be considered: stability and mobility. Certain joints of the body prefer stability and others favor mobility. Feet, knees, the low back and scapular regions favor stability. Ankles, hips, the thoracic spine (middle back) and glenohumeral joints (shoulders) flourish with mobility. The joints need to do what they are designed to do. If not, then asymmetries and injuries occur. And here’s the double whammy—not only will the misaligned joint be affected, the ones above and below it will too! For example, if a person has tight hips, their hip movement will be compromised. The movement will need to take place in other parts of the body, usually the knees and low back, both of which are stability-favoring joints above and below the hips. This creates instability in these joints, resulting in pain and anomalies.

Many people have low back pain. They might stretch their backs, get chiropractic adjustments, or take pain pills, but the issue will still not be addressed. The real issue be that the hips are tight and immobile, and/or the hamstrings are too tight. They may also have immobility issues if their thoracic spine (t-spine) is not strong enough or mobile enough to move safely. Are the erector spinea and the multifidi muscles (muscles that connect the vertebra) strong and engaged? Are the rhomboids, trapezius and other muscles of the scapula developed? Does the individual know how to keep them engaged? On many occasions, low back issues really lie in the areas above and below. Addressing the strength and flexibility of these major joints often significantly relieves back pain.

How do we address and avoid these issues? First, if you are not training, start. You’ll move better, feel better and live a longer (and often more productive) life. Next, consider that type of training, is it cardio, mobility or strength based? Are you getting the correct balance for optimal health? With your strength training or resistance training, are you using closed chain or open chain exercises? Closed chain movements involve more joints of the body and tend to be better for you. Open chain movements are more isolated and can have a shearing effect on the joint.

For example, let’s compare bodyweight squats and leg extensions. Bodyweight (or weighted for that matter) squats are a closed chain movement. The major joints and muscle groups addressed are the hips, knees and ankles, and the glutes, quadriceps, hamstrings and gastrocs (calves) are on the muscle side of the equation. Other muscles and stabilizers are involved at lesser degrees along with a good deal of core engagement for bracing. When performing squats, the feet are firmly planted and positive joint compression is employed. In contrast, leg extensions only address the quadriceps with concentric and eccentric contractions. The other leg muscles are virtually dormant and only the knee joint is involved. There is a shearing effect on the knee joint which may cause injury over time. In my estimation, this machine should be disassembled, melted down and repurposed as something useful, like a kettlebell! Just ask yourself, when you walk, run or jump, do you isolate a muscle or use your whole limbs and torso? In a rehabilitation situation or in bodybuilding, then muscle isolation may be appropriate, but otherwise multi-joint movements are superior.

There are many reasons why kettlebell training is my central mode of training. With kettlebells, all of the facets of fitness are addressed: strength, explosive power, flexibility, durability, muscular endurance, cardiovascular training, and mobility. Let’s consider mobility. Outsiders (I’m referring to those not acquainted with bonafide kettlebell training), only view kettlebell training as strength, explosive power and muscular endurance, but not necessarily promoting healthy mobility.

Along with the bo staff, freehand mobility and calisthenics I lead on a daily basis in my classes, there are three kettlebell based complexes we use to prepare for the rigors of the training session. We execute 10 repetitions of each movement on each side, or in each direction where applicable. The first complex is figure-8, then low, middle, and high halos. The second complex is bottoms-up crescent swings, kettlebell good mornings, and goblet squats. The third complex is the RKC armbar, lying side swings, and kettlebell pullovers.

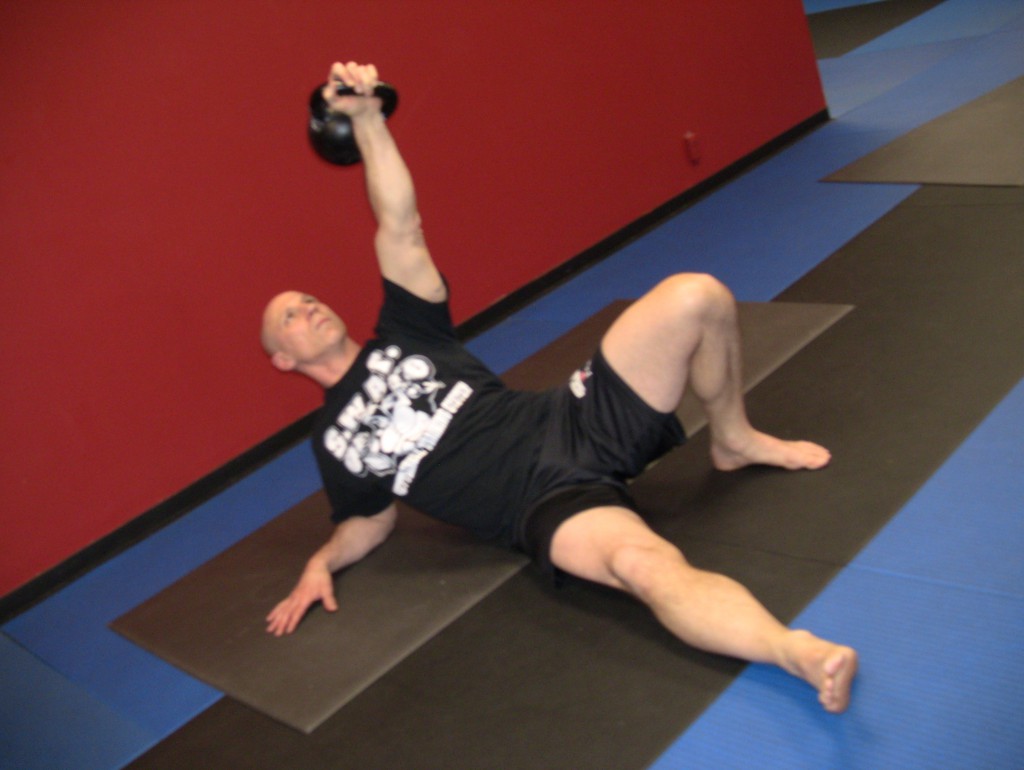
Let’s discuss the third complex: the RKC armbar, lying side press and the kettlebell pullover. Generally, we do 10 repetitions of the armbar, 10 reps of the lying side press on both sides, and then 10 reps of the kettlebell pullover. Two sets of each.

The Armbar packs the shoulder and prepares the participant for overhead work. Lie on your side in the fetal position as if you were starting a get-up. Grasp the kettlebell by the handle, bring it to your shoulder, then roll onto your back. With two hands, press the kettlebell upward. Make sure that your wrist is straight, your elbow is locked, and your shoulder is packed. If the kettlebell is in your right hand, take your right leg and bring it to the other side of your body so that your hip is facing the floor and most of your anterior is in the prone position. Do all of this while maintaining a relaxed neck and while rotating kettlebell in space. Attempt to bring your right hip as close to the floor as possible as you keep your arm and wrist locked. Once you’ve settled into the bottom of this movement, bring your right leg across the body until you are supine with the kettlebell above. This movement needs to be performed slowly, to maximize the opening of the hips and packing of the shoulders. Relish the time under the kettlebell as your thoracic region savors the mobility!

The Lying Side Press is to be done as soon as you have completed the armbar. As you are on your side, press the kettlebell upward. It is imperative to maintain a straight wrist and vertical forearm throughout this exercise. Pull the kettlebell down so that your elbow is slightly behind your hip. Keep the kettlebell steady and feel your rhomboids working. If you feel stress in your anterior deltoid, you are doing the movement incorrectly and most likely not keeping your forearm vertical.
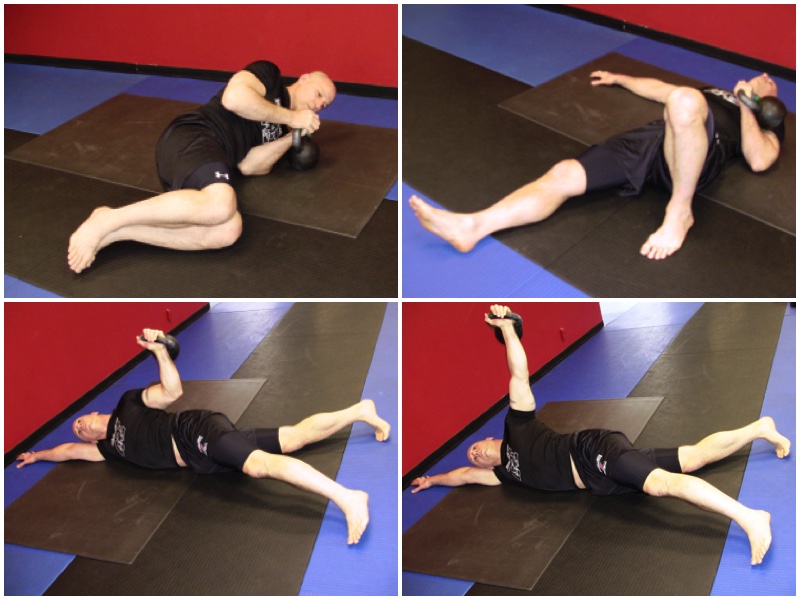
Phil Ross Lying Side Press Sequence

The Kettlebell Pullover is a movement that’s very easy to cheat! Don’t be “that guy” or “that girl”. The kettlebell is on the ground above your head as you lie in the supine position. Grasp the kettlebell in both hands at the horns and bring it overhead. Now, lock your arms. While you lower the kettlebell, remember the phrase “sometimes, always, never”. Sometimes your thoracic region comes off of the ground, Always have your head and cervical spine off of the ground and Never let your lumbar spine or hips come off of the ground. So, lower the bell with your head off of the mat and do not allow the kettlebell to touch the ground. As you keep the bottom of the kettlebell facing away from you, raise it so that it is perpendicular to the floor. Pause. Next, contract your abdominals as you bring the kettlebell straight upward while keeping your lumbar spine on the floor. Repeat this process for 10 repetitions.
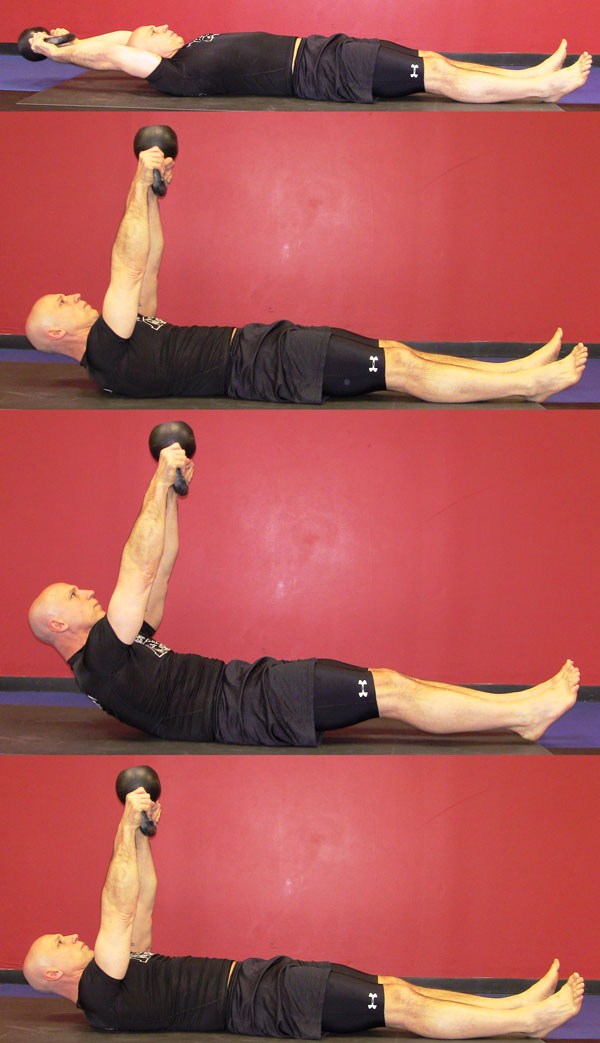
PhilRoss Kettlebell Pullover Sequence

If you have any questions regarding this RKC blog post or any other kettlebell or fitness related matter, please feel free to contact me.

Strength and Honor!

Coach Phil 


***

Phil Ross Master RKC, 8th Degree Black Belt, CK-FMS, PCC and ACE Certified. Author of Ferocious Fitness and Survival Strong, producer of The Kettlebell Workout Library. He is also the Chief Instructor at American Eagle MMA & Kettlebells
Filed Under: Kettlebell Training, Mobility and Flexibility Tagged With: kettlebell training, Master RKC Phil Ross, mobility, mobility training, mobility warmup, phil ross, warmups

My “Body” of Work: Part 1

December 2, 2016 By Phil Ross 5 Comments

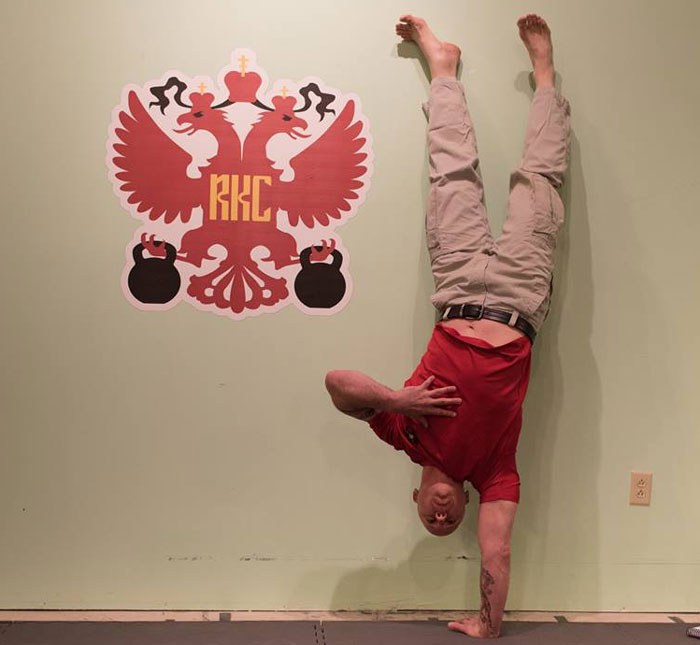
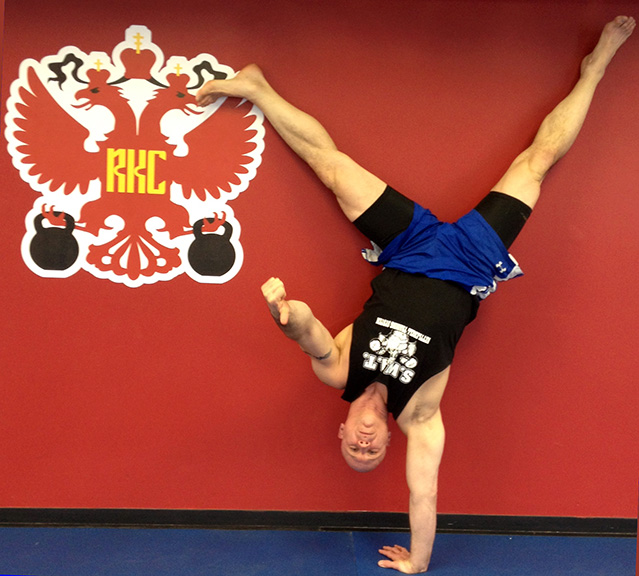
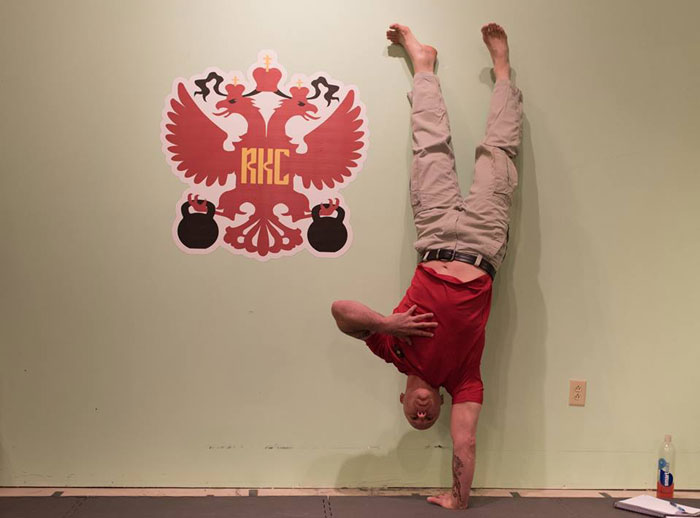
Phil Ross One Arm Handstand

Having recently hit my 54th birthday, I can’t help but reflect on what I’ve put my body through and how lucky I was to find the RKC‘s incredible strength and mobility training. The system is truly remarkable. This is a long post, but I strongly feel that many people will benefit from this information. I also want to give hope and inspiration to those who are in pain, struggle with immobility and injuries from their “sins of the past”. More importantly, I want to help instructors, trainers, and their students (or clients) avoid injuries and set-backs. Enjoy!

For most of my life, I was a competitive combat athlete. I played contact football at age 9 and at age 13, had my first combat competition. There weren’t many junior wrestling leagues or martial arts schools around in 1975. I still spar (stand-up kickboxing) and roll (ground fighting in Jiu Jitsu), but not nearly as intensely or as often as I did from 1976 to 2011. However, I keep my skills sharp by doing a great deal of drilling and bag work. Scaling down from that level of training and giving up competition was–and still is–a difficult thing for me. But, my current situation allows me to focus my professional energies on other challenges: developing my students, growing my business, producing videos, writing books and furthering my education. I also get to spend a little more time with my family, coaching my little one and helping my older children reach their goals. This is something I cherish very much.

A couple of years ago, John Du Cane and I were talking. I told him how my kettlebell training and the other movement training I’ve learned since I started with the RKC has enabled me to move much more effectively and overcome the many injuries sustained during a lifetime of contact activities. The many years of football, wrestling and combat sports training and competition took their toll on my body, but I still workout virtually every day. I’m only able to do this is because of my kettlebell and bodyweight training regimen. John said that I should write a blog post and list all of the injuries. I agreed, and while some of the injuries haven’t had any effect on my ability to train, I’ll furnish the list of the most significant. I’ll also put forth the movements that have helped me the most.

Here’s my “Body of Work”

I won’t bore you with all the times that I’ve cracked a toe or broken a finger. I’ve had so many jams, sprains, minor dislocations, and stitches that I can’t remember them all. Many times, I’d simply pop my finger, toe–and once even my knee–back in place, throw on some tape and go back to training or back in the fight. At 17, I broke my thumb in two places while wrestling in the NJ State Freestyle Championships. But I taped it up, finished that match and wrestled in the finals. In my mind, that was “just another day at the office”.

So, we’ll start from the top…

Head:

I have had four diagnosed concussions, and several minor ones that I just shook off and either went back on the field, got back on the mat or went out for the next round. Since most of them occurred in the 70’s and 80’s, there was no real treatment, and not much time off. I took a week off when I had my worst concussion, but my eye was also swollen shut at the time and I had 17 stitches in my head and 5 more in my arm. I wasn’t going to be doing much for a few weeks anyway.

I also had my nose broken four times and had it repaired twice. This has had an adverse effect on breathing while training. At one point, one nostril was fully closed and the other operating at 50%. It was difficult not to be a “mouth breather” at that point. Getting enough oxygen into my lungs was tough for a while until my second nose operation. I still use saline spray (Xlear with xylitol) and a nasal inhaler (Oblas with menthol, and oils of peppermint, cajeput, eucalyptol) several times a day. Incidentally, this practice has also helped me avoid many colds and sinus infections. I haven’t had or needed antibiotics in years, which has further bolstered my immune system.

philrossarms

Neck:

I’ve had three memorable injuries to my neck and have experienced countless “burners” during competition or fight training. For those of you who don’t know what a “burner” or “stinger” is, it’s when your neck (or head) gets twisted, jammed or otherwise forced into a compromising position, usually very quickly and a “hot”, “shocking” or “burning” sensation runs from your neck down your arm. Generally, you experience a “flash of light” in your eyes, pain, and temporary lose the use of your arm. I’ve had this happen more than once in actual combat and had to just deal with it. I’ve experienced so many of these in training and competition that I can’t even try to remember how many times it has happened.

One of my major neck injuries occurred in a football game, and another during a wrestling match. But, the most notable injury required surgery on four levels of my neck. This injury occurred during fight training at the end of 2011, but the situation was acerbated from years of abuse. The MRI revealed two herniated and five bulging discs in my neck, spinal stenosis in many of my foramen, and an osteophyte on the inside of my spinal canal. This caused an edema (bruising/scarring) on my spinal cord, resulting in a permanent spinal cord injury. Four levels of my vertebra had their foramen removed, “windows” were put in the vertebra, and the osteophyte was removed. But, the damage had already been done.

I started my rehabilitation a little less than two weeks after the operation. For the first week, I could only do planks. I progressed to plank pull-ups (Aussie pull-ups) and incline push-ups for sets of five reps. Within five months, I was able to perform most of my movements again, and began to film The Kettlebell Workout Library. Prior to my operation, I was unable to press a 10kg kettlebell overhead. After only four months of training I was able to press a 20kg kettlebell bottoms-up. I attribute my speedy recovery to my strength and conditioning practice both prior to the operation and the RKC methodology employed afterward.

Shoulders:

I have a torn labrum (slap tear) in my right shoulder. Prior to 2006, it used to slide out on a regular basis. At that time, I had just gotten into kettlebell training–my first set of kettlebells was delivered in December 2005. I hadn’t quite developed the ability to engage my lats and pack my shoulders properly at this point. In June of 2006, I was set to shoot 3 DVDs: Fit 2 Fight, Combat Ready and Let’s Sweat. Five days before the shoot, my shoulder popped out–and stayed out. I drove myself to the hospital and they couldn’t get it to stay in. The next day, I got an ART (Active Release Technique) treatment from Dr. Michael Dworkin and my shoulder slid back into place. At first, I rehabbed it with swings while only focusing on packing my shoulders and engaging my lats. My shoulder hasn’t slid out in over 10 years!  Not only was I able to complete shooting the videos, but the new strength permitted me to get back to live grappling. I was also able to successfully compete through 2010 in submission fighting. Kettlebell training changed my life and extended my competitive career to span four decades. Very cool!

Elbows:

I’ve had an ongoing battle with my elbows. Back in the day, I used to spend endless hours pounding on the Makawara affixed to the concrete wall in my garage. As a fighter in my early twenties, I didn’t consider the long term repercussions of sending force into an object that could not give way. I just wanted to toughen my hands and hit hard. By hitting the wall-mounted striking surface, all the force that I put into the punches came back at me. All of the years spent fighting, sparring, grappling, and getting armbars finally caught up to me in 2005. I was doing heavy cable curls and the next day my forearms, particularly my brachial radiali were screaming in pain. I could barely turn a door knob, walk my dog, shovel snow off of my driveway or even start my car without an excruciating pain shooting through my arm. It was so bad that one day in 2005, I was training with Frank Shamrock and I couldn’t move my arm at all. He said, “Bro, I’d get that taken care of ASAP”. Good advice. He told me about ART and that’s how I found Dr. Mike Dworkin (the guy who fixed my shoulder).

Kettlebell training taxes your grip. Doing pull-ups and hanging abs wreaks havoc on your grip and elbows. Not to mention BJJ (Brazilian Jiu Jitsu), grappling, kickboxing and weapons training. All of the activities I love were adding to and were the root cause of my elbow pain. I tried all of the standard and non-standard treatments. Here’s what didn’t work: cortisone injections, acupuncture, prescription and a myriad of useless bands, straps and sleeves. Don’t waste your time or money. Here’s what worked: ART and Graston Technique, dry needling, oblique activation and a sound stretching regimen. I leveraged my relationships with the many professionals that I met through the RKC and put together a stretching routine for my forearms/elbows.

These are the best exercises I have found to maintain elbow and forearm health:

This first exercise is a stretch. I place my palm, fingers down, against the wall and keep my arm straight while pressing against the wall for 30 to 60 seconds. Now, I also do this stretch against a suspended, supported horizontal bar for a greater range of motion.

Back of the wrist push-ups: start on your knees if necessary, turn your hands inward and make sure that your arms are completely straight. After you become more advanced, ball your fists and press your knuckles together as you press up to full extension.

Handstands, wall handstands, crow stands, and toad stools: these movements build strength in the shoulders, arms, and core. More importantly, they de-load the the forearms. Practice these strength movements with your hands completely open and gripping the floor will do wonders to counterbalance the effects of a great deal of clenched-fist work.

For the last exercise, stand tall, pack your shoulders, and keep your neck, shoulder and arm in the same vertical plane. Grasp a small kettlebell, nothing heavier than 16kg, with your thumb facing forward. Rotate your palm so it faces forward, then bring your opposite ear to your shoulder. Be sure to maintain the same plane. For example, if you have the kettlebell in your left hand, bring your right ear toward your right shoulder while keeping all your moving parts in the same plane.

Hands:

My hands are crucial to my work, activities and life. I’ve had many fractures, jams, sprains and dislocations. Strong hands are critical. There was a time when one of my hands was so weak that I couldn’t even military press a 10kg (22lb) kettlebell. This is coming from guy who had to strict press the Bulldog (44kg – 97lbs) to attain my RKC Level-II! Yes, I was a little down.

The main exercises that helped me regain my strength are: single kettlebell deadlifts, kettlebell wrist twists, pitcher curls, bottoms-up presses, bottoms-up carries, farmers walks, Neuro-Grip push-ups and kettlebell snatches.

Single kettlebell deadlifts: keep your shoulders and hips in prefect alignment, pack your shoulders, engage your lats, grasp the kettlebell handle firmly, and lift. It’s important not to “dip” your shoulder or twist your hips. I am now up to using a 150 pound kettlebell for sets of five reps.

Kettlebell wrist twists: lay the back of your hand against the floor as you grab the kettlebell by the handle. Twist the kettlebell back and forth as you “kiss” the ground with the bell. Repeat for 5 to 10 repetitions.

Pitcher curls: grasp one or two kettlebells by the handle(s) and start with them at your thighs. Maintain a straight back with your arms held at your sides. Keep your elbows in the same position, move the kettlebell(s) upward to the bottoms up position. Repeat the movement for 5 to 10 repetitions.

Bottoms-up press: this movement is the most effective pressing motion to engage your lats and improve your overall overhead press, and it’s incredible for grip development. On a good day, I can do it with a 28kg kettlebell, but I can invariably perform this movement with a 24kg kettlebell, even on my worst day.

Bottoms-up carries: this exercise forces the recruitment of additional stabilizers, not only in the forearms, but in the whole body, and aids in discovering new neural pathways for the hands. Since several muscles in my hand not longer had a signal coming form my brain, I had to find new pathways and develop additional strength in other, previously ancillary muscles and stabilizers. This movement also creates greater muscular endurance.

Farmer’s walks: grip strength development is one of the many benefits of the farmer’s walk. I will typically do 4 to 6 minutes of farmer’s walks as the last part of my workout–as a finisher. In contrast, I generally perform the bottoms-up carries in the beginning of the session.

Neuro-Grip push-ups: I have to thank my buddy Jon Bruney for inventing this device and bringing it to Dragon Door. I love this device and use it a great deal! Grip strength, wrist strength, balance, and core recruitment are developed to such a high level with this little tool. When I first got them in, I could only do about 20 repetitions. Fast forward a year later, my PR is 57 on two hands and 5 with the one armed version. My best is two in a row on my damaged (right) side. I recommend that everyone get Neuro-Grips.

Snatches: snatches tax the grip. Even if you pop the kettlebell in your hand from palm to fingers on the downward movement, spear your hand at the top and rotate your thumb inward at the bottom. The grip will be the first thing that goes, check out people’s hands after doing their first RKC Snatch Test or after executing the V02 protocol, if you have any doubt.

There are a few other practices I employ. I use a thumbless grip whenever possible, and I focus on squeezing my pinky when I’m doing grinds with my full grip. These two variations have helped me avoid recurring elbow problems. The thumbless grip forces you to use your lats more.

There are many other exercises: hanging from a pull-up bar, rows, bottoms-up cleans. I’m not back up to pressing the 44kg yet, but I can get the 40 up on a good day and recently did a get-up with the 44kg. So four and 1/2 years after my surgery, I continue to improve!

Strength and Honor!

Coach Phil

Stay tuned for Part 2!

****

Master RKC Phil Ross is the creator of many strength and conditioning programs, including The Kettlebell Workout Library. Visit www.philross.com to learn about his programs, classes, and workshops. Subscribe to his YouTube channel for more workout and exercise info.

Filed Under: Kettlebell Training, Tutorial Tagged With: kettlebell training, Master RKC Phil Ross, mobility, phil ross, training around injuries, wellness

How to Keep Training When Life Gets in the Way

July 6, 2016 By Phil Ross 4 Comments


Phil Ross Master RKC One Hand Handstand

Other than the excuse of “I don’t have the money to train”, the other top excuse for not exercising is “I don’t have time”. The money issue is usually more a question of priorities. At my gym, it costs about five dollars a day to join my classes. That’s not much when it seems like many people spend $3 to $5 on their morning coffee, $10-15 on lunch and waste even more on other frivolous expenditures. If it still isn’t in the budget, people can always work out at home with books like Convict Conditioning, Survival Strong, or Master the Kettlebell for a small one-time investment. But, budgeting to join a class could be as easy as packing your lunch and making your own coffee. Where there’s a will, there’s a way. I’ve been almost penniless—twice—and never stopped training. Excuses are like armpits, everyone has them and they all stink! But, my focus for this post isn’t savings, it’s time allocation.

“No time, no time, no time…” That’s no excuse. Make time! It doesn’t take much. Pick an activity and do it for one hour, three times a week. Do something else for 20 to 30 minutes a day on your “off days”. If you still can’t manage one hour, three times a week, start by doing this little workout to get your juices flowing—all you need is 30 minutes, a floor and a $10 jump rope:

The goal is 1000 jump rope skips (200 per round for 5 sets), 100 push-ups (25 per round for 4 sets) and 120 abdominals (30 per round for 4 sets). Here’s the order: jump rope, push-ups, abs, jump rope, push-ups, abs, jump rope, push-ups, abs, jump rope, push-ups, abs, jump rope. End the workout with planks, bridges and stretching.

With kettlebells, you can do a 12 or 20 minute Tabata interval sequence. Pick 3 to 5 exercises, and set your interval timer for 20 seconds of work/10 seconds of rest and hit it! Your heart rate will rise and you’ll be sweating in no time! For example, you could pick three exercises like double kettlebell swings, double kettlebell front squats and double kettlebell presses. If you pick five exercises you might add double kettlebell rows and cleans. There are endless combinations. Pick a few that work well together. A bodyweight exercise only version could be burpees, push-ups and abs. End the workout with bridges and stretch out. There are endless possibilities.

Here’s a real life example of how I kept training in a very busy time…

It was crunch time. I had less than three weeks before the photo shoot for my upcoming book with Marty Gallagher, Ferocious Fitness. I needed to be in peak condition, so missing my training was out of the question. My training had been going according to schedule, but then life happened—as it often does—when you own a business, are a parent, a spouse, have older parents, and have dogs, too.

Right before noon, I got a call from my six year old daughter’s school. She was sick and needed to come home. Since my wife was at her job 40 miles away from home, I also needed to take my daughter to the doctor. I told my blue belts what to cover in our noon Brazilian Jiu Jitsu class, and I was out the door.

The first available doctor’s appointment was 2PM, and it was already 12:22 by the time I picked up my little one. After I situated her on the couch at home, I had 1 hour and 38 minutes to workout, eat, shower and get her to the doctor. Game on!

I went into the garage and hit it. I started with the 5 Geometric Bando forms (Point, Square, Cross, T and the Line), three times each. Then I did a nonstop circuit with Neuro-Grip push-ups and kettlebells. I did four sets of the Neuro-Grip push-ups and three sets of the other exercises:

  • 25 Neuro-Grip push-ups
  • 10 hand to hand kettlebell swings
  • Table top push-downs, 10 seconds, 6 reps
  • Single kettlebell front squats, 5 reps each side
  • WOD-QB roller: 5 seconds out and back, 5 reps to the center and each side
  • Single kettlebell high pulls, 8 each side
  • 4 way neck, 10 seconds dynamic tension in each direction
  • Single kettlebell rows, 8 each side

I ended the workout with 5 sets of uneven kettlebell shrugs (20 reps per set). 
Since I didn’t have time for a “real” lunch, I made a shake with a banana, a splash of OJ, water, a tablespoon of peanut butter, and egg white protein powder—then chugged it. I took the next 7 minutes to shower, get dressed and get in the car. (I’m glad I’m bald at times like this!) At 1:45PM we were off to the doctor’s office, and made it on time. It even worked out that we were able to pick up her prescription, and drop her off at home with the sitter by 3:15PM. I had plenty of time to teach my 4PM kettlebell class, and since my wife got home from work early, I was able to teach my classes through 9PM.

I could have easily bypassed the workout and no one would have thought less of me—except for me! My point is that these scenarios happen fairly often. A sick child, a parent who needs help, a dog eating the carpet, network problems at the studio… Life happens, but if you roll with the punches, you can still fit in your workout. You can do it!

Strength and Honor,

Coach Phil

****

Master RKC Phil Ross is the creator of many strength and conditioning programs, including The Kettlebell Workout Library DVD set. Visit www.philross.com to learn about his programs, classes, and workshops. Subscribe to his YouTube channel for more workout and exercise info.

Filed Under: Kettlebell Training, Motivation Tagged With: bodyweight workout, calisthenics, exercise, how to find time to workout, kettlebell workout, phil ross, time crunch workout, time-crunched, workout, workouts

How to Turbo Charge Your Big Six (Part 2)

November 25, 2015 By Phil Ross 3 Comments

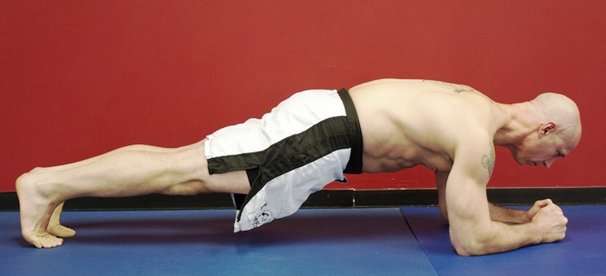
Master RKC Phil Ross RKC Plank

To get the full effect of these routines it’s important that you’ve read the first part of this series. If you haven’t, please consult my previous blog post: How to Turbo Charge Your Big Six (Part 1).

Now, we will continue our heavy load volume training with the next two workouts. As explained in Part 1, although the movements are relatively basic, these workouts should only be attempted by experienced kettlebell lifters. There is a great deal of volume involved and one must possess the strength, muscular endurance and technical skill to complete the workouts as designed.

Workout #3: Press Pyramid, Row Ladder and Cleans

Pick a bodyweight warm-up, then perform 2 sets of the following:

  • Armbar
  • Lying side press, 10 each side
  • Kettlebell pullover, 10 reps

Press Pyramid:
Strategically plan out which kettlebells you will be using. Again, I start with the RKC Snatch Test sized kettlebell. Do 5 reps with the first kettlebell on each side, then go up in weight and do 4 reps, increase and do 3 reps, go up again in kettlebell size and do 2 reps. When you get to your heaviest chosen weight, perform one rep on each side. Now we go back down the pyramid, but not all the way. Once you get to kettlebell # 3, perform 3 reps on each side and stay at this weight for the 4 rep and the 5 rep sets. If you are not able to increase the weight each set, then simply stay at the highest weight you can do and simply decrease the reps. If you want to make your pressing pyramid more challenging, do the “bottoms-up” version of the press.

Row Ladder:
These static kettlebell rows are a double kettlebell exercise. To understand the importance of stability in this exercise, sssume the bent over kettlebell row position, contract your lats and pack your shoulders. If the kettlebells touch the ground, your position is not stable.

Your palms are facing forward while you are in the racked position. NEVER begin this exercise from the bent over position, start by grasping the bells, standing straight up, then lowering yourself into the 10 & 4 position (head at 10 o’clock and tail at 4). Employ a 180 degree rotation as you allow one kettlebell to descend so that it is in front of your knee, while keeping the other kettlebell racked. Bring the kettlebell back, pause, then repeat this on the other side. Envision pulling your chest through the kettlebells to help counter the temptation to be standing more upright. The reps are 1, 1, 2, 2, 3, 3, 4, 4, & 5, 5. Repeat this series 2 more times.

Bottom-Up Clean and Hold:
During this exercise we will alternate between the ballistic clean and the full body tension of the hold. You must use tension through your abdomen, trunk. lats, glutes, pecs and legs to maintain this position with a heavy kettlebell. We will perform 5 reps on each side for 5 sets. There will be a 3 second hold at the bottoms up racked position. Clean the bell, beginning with your thumb facing forward, especially if you are using a heavy bell. This is virtually the only exercise that I recommend performing the backswing between your legs in this fashion. It’s difficult to control a large kettlebell while twisting it into a secure bottoms-up position. It’s far better to take a straight line approach.

Cool down and you’re done. Be sure to de-load your forearms during your cool down, your grip will get very taxed during this session.

MasterRKCPhilRossKettlebellSnatch

Workout #4: Snatch Pyramid, Squat Ladder and Planks

Choose from one of the aforementioned warm up routines from Part #1 and then you are good to go!

Snatch Pyramid:
Take your RKC Snatch Test sized kettlebell and begin. The idea is to move through the routine without resting between the sets. Perform these reps in succession on each hand. 1, 1, 2, 2, 3, 3, 4, 4, 5, 5, 6, 6, 7, 7, 8, 8, 9, 9, 10, 10. And then back down – 9, 9, 8, 8, 7, 7, 6, 6, 5, 5, 4, 4, 3, 3, 2, 2, 1 & 1. Shake your arms loose and stretch out your forearms.

Squat Ladder:
5 reps each side, 10 sets. As with most of the other exercises, we begin with our snatch test size kettlebell and increase the weight each set, if you can. If not, stick with the heaviest possible kettlebell you can manage and complete the remainder of the sets with that particular size. We do not travel back down the ladder, we end with the highest weight that we are able to use for 5 repetitions on each side.

Planks:
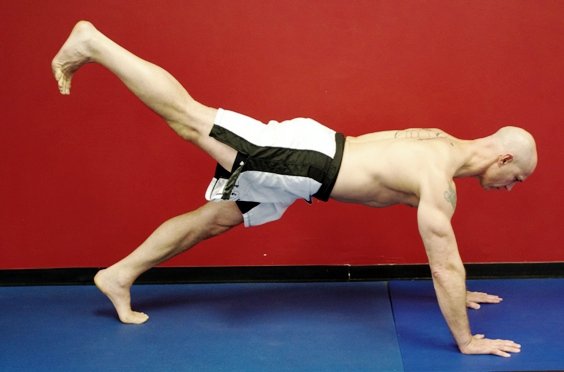
I call this “Just Plank Fun.” If you have a training partner, switch off and on, holding each other’s feet up in the tall plank and then release one foot. You may also pick one hand off of the ground or if you are adventurous, have one foot in the air and pull the adjacent hand off of the ground, while keeping your hips and shoulders in the same plane. If you are alone, you may use the wall to press your feet against and remove one foot and then switch. You may also remove one hand from the floor as well.

For less conditioned students, plank practice is always beneficial. RKC-style planks (on your elbows), power planks, tall planks or side planks may all be used to finish up the training session. Again, this depends on your level of expertise and fitness.

PhilRossRaised_Plank

Workout #5 Fun Friday: Toss, Sprint, Push-up, Sprint, Toss, Abs & Repeat

On Fridays, I like to have some fun and mix up my workouts. Living in the Northeast, training a great deal of the time outside is not very practical. So during the warmer months, I like to get into nature and enjoy. On a recent Friday, I did the following and I really got into the zone – it was great! I felt like the Energizer Bunny, because I just kept going and going. Check out this workout and have some fun!

First, I grabbed a 20kg kettlebell from the garage and farmer carried it through the woods behind my house and to an open field. I had done a 1/2 hour of bodyweight exercise and an hour of No-Gi Jiu Jitsu a few hours before, so I didn’t need to do a complete warm-up. If your workout wasn’t preceded by what I did, I would suggest a thorough 15 minute warm-up including hip openers and hamstring stretching.

After I got to the field, I kicked off my flip flops, did a light warm up. I jogged to the 50 yard mark and set my towel down. I jogged back and did some cossacks and hamstring stretches. Then I got to work…

Here was the routine:

  • One kettlebell toss: Either straight out or overhead.
  • 50 yard sprint (to the towel)
  • 15 Push-ups
  • 50 yard sprint (back to the kettlebell)
  • One kettlebell toss
  • 50 yard sprint (to the towel)
  • 20 abdominals
  • 50 yard sprint (back to the kettlebell)

I repeated this for a total of 40 sprints which also yielded 20 kettlebell tosses, 150 push-ups and 200 abdominals. I was sweating and PUMPED! There’s not a great deal of thinking involved, so you can allow yourself to “get into the zone”.

I cooled down and farmer’s walked back home. I did have to change hands once on the way back to my house as I went through the woods.

There you have it, five workouts, four that reinforce the basic kettlebell movements and one that’s a total burner to round things out–all accomplished while providing a challenging set of sessions. Put these routines into your training cycles and enjoy improvement with all of your movements!

Enjoy!

Coach Phil Ross


****

For more information on Master RKC, 8th Degree Black Belt, and Bodyweight Specialist Phil Ross’s strength and conditioning programs, videos (including The Kettlebell Workout Library), and workshops, please visit www.philross.com.

Filed Under: Kettlebell Training, Workout of the Week Tagged With: big six, kettlebell training, phil ross, Turbo Charge Your Big Six Series, tutorial, workout

How to Turbo Charge Your Big Six

September 23, 2015 By Phil Ross 4 Comments

Master RKC Phil Ross Kettlebell Split Squat

There are so many workouts, so many movements, and so many choices… So, what’s the best way to train? Variety is the spice of life, but is it necessary for achieving optimal fitness levels? As humans, we tend to get bored, so we are on a continuous quest for something different, something better. But on the other hand, we are also creatures of habit. We tend to go to the same restaurants, buy the same type of car or get the same breed of dog. We like a certain level of comfort and familiarity. Yet, we still yearn for the exotic, the different. This is part of the Human Condition. What does this have to do with training? Everything. 

We can achieve both with our training and quench the desire for both the exotic and the basic. I wanted to shock my system (and my students’) with the basics. Most people might think, “WHAT? With the basics? To shock our bodies, we need variety! We need to keep it off-guard! I’ve been doing kettlebells for years, show me some new moves!” Au contraire my friends, try the workouts below and treat yourself to some very basic movements performed in a method that will blow you away!

Even though the movements on the whole are very basic, the delivery and the proper execution of the sets require a great deal of skill. Due to the density and intensity required, these workouts are designed for a more experienced Girevik.

You have to be prepared to challenge yourself weight-wise as well. Your snatch test size kettlebell or heavier is required as a starting point for the workouts. Get set to challenge yourself with these basic routines… or are they really so basic???

We start all of our classes by jumping rope for 3 to 5 minutes. Then we perform a myriad of mobility, stretching and tension movements with the bo staff (dowel). After that, we perform some freehand stretching, crawling patterns or primal movements. But even then we are still not ready to put some iron in our hands.

Instead, we will generally perform three sets of three different bodyweight exercises. Some examples would be as follows:

  1. Scapular push-ups (20 reps), thoracic bridge (5 each side) & deck squats (10).
  2. Deep squats (20), pull-ups (80%), planks (various)
  3. Handstands or crow stands (1 minute), Table top bridges (10), Skewed squats (10 each side)
  4. 10 Ninja push-ups (push-up, table top bridge and frog squat)

When starting the cycle, I begin with the overall basics tested in the RKC Level 1. Then I move to the next workout and so on. Do them in the order prescribed for the best results.

Workout 1: RKC Basics:

Armbar, Lying side press and kettlebell pullover, 2 sets, 10 reps of each (each side, when applicable).

Now we perform the RKC Basics Complex. Do anywhere from 3 to 5 sets.

Phil Ross BackswingPerform these as one big complex, moving from one exercise to the next without rest. Take a one minute rest period between the rotations. This is a great method for prepping for your RKC Level 1, a re-certification, and it is also a good way to prepare for part of your RKC-2.
RKC Basics Complex: Use RKC Snatch Test sized kettlebells or larger

  • 1 Heavy get-up each side
  • 10 Double kettlebell swings
  • 5 Double kettlebell cleans
  • 5 Double kettlebell presses
  • 5 Double kettlebell front squats
  • 10 Snatches each side

Once you are done (with your 3 to 5 sets), do 3 sets of the following:

10 reps of single kettlebell split squats, followed by 10 reps of single kettlebell rows. Finish one side and then do the other. Rest for one minute between sets.

Cool down and stretch

Workout #2: TGU Pyramid and Swing Ladder

Once you have completed one of the warm-up circuits, preferably one including arm bars, we need to make certain that our shoulders and hips are prepped for the task ahead.

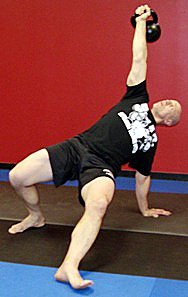
Phil Ross Get UpGet-Up Pyramid. Begin with your snatch test size kettlebell. Perform 5 reps on each side. Move up to the next sized kettlebell and do 4 reps on each side. Repeat this with 3 reps at with a heavier kettlebell, 2 reps with the next heavier kettlebell and then one rep with the heaviest kettlebell you are able to use. Once you’ve gone up, go down repeating the sequence in reverse. This will yield 60 repetitions. If you are not able to increase on every set, use good judgment and only use a kettlebell that you are able to safely perform the get-ups with proper form.
Next, we will perform a swing ladder. 5 reps of each, for 10 sets. Start with the snatch test sized kettlebell and move up each set while maintaining the same amount of repetitions.

I happen to have a plethora of kettlebells (well in excess of 100), so it’s easy for my students and I to change kettlebell sizes. Depending on your circumstances, you may have to improvise by doubling up kettlebells (double kettlebell swings, for example) or doing two sets at the same weight before moving on.

We will now work on our push-ups to round off the session. We do one set of standard push-ups, generally between 20 and 50 reps, depending upon your fitness level. Follow this up with 2 sets of plyometric push-ups, anywhere from 10 to 20 reps.

Cool down with some restorative stretching and you’re done.

Stay tuned for Part 2 of the Turbo Charged Series…..

Strength & Honor,
Coach Phil Ross

****

For more information on Master RKC, 8th Degree Black Belt, and Bodyweight Specialist Phil Ross’s strength and conditioning programs, videos (including The Kettlebell Workout Library), and workshops, please visit www.philross.com.

Filed Under: Kettlebell Training, Workout of the Week Tagged With: double kettlebell workout, Kettlebell, kettlebell workout, kettlebells, phil ross, RKC 6, Turbo Charge Your Big Six Series

Kettlebell Training, the Secret to an All American Distance Runner’s Success

September 9, 2015 By Phil Ross 3 Comments

Carleen Jeffers Running Track

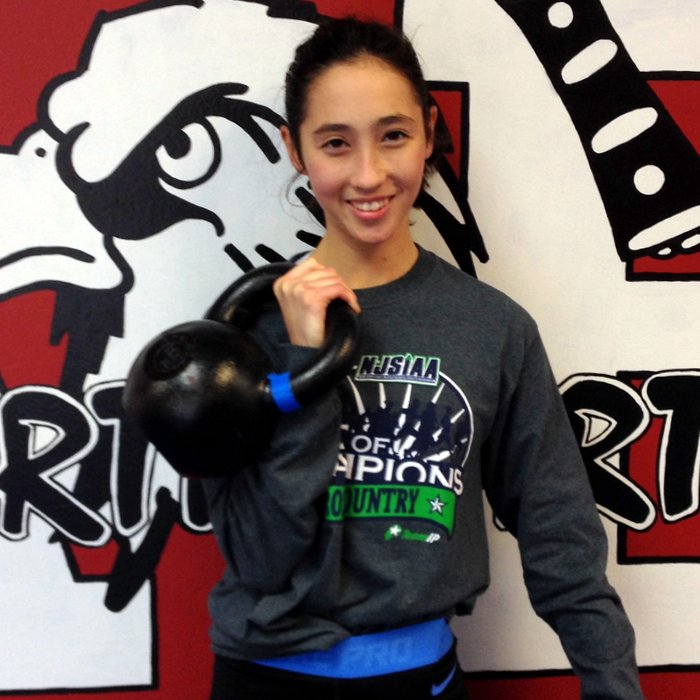
Over the past 22 months, Carleen Jeffers has amassed an incredible amount of championships—and has set distance running high school and county records that were previously unbroken for decades. Brown University bound, Jeffers didn’t even consider long distance running until the summer of 2013. But in the fall of that same year, she earned the honor of First Team All County for Cross Country in the incredibly competitive county of Bergen, NJ—population, one million. During her first season, she went from not running track to First Team All County! Some top-shelf athletes train their whole lives and never achieve that level of success in our county. Prior to running, Carleen played softball, trained in the martial arts for many years, and began swinging kettlebells about a year before track.

Many distance runners don’t like the idea of resistance training, but they need strength! While bodybuilding routines or powerlifting will usually be counter-productive, kettlebells and bodyweight training can also provide relief from the repetitive movements of running. Tendons and ligaments will also become stronger which can prevent injuries and/or lessen their severity. Diaphragm strength also increases, and will supply the muscles with more oxygen. The body will process lactic acid more efficiently, allowing an athlete to have a stronger kick at the end of a race. Becoming stronger also has psychological advantages. Obviously, kettlebell and bodyweight training makes a lot of sense for runners.

Even during her highest mileage training of more than 60 miles a week, Carleen was able to maintain her muscle mass and avoid injury. While teammates suffered from stress fractures, shin splits and other common overuse injuries, her season was uninterrupted.

Carleen Jeffers With Kettlebell

She completed her senior year by placing 4th in the New Balance National High School track meet on June 19th, 2015, earning her High School All American status. Her performance of 16.58 in the 5K smashed both the former Bergen County and Ridgewood High School records and earned her Track Athlete of the Year for Northern New Jersey. That’s quite a few accomplishments for an athlete in a sport for only 22 months.

Carleen’s coach, Jacob C. Brown, of Ridgewood High School, is a coaching legend in the world of women’s track. He’s coached more champions and championship teams than virtually any other coach in the state of New Jersey. He advised her to keep training with kettlebells while she is in college—even if the college strength program doesn’t call for it. Coach Brown and I agree that that Carleen’s kettlebell training was the major differentiator in her success as a runner.

How did a 97 pound, 5’ 4” high school distance runner quickly achieve such a high level of success? Normally in track and field, athletes rarely improve from one contest to another, especially at higher levels of competition. The goal is to stay healthy while peaking for the States, Nationals or Worlds.

Carleen Jeffers Trail Running

Many runners—along with many in the general population—have rounded shoulders and poor thoracic mobility. And this situation is acerbated by the form these athletes adopt while running. Instead, they need to open up their chests to expand their lung capacity and increase blood flow.

The following are examples of Carleen’s training with kettlebells as a track athlete. We generally cycle our weekly training.

Warm-Up and Mobility:
Each session includes a warm up of jumping rope for 3-5 minutes, and a mobility sequence. The mobility portion includes six posterior chain and shoulder mobility exercises performed with a bo staff or dowel, armbars, thoracic bridges, deck squats or some other squat, hip opening movements, zombie rolls, and push-ups, to name a few. We also employed crawling movements along with quad and hamstring stretching.

Power Days:
Heavy lifting with sets of 5 to 10 reps. We have Power Days within three or more days before an event. If it’s a major event, we’ll leave a week between power sessions. These sessions include heavy swings, sumo squats, double kettlebell squats and heavy presses, bottoms-up presses, heavy get-ups, floor presses, heavy rows, kettlebell carries, and complexes. We also perform low rep plyometric versions of some of these movements.

Endurance Days:
Endurance days include chains with 30 to 40 reps, and weighted plyometrics of 10 to 20 reps per set. With kettlebells, we perform walking figure-8 lunges, walking swings, over-speed eccentric swings, ladders, and VO2Max snatch workouts. If we don’t do a VO2Max workout, we’ll end with “6 Minutes of Hell” or 5 minutes of kettlebell snatches (similar to part of the RKC Workshop testing requirements).

An example of a “6 Minutes of Hell” variation: Perform a clean, press, and a squat as a chain for one minute on one side, then change to the other side for the next minute. Repeat this for 6 minutes.

After an endurance day, we would make sure to have at least two days of rest before an event. Sometimes we might do an endurance day workout the day before an event, but with reduced weights, so the athletes would not be too sore to compete. However, we wouldn’t have an endurance day before a big meet.

PowerDure Days:
A good 40 to 50% of our weekly workouts are based on the PowerDure method. We perform the first half of the workout using mid-range power sets. We’ll do 3 to 4 sets of a mobility exercise along with an upper body push and pull, and lower body push and pull. 8 to 10 reps per set. Sometimes unilateral, other times bilateral.

In PowerDure, grinds are our primary focus. The second half of the session is dedicated to muscular endurance, while maintaining our bracing and the lock and pop of our ballistic movements. We focus on chains and circuits using workouts like our “Warrior’s Challenge”, “Scrambled Eggs” (see example below), and Tabatas. Heart rates are high and so is the sweat production! Afterwards, we cool down with mobility and flexibility training. I have a pool of several hundred workouts in the PowerDure category.

Bodyweight Days: These are performed once a week, especially close to the meets and sometimes the day before. We will either train with low reps (1 to 5) for strength or we will use timed circuits, moving from one exercise to the next while trying to hit 80% of our max reps. Generally, our bodyweight circuits are timed at 50 seconds on, 10 seconds off. We usually do 9 exercises for 5 rotations. During strength (low rep) days, we’ll challenge ourselves with the most difficult exercises. On bodyweight days, we always revert to regressions when the reps of the more difficult movements are no longer achievable. I find the bodyweight-only days round out the training since bodyweight exercises also improve balance and overall coordination.

Bergen County Track Stars 2014
Bergen County Track Stars

Example PowerDure workout with an intermediate variation of “Scrambled Eggs”

Our “Scrambled Eggs” circuit requires anywhere from 6 to 8 minutes to complete prior to the 1 minute rest between sets. There is no rest between the exercises, only one minute rest at the end of each set. This type of training prepares the body to deal with the lactic acid produced during sports or other strenuous activities.

Circuit 1: 2 sets

  • Two-hand kettlebell swings: 50 reps
  • Armbars: 10 each side
  • Side Press: 10 each side

Scrambled Eggs (1 kettlebell): 3 sets

  • Two-hand swings: 20 reps
  • Hand-to-hand swing: 10 reps each side
  • Snatches: 10 each side
  • High pulls: 10 each side
  • Swing squats: 10 reps
  • Waiter press: 5 each side
  • Single-leg deadlift: 5 reps each side
  • Bottoms-up press: 5 reps each side
  • One minute of rest


Strength and Honor!
Coach Phil

****

For more information on Master RKC Phil Ross’s strength and conditioning programs, videos (including The Kettlebell Workout Library), and workshops, please visit www.philross.com. Coach Jacob Brown’s website is available at jacobbrown.com. View Carleen Jeffers’ MileSplit profile.

Filed Under: Kettlebell Training, Workout of the Week Tagged With: Athletic Training, endurance athletes, fitness, Kettlebell, kettlebell workout, kettlebell workouts, phil ross, track and field, workout

Why I Run and How I Keep My Motivation

September 3, 2014 By Phil Ross 6 Comments

Master RKC Phil Ross Running
Technically, I’m on my one week vacation, but I had some thoughts coursing through my head as I was on a 4 mile jaunt this morning. For those of you who have been following my Dirty Dozen exercise blog posts, don’t worry, the installments for the final two movements, #11 The Kettlebell Snatch and #12 The Push-Up are forthcoming. They happen to be my two favorite exercises, so I’m really looking forward to getting the information out.

Why should I run? I do kettlebells, bodyweight and a significant amount of Martial Arts–do I really need to run? Can’t I simply move my bodyweight around, do a weight training circuit, swing some bells or maybe do a little yoga? Ever since the 1970’s I’ve observed a running regimen. I have many reasons not to, there are a vast amount of alternative cardio training methods that I could employ, but yet, I still run.

I run because I hate it.

That statement sounds silly on the onset, but there is a method to my madness. I hate to run, but I love the results and the euphoria when I am done. Years ago, when I was around 18 or so, my instructor and I were discussing running. Despite the fact that I was reasonably fast and had good form, I hated to run. He proceeded to explain to me that it was very important to do something that you hated to do, especially if you were a fighter. It was part of the sacrifice that forged the mettle of your soul. When you are fighting, a lot of things go through your head. You see, if you are in a tough bout and this guy has you in the corner and is pounding away on you, you start to think. You think about the miles that you ran, how much it hurt and how hard you pushed, all of the sacrifices you made and then you start firing back. You didn’t make all of those sacrifices and go through all of that pain to lose to this clown! NO WAY!

If people see me, they think that I have no issue keeping my weight down. WRONG. I can easily put on 10 pounds in one weekend. My grandfather on my mother’s side’s nickname was “The Whale”, my paternal grandfather had 7 strokes and 2 heart attacks and the third one finished him at the age of 72. My father passed away due to congestive heart failure at the ripe old age of 66. Walking around at 5’8” and being 285 lbs is not the best way to achieve a long, healthy life. I am of Italian-American Heritage and love to eat. Therefore, I’m in a constant battle. Running helps me win the life-long war. I want to do everything in my power to avoid the pitfall of succumbing to my natural genetic disposition. Look at it this way, if I want to eat something that is not super healthy, I think about how much I have to work to get rid of it, I then choose a healthier option. However, if I put in a good run and have some hard training sessions, I reward myself. I don’t really do “Cheat Days”, I prefer to partake in “Reward Meals”. It’s a good thing to reward yourself for the sacrifices that you make.

If you don’t make sacrifices, you don’t have discipline. If you have no discipline, you are soft. If you allow yourself to become soft, you will not have what it takes to deal with real adversity and emerge triumphant. Adding running to my training regimen is one of the easiest ways for me to keep my weight down.

Running clears my head. When I first start my run, the toughest part is to “get my feet to hit the floor”. Once I get out there, the rest is easy. Although runs can be difficult at times in the beginning, the first 1/2 mile of a run stinks. Everything hurts, I feel slow and tired. However, I push. Before you know it, I’m cranking away! I do a great deal of thinking when I’m running, but my clarity only comes after I’ve gotten into my zone. I come up with ideas, release frustration and get lost in my thoughts. I do not run with any music, I practice Zen Running. I count my breaths, give myself little goals like, “run to that telephone pole” or “make it to that corner.” By focusing on minor goals, the run does not seem as overwhelming. The task, like most, is better handled by conquering the smaller pieces. I am in-tune with my environment and I listen to sounds, pay attention to sights and am aware to what is happening in my body. Once I have this going for me, the rest of the run is awesome! I’m “In the Zone” and thoughts flow freely. Now I can begin to push my body. The blood fills my quads, my lungs burn and my breath becomes more labored as I pump my arms harder and pick up speed. Yeah, this is the fun part.

You never know when you’ll have to run. I’ve seen those shirts that say, “Running Promotes Cowardice.” Cute. What if you have to catch someone? You have to run then. I may have to run after someone or run to the aid of one of my family or friends. In the face of a catastrophic event you will need to exit the area in an expeditious manner. There are plenty of other occasions that will require you to get from Point A to Point B and quickly. So, you will need be able to run. As with any other skill, if you are not practiced at it, you will not be able to accomplish it. The mechanics of your stride will not be smooth nor will they be efficient.

Running is a basic human movement. As humans, we are supposed to be able to run. Human beings were designed as one of the world’s best long distance, warm weather runners as referenced in this article from Popular Mechanics. We are basically hairless, stand upright and have an endocrine system suited to producing sweat to keep our skin cool and dissipate heat. We can out run a horse or a deer. If you want to consider “Paleo”, we used to track our prey down relentlessly in prehistoric times. So if you have a body or training regimen that does not facilitate running, you are not doing what your body was designed to do.

Running is a very inexpensive activity, especially if you look at the ridiculous amount of money people spend on fitness gadgets, unused gym memberships and expensive machines that wind up collecting dust. Depending upon how much you run, you will need to buy a new pair of shoes once or twice a year. You can get a great pair of shoes for under $100.00. I run outside, so I don’t have to spend money on a treadmill. If I were meant to be a hamster, I’d live in a cage and have a penchant for seeds and grain. Running on a treadmill is not the same as road, beach or trail running. Get outside! Compare the costs of a good pair of running shoes to what a road bike costs–entry level competition grade road bikes are around $7,000.00! I know others who have bikes that cost more than my car. No offense directed toward my cyclist friends, but with three kids, two of which are in college, spending a years worth of tuition on a bicycle is not in the cards for me!

Running is time efficient. In about a half an hour, I can get a great run in. I don’t want you to think I’m picking on the cyclists again but how long does it take to get a meaningful bike ride in? To be fair to my cyclist buddies, let’s consider swimming. Unless you live in a warm weather zone or have an indoor pool, look at the time that it takes to get in the car, head to the pool, change, swim, shower and then drive either back home or head to work. It’s a great deal of time compared to throwing your shorts, t-shirt and running shoes on then heading out the door.

This blog is primarily dedicated to what I consider distance running. Generally, I don’t run less than three or more than five miles. Sprints and more often intervals, were a large part of my running training when I was competing. However, I don’t feel the need to do a lot of sprinting, because I do a great deal of other explosive training work and use my running as more of a restorative training session. Plus, I generally end my runs at a pretty good clip.

There are many more compelling reasons to run. The aforementioned are the main ones for me. I’m certain that you’ll come up with your own. Good luck with your roadwork. Running is one of the basic human movements, and should be worked into your training regimen.

Strength & Honor

Coach Phil

***

About Master RKC Phil Ross: Master RKC, 8th Degree Black Belt, Specialist in Bodyweight Strength, PCC and CK-FMS Certified. His name is synonymous with Martial Arts and Fitness. He is known as the area’s Kettlebell King and has successfully competed on the National Level in…  Read more here.

Filed Under: Tutorial Tagged With: balanced fitness, Cardio, Discipline, Distance Running, mental training, Motivation, phil ross, running, training regimen, Zen running

Dirty Dozen #9 The Get-up

April 2, 2014 By Phil Ross 1 Comment

Phil Ross Get UpThe next movement in our Dirty Dozen Line-up is #9, The Get Up. The Get Up is often referred to as the Turkish (TGU) or Low Sweep Get Up. Just the mention of the movement conjures up fear, apprehension and utter abhorrence in most people. I had the same attitude until I began to absolutely love this movement!

I recall when I first started training with Kettlebells, I only did the TGU’s (as we referred to them) enough to pass my tests and move on. After the 6 months or so upon passing my RKC 1, I started to notice that through my practice, my TGU’s were getting better. I also noticed that my shoulder was more stable and the weights of my other lifts were increasing! Much to the chagrin of my students, I started to completely embrace the Get Up.

I soon realized that I wasn’t just doing them to pass my next test, but to get the most that I could from the movement. I started to add different types of Get Ups to my training regiment. Bridge, Squat, Bottoms-up, No Hand and Dual Bell Get Ups to name a few.

Phil Ross Get UpI then began to incorporate Heavy Get Up training and worked on methods to imprint the movement into the muscle memory. Owning each segment of the movement became my focus. The Roll to Press, Sit-up to Elbow, Tall Sit, Side Press, Tall Kneel and the Standing Press. Each section of the Get Up needed to be owned. To imprint this I employed three basic approaches. The first was practicing a 5 second hold at each of the 6 specific positions of the Get Up.The second was to perform 5 repetitions at each position and the third was the 5 3 2 1 Method.

Training Method #1:
At each of the positions, hold the Kettlebell in the lock out for a 5 second count. Feel the position of your body and embrace the tension. Don’t simply do it to get it done and over with, though the temptation will be present. Focus on increasing your stability in each of the 6 positions on the way up as well as the way down.

Training Method #2:
This method always evokes moans and groans from my class. Well, that simply makes me grin and tell them how many sets to do. Execute 5 presses at each of the 6 positions. Change position with the Kettlebell in the full lock out, no resting in the Rack. Go up one side of your body, change hands at the top and do your Get Down on the opposite side with the same 5 press repetitions at each position. Repeat on the other side, but perform the ascent with the side that descended last time.

IMG_1885

Training Method #3:
I call this one the 5 3 2 1 Method. I use this for increasing my 1, 2 & 3 RM (Repetition Maximums). I will generally perform 3 to 5 sets of the aforementioned repetitions. Beginning with a lower weight and increasing to a higher one. Be very cautious when performing the doubles and singles, especially if you are in “uncharted waters” (a weight that you’ve never done previously). I noticed the most improvement when I employed this method last in the progression. It is essential to have complete stabilization and OWN each and every of the 6 positions to safely increase the weight of your Get Ups.

Well it’s now time to grab your Kettlebell and GET UP!


Strength & Honor

Coach Phil

***

About Master RKC Phil Ross: Master RKC, 8th Degree Black Belt, Specialist in Bodyweight Strength, PCC and CK-FMS Certified. His name is synonymous with Martial Arts and Fitness. He is known as the area’s Kettlebell King and has successfully competed on the National Level in…  Read more here.


Filed Under: Uncategorized Tagged With: coach, dirty, dozen, dragon door, get up, Kettlebell, kettlebells, master rkc, phil, phil ross

Dirty Dozen Move # 8: The Handstand

January 29, 2014 By Phil Ross 4 Comments

Phil_Ross_handstand_smallThe Handstand, I LOVE IT! It’s such a fun exercise to do. I will tell you though, that it was very challenging for me to accomplish. I’m not a gymnast, I’m a 189 lb, 51 year old man who hadn’t done much inverted training since walking on my hands in college back in the ’80’s (and banging out 20 reps of Handstand Push-ups after wrestling practice). Throw in a few injuries, especially the most recent one in 2011 and the thought of me being upside-down and unsupported was an unlikely proposition. I then took the first ever PCC in June of 2013 and I was determined to be able to perform a Free Standing Handstand. During the PCC, I accomplished a few personal bests, but I was unable to hit the Free Standing Handstand for more than a few unbalanced seconds. I didn’t “own” the movement. So, I laid out a plan and executed it. I referenced the PCC manual, took the advice the Kavadlo Brothers had given me at the certification and some other tips from Max Shank, and I was off and “standing.”

After about 2 months of dedicated training with the “Grease the Grove” method, I was able to hit a Handstand with relative ease and hold it. My best Handstand was a 29 second hold. I was even able to hit a few push-ups–3 was my best. Albeit, they are not full, touch my head to the ground push-ups, but I did break the 90 degree plane. I was even able to pull off a Handstand on top of two 24KG bells!

You may be asking yourself what is so great about the Handstand? For one, doing Handstands improves your pressing ability by reaffirming the proper alignment of your shoulders, neck arms, torso and legs. If you are not balanced, you will fall. If you have the proper alignment required for the Handstand, you’ll be conditioning your body to adopt the most efficient position for proper execution of the Kettlebell Press. Think about the alignment of your shoulder, arm, neck, torso, etc..for the Press and then look at the Handstand – IDENTICAL! Additionally, Free Standing Handstand and Wall Push-ups require and increase your strength dramatically without the use of weights! Imagine you are a 225 pound guy performing Handstand Push-ups, that’s a lot of beef being pushed around! Simply getting into the position and holding has incredible strength developing benefits.

Handstands are now part of my training regimen and I encourage all of my students to practice them as well. Even if a particular individual does not ever hit a perfect, Free Standing Handstand, SO WHAT? They are getting stronger and better conditioned throughout the process. Additionally, their pressing will get better, they will get stronger and their shoulders will be healthier. Plus, you never know; keep plugging away long enough and almost ANYTHING is possible. Please read on….

One of my female clients was a little reluctant to attempt the Handstand. She has four children and her shoulders needed strengthening. She was having issues with her core and her presses as well. She couldn’t even hold a Crow Stand for more than 3 seconds before taking a nose dive. Not a likely Handstand Candidate, right? WRONG! I first started her with the Crow Stand with several karate striking pads piled up to support her head while she developed the necessary tension to be able to hold herself up. Once she achieved 30 seconds, I’d remove a pad. By the end of the month, she was performing the Crow Stands–sans the pads!

We then moved to the wall. She had a fear of being inverted, so we needed to build her confidence with “Face the Wall” Handstands. After she got closer and closer and was able to hold the position for 30 seconds, I had her kick-up into the outward facing “Wall Handstand.” Using the 30 second time as an indicator to move to the next level, we began the “Free Standing Handstand” with me spotting her. This is where we are at four months later.

I really can’t tell you how long it will take another individual to progress, but she trains 3 to 4 days a week (sometimes 5) and she’s very motivated by health and strength. She is determined, dedicated and disciplined. Training is a priority. If you possess her attributes – There’s Nothing You Can’t Accomplish!

Strength & Honor,

Coach Phil Ross


***

About Master RKC Phil Ross: Master RKC, 8th Degree Black Belt, Specialist in Bodyweight Strength, PCC and CK-FMS Certified. His name is synonymous with Martial Arts and Fitness. He is known as the area’s Kettlebell King and has successfully competed on the National Level in…  Read more here.

Filed Under: Uncategorized Tagged With: athletic application, ballistic to static, clean, dirty dozen, handstand, Kettlebell, kettlebell king, phil ross

Dirty Dozen Move #7: The Kettlebell Clean

December 4, 2013 By Phil Ross Leave a Comment

dirty_dozen_number7_smallThe Kettlebell Clean is often overlooked as an essential exercise because it lacks the “sexiness” of the Swing and Snatch, the power of the Squat and Press and it does not stimulate the intrigue of the Turkish Get-up. However, couple your Swings with Cleans or perform a chain with a Swing, a Clean and a Snatch and you’ll have some great routines. Also, if you want to perform your Presses and Squats, how will you get your Kettlebells into the Racked position? You got it, The Kettlebell Clean.

In all of it’s simplicity, the Clean is more often performed incorrectly. This results in bruised wrists, strained biceps, elbows or forearms as well a faulty rack incapable of providing a stable starting point for your Press or Squat. Also, casting of the Kettlebell on the descent will place undue stress on the low back and possibly result in a face-plant!

Simply put, a Clean is nothing more than a Swing with your elbows pinned to your sides. There is no jerking up into the position, nor is there a “curling” of the bell into the rack (try to use that method to rack the Beast and let me know how many pieces you shred your bicep into). I have also found that teaching people how to Clean two kettlebells at once is easier. The students don’t have to be concerned with over rotating one hip and they are also psyched about using two Kettlebells at the same time. Once they have the idea that the Clean is identical to the swing at the start point, exhale and hip movement, the Clean becomes easier to perform. Pay particular attention to the breathing aspect. The breath of the Clean occurs at the exact point as your exhale while performing the Swing – at the top of the hip motion when your knee caps are drawn into your quads and your legs are locked. The sharp exhale does not occur when the Kettlebells are in the Rack, it happens slightly before. This simple tip will significantly reduce the amount of “smashing” that occurs on your wrists. At this point, the top of the Swing portion of the clean, you stop pulling and allow the Kettlebells to “float” into position. The float will occur only when your breath is timed correctly and you allow the bells to achieve the Rack position without using your arms to pull.

If you find that you are “curling” the bell during your Cleans, use a heavier bell. This will cure many issues because you will not be able to “curl” a heavier bell into position. Once your technique improves, you should be able to execute proper form of your Cleans with any sized bell. For one to attain mastery of the Clean, the technique should look identical, regardless of the size of the Kettlebell.

There are also several extremely beneficial variations of the Clean. Alternating Cleans provide an incredible core workout, Bottoms-up Clean and Hold are one of the best grip development exercises available. Have Cleans as part of any Chain or Complex for a transitory or additional movement to enhance the circuit.

The Kettlebell Clean is not only essential for transitions from one movement to another, but it is an incredible exercise for going from ballistic to static to ballistic again. The athletic application from the Clean is is beneficial for development of power for strikes, throws, synergy of upper and lower body movements, not to mention the incredible way it develops superior core strength.

Good luck with your Training!

Strength & Honor,

Coach Phil 

www.kettlebellking.com

***

About Master RKC Phil Ross: Master RKC, 8th Degree Black Belt, Specialist in Bodyweight Strength, PCC and CK-FMS Certified. His name is synonymous with Martial Arts and Fitness. He is known as the area’s Kettlebell King and has successfully competed on the National Level in…  Read more here.

Filed Under: Uncategorized Tagged With: athletic application, ballistic to static, clean, dirty dozen, Kettlebell, kettlebell king, phil ross

  • Page 1
  • Page 2
  • Go to Next Page »

Primary Sidebar

Featured Products

previous arrow
BOOK-RKCBookofSnC
HardStyleKettlebellChallegeDanJohn700
BookCoverMasterTheKettlebell1
RKCiconKettlebell512
KettlebellGoddessdv040
next arrow

Recent Posts

  • RKC Big Six Workout
  • The Kettlebell Swing & Low Back Pain
  • Key Kettlebell Exercises To Help You Create Better Balance
  • How to Most Effectively Use Kettlebells to Meet Your New Year Goals
  • 1 Exercise That Checks All The Boxes
FOLLOW US ON TWITTER!

Archives

Copyright © 2025

Dragon Door Publications / The author(s) and publisher of this material are not responsible in any manner whatsoever for any injury that may occur through following the instructions or opinions contained in this material. The activities, physical and otherwise, described herein for informational purposes only, may be too strenuous or dangerous for some people, and the reader(s) should consult a physician before engaging in them.