• Skip to main content
  • Skip to primary sidebar
  • Home
  • Contributors
    • Matt Beecroft, Master RKC
    • Martijn Bos, Master RKC
    • Andrea Du Cane, Master RKC
    • Angelo Gala, Master RKC
    • Chris Holder, Master RKC
    • Steve Holiner, Master RKC
    • Dan John, Master RKC
    • Mike Krivka, Master RKC
    • Thomas Phillips, Master RKC
    • Robert Rimoczi, Master RKC
    • Phil Ross, Master RKC
    • Max Shank, Master RKC
  • Workshops
    • HKC Workshops
    • RKC Workshops
    • RKC-II Workshops
  • Find an RKC Instructor
  • Resources
    • Articles
    • Forums
    • Kettlebells
    • Products
  • Blogs
    • PCC Blog
    • Strong Medicine Blog
  • Archives

RKC School of Strength

Official blog of the RKC

tutorial

Hacks for an Iron Clad Goblet Squat

December 2, 2015 By Mike Krivka 11 Comments

MikeKrivkaGobletSquatLeadPhoto

What is a hack? Hacks are shortcuts or enhancements and can be technical or lifestyle based. Think of hacks as inside tips to get the good stuff—the stuff that works fast and gets you to the tasty, rich and gooey center quicker! In this case, my goal is to provide you with hacks that will allow you how to get the most out of the kettlebell goblet squat.

What’s the Big Deal?

The goblet squat lies squarely within the realm of “simple but not easy”. But, don’t confuse the goblet squat with something that is so “simple” to master that it’s not worth your time. On the contrary—it is supremely important for all demographics, age groups and athletic abilities. Because it is so “simple”, it is easy to underestimate what needs to be in place for it to be maximally effective. Anyone looking at the goblet squat would immediately think “I can do that” …and they can. Once they get the feel for what the goblet squat really is, then they can then learn the specifics that take the goblet squat from simple to sublime.

By the way, if you don’t grasp the importance of the goblet squat yet, consider this: the goblet squat is part of both the HKC (Hardstyle Kettlebell Certification) and the RKC (Russian Kettlebell Certification). It is also one of the techniques Master RKC Dan John recommends to any and all of the athletes he trains—that should give you some indication of its value and application.

Hacking Away at the Goblet Squat

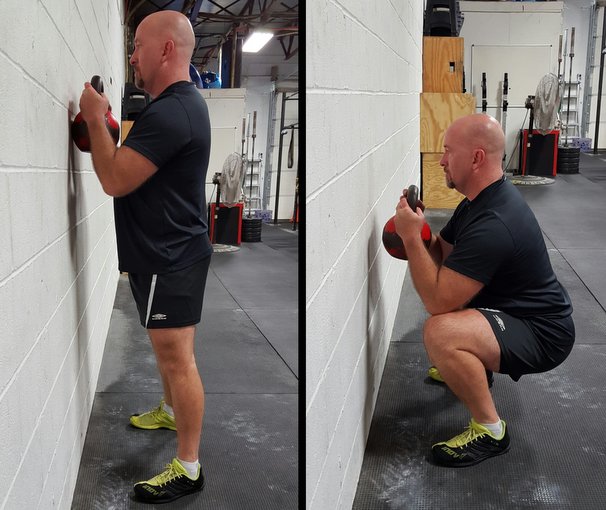
The following are a series of hacks that will allow you to get the most from the goblet squat. Take a look at the pictures so that you can effectively model the movement.

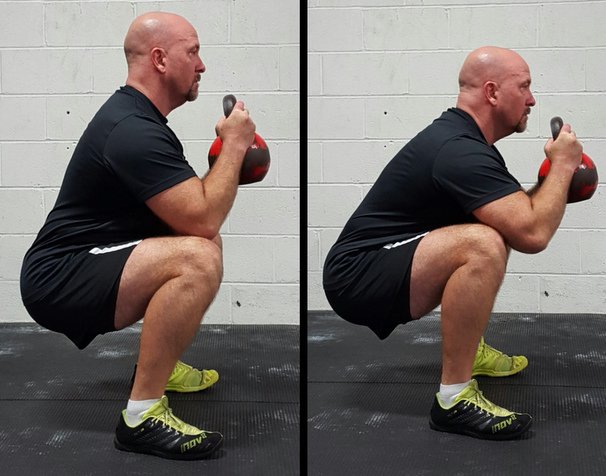
Elbows to Knees—It’s a Straight Line!

  • Don’t unload the torso by flaring the elbows outward or forward—you are supposed to feel the weight of the kettlebell on the front of your body, especially the stomach.
  • Where you start dictates where you end up—if you unload the torso by flaring the elbows, you will find it difficult, if not impossible to find the correct bottom position in the goblet squat.
  • Kiss your knees with your elbows—go down slow enough so that your elbows and knees barely touch; think of it as a caress! From some of the examples I’ve seen there would be a lot of bloody lips!
  • Tall and proud—with near vertical forearms, torso, and shins in the bottom position.
Mike Krivka Goblet Squat Elbow Position
Left: correct elbow alignment, Right: incorrect elbow alignment and posture faults

Find the Perfect Stance That Works For You

  • Heels in your armpits, or slightly wider is a good starting point. Going excessively wide is not going to help.
  • The toes may face straight forward or slightly turned out within 15-20 or so degrees, depending on each person’s individual hip structure.
  • Excessive external rotation should be limited. There may be mobility issues that need to be addressed if they flare excessively. This is a real problem especially if the feet rotate outward while squatting.

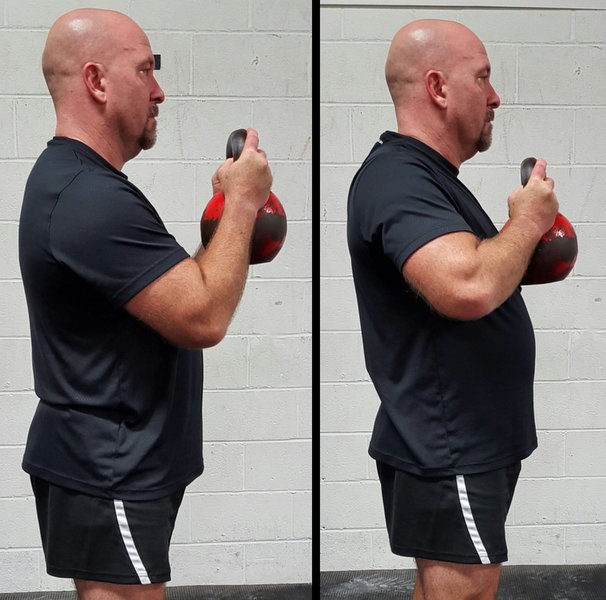
The Rack Is Where It’s At!

  • The kettlebell should not be resting on the chest—I know, I know, I know! It’s easier to hold it there but you are offloading the weight to the shoulders and neck.
  • Wedge it—the kettlebell should be held in a “wedge” created by the triceps locked into the lats and the elbows tight against the ribs.
  • Short of breath? The “wedge” should focus the load on the abs, lats, and pecs, not the shoulders and neck.
  • Heavy—the kettlebell is going to feel exceptionally heavy if held correctly in the wedge. Good! You’re doing it right!
  • Straight wrists—don’t break the wrists while holding the kettlebell. Broken wrists are going to adversely affect the movement down the line and you will be sneaking in compensations to correct them.
MikeKrivkaGoblet Squat Kettlebell Position
Left: correct elbow alignment, Right: incorrect elbow alignment and posture faults

It’s a GRIND, Damn It!

  • Lock down: “Lock down” your ribs before you start your decent. Some people call this bracing, but the end result is that you are clenching your abs, pulling your ribs down, and minimizing slack in the upper torso and thoracic spine.
  • Slow down: Slow way the heck down and pull yourself into the bottom position.
  • Hold it: Once you get to the bottom, maintain the tension. If you release it you’re going to be challenged to get it back and not comprise coming up out of the bottom position.

Bust a Move!

  • Don’t “pop and drop” into the goblet squat, this refers to the tendency for athletes to load forward through the hips and then throw them back to initiate the goblet squat.
  • Lock the ribs down first, this will keep you from even thinking about loading forward and backwards to initiate the movement.
  • Initiate with the hips—but not with a ballistic unlocking of the hips. The hips unlock and are pulled straight down.
  • Don’t drop—in no uncertain terms, do not drop into the bottom position of the goblet squat. Pull yourself slowly down into the bottom of the squat. Think G-R-I-N-D! I know it sucks, deal with it!

Start Strong to Finish Strong!

  • Where you start will either help you or hurt you. If you start in a bad position, chances are you are going to end up in an even worse one. With that in mind, your starting position for the goblet squat should be considered very carefully.
  • Down, not back: Pull yourself straight down leading/initiating with the hips. “Pry” the hips away from the elbows
  • Face the wall: The goblet squat can (and should be practiced) facing a wall. Start with the kettlebell touching the wall. Done correctly, you will still end up with plenty of space at the bottom.
  • Enough is enough: The goblet squat terminates when the point of the elbow touches just inside the knee; there’s no reason to go lower unless you are working on mobility.
  • Stack it up! From the bottom position, keep driving and maintaining alignment until all of the “parts” snap back into place. You should end up exactly where you are started!

Putting It All Together

The goblet squat is part of the “Trinity” in the HKC and “The Big Six” in the RKC for good reason. It looks so simple—and it is—but it will only be effective if you know how to efficiently load and unload it, as well as how to make the transitions smooth and flawless. Making the goblet squat look “simple” is not so much a factor that it is simple to do, but that the athlete has taken the time to properly cultivate the movement. Take some time to explore the points that were made above, get a feel for how the load is set and maintained throughout the movement, and I’m sure that you will come away with a new and profound appreciation for the goblet squat.

I look forward to seeing your thoughts and comments below. Until then, “Squat On Garth!”

***

About Michael A. Krivka, Sr. – Senior RKC: Michael A. Krivka, Sr. is a Washington, DC native who has been involved in Kettlebell training for over a decade and is currently a Senior RKC and member of the RKC Board of Advisors and the RKC Leadership Team under Dragon Door (where he has been listed as one of the top reviewed RKC’s in the world for the last five years). He is also the author of a bestselling eBook entitled “Code Name: Indestructible” and is in the process of finishing up several other eBooks on Kettlebells, body weight, and the integration of other tools into an effective strength and conditioning program. Mike has traveled extensively throughout the United States teaching Russian Kettlebells to military (USMC, USN, USA and USAF) and law enforcement personnel (FBI, DEA, USSS and CIA)… read more here.
Filed Under: Kettlebell Training, Tutorial Tagged With: goblet squat, goblet squat tutorial, how to do the goblet squat, kettlebell how to, mike krivka, tutorial

How to Turbo Charge Your Big Six (Part 2)

November 25, 2015 By Phil Ross 3 Comments

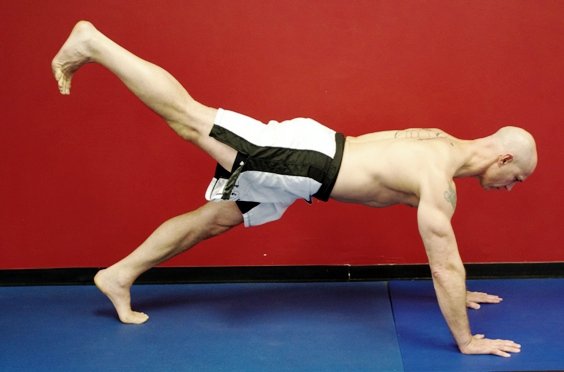
Master RKC Phil Ross RKC Plank

To get the full effect of these routines it’s important that you’ve read the first part of this series. If you haven’t, please consult my previous blog post: How to Turbo Charge Your Big Six (Part 1).

Now, we will continue our heavy load volume training with the next two workouts. As explained in Part 1, although the movements are relatively basic, these workouts should only be attempted by experienced kettlebell lifters. There is a great deal of volume involved and one must possess the strength, muscular endurance and technical skill to complete the workouts as designed.

Workout #3: Press Pyramid, Row Ladder and Cleans

Pick a bodyweight warm-up, then perform 2 sets of the following:

  • Armbar
  • Lying side press, 10 each side
  • Kettlebell pullover, 10 reps

Press Pyramid:
Strategically plan out which kettlebells you will be using. Again, I start with the RKC Snatch Test sized kettlebell. Do 5 reps with the first kettlebell on each side, then go up in weight and do 4 reps, increase and do 3 reps, go up again in kettlebell size and do 2 reps. When you get to your heaviest chosen weight, perform one rep on each side. Now we go back down the pyramid, but not all the way. Once you get to kettlebell # 3, perform 3 reps on each side and stay at this weight for the 4 rep and the 5 rep sets. If you are not able to increase the weight each set, then simply stay at the highest weight you can do and simply decrease the reps. If you want to make your pressing pyramid more challenging, do the “bottoms-up” version of the press.

Row Ladder:
These static kettlebell rows are a double kettlebell exercise. To understand the importance of stability in this exercise, sssume the bent over kettlebell row position, contract your lats and pack your shoulders. If the kettlebells touch the ground, your position is not stable.

Your palms are facing forward while you are in the racked position. NEVER begin this exercise from the bent over position, start by grasping the bells, standing straight up, then lowering yourself into the 10 & 4 position (head at 10 o’clock and tail at 4). Employ a 180 degree rotation as you allow one kettlebell to descend so that it is in front of your knee, while keeping the other kettlebell racked. Bring the kettlebell back, pause, then repeat this on the other side. Envision pulling your chest through the kettlebells to help counter the temptation to be standing more upright. The reps are 1, 1, 2, 2, 3, 3, 4, 4, & 5, 5. Repeat this series 2 more times.

Bottom-Up Clean and Hold:
During this exercise we will alternate between the ballistic clean and the full body tension of the hold. You must use tension through your abdomen, trunk. lats, glutes, pecs and legs to maintain this position with a heavy kettlebell. We will perform 5 reps on each side for 5 sets. There will be a 3 second hold at the bottoms up racked position. Clean the bell, beginning with your thumb facing forward, especially if you are using a heavy bell. This is virtually the only exercise that I recommend performing the backswing between your legs in this fashion. It’s difficult to control a large kettlebell while twisting it into a secure bottoms-up position. It’s far better to take a straight line approach.

Cool down and you’re done. Be sure to de-load your forearms during your cool down, your grip will get very taxed during this session.

MasterRKCPhilRossKettlebellSnatch

Workout #4: Snatch Pyramid, Squat Ladder and Planks

Choose from one of the aforementioned warm up routines from Part #1 and then you are good to go!

Snatch Pyramid:
Take your RKC Snatch Test sized kettlebell and begin. The idea is to move through the routine without resting between the sets. Perform these reps in succession on each hand. 1, 1, 2, 2, 3, 3, 4, 4, 5, 5, 6, 6, 7, 7, 8, 8, 9, 9, 10, 10. And then back down – 9, 9, 8, 8, 7, 7, 6, 6, 5, 5, 4, 4, 3, 3, 2, 2, 1 & 1. Shake your arms loose and stretch out your forearms.

Squat Ladder:
5 reps each side, 10 sets. As with most of the other exercises, we begin with our snatch test size kettlebell and increase the weight each set, if you can. If not, stick with the heaviest possible kettlebell you can manage and complete the remainder of the sets with that particular size. We do not travel back down the ladder, we end with the highest weight that we are able to use for 5 repetitions on each side.

Planks:
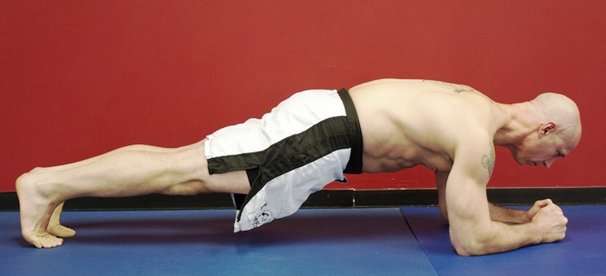
I call this “Just Plank Fun.” If you have a training partner, switch off and on, holding each other’s feet up in the tall plank and then release one foot. You may also pick one hand off of the ground or if you are adventurous, have one foot in the air and pull the adjacent hand off of the ground, while keeping your hips and shoulders in the same plane. If you are alone, you may use the wall to press your feet against and remove one foot and then switch. You may also remove one hand from the floor as well.

For less conditioned students, plank practice is always beneficial. RKC-style planks (on your elbows), power planks, tall planks or side planks may all be used to finish up the training session. Again, this depends on your level of expertise and fitness.

PhilRossRaised_Plank

Workout #5 Fun Friday: Toss, Sprint, Push-up, Sprint, Toss, Abs & Repeat

On Fridays, I like to have some fun and mix up my workouts. Living in the Northeast, training a great deal of the time outside is not very practical. So during the warmer months, I like to get into nature and enjoy. On a recent Friday, I did the following and I really got into the zone – it was great! I felt like the Energizer Bunny, because I just kept going and going. Check out this workout and have some fun!

First, I grabbed a 20kg kettlebell from the garage and farmer carried it through the woods behind my house and to an open field. I had done a 1/2 hour of bodyweight exercise and an hour of No-Gi Jiu Jitsu a few hours before, so I didn’t need to do a complete warm-up. If your workout wasn’t preceded by what I did, I would suggest a thorough 15 minute warm-up including hip openers and hamstring stretching.

After I got to the field, I kicked off my flip flops, did a light warm up. I jogged to the 50 yard mark and set my towel down. I jogged back and did some cossacks and hamstring stretches. Then I got to work…

Here was the routine:

  • One kettlebell toss: Either straight out or overhead.
  • 50 yard sprint (to the towel)
  • 15 Push-ups
  • 50 yard sprint (back to the kettlebell)
  • One kettlebell toss
  • 50 yard sprint (to the towel)
  • 20 abdominals
  • 50 yard sprint (back to the kettlebell)

I repeated this for a total of 40 sprints which also yielded 20 kettlebell tosses, 150 push-ups and 200 abdominals. I was sweating and PUMPED! There’s not a great deal of thinking involved, so you can allow yourself to “get into the zone”.

I cooled down and farmer’s walked back home. I did have to change hands once on the way back to my house as I went through the woods.

There you have it, five workouts, four that reinforce the basic kettlebell movements and one that’s a total burner to round things out–all accomplished while providing a challenging set of sessions. Put these routines into your training cycles and enjoy improvement with all of your movements!

Enjoy!

Coach Phil Ross


****

For more information on Master RKC, 8th Degree Black Belt, and Bodyweight Specialist Phil Ross’s strength and conditioning programs, videos (including The Kettlebell Workout Library), and workshops, please visit www.philross.com.

Filed Under: Kettlebell Training, Workout of the Week Tagged With: big six, kettlebell training, phil ross, Turbo Charge Your Big Six Series, tutorial, workout

Regress to Progress—Why Patterning is the Key to Fixing Your Swing

October 28, 2015 By Matt Beecroft 5 Comments

Matt Beecroft Swing Setup
Matt Beecroft demonstrates the incorrect (left) and correct (right) position for starting a kettlebell swing

Movement quality underpins any good strength training system. The RKC has never been just about the kettlebell, it’s always been about learning to move better. And the key to moving better is often knowing the right time to progress an exercise—and when to regress. It can be challenging to know when to increase the movement challenge, complexity or difficulty of an exercise if you don’t have an RKC instructor to coach you. Fortunately, the RKC system also includes an awesome system for teaching the movements progressively and safely.

Sure, you could go out and learn 17 different techniques in other one or two day workshops… But not only will your personal proficiency in those lifts be suspect (unless you are an athletic freak, like our own Master RKC, Max Shank) but more importantly your ability to communicate and teach the information to others will also be questionable. This is especially true when attempting to coach someone who is new to training efficiently, safely, and effectively.

Also, the skill set of an athlete and a coach are very different. Many of your clients aren’t really interested in your amazing athleticism, they are much more interested in how amazing you can make them. We all know great athletes who are terrible coaches and vice versa.

The intelligent progression of exercises which teach how to get from “point A” to “point B” is what sets the RKC apart. If someone is having trouble mastering the swing, you probably know by now that trying to correct it is difficult. Because swings are ballistic, they’re fast, so trying to correct a client (or yourself) during an exercise like a swing can be almost impossible.

The first thing I want to emphasize that you must be patient with the steps leading up to the kettlebell swing. You will know if you have successfully completed the steps if you finally pick up the kettlebell and swing it with some grace and efficiency. But, if you have sped through the progressions too quickly, your swing will be ugly and dangerous. And then more problems will arise when you progress to the clean and the snatch—which should look exactly like a swing in many ways since your arms simply guide the kettlebell to these other positions while your hips do all the work. These more sophisticated exercises will amplify and illuminate all the flaws with your kettlebell swing technique.

Many people speed through the progressions in various exercises thinking that if they have to be patient and spend the time mastering the basics (note: basic doesn’t mean easy) or need to regress the exercise, then they have somehow failed or gone backwards. This couldn’t be further from the truth.

A few things happen when people try to outsmart the process, or jump ahead in the progressions:

  1. They find out that their swing is terrible and have many things to troubleshoot.
  2. They get injured.
  3. All of the above.

Either way, they will end up spending much more time ironing out their kettlebell swing issues. Hopefully they will go to an RKC Workshop to learn the “a-ha drills” we teach to troubleshoot and save time. Otherwise, they risk getting sidelined by injury instead of patiently mastering the progressions and enjoying the journey. Speeding ahead with load and intensity usually causes limited or dysfunctional movement patterns, if adequate mobility and motor control (stability) aren’t achieved beforehand.

So, how should you fix your kettlebell swing?

Embrace the suck and regress to progress. One reason the swing is taught through a progression—at least in my opinion—is because of the patterning. In many respects, it’s similar to some of the ideas in the Functional Movement Screen (FMS). By the time you pick up a kettlebell, after all the correct patterning you have practiced , it shouldn’t look like you are trying to hump the bell! Instead, your kettlebell swing will be a thing of power and beauty.

The general rule is to only use techniques that improve form, quality of movement, and quality practice while reducing compensations. Unfortunately, many trainers don’t have a system for teaching the swing, they just pick up the kettlebell any way they can and then try to get it to move!

The FMS and the RKC teach patterning in this order:

  1. No load, pattern assistance.
  2. No load, no pattern assistance.
  3. Load, with pattern assistance.
  4. Load, with no pattern assistance.

In the RKC, we begin by teaching the hinge unloaded. This is often assisted in a variety of ways – either the student uses the blades of their hands in their hips to help find the hip crease (sometimes coined “chopping and popping”), they might push their butt back towards a wall, or use a dowel touching three points along the spine (head, between the scapula, and the sacrum) to teach how to maintain a neutral spine.

Next we would aim to do this without load, but with no pattern assistance. Our goal is to remove the pattern assistance and do the movement unloaded with perfect form. If the form breaks down we can go back and return to the pattern assistance method (dowel, wall, etc.) until the right movement becomes what we do every time. Old strength coaches were renowned for not letting their athletes pick up a bar until they could first do the movements correctly with a dowel or a stick.

The third stage is load with pattern assistance. In the RKC curriculum, this is the kettlebell deadlift. Placing the kettlebell in line with the heels also places the shoulder blades over the kettlebell. This makes for a foolproof deadlift when we simply stand up with the bell. If you can’t do it slow then you probably can’t do it fast—this is what grinds like the deadlift are all about. Slow is smooth, smooth will become fast later. If the deadlift lacks stiffness or tension, we can use the static stomp deadlift or Hardstyle plank to link the body with tension and to keep midline stability and posture.

The next step is using the deadlift drag or pendulum swing to teach the backswing and the start of the swing—pattern assistance with load. At the final stage we will do dead swings or the proper two handed swing, which is the load with no pattern assistance. If we have adequately mastered the first three steps, the final stage, load with no pattern assistance, will be solid.

Every time I progress a client who isn’t ready, I find that I spend a lot of time trying to troubleshoot their swing. Regressing these clients back to one of the first three stages of patterning was the fastest way to actually help them master the swing.

So relax and enjoy the journey. Be patient in your progress and understand you don’t have to master everything immediately. Basic doesn’t mean “easy”. Spend more time on patterning and you will likely spend less time with the difficult task of troubleshooting swings at full speed. This approach also works with more advanced exercises, for example if your clean isn’t great, your one arm swing probably will need work. If your press isn’t great, your clean will need work. If your kettlebell snatch isn’t great, then your one arm swing, clean, and press probably all need work too.

If you find that your swing isn’t great, don’t think of regressing to an earlier step as failure, or that you’ve made a mistake. You are still traveling in the right direction. Regressing to progress is an amazing strategy that will still have you traveling in the right direction.

***

Matt Beecroft, RKC Team Leader, PCC Instructor is the director and head coach of Reality Self Defense & Conditioning in Adelaide, South Australia. He can be contacted through his website at realitysdc.com.au email: matt.beecroft@realitysdc.com.au or follow him on Facebook: facebook.com/MeetLifeHeadOn.

Filed Under: Coaching, Kettlebell Training, Tutorial Tagged With: clean a kettlebell, how to learn kettlebell swing, how to teach the kettlebell swing, how-to, kettlebell squat, kettlebell swing regressions, kettlebells, Matt Beecroft, movement patterning, movement patterns, movement quality, tutorial

Miyagi Pinball: Tilt Your Kettlebell Snatch!

September 16, 2015 By Steve "Coach Fury" Holiner 27 Comments

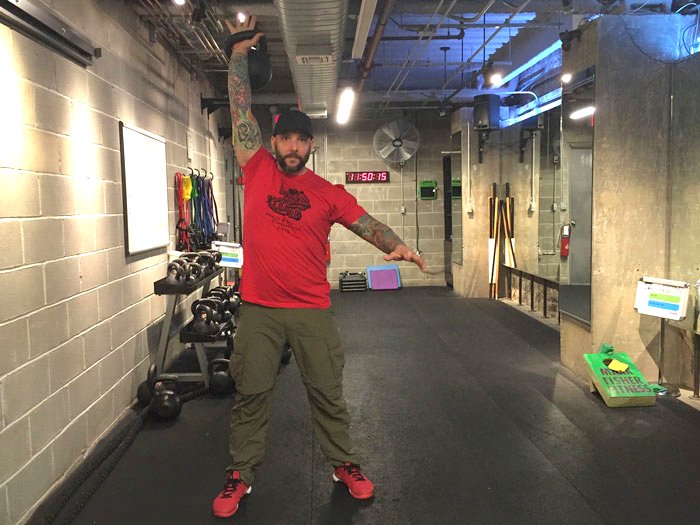
Steve "Coach Fury" Holiner Kettlebell Snatch

“You’re the best around. And nothing’s gonna ever keep you down”. That’s what they’ll be singing after you apply the following tips to your snatch technique. The following tips will improve your kettlebell snatch and help you destroy your snatch test if your RKC Workshop is coming up.

The kettlebell snatch is actually a fairly simple move, but people love to overcomplicate it. Over the years, I’ve broken down the technique into two simple words that pack a punch—or a crane kick—MIYAGI PINBALL! (Remember The Karate Kid?)

Two super common errors you’ll see with the Hardstyle kettlebell snatch are:

  1. Rotating or corkscrewing the kettlebell around the wrist as the kettlebell travels up and down.
  2. The arm staying straight during the entire snatch.

This is where “Miyagi” comes in. You have to paint the fence! Imagine you are Daniel-san standing in front of a fence. Your hand is an imaginary paintbrush. You’ll begin to paint upwards with the back of your fingers, then as you near the top of the fence, you’ll spike your fingers upward. The palm of your hand faces outward in this position. Now reverse the same motion on the way down. This will eliminate the first common error (corkscrew rotation) I previously mentioned. Painting the fence will also dramatically decrease the wear and tear on your hands when performing high rep kettlebell snatches.

Steve Holiner Kettlebell painting the fence
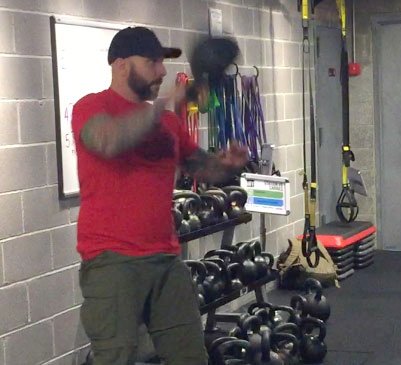
Steve “Coach Fury” Holiner in motion while demonstrating the kettlebell snatch “painting the fence” cue.

Do the following to fix the “straight arm” issue: Stand facing a wall, feet together, and with your right arm fully extended. Make a fist then move close enough to the wall that your arm is still straight and your knuckles are making contact with the wall. Now take a half step forward and allow your arm to bend. Paint the fence from this position. We’ve just shortened the arc of your kettlebell snatch, and that’s a very good thing.

Please note, that it is possible to try and shorten the arc too much. This will cause the kettlebell to travel almost straight down the body, forcing the elbow and shoulder to snap almost like a whip. We want to shorten the arc, not eliminate it, and you’ll still need some space to allow for a smooth transition into the backswing.

So, grab your kettlebell and go “Miyagi” on it! Hike the kettlebell back, snap your hips, let the elbow bend, and “paint the fence” until the kettlebell is locked out overhead. Reverse and repeat. If that feels different then you’ve earned that Karate Kid black belt from JC Penney.

Now, here’s where “pinball” comes into play. Having completed, witnessed, and administered over one hundred snatch tests, I’ve noticed another common (and fatal) flaw. Many people will allow their hinge to get shallow as they snatch—and they lose the ability to generate a TON of power when this happens.

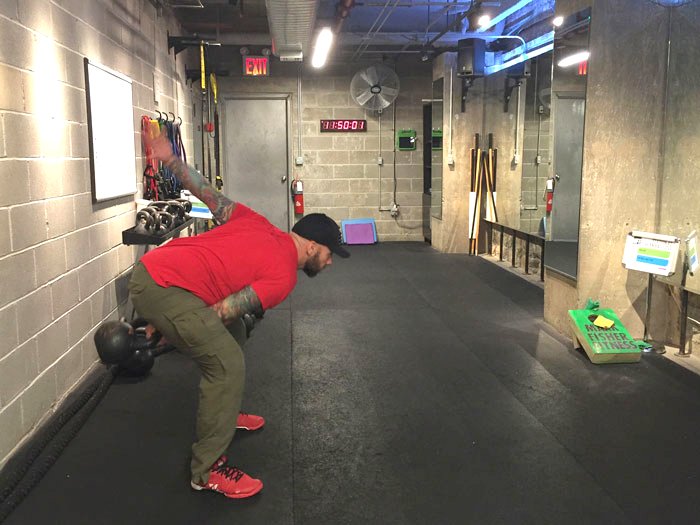
Steve Holiner Pinball Backswing

Your hips are a pinball hammer. The kettlebell is the pinball. Pull your hips deep into the hinge (always while keeping the shoulders above the hips, and hips above the knees). As you “paint the fence” into the downward eccentric phase of the snatch, “pull the hammer back” by deeply hinging, then squeeze your glutes hard and fast, drive your feet into the floor, stand tall and “paint that fence”! The kettlebell will soar overhead.

Here’s a combination to help practice the “Miyagi Pinball”:

  • Heavy dead swing x 5
  • Snatch x 5 per arm *Remember to “Paint the Fence”.
  • Heavy dead swing x 3
  • Snatch x 8 per arm
  • Heavy dead swing x 1
  • Snatch x 10 per arm

Here’s why it works:

The kettlebell snatch is about efficiency. Shortening your arc means that you will have to project the kettlebell over a lesser distance to get it overhead. Shortening the arc also allows you to cut the kettlebell’s momentum as it approaches the lockout. This drastically reduces the risk of wear and tear on your shoulders. Using your hips to project the kettlebell will also keep your shoulders and back healthy, while cutting back on undue fatigue during high rep snatches.

Do you think any above would help you crush an RKC Snatch Test?

I do.

https://youtu.be/VRybp4KhA3Q

A fellow coach at MFF, Laura Smith had this to say about “Miyagi Pinball”:

“After Steve told me to “paint the fence” (karate kid style of course) I never had hand issues again. After months of my hands tearing every time I did a snatch test, this was life changing.”

There it is gang.

Try it and let me know what you think.

-Fury

Steve “Coach Fury” Holiner’s superhero headquarters is Mark Fisher Fitness in NYC. Fury’s a Senior RKC, a DVRT Master Chief, and an Original Strength Instructor. He is available for classes, semi-privates, instructor training and programming at MFF. Check out coachfury.com, facebook.com/coachfury Instagram @iamcoachfury and Twitter @coachfury for more info.

Filed Under: Kettlebell Training, Tutorial Tagged With: Coach Fury, cues and drills, how to pass the snatch test, kettlebell snatches, kettlebell technique, Steve Holiner, tutorial

Stop Fearing the 5 Minute Snatch Test

September 2, 2015 By Paul Britt, DC 15 Comments

Paul Britt Kettlebell Snatches

Nothing seems to scare potential RKC Instructors more than the 5 Minute Snatch Test (read complete testing requirements here), the gatekeeper of the system. In the long run, it’s only 5 minutes out of 23 hours of training—just 0.36% of the weekend. Sometimes I think the fear comes from a lack of confidence in their preparation, even though I have found that many people over-train for the snatch test. They snatch almost daily for tons of reps for long periods of time. In my opinion, a less is more approach works better. My last snatch test was my easiest one to date, and I only trained an average of 5 minutes a day for the test.

If you break down the kettlebell snatch, it’s a swing that ends up at the top position of the press. My plan was to work the swing and the press to train for the snatch test. It works if you look at the small space you must travel between the two exercises. The swing comes to chest height, and the press begins just a little bit higher. There’s only a small space missing when performing the snatch.

In my opinion, if you cannot handle heavy weight overhead, it’s not smart to ballistically propel the weight into position at the top of the snatch movement. So, my students work on heavy presses—snatch weight or heavier. Since this is RKC prep, this approach knocks out two birds at once.

When it comes to swings, I mix it up a little. I believe in having a great hip extension to launch the kettlebell and use the “float” as rest—with swings and as much as you can during the snatch test. That explosive hip extension also makes snatching easier as there is no pulling or fighting the bell on the way up. You can generate the float and guide the bell into position. That power can be developed with heavy double swings to chest height. This is typically the longest training session because we like to get a little more rest between sets when working on power and explosiveness. We will typically perform 10 reps on the minute, every minute, for 10 minutes. This usually gives us about 45 seconds of rest each set. If I feel like I’m losing some of the pop or if form deteriorates, we will occasionally just perform a set of swings and wait one minute.

On some days, we will see how many swings we can do in a 5 minute set of one-arm swings. A starting goal is to hit 100 swings. After a student can do 100 in five minutes, they will work up to as many as possible in that time frame. We have had a couple of students perform 160 swings in 5 minutes. On other training days, the students will grab a medium weight kettlebell for two-hand swings—somewhere between their one hand and two-and swing weights—and perform 100 two-hand swings in a 5 minute set. This helps bridge the gap between endurance and power.

We do the snatch test about every two weeks. And it is the only training for that day, they don’t get to work anything else other than recovery and mobility.

Typically the first time they hit 100 snatches, they knock it out in less than 4 minutes. They are typically spent and take a while to recover, but once they know that they can do it, we work on strategy and timing. If you finish the test in 3:30 minutes or 4:59 minutes, you still pass. I like to take my time and have something left at the end. We typically train for 10 left and 10 right on the minute for the test, but find that some students like the 20, 15, 10 and 5 rep scheme to pass. Once you can pass the test, the rep strategy comes down to personal preference and finding what works best for you.

The following training template focuses on the swing and snatch, I did not include the rest of the skills, but they can fit into the training plan if they’re thought of as a skill to practice. Use appropriate weights and make sure that the technique is good. There is no need to really push it for an extended length of time. Remember that this is only a small part of your RKC Workshop weekend. Do not dread it so much that you miss the awesomeness of the entire experience.

Monday

  • 5 Minutes of 2 hand swings
  • 5 x 5 pressing

Tuesday

  • 10×10 heavy double kettlebell swings
  • 5 x 5 double kettlebell squats

Thursday

  • 5 minutes of snatch weight one-arm kettlebell swings
  • 3 x 5 presses each side

Friday

  • Light to medium one-arm swings for 10×10 (30 seconds on / 30 seconds off works well)
  • 5 Get-ups left and right

Saturday

  • Snatch test

***
RKC Team Leader Paul Britt has been an RKC kettlebell instructor since 2006. He trains clients at Britt’s Training Systems, his award-winning Hardstyle Kettlebell Training Facility in Rockwall, Texas. Paul has served as an assistant instructor at many RKC and HKC Courses, is a Certified Kettlebell Functional Movement Specialist (CK-FMS) and works with some of the top Chiroprators in North Texas. Please visit his website brittstrainingsystems.com for more information.

Filed Under: Kettlebell Training, Tutorial Tagged With: how to pass the RKC, kettlebell snatches, passing the RKC, Paul Britt, RKC Prep, RKC snatch test, Snatch Test, training template, tutorial

Kettlebells and Moving Planks

June 10, 2015 By Josh Henkin Leave a Comment

Josh Henkin Half Kneeling Kettlebell Press

If you want core strength, the “Fitness 101” answer is that you must do planks. While the plank is a great starting point and should be well established in any fitness program, it is not nearly the end of smart core conditioning. That’s is why there’s a plethora of plank variations—from the innovative to flat-out goofy!

The biggest problem with the plank is that when practicing it, you CANNOT MOVE! The whole point of the plank in the foundational phases of training is to teach the body how to resist movement by integrating the body’s entire chain. But, MOST of the things my clients and I do require movement.

Think of the plank as a reference point. Of course we want to establish strength in the plank, but we also want to use it as a reminder of concepts we want to use in other movement patterns. The beautiful thing about kettlebells is that they allow us to create many different functional variations of moving planks. We need to produce and resist forces at the same time. I will describe three easy ways to use kettlebells to create extremely functional plank variations.

Overhead Pressing

I love overhead pressing because it is basically an extended plank. If we start on the ground and assume a standard push-up position, we have the beginnings of overhead pressing. By simply walking the hands further and further forward, this straight arm plank variation becomes more difficult. And the problem with continuing on the ground is that we will eventually fall on our faces! Instead, by standing and pressing kettlebells overhead we can train that extended plank.

Of course the other beautiful thing about overhead pressing is that it points out any lack of mobility. Both the hips and upper body can cause us to have major compensations because places which lack mobility will usually cause us to recruit stability from an inefficient place. In other words, mobility issues cause compromised movement.

Assuming we have good mobility, there are so many awesome ways to use kettlebells with overhead pressing. I think of these progressions as similar to moving from a standard front plank before adding more side plank elements over time. You will see this progression in how we lift the kettlebells, and how we stand when we lift the kettlebell—or both! Here is a series you can use to progress from easiest to most challenging variation.

Overhead Pressing Variations Positional Emphasis Type of Plank
Standing Double KB Press KB movement Front Plank
Loaded KB Press KB movement Front/Side Plank
Alternating KB Press KB movement Front/Side Plank
One Arm Press KB movement Front/Side Plank
Military Double KB Press Body Position Front/Side Plank
Half Kneeling Alternating Press KB Movement/Body Position Front/Side Plank


Frequently Asked Questions:

  1. What about the Turkish get-up? It’s very different from a plank and emphasizes rolling patterns instead.
  2. Where is the bottoms-up press? It’s a personal preference, but I find that the progressions listed above are accessible for more people.
  3. Where are drills like push presses and jerks? These are all further progressions of plank training. When you add speed, you must have a more reactive core—which is definitely more advanced training.

One more note about pressing overhead. Some people may be wondering about the side lean that some trainees seem to use with kettlebell pressing. While I understand the idea of using leverage to help press the weight overhead, this approach does not build the core strength we can develop with the overhead press and may explain the lack of carryover these same trainees experience with other exercises or implements.

Hip Hinge

I have to credit kettlebell training for raising the awareness of the hip hinge pattern. While I had performed deadlifts and cleans in the past, the emphasis on quality of motion was something I really took home from my first RKC way back in 2003.

The hip hinge is actually a more complex plank variation than an overhead press. We can use it to create the pelvic “lock” used in overhead pressing in the beginning phase of the hip hinge. Because the torso changes angles during the hip hinge, the stress on the core constantly changes.

While most people might think kettlebell hip hinging is only for deadlifts, swings, cleans, and snatches, I am really happy to see the re-birth of bent rows with kettlebells! While it’s not nearly as sexy as many of the other kettlebell lifts, it’s probably one of the most important!

The bent row really challenges our core strength and endurance! Most people can’t maintain the proper hip hinge in the bent row without altering their posture. It’s pretty common for people to creep upwards and end their set more upright, or to speed through their bent rows because they don’t have the core integrity to perform them well.

The bent row should be a cornerstone drill for anyone progressing towards ballistic kettlebell exercises. Having the capacity to tolerate multiple sets of the bent row while maintaining the same hip hinge is a great indicator that the lifter really has excellent core strength and endurance.

Having said that, most people will fatigue in the bent row, so combining the bent row and kettlebell deadlift will allow us to introduce more time under tension without causing bad form from exhaustion.

Here is a series of big “bang for your buck” row and deadlift variations for the hips and plank. Again, move from least to most complex…

Bent Row & Deadlift Variations
Bilateral Deadlift and Row
Bilateral Deadlift with Alternating Row
Suitcase Deadlift with Row
Sprinter Stance Deadlift and Row
Sprinter Stance Deadlift with Inside Row
Sprinter Stance Deadlift with Outside Row
Rear Step Deadlift and Row
Rear Step Deadlift with Inside Row
Rear Step Deadlift with Outside Row


Manipulating the body position and which side the kettlebell is on allows us to challenge ourselves beyond just loading. These variations introduce anti-rotational forces, lower leg stability, and many more benefits as we progress. These kettlebell variations allow you to eventually progress and succeed with familiar but advanced drills like renegade rows.

Lunges

You may have expected me address squats next, but I find so much more value in the vital role lunges play in core strength. I know, you HATE lunges, but that’s all the more reason we need to use them. So many of us need MORE lunges in our training. Lunging is much closer to everyday movements like walking, running, etc. than almost anything else we do in the gym. The lunge is a very functional drill!

As soon as we go into the split position, we can almost instantly see where people lose their plank. Remember, the core is not just a fancy word for your abs, but an integration of your hips, and even your feet—one reason that barefoot training became popular.

The popularity of the half kneeling position for overhead pressing should tell us how important lunges are to real core stability and strength. For the sake of this blog post, we will keep things simple and focus on the reverse lunge which is the easiest to progress people. With lunges, we can vary load placement, and direction of the lunge to challenge the movement. For now, we will focus on using different kettlebell loading positions to build some incredibly strong moving planks!

Lunge Loading Progressions
Suitcase Double Lunge
Double KB Rack Lunges
Off-Set Loaded Suitcase Kettlebells
Suitcase Contralateral
Suitcase Ipsilateral
Off-Set Rack Kettlebells
Rack Contralateral
Rack Ipsilateral
Tactical Lunge
Double Overhead Lunge
Overhead Contralateral
Overhead Ipsilateral


This is the REALLY cool part—we are not just building MANY more kettlebell movement variations, but increasingly more meaningful progressions. Changing the intent of familiar, and often underestimated movements gives them new meaning and value.

You will never really outgrow the plank, it evolves over time just like kettlebell training. The purpose of the HKC and RKC are to give you a very strong foundation to kettlebell training. Most people underestimate the incredible value and versatility of kettlebells if they get stuck in the habit of just performing a few movements. But, if you understand that gaining proficiency in one drill opens the door to another, you will find infinite uses and benefits to every drill in your kettlebell toolkit.

***

Josh Henkin, Master RKC, CSCS has been a RKC instructor since 2003 and has implemented kettlebell programs for major Division I programs, SWAT teams, and many different general fitness programs. Josh is also the creator of the DVRT Ultimate Sandbag Training system where he is a highly sought after presenter worldwide. He can be reached at info@ultimatesandbagtraining.com or http://DVRTFitness.com. Josh Henkin is also the author of DVRT, The Ultimate Sandbag Training System now available in paperback and ebook format.

Filed Under: Kettlebell Training, Tutorial Tagged With: advanced training, Athletic Training, core strength, core training, fitness, functional movements, functional training, Josh Henkin, kettlebell drills, kettlebell training, progressions, tutorial, unusual progressions, variations

The Sweaty Beast Workout

May 13, 2015 By Beth Andrews 4 Comments

Beth Andrews Senior RKC

I live for a great workout. Do you? This is one of my favorite workouts and it’s a hit with my students as well. I thought I would share some of the kettlebell love and sweat with you. This workout is challenging, fun, will leave you in a pool of sweat and feeling like a beast when you’re done.

You can take this workout and grow with it by challenging yourself with heavier weight. I would first suggest you complete it with a kettlebell that’s your snatch test weight. When you can successfully do that, you can advance to the next size kettlebell.  🙂

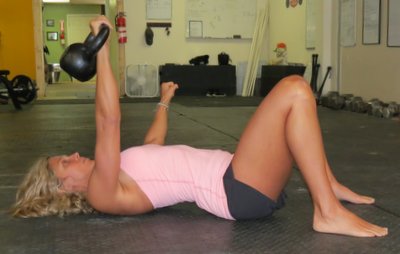
Most people are familiar with the snatch and goblet squat, but are unfamiliar with the one arm chest press. Here are a few things to remember when performing the one arm chest press, a few options for the workout, a quick video tutorial and a demo sample of the workout.

1.There are many different ways to do the one arm chest press. My preference is to perform it with both legs down and both arms off of the floor, in the video below. This variation requires more body control/core stability. If you can’t keep your low back flat and your bum tight, bring one or both knees up. I prefer both knees up or both down.  Please option it out if needed. See pictures below.

Beth Andrews Chest Press Legs Up option
Yes! Legs up, bum tight, low back on floor.
BethAndrews Chest Press Legs Down Option
YES! Legs down, bum tight, low back on floor.
 belly button up to chin. This will help bring low back to the floor.
No! We want to prevent arching the low back.
Focusing on squeezing the glutes and pulling
belly button up to chin. This will help bring low back to the floor.

2. It can be challenging to chest press with your snatch test weight. No worries, just drop down to a lighter weight for that exercise.

3. You have 25 min to complete the workout. This workout is not about beating the clock, the timing is to keep you focused. It is all about good form, you gain nothing by racing through and taking shortcuts with form. Finish strong, my friends!

4. There are two ways I like to mix up the reps: a 10-1 countdown on all exercises, in a circuit fashion, or stay with 5 sets of 10 reps on everything for a beastlier challenge.

Check out the One-Arm Chest Press video tutorial:
(All kettlebells in the videos below are official Dragon Door kettlebells that have been painted)

Now you’re ready to give the The Sweaty Beast Workout a try! 🙂

***

Beth Andrews is a Senior RKC, PCC Team Leader, and CK-FMS. She leads HKC and RKC certifications, and assists at the PCC. She became the 5th Iron Maiden in 2013. Beth owns Maximum Body Training and a successful online training business. She has over 25 years of training experience. For online training or to host a certification, email Beth at: bethandrewsrkc@gmail.com. For more training tips and workouts subscribe to her YouTube channel, Beth Andrews RKC or visit her website at maximumbodytraining.com

Filed Under: Tutorial, Workout of the Week Tagged With: beth andrews, chest press, kettlebell technique, kettlebell training, kettlebells, one arm chest press, RKC, tutorial, video, workout, workout of the week

Gripping Your Strength

October 22, 2014 By Nick Lynch 1 Comment

RKC Team Leader Nick Lynch 2014

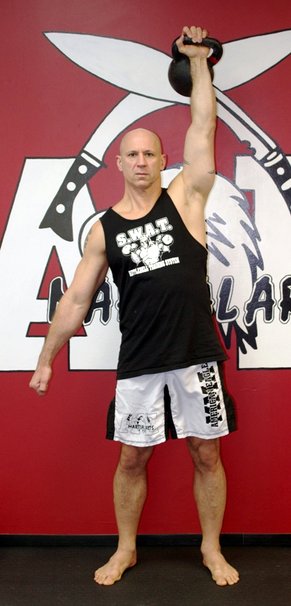
The first two body parts to make any form of physical contact (unless you’re in FIFA) are your feet and hands. First feet, then hands. To strengthen your feet, train barefoot. To strengthen your hands, train barehanded and lift heavy stuff with vengeance.

Why should you care about your grip strength? “The tenser your muscles are, the more strength you display and build.” –A quote from the Naked Warrior. In order to withstand your 7th, 8th, 9th and 10th rep with a thicker grip swing, one must remain completely tense to not throw the bell at a loved one or through your neighbor’s window.  “What is truly remarkable is that tightening your fist can enhance your leg strength, as well!” – Naked Warrior. The difference between gripping a 1.5-inch handle and a 4-inch handle speaks for itself. There is 2.5 more inches one must attempt to tighten their hand around. The extra 2.5 inches is harder to grip no matter who you are!

In this program, you will be using the kettlebell swing with a modified grip to strengthen your hands, elbow and shoulder joints.

  • 1st step – Get a 65% max swing weight kettlebell
  • 2nd step – Get a hand towel
  • 3rd step – Learn to perform a swing safely by hiring your local RKC instructor!

The program:

1. Wrap hand towel 1/4, 1/2, 3/4 or fully around the handle of the kettlebell

2. Perform 10 swings every minute on the minute (EMOTM) for 10 sets or 10 minutes

If you find your forearms screaming for mercy, adjust the thickness of grip. Example; Set 3, adjust handle from 3/4 grip to 1/2 grip. Set 4 from 1/2 grip to 1/4 grip. Set 5 from 1/4 grip to kettlebell handle only. Use a ladder format for increasing grip thickness until you can complete 10 sets of 10 reps EMOTM with towel fully wrapped around the handle. Once you can complete this, move up 10% in kettlebell swing weight.

Use this program as a swing supplement to your current program. This can and should be done 1-2 days per week. 3 if you plan on trying out for the over the top sequel… Embrace the power of your grip strength!


Nick Lynch also loves to paint his Dragon Door RKC kettlebells to indicate different sizes.
***
RKC Team Leader, Nick Lynch is a Strength and Conditioning Coach at Milwaukee School of Engineering University (MSOE). He owns Superb Health Milwaukee, a kettlebell studio in Milwaukee, WI. Most recently, he became an RKC Team Leader. He has 13 years of full-time training and coaching experience and a lifetime of wellness education. Nick lives in Milwaukee, WI with his wife Natalie and son Weston.

Filed Under: Tutorial Tagged With: grip strength, kettlebell grip training, Nick Lynch, tutorial, video

Improve Your Windmill

October 1, 2014 By Beth Andrews 1 Comment

Beth Andrews Kettlebell Windmill

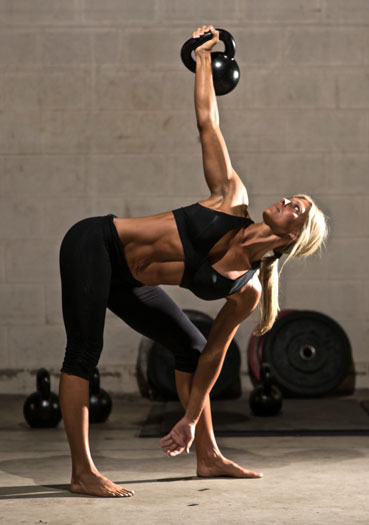
The windmill is an excellent exercise to increase mobility, flexibility and core strength. As an added benefit, it also increases shoulder strength and stability. It’s a unique exercise because it engages multiple muscle groups and takes the body through a combined range of motion. Windmills are a great way to get heavy weight over your head in a challenging movement pattern, building the core as strong as the mighty oak tree.

Here are a few tips to improve your windmill:

Beth Andrews loves to paint her RKC kettlebells, to indicate the different sizes. To each his own with color choices we say, but there are a bunch of good reasons that Beth trains exclusively with the RKC brand🙂 –JDC

This next video shows two disadvantages. 1-reaching out, 2-reaching down. The third shows the advantage of focusing on hinging deep into the hips and squeezing shoulders blades together. This creates proper alignment which allows you to stack your body under the weight to gain all the benefits of the kettlebell windmill.

***
Beth is a RKC Senior Instructor, PCC Team Leader, Primal Move Certified, and CK-FMS, She leads and certifies HKC and RKC certifications, assists at the PPC. She became the 5th Iron Maiden in 2013. Beth is the owner of Maximum Body Training and has over 20 years of training experience. She also has a successful on-line training business. For on-line training or to host a certification, Beth Andrews can be reached by email at: bethandrewsrkc@gmail.com. For training tips and workouts subscribe to her channel on YouTube and visit her website at maximumbodytraining.com

Filed Under: Kettlebell Training, Tutorial Tagged With: advanced training, beth andrews, kettlebell training, kettlebell windmill, RKC, training tips, tutorial, windmill

Pass Your RKC: A Complete 6-Month RKC Level One Preparatory Program

September 24, 2014 By Nick Lynch 4 Comments

RKC Team Leader Nick Lynch Training With Kettlebells

As athletes preparing for a grueling physical feat, we must ask ourselves, “How do I train properly?” There are many outstanding training programs already out there, so my hope for this program is to further help you and your students prepare for a successful RKC certification. I’ve personally had great success with this program, as have my clients. Please, feel free to ask questions about this program, as each individual’s needs differ. I’ll do my best to answer or point you in the direction of a fellow RKC Leader who can help.

A common concern in passing the RKC is the Snatch Test. 100 strict reps in 5 minutes or less proposes many issues beyond tearing hands. What many first time RKC hopefuls don’t account for is that the Snatch Test will occur after already having completed hundreds of swings, countless overhead presses and a plethora of skill refining corrective exercises. You’re already physically fatigued by the time the Snatch Test begins! Another major issue to consider: food and sleep! Your nervous system is taxed and therefore sleep is light (for most of us) and there is little time to eat throughout the day, especially to meet the needs of your great caloric output.

To ensure you’re getting adequate nutrition while training for the RKC keep it basic! Avoid large amounts of alcohol, sugar and refined oils. Stick with nutrient dense foods like sprouted grain cereal and bread, free-range eggs and organic meats, fruits and veggies. Looking for something to drink? Try water.

Hand care is of utmost importance, as is the correct kettlebell. Dragon Door’s kettlebells may cost more than the kettlebell you’ll find at your local used sports store but they’ll help prevent tears as they’re single mold cast iron. Huh? Single mold cast iron bells do not have a bump or ridge on the bottom of the handle. That ridge is best to avoid. It will cause extra friction during kettlebell ballistics. Here is a simple hand care protocol:

  1. Buy a 2-sided callus shaver. Sold at any drug store.
  2. Fill a bucket or pot with hot water.
  3. Soak hands and then shave skin.
  4. Apply Shea butter or Bag Balm (Yup, the stuff for cow udders. Hey! I’m from Vermont and now live in Wisconsin’s Dairyland! What can I say…)

2-3 times per week soak hands in water hot enough to make you think twice for about 5-10 minutes. Thoroughly dry hands with hand towel and wait about 30 seconds for moisture to completely evaporate. Now, take the callus shaver’s rough side and shave calluses for about 20-30 seconds on both hands. Flip callus shaver over to the gritty sand paper side and shave 20-30 seconds on both hands. The dead skin will start to crumble off, leaving your rough hands smooth. DO NOT over shave or your hands will burn.

Now we know how to eat and care for our hands, so how do we train? Good question. Below you’ll find a foolproof training program that’ll leave you with two thick pieces of paper and a shiny, new red shirt that says “RKC Instructor”.

*The following program is based on testing with a 24kg kettlebell. Please adjust based on your test size bell.

Monday – Light Day working on Level 1 skills. Smooth out your form and master the techniques.

Warm up: 12-16kg Arm Bar per side w/20-second hold; Turkish Get Up (TGU) per side; Pull up bar hang x10-seconds w/shoulders packed; hold deep Goblet Squat x10-seconds; x10 Swings; Cobra Stretch and x3-4 deep breaths arching on the inhale, Kime stance on the exhale.

Nick showcasing the mobility enhancing RKC Arm Bar

x10-minutes TGU with 16kg. Do as many TGUs as possible in 10 minutes with strict form.
*light weight is used to fix form. No record setting here…

x5 sets of x5 Cleans per side

x5 sets of x5 Presses per side

x5 sets of x5 Double Bell Front Squats

x5 sets of x10 Single Arm Swings per side

*all the above exercises are done with a 16KG Kettlebell. Switch in the air.
**allow 20-30 Seconds break in between the ballistics, x45 Sec – 1 minute in between the grinds.

Superset: x10-Second Hardstyle Plank with x5 Straight Leg Raises for a total of x5 sets. Ensure your lower back is hard pressed into the floor during the leg raise.

Tuesday – stretch, practice deep breathing to expand the diaphragm.

Wednesday – medium day

Warm up: same as above

x30 seconds – 1 minute Hardstyle Plank.

x10 2-handed Swings with anywhere from 24kg-32kg bell EMOTM (every minute on the minute) for 10 minutes.
*fast n’ loose between sets of Swings

x2 Single arm Clean, Squat and Press with 20-24kg EMOTM for 10 minutes
*alternate sides each minute

x1 TGU per side with 24-32kg (based on current level of strength) By using strict form you’ll know the appropriate weight to utilize.

x1-minute Hardstyle Plank.

RKC hopeful Natalie showcasing proper TGU form. Note locked out joints and knee-to-hip alignment.

Thursday – same as Tuesday

Friday – Press/Pull Up Ladders

Clean and Press x1-5 reps superset with Pull Ups x1-5 reps

*if you perform x1 clean and press then perform x1 pull up. If you perform x2 clean and presses, perform x2 pull ups and so on; if you cannot yet do pull ups, supplement the number of pulls ups with seconds for a flexed arm hang. Ensure you end each rep with elbows locked out overhead before releasing the bar.

*climb the ladder up to 5 reps a total of twice per side. Example: x1 left, x2 right, x3 left, x4 right, x5 left and then start again with x1 right, x2 left, x3 right and so on…

*bell size is subjective to the individual’s current level of strength. Choose a bell you can perform x2 full ladders utilizing strict form. Practice this high load for about 6-weeks before moving up to a higher bell. Never sacrifice form for pride. If you need to do fewer reps, sets or weight so be it!

*When to move up? Once you can successfully complete x2 full ladders per side for a few consecutive weeks.

x5 set of x5 Heavy Bell Single Arm Swings per side with 32kg, for a total of 50 Single Arm Swings

Saturday and Sunday – Stretch, practice deep breathing, visualize passing the RKC, read Master The Kettlebell by Max Shank and watch Lord of The Rings (the extended versions!)

For the first 2-3 months, pick one Sunday per month grab a 24kg, set the timer for 5-minutes and:
Clean and Get-it-Overhead (without setting the bell down).

Options include: Clean and Press, Clean and Push Press or Clean and Jerk. Your resting positions are overhead or in the rack. This will help build your mental and physical threshold. Use a single kettlebell or if you’re mobility is like that of Bryan (below) use double bells!

Bryan showcasing mobile joints with double 24kg kettlebells locked out overhead.

Before you begin incorporating Snatches, I recommend following the plan above for your first 2-3 months of RKC preparation. The purpose of this is to develop mobility, stability and comfort with the RKC standards. There is no use in weight training with improper form. I call this “injury training”. You want to “strength train”. Once the 2-3 month mark hits, practice this Snatch progression in place of the 5-minute Clean and Get-it-Overhead:

Weeks 1-6: 16kg or 20kg

Weeks 6+: 24kg

Week 1: Snatch for 1-minute

Week 2: Snatch for 1½-minutes

Week 3: Snatch for 2-minutes

Week 4: Snatch for 2½-minutes

Week 5: Snatch for 3-minutes

Week 6: Snatch for 5-minutes

Start over with a heavier bell if you achieve 100 strict Snatches in 5-minutes. Focus on form and the biomechanical breathing match.

There you have it! A simple, effective and nourishing kettlebell program. How cool would it be to see 90% + pass at the RKC Workshop in Milwaukee May of 2015?

A word to the wise: If you are not sure of the RKC standards, hire a local RKC to help you prepare. If there are no local RKCs, reach out to me or another member of the community and we’ll do our best to assist you via the Internet.

RKC hopeful Andrew nailing his 5-minute Snatch Test!

***
RKC Team Leader, Nick Lynch is a Strength and Conditioning Coach at Milwaukee School of Engineering University (MSOE). He owns Superb Health Milwaukee, a kettlebell studio in Milwaukee, WI. Most recently, he became an RKC Team Leader. He has 13 years of full-time training and coaching experience and a lifetime of wellness education. Nick lives in Milwaukee, WI with his wife Natalie and son Weston.

Filed Under: Kettlebell Training, Tutorial Tagged With: exercise programming, how to pass the RKC, Nick Lynch, Prepare for RKC, programming, RKC Prep, RKC Testing, RKC Workshop, tutorial

  • « Go to Previous Page
  • Page 1
  • Page 2
  • Page 3
  • Go to Next Page »

Primary Sidebar

Featured Products

previous arrow
BOOK-RKCBookofSnC
HardStyleKettlebellChallegeDanJohn700
BookCoverMasterTheKettlebell1
RKCiconKettlebell512
KettlebellGoddessdv040
next arrow

Recent Posts

  • RKC Big Six Workout
  • The Kettlebell Swing & Low Back Pain
  • Key Kettlebell Exercises To Help You Create Better Balance
  • How to Most Effectively Use Kettlebells to Meet Your New Year Goals
  • 1 Exercise That Checks All The Boxes
FOLLOW US ON TWITTER!

Archives

Copyright © 2025

Dragon Door Publications / The author(s) and publisher of this material are not responsible in any manner whatsoever for any injury that may occur through following the instructions or opinions contained in this material. The activities, physical and otherwise, described herein for informational purposes only, may be too strenuous or dangerous for some people, and the reader(s) should consult a physician before engaging in them.