• Skip to main content
  • Skip to primary sidebar
  • Home
  • Contributors
    • Matt Beecroft, Master RKC
    • Martijn Bos, Master RKC
    • Andrea Du Cane, Master RKC
    • Angelo Gala, Master RKC
    • Chris Holder, Master RKC
    • Steve Holiner, Master RKC
    • Dan John, Master RKC
    • Mike Krivka, Master RKC
    • Thomas Phillips, Master RKC
    • Robert Rimoczi, Master RKC
    • Phil Ross, Master RKC
    • Max Shank, Master RKC
  • Workshops
    • HKC Workshops
    • RKC Workshops
    • RKC-II Workshops
  • Find an RKC Instructor
  • Resources
    • Articles
    • Forums
    • Kettlebells
    • Products
  • Blogs
    • PCC Blog
    • Strong Medicine Blog
  • Archives

RKC School of Strength

Official blog of the RKC

kettlebell how to

Hacks for an Iron Clad Goblet Squat

December 2, 2015 By Mike Krivka 11 Comments

MikeKrivkaGobletSquatLeadPhoto

What is a hack? Hacks are shortcuts or enhancements and can be technical or lifestyle based. Think of hacks as inside tips to get the good stuff—the stuff that works fast and gets you to the tasty, rich and gooey center quicker! In this case, my goal is to provide you with hacks that will allow you how to get the most out of the kettlebell goblet squat.

What’s the Big Deal?

The goblet squat lies squarely within the realm of “simple but not easy”. But, don’t confuse the goblet squat with something that is so “simple” to master that it’s not worth your time. On the contrary—it is supremely important for all demographics, age groups and athletic abilities. Because it is so “simple”, it is easy to underestimate what needs to be in place for it to be maximally effective. Anyone looking at the goblet squat would immediately think “I can do that” …and they can. Once they get the feel for what the goblet squat really is, then they can then learn the specifics that take the goblet squat from simple to sublime.

By the way, if you don’t grasp the importance of the goblet squat yet, consider this: the goblet squat is part of both the HKC (Hardstyle Kettlebell Certification) and the RKC (Russian Kettlebell Certification). It is also one of the techniques Master RKC Dan John recommends to any and all of the athletes he trains—that should give you some indication of its value and application.

Hacking Away at the Goblet Squat

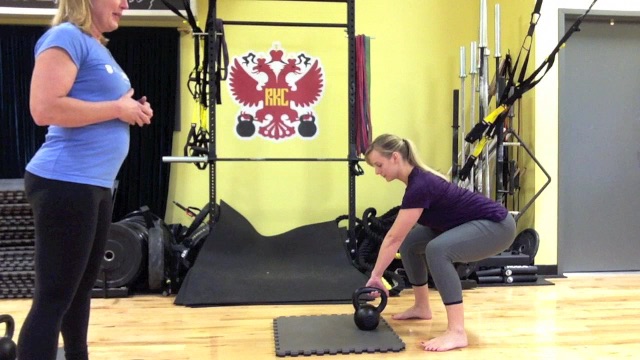
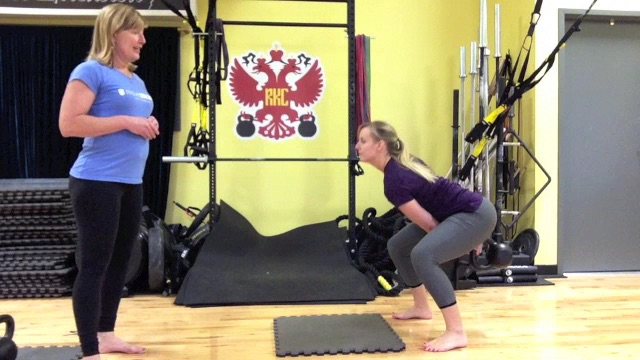
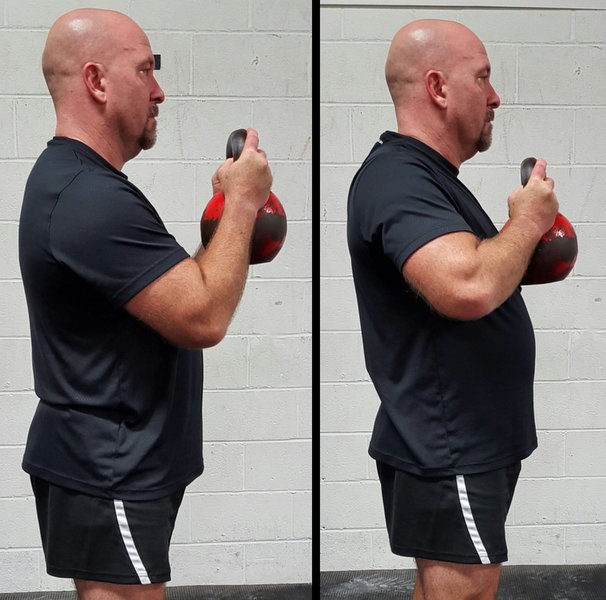
The following are a series of hacks that will allow you to get the most from the goblet squat. Take a look at the pictures so that you can effectively model the movement.

Elbows to Knees—It’s a Straight Line!

  • Don’t unload the torso by flaring the elbows outward or forward—you are supposed to feel the weight of the kettlebell on the front of your body, especially the stomach.
  • Where you start dictates where you end up—if you unload the torso by flaring the elbows, you will find it difficult, if not impossible to find the correct bottom position in the goblet squat.
  • Kiss your knees with your elbows—go down slow enough so that your elbows and knees barely touch; think of it as a caress! From some of the examples I’ve seen there would be a lot of bloody lips!
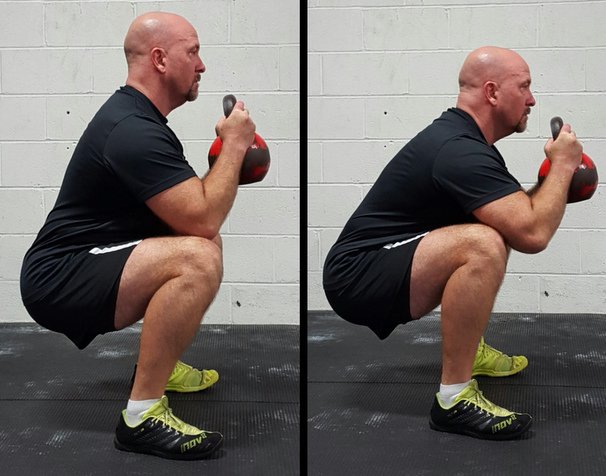
  • Tall and proud—with near vertical forearms, torso, and shins in the bottom position.
Mike Krivka Goblet Squat Elbow Position
Left: correct elbow alignment, Right: incorrect elbow alignment and posture faults

Find the Perfect Stance That Works For You

  • Heels in your armpits, or slightly wider is a good starting point. Going excessively wide is not going to help.
  • The toes may face straight forward or slightly turned out within 15-20 or so degrees, depending on each person’s individual hip structure.
  • Excessive external rotation should be limited. There may be mobility issues that need to be addressed if they flare excessively. This is a real problem especially if the feet rotate outward while squatting.

The Rack Is Where It’s At!

  • The kettlebell should not be resting on the chest—I know, I know, I know! It’s easier to hold it there but you are offloading the weight to the shoulders and neck.
  • Wedge it—the kettlebell should be held in a “wedge” created by the triceps locked into the lats and the elbows tight against the ribs.
  • Short of breath? The “wedge” should focus the load on the abs, lats, and pecs, not the shoulders and neck.
  • Heavy—the kettlebell is going to feel exceptionally heavy if held correctly in the wedge. Good! You’re doing it right!
  • Straight wrists—don’t break the wrists while holding the kettlebell. Broken wrists are going to adversely affect the movement down the line and you will be sneaking in compensations to correct them.
MikeKrivkaGoblet Squat Kettlebell Position
Left: correct elbow alignment, Right: incorrect elbow alignment and posture faults

It’s a GRIND, Damn It!

  • Lock down: “Lock down” your ribs before you start your decent. Some people call this bracing, but the end result is that you are clenching your abs, pulling your ribs down, and minimizing slack in the upper torso and thoracic spine.
  • Slow down: Slow way the heck down and pull yourself into the bottom position.
  • Hold it: Once you get to the bottom, maintain the tension. If you release it you’re going to be challenged to get it back and not comprise coming up out of the bottom position.

Bust a Move!

  • Don’t “pop and drop” into the goblet squat, this refers to the tendency for athletes to load forward through the hips and then throw them back to initiate the goblet squat.
  • Lock the ribs down first, this will keep you from even thinking about loading forward and backwards to initiate the movement.
  • Initiate with the hips—but not with a ballistic unlocking of the hips. The hips unlock and are pulled straight down.
  • Don’t drop—in no uncertain terms, do not drop into the bottom position of the goblet squat. Pull yourself slowly down into the bottom of the squat. Think G-R-I-N-D! I know it sucks, deal with it!

Start Strong to Finish Strong!

  • Where you start will either help you or hurt you. If you start in a bad position, chances are you are going to end up in an even worse one. With that in mind, your starting position for the goblet squat should be considered very carefully.
  • Down, not back: Pull yourself straight down leading/initiating with the hips. “Pry” the hips away from the elbows
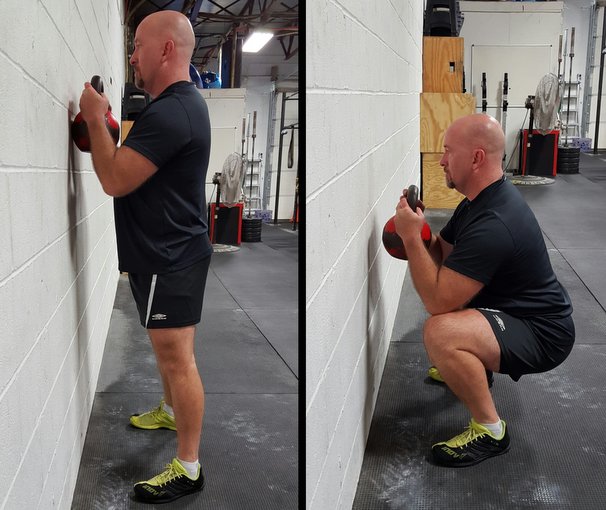
  • Face the wall: The goblet squat can (and should be practiced) facing a wall. Start with the kettlebell touching the wall. Done correctly, you will still end up with plenty of space at the bottom.
  • Enough is enough: The goblet squat terminates when the point of the elbow touches just inside the knee; there’s no reason to go lower unless you are working on mobility.
  • Stack it up! From the bottom position, keep driving and maintaining alignment until all of the “parts” snap back into place. You should end up exactly where you are started!

Putting It All Together

The goblet squat is part of the “Trinity” in the HKC and “The Big Six” in the RKC for good reason. It looks so simple—and it is—but it will only be effective if you know how to efficiently load and unload it, as well as how to make the transitions smooth and flawless. Making the goblet squat look “simple” is not so much a factor that it is simple to do, but that the athlete has taken the time to properly cultivate the movement. Take some time to explore the points that were made above, get a feel for how the load is set and maintained throughout the movement, and I’m sure that you will come away with a new and profound appreciation for the goblet squat.

I look forward to seeing your thoughts and comments below. Until then, “Squat On Garth!”

***

About Michael A. Krivka, Sr. – Senior RKC: Michael A. Krivka, Sr. is a Washington, DC native who has been involved in Kettlebell training for over a decade and is currently a Senior RKC and member of the RKC Board of Advisors and the RKC Leadership Team under Dragon Door (where he has been listed as one of the top reviewed RKC’s in the world for the last five years). He is also the author of a bestselling eBook entitled “Code Name: Indestructible” and is in the process of finishing up several other eBooks on Kettlebells, body weight, and the integration of other tools into an effective strength and conditioning program. Mike has traveled extensively throughout the United States teaching Russian Kettlebells to military (USMC, USN, USA and USAF) and law enforcement personnel (FBI, DEA, USSS and CIA)… read more here.

Filed Under: Kettlebell Training, Tutorial Tagged With: goblet squat, goblet squat tutorial, how to do the goblet squat, kettlebell how to, mike krivka, tutorial

Achieve Pain-Free Single Kettlebell Cleans From The Start

January 28, 2015 By Lori Crock 5 Comments

RKC Team Leader Lori Crock's Kettlebell Cleans Tutorial

I am a coach who hates to see people in pain from doing cleans.

And it doesn’t matter whether it’s a beginner, or a more advanced kettlebell athlete, the clean can be a challenge to do as effortlessly as its kindred ballistic—the swing or even the snatch.

I speak from experience—the clean was hard for me when I was preparing for the RKC-I. It wasn’t hard with the typical thump on the wrist and forearm in the catch. No. My issue was a shoulder-hike on one side as the kettlebell made its way up … which can be even worse with the trap pain and the potential for some serious asymmetry down-the-road.

To avoid this, read on!

When you are first learning the clean, it can seem mysterious as to what the hand, arm and kettlebell are doing on the way up to the racked position. It happens so fast!

Often we see the clean only as a transitory movement that prepares us for pressing, front-squatting or doing racked carries—instead of focusing on the quality of the clean—even though we know a more efficient clean results in stronger pressing and squatting. And the clean is a nice alternative to the swing or snatch for conditioning.

You might not realize the inefficiencies in your clean if you don’t train it on its own very often—until you notice bruises on your wrist or arm the next day.

So let’s review the phases of the clean to achieve pain-free cleans. Note that the coaching cues included here are phrases I use when teaching to help people remember key points. The phrases may not exactly match the words used in our RKC manual, but they are rooted in my RKC kettlebell training.

The Swing

Get your two-hand and one-hand swing down first to set your start position, hip hinge and especially a deep back swing. Use cheat cleans (two-hand cleans) while you are learning the swing to prevent grooving bad movement patterns with your single kettlebell clean.

The Setup

Clean setup is just like the swing, holding the center of the handle, except the handle is tipped vertically for internal shoulder rotation to prepare your elbow to lock into your side once your arm moves through to the front of the body.

Coaching Cue: Set up like a slingshot.

Lean back with hamstrings on, lats activated, the kettlebell is tipped toward you—the whole body is taunt and slightly leaning back—and ready to release the kettlebell into a deep back swing.

You are in this same slingshot position each time you clean, whether from the ground or in the air into another rep. This athletic, ready position also applies to the Swing and Snatch with the handle in a horizontal position … but when learning the clean, in my experience, students need a reminder about the importance of the setup because they are more focused on the finish.

Lori Crock Kettlebell Cleans Tutorial: The Setup
The Set Up

The Back Swing

Get into your best hip hinge and hike the bell back as deep as possible to load and explode out of your hips. Shortchanging the back swing means you’ll end up without the power to send the kettlebell upward; so your body may compensate by arm curling the kettlebell or hiking the shoulder to assist the kettlebell upward.

Coaching Cue: Crush the wall behind you with your tailbone and explode up.

Go back to the swing if you are having problems achieving a deep back swing and hip explosion.

Practice: Swing-Swing-Clean 3 times each side to refine the back swing for the clean.

Lori Crock Kettlebell Cleans Tutorial: The Back Swing
The Back Swing

The Breathing

Breathe in through your nose to fill the diaphragm on the back swing. Exhale as the hips snap and knees and glutes lock.

Hardstyle breathing is used for power production and safety at the concentric or positive part of the clean (and all ballistic kettlebell movements). Exhaling when the hips snap creates a powerful muscular contraction in the torso that assists the body with the movement.

Coaching Cue: Explode, exhale.

Time your exhale on the hip snap/lock—not on the catch of the kettlebell in the racked position.

The Rise

When the kettlebell enters the front of the body there is some quick work to lock the elbow against the side of the body and get the hand around the kettlebell handle with a loose grip. Do this right away after the back swing when the hand is at hip level rather than waiting until you are about to rack the kettlebell.

Coaching Cue Elbow and Arm: Hip and zip

Lock the elbow into you side above your hip, zip up your jacket; keep you hand and arm close to your chest as you guide the kettlebell upward.

Coaching Cue Hand: Houdini hands

Move your hand quickly around the kettlebell handle as soon as it enters the frontal plane; do this quick hand work at approximately hip/waist level.

Practice: Clean in front of a wall, door, or post to practice keeping the kettlebell close to the body if you tend to cast it out away from the body. Use your other hand to cover your face in case of actual impact to the wall.

The Catch

The triangle of your forearm / upper arm will receive the kettlebell and hold it with even pressure (50% pressure on forearm and 50% on your bicep), but think of the whole body as catching the kettlebell. We move into a vertical Hardstyle plank when receiving the kettlebell to help avoid high impact on the wrist and forearm.

In the racked position, the kettlebell will not be sitting on your chest; instead, the inside of your arm will connect with at the side of your torso with a vertical forearm and vertical wrist about at the level of your collarbone. Do not hold your racked arm out in space—keep it touching the body to prevent overloading the elbow joint and to engage the lats. The arm and the body are connected and working as one unit.

Coaching Cue Torso: Catch with your cylinder of strength (Thanks, Andrea Du Cane for this phrase!)

Feel the muscular sinking in of your whole body around the kettlebell (not a collapse, but a tightening) as your abdominals and glutes contract, lats engage, knee caps roll up into quads and the entire body links and locks to receive the kettlebell in the racked position.

Coaching Cue Wrist: Knuckle up!

Because we use a loose grip on the rise of the kettlebell, beginners sometimes end up catching with a ‘broken wrist’ (wrist slightly bent back) in the racked position. To avoid this, re-tighten the grip after the catch so that knuckles are flat and facing the ceiling.

Practice: 5 Cleans left and 1 Hardstyle plank for 15 seconds / repeat right.

The Drop

Tip the wrist to release the kettlebell into a downward descent with a relaxed arm, thumb down slightly and the shoulder will be slightly internally rotated. Use only enough tension to hold on to the kettlebell and guide it to the floor or into another rep. Your hips, as usual, are doing most of the work. Keep the kettlebell as close to your body as possible, with your arm still touching your body, and finish with the arm straight in the back swing position at the end of drop before setting the kettlebell gently on the ground.

Note that death-gripping the kettlebell on the drop can lead to elbow pain.

Coaching Cue: “Waterfall” the kettlebell downward.

Allow gravity to do most of the work on the descent of the kettlebell using only a light grip.

Putting it All Together

Now you are ready to put it all together and practice your (hopefully!) pain-free cleans.

The Practice

I use the clean for conditioning in complexes and chains. I also like kettlebell chains that include a clean to practice smooth transitions between movements. This complex meets both of those goals. I use one kettlebell for all movements with 1 minute of rest between 3-5 rounds.

10 Cleans left / 10 Cleans right

SA 2 Swings-2 Cleans-2 Press left

SA 2 Swing-2 Clean-2 Press right

***
By Lori Crock, RKC Team Leader, FMS II and MovNat MCT II. Lori owns MoveStrong Kettlebells in Dublin, Ohio where she teaches small group kettlebell classes to all ages and fitness levels and continues to be amazed, inspired and educated by her students. Her email address is lori@movestrongkbs.com

Filed Under: Kettlebell Training, Tutorial Tagged With: clean a kettlebell, kettlebell cleans, kettlebell how to, kettlebell instruction, kettlebell technique, kettlebell video, Lori Crock, RKC Team Leader, video

Primary Sidebar

Featured Products

previous arrow
BOOK-RKCBookofSnC
HardStyleKettlebellChallegeDanJohn700
BookCoverMasterTheKettlebell1
RKCiconKettlebell512
KettlebellGoddessdv040
next arrow

Recent Posts

  • Key Kettlebell Exercises To Help You Create Better Balance
  • How to Most Effectively Use Kettlebells to Meet Your New Year Goals
  • 1 Exercise That Checks All The Boxes
  • Kettlebells in the Clinic
  • How Breathing Can Improve Your Kettlebell Training
FOLLOW US ON TWITTER!

Archives

Copyright © 2023

Dragon Door Publications / The author(s) and publisher of this material are not responsible in any manner whatsoever for any injury that may occur through following the instructions or opinions contained in this material. The activities, physical and otherwise, described herein for informational purposes only, may be too strenuous or dangerous for some people, and the reader(s) should consult a physician before engaging in them.