• Skip to main content
  • Skip to primary sidebar
  • Home
  • Contributors
    • Matt Beecroft, Master RKC
    • Martijn Bos, Master RKC
    • Andrea Du Cane, Master RKC
    • Angelo Gala, Master RKC
    • Chris Holder, Master RKC
    • Steve Holiner, Master RKC
    • Dan John, Master RKC
    • Mike Krivka, Master RKC
    • Thomas Phillips, Master RKC
    • Robert Rimoczi, Master RKC
    • Phil Ross, Master RKC
    • Max Shank, Master RKC
  • Workshops
    • HKC Workshops
    • RKC Workshops
    • RKC-II Workshops
  • Find an RKC Instructor
  • Resources
    • Articles
    • Forums
    • Kettlebells
    • Products
  • Blogs
    • PCC Blog
    • Strong Medicine Blog
  • Archives

RKC School of Strength

Official blog of the RKC

strength

Three Ways to Reinforce Tension

October 24, 2018 By William Sturgeon Leave a Comment

William Sturgeon Kettlebell Swing

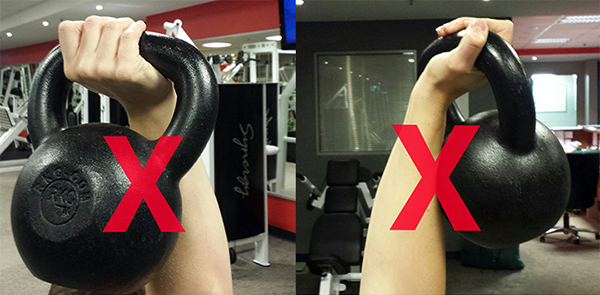
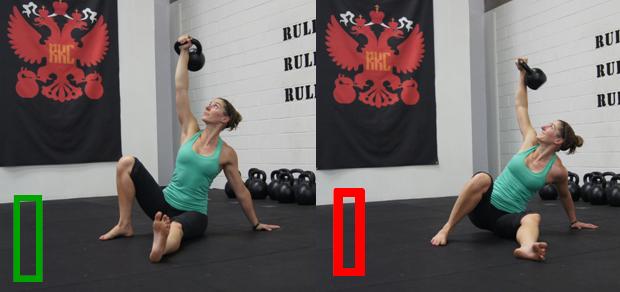
We commonly coach our clients to create tension with cues such as “brace the core”, “tighten the glutes”, “crush the handle”, etc.  These phrases can help get clients to create tension in their lifts. You may see the specific group of muscles tighten, or a change in your client’s face when you ask them to create more tension.

Deconditioned clients are often unable to create tension through a specific area at first. It’s important that we spend time teaching them certain drills and use different cues to help them find the ability to create tension. It can be challenging to teach people how to apply tension during a lift.

Why Reinforcing Tension is an Important Skill to Practice and Teach:

Tension Keeps You Safe
Ballistic movements like the kettlebell swing require that we move rapidly—and if the movement is done incorrectly it can lead to injury. Kettlebells are not unsafe tools—users with bad technique are unsafe. Placing an emphasis on stressing the muscle with tension will allow you and your clients to work on technique without irritating the joints as much.

Tension Builds Strength
Your muscles recognize tension, not load—this is why we should focus on contracting the muscle before and during the exercise. Using “time under tension” (TUT), you can stimulate the muscle for greater growth. The denser the muscle, the stronger the body. Producing more tension throughout your lifts can also help generate more force.

Tension Stimulates Muscle Growth
Creating mechanical tension is one the of the primary factors associated with muscle growth. Mechanical tension is created by stressing the muscle throughout its full range of motion during an exercise. The phrase “time under tension” (or ‘TUT’ as referenced in the paragraph above) relates to the amount of time we’re stressing the muscle during an exercise. The more tension created during an exercise, the more muscle that will be recruited to perform the task. In turn, this gives the muscle a greater growth stimulus.

Drills That Teach How to Create and Reinforce Tension:
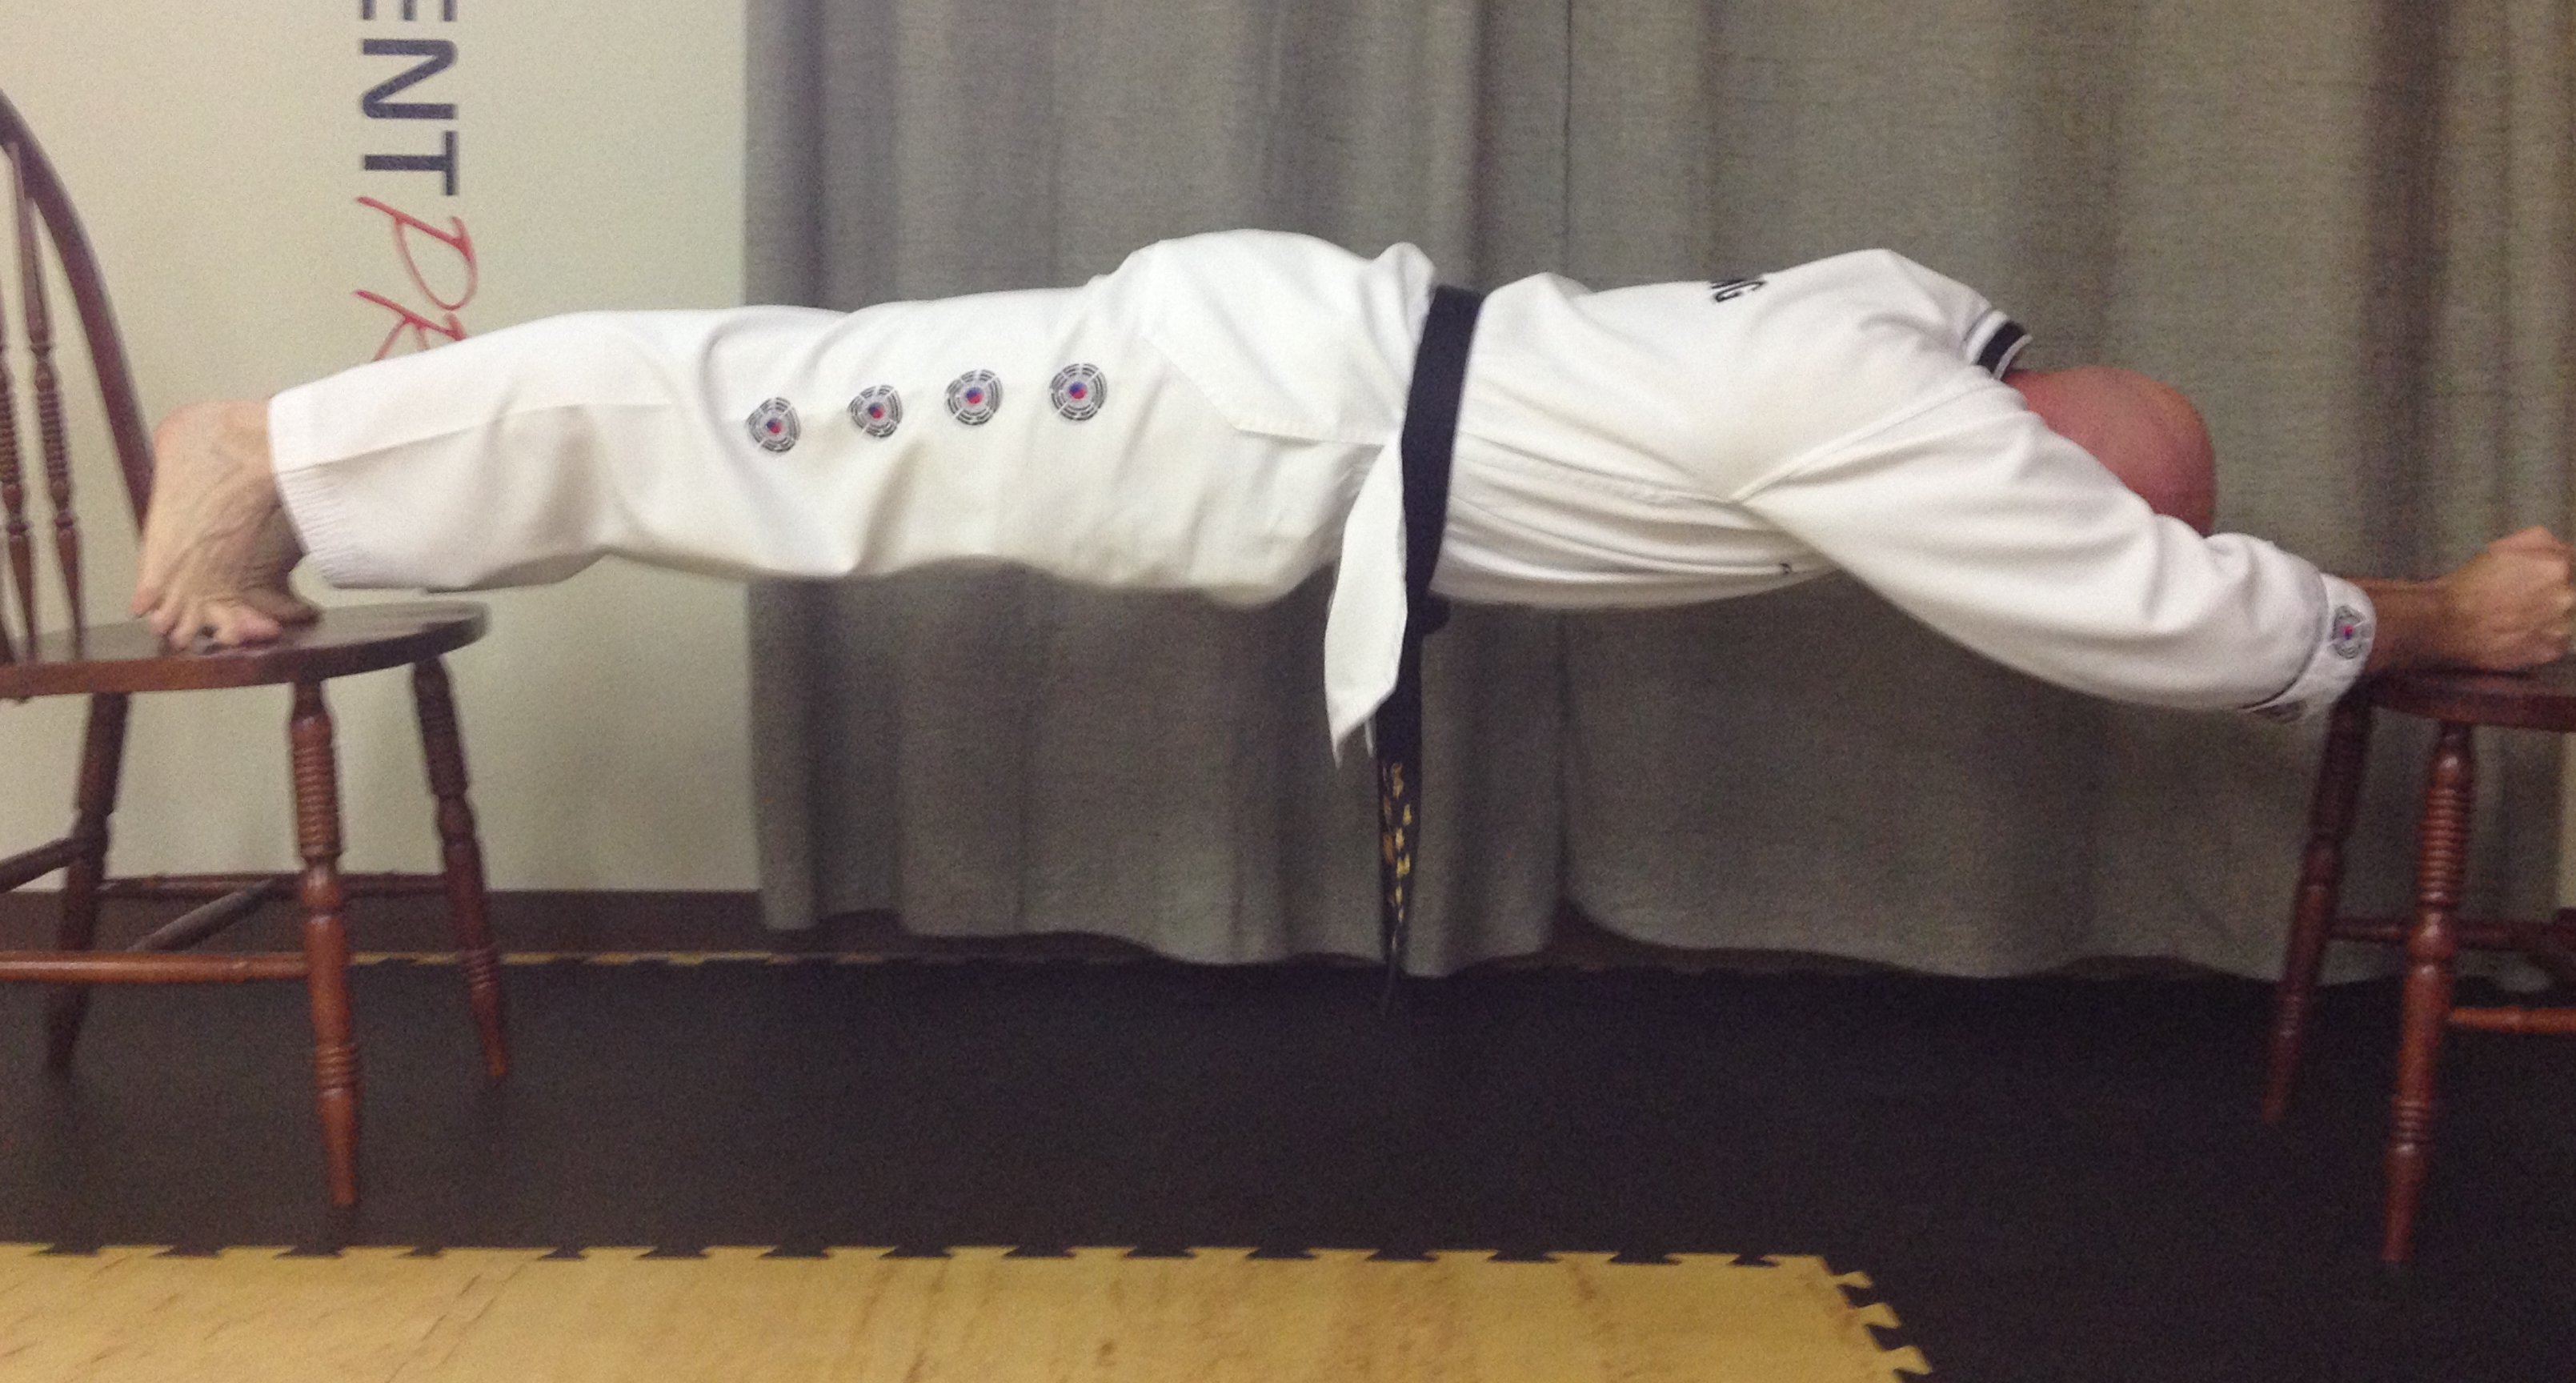
Hardstyle Plank
The RKC Hardstyle plank is the traditional plank’s older, much cooler brother. While a traditional plank is good for teaching a client to engage or brace their core, the client can still perform it poorly or fall short of the correct amount of tension we are looking to create. The Hardstyle plank creates a lot more tension than a regular plank. Most regular planks are held for 30 seconds or more, but the more intense Hardstyle plank is held for a much shorter amount of time maximizing the body’s full strength potential.

How to perform the Hardstyle Plank:

Isometrics
During isometric exercises, the muscle tenses but its length remains the same. A good example of an isometric exercise is an RKC drill we use to help pry open the hips. We place the client in the bottom position of a kettlebell goblet squat, then ask them to create a great amount of tension while forcing “prying” the hips out—all while keeping the hips in place. This powerful drill can help your clients find their glutes while understanding the amount of tension they need to create at the top position of their squat.

How to Perform an Isometric Hip Prying Drill
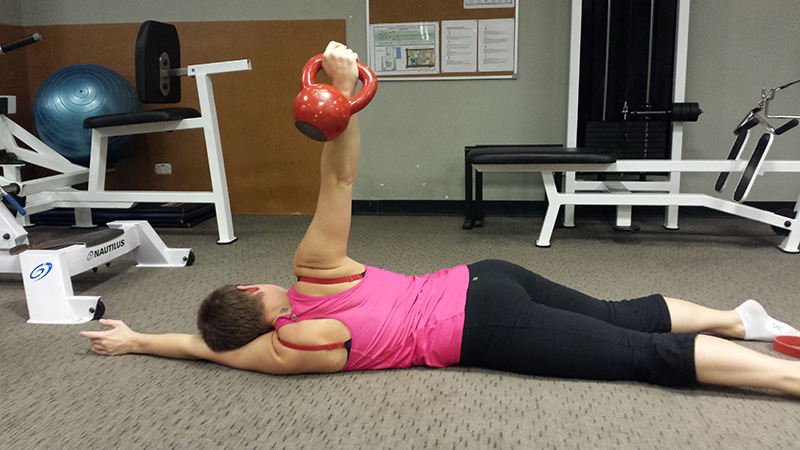
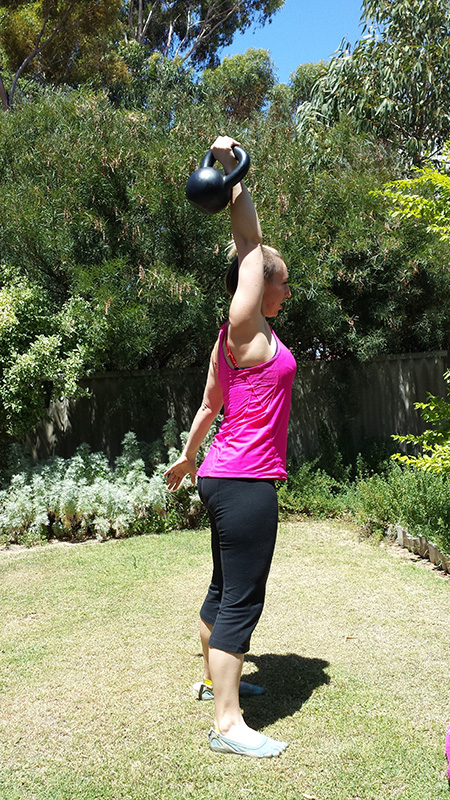
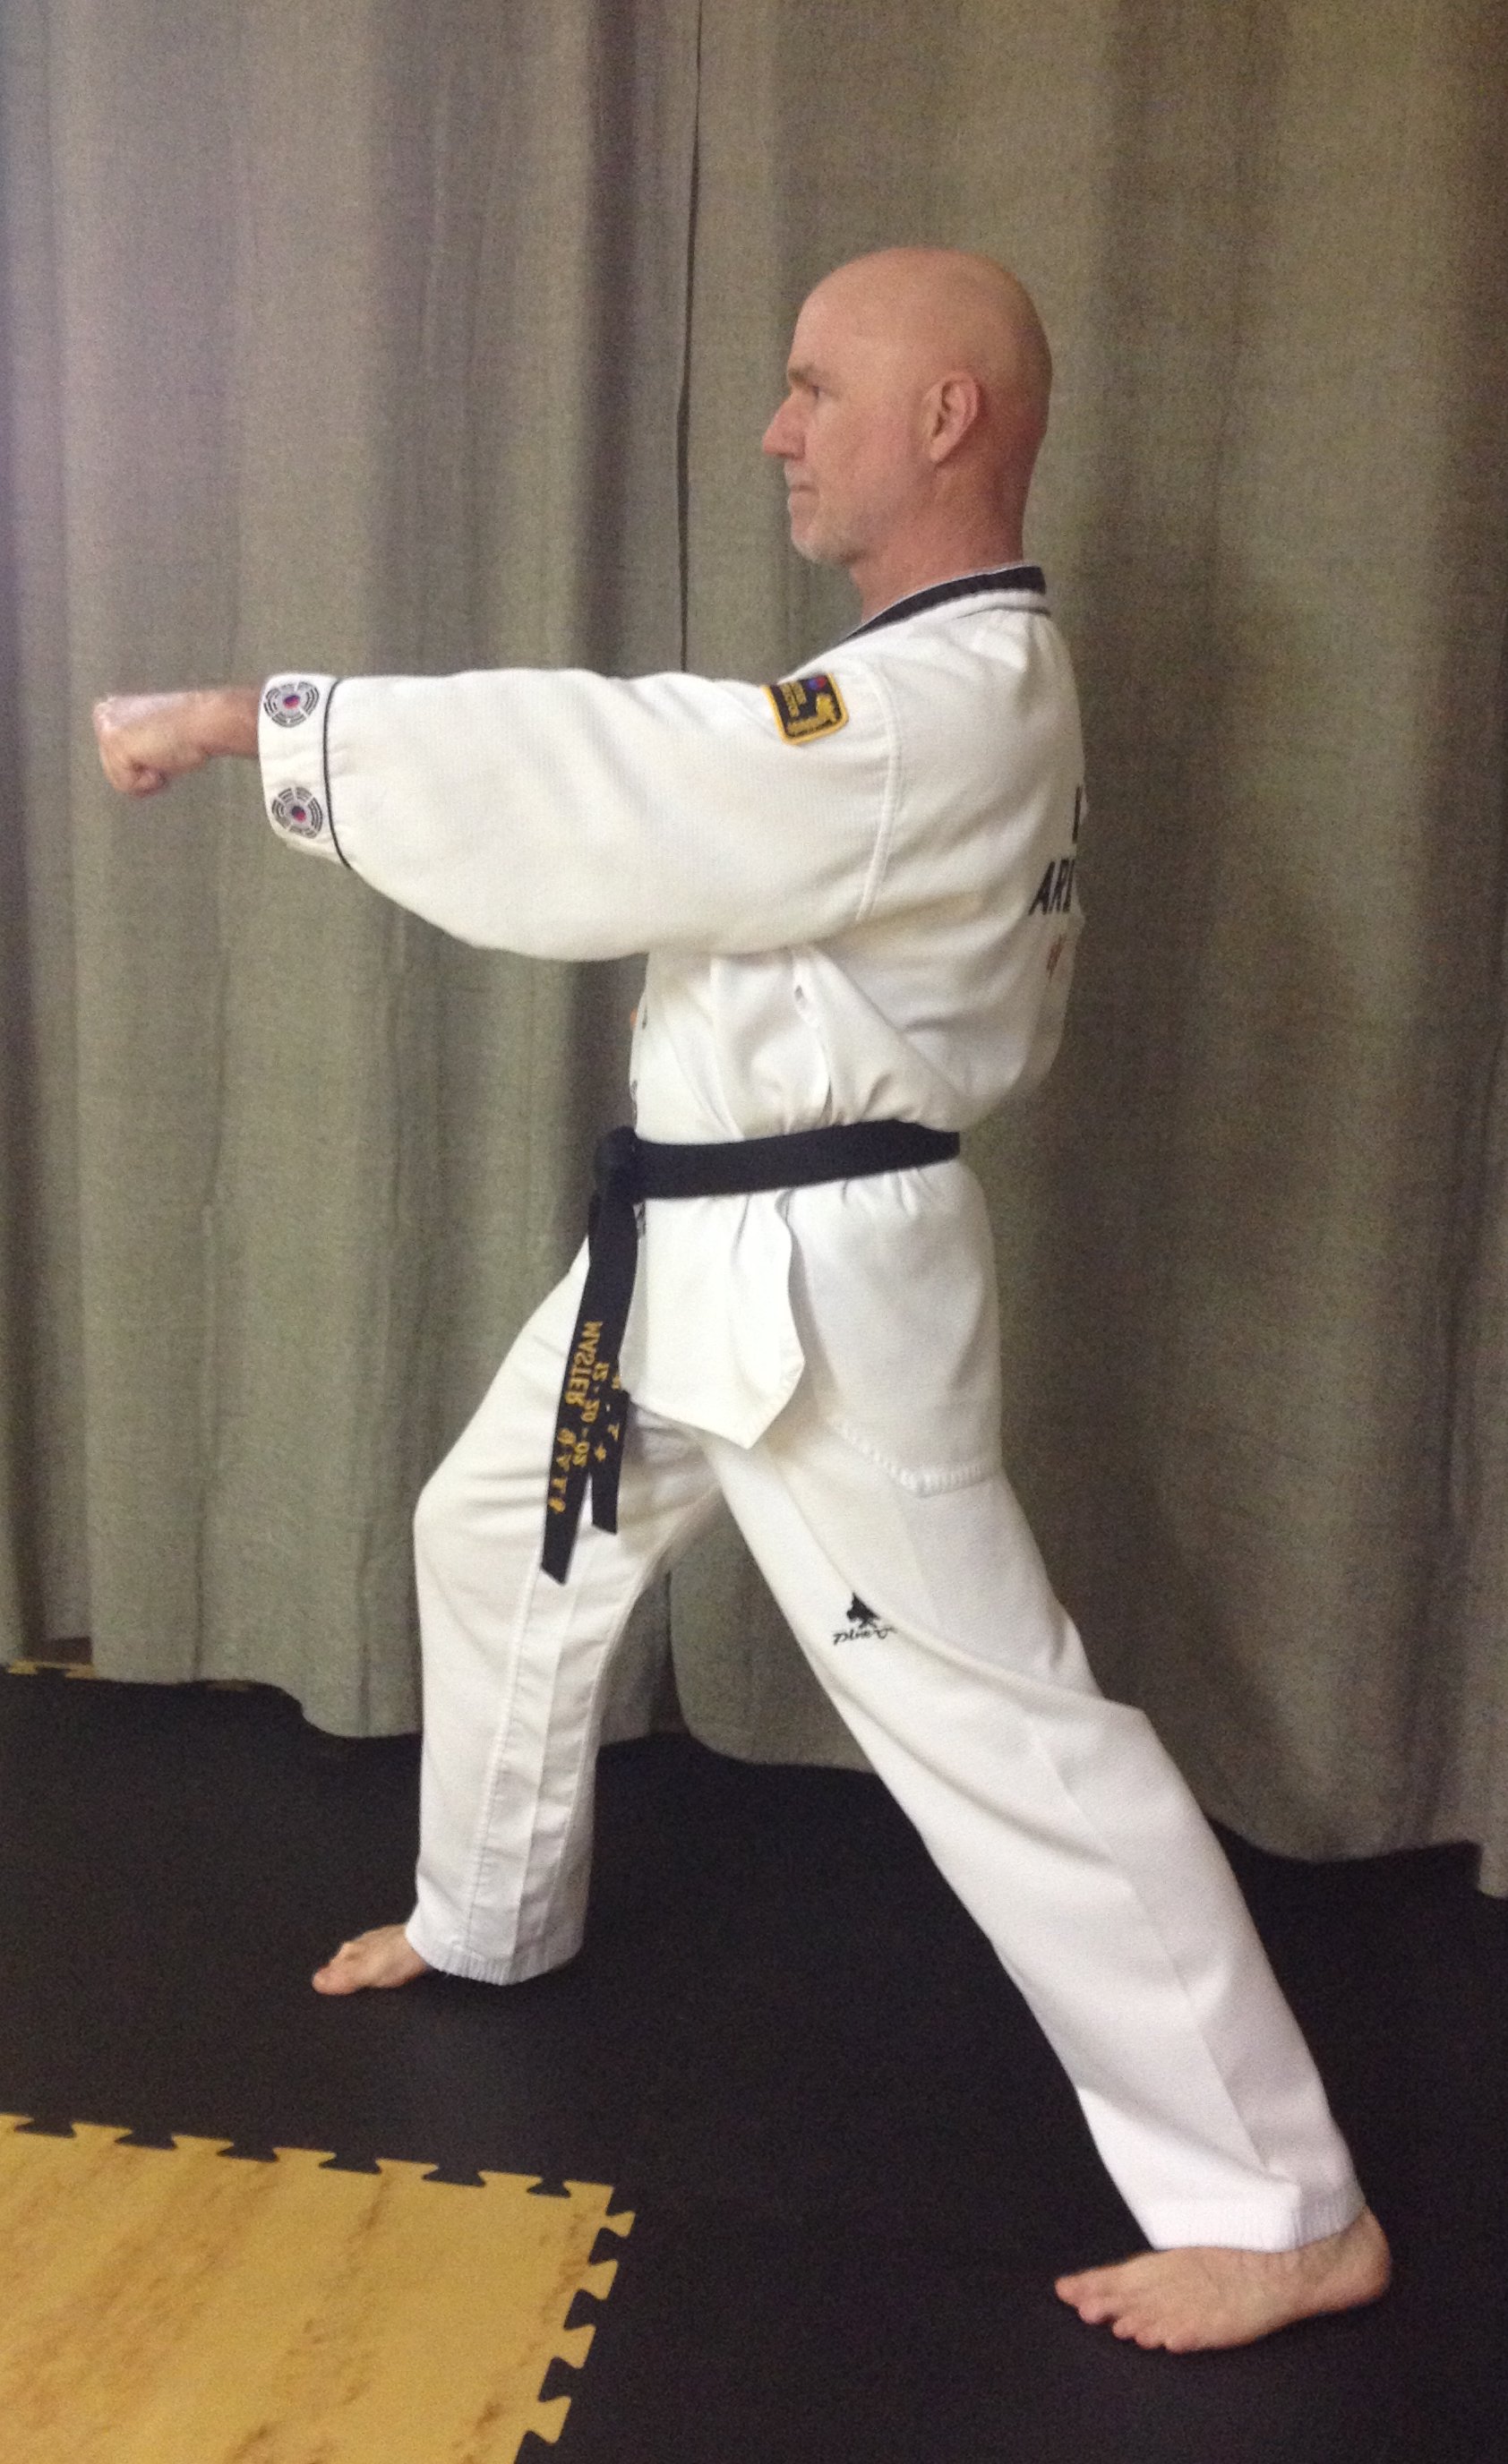
Time Under Tension
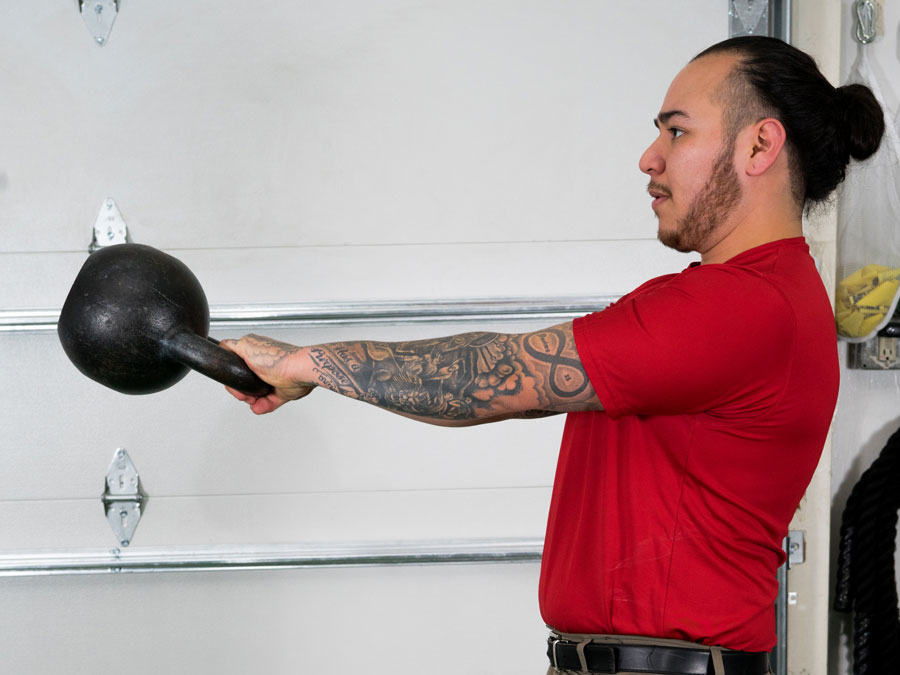
Time under tension is one of the greatest tools for helping our clients create or reinforce tension. Coach the client through a “grind” exercise—such as a kettlebell press—during a set amount of time. The kettlebell press can be performed and progressed in many ways, though most people will immediately want to just increase the weight. But, if we apply “time under tension” to the kettlebell press, we can make a lighter kettlebell feel far heavier. This can help a client spend more “time under tension” while safely finetuning their technique.

The Time Under Tension Kettlebell Press


****

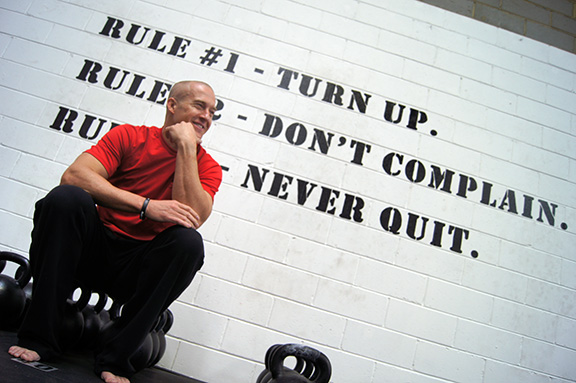
William Sturgeon, RKC II trains clients at his gym, Restored Strength. Contact him through his website at RestoredStrength.com or follow him on Facebook: facebook.com/restoredstrength

Filed Under: Coaching, Kettlebell Training, Tutorial Tagged With: Hardstyle Plank, isometric, isometric exercises, kettlebell press, RKC, strength, strength training, tension, Time under tension, William Sturgeon

How to Build Muscle Mass with Kettlebells

May 24, 2017 By Robert Miller 10 Comments

Robert Miller Beast Kettlebell Press

The number one rule for lifting—since lifting is life, it’s also the rule number one for life—is always look cool. This accounts for every variable of the workout and all the choices which come with it. Looking cool requires flawless technique, accounting for all safety points, and training with intention.

Training with purpose is the only way to get your peak physique. Let’s face it, we got into training to get jacked and stacked. Improving your physical appearance is an important exercise goal. Strength is a skill, sure. The stronger you become, the more you will get out of life. It is pretty safe to say we can accept this as a universal truth. However, since strength is a function of mobility and stability, we must pay homage to the details of healthy movement.

No other tools in modern history have offered more for dynamic strength gains than kettlebells. For some people, strength is a side effect of training. For others, strength is their only goal. Certainly there are trade offs in training which must be considered when setting goals, and more strength should always be a top priority. But, wanting to look like the prototypical athlete isn’t vanity—it is strength on display. And it takes a truck load of work. When we’ve put in the work, our bodies show it. People will check us out or size us up. How we look communicates our work ethic, discipline, overall health, confidence, and other aspects of our character. This is the cover of the book by which every other human judges our stories.

Robert Miller Kettlebell Racked
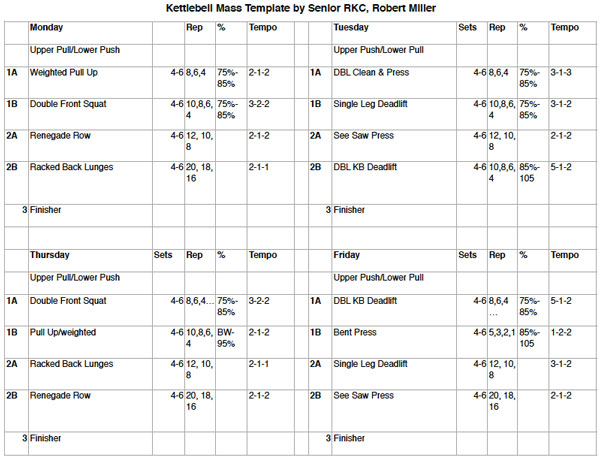
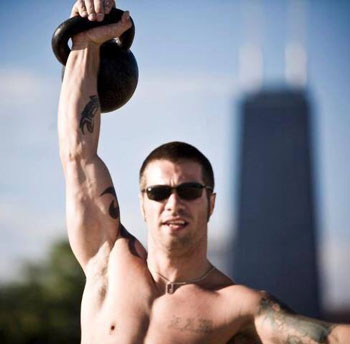
On some level, we all try to make ourselves more presentable. We’ve bought designer jeans from boutique stores and tried designer workouts at twice the price for half the results. If you haven’t reached this conclusion yet, let me help enlighten you: it’s not the clothes on your body that matter, it’s the body in your clothes. So, let’s tune up our bodies and spend our time wisely. Male or female it is important to maintain our muscle mass as we age and the kettlebell gets results. That’s why we train with kettlebells for massive shoulders, thick arms, solid legs, ripped abs and athletic skills for any task.

It’s grind time! Kettlebell ballistics are fun and one of the best ways to increase your conditioning and stamina but if you’re looking to bulk up, then kettlebell grinds are the answer.

Two key variables in the strength and hypertrophy equation are “X” (the speed of the work) and “Y” (time under tension). We want to simplify this equation and solve for X and Y. Every rep of our hypertrophy training program, becomes about decreasing X and increasing Y as we increase the resistance across the sessions. This is why kettlebell ballistics take a back burner during this period of training. To grow our muscles, we also need to choose the right movements. We don’t want to isolate the targeted muscles, because that approach doesn’t yield as much mass. Compound exercises are universally accepted as the most effective way to build muscle and strength. This still holds true at universities and “bro-science labs” around the world. Luckily for us 99% of kettlebell exercises are compound exercises.

Compound movements involve more than one muscle group, and usually use two or more joint systems. With all this tension, we won’t need much variety in our program. Since each exercise supports the next, there isn’t much need for accessory drills. With double servings from a simple menu of exercises, we will stimulate the growth environment.

These eight kettlebell drills are essential for building mass:

Kettlebell Front Squat:

Double Kettlebell Deadlift:

Military Press:

Renegade Row:

See-Saw Press:

Weighted Pull-up:

Back Lunges (Kettlebells Racked):

Single-Leg Deadlift:

Bent Press:

To keep growing muscle while combating training plateaus, we must attempt to master the training tactics of irradiation and lifting tempo. The concept of irradiation is important for creating tension and linking tensing muscles together. Strongly tensing a muscle will recruit nearby muscles to assist and support. However, this does not happen automatically. One must force neuromuscular activity to call as much of the muscle fibers into the workload through a full range of motion.

By making light training weights feel heavier during your reps, you force more supporting muscle tissue into activation. This is one of the central themes of the RKC. This type of training takes more focus, more attention to detail, and it isn’t easy—but training isn’t easy, nor should it be. We demand results, and that’s why we crush the handles tightly for the entire set. That’s why we force our inhales and exhales on time. That’s why we flex our glutes, quads and abs as we stand through the top of our squats. When we make our training more difficult by adding tension, we will force more hypertrophic adaptation with 85% resistance for sets of eight to twelve reps.

The tempo of the lift and instructions for maintaining tension throughout the set are the missing pieces from most mass building plans. We must focus during all three phases—eccentric, isometric, and concentric—of the working muscle’s stretch-shortening cycle to maximize growth.

The tempo of the lift is the amount of time spent in each phase under the added tension of the load. Add tension and stay active as the resistance is loaded through the eccentric or “negative” phase. Don’t rush this part, stretching the muscle combined with overload is the most effective stimulus for muscle growth. Pause and hold at the fully loaded position for at least one full second, sometimes up to five. Exploiting this isometric position under great resistance yields significant results.

Robert Miller Straddle See-Saw Press

The concentric phase of the lift is usually the most difficult phase since the muscle fibers are shortened under the resistance. When the muscles shorten, they get dense and pumped from the work. People often confuse this phase as the growth phase because it is difficult, but many studies have shown that it is not the most important phase for hypertrophic response. To make the muscles grow, place great emphasis on the negative phase.

A lifting tempo of 5-2-2 is a five second negative, a two second isometric pause, and a two second focused contraction until there is a full squeeze of the working muscle groups. That is how every rep is executed. A tempo of 3-2-1 is quicker: three second eccentric, two second isometric, and one second on the concentric phase. Your breathing may need to change with the longer duration lifts, but never lose your structure. “Breathing behind the shield” is an important cue to remember, especially when briefly holding those isometric positions.

What about the get-up and snatch? The get-up is a great drill to set up a strong and stable body. I would never discount the get-up. I think it’s the best exercise in the history of fitness. It will get your shoulders fully functional, fortify strength, and build coordination throughout the entire kinetic chain. This is why I prefer to use the get-up in beginning of my workouts. Instead of a warm-up, I call it a gear-up for getting everything grinding at the right speed.

I also love the kettlebell snatch. Throughout this muscle-building program, the snatch is best used as a workout finisher. Since we’re striving to train the muscles to generate more force, maintaining tension through the concentric phase, and especially the eccentric phase is the best way stimulate muscle growth. The snatch does a great job of eccentrically loading the posterior, but it happens so quickly that barely any time is spent under that tension. This is why it is not the greatest “muscle building” exercise even though what it does for the glutes, legs and abs is incredible. The snatch still is the Tsar of kettlebell exercises, but use it at the end of your session.

Having a wide range of kettlebells is necessary for double kettlebell drills and heavier progressions. Heavy weights will be necessary. As I mentioned earlier, strength will always be a central focus of all our programming. To achieve this most effectively, training weights should be in the calculated ranges of 80%, 90-95% and even beyond 100-105% efforts. It’s great that Dragon Door manufactures the “in between” weights in increments of two kilograms. Having these options will help smooth out the growth curve so the jump up to a bigger kettlebell won’t take nearly as long as before.

RobertMiller Kettlebell Overhead Press
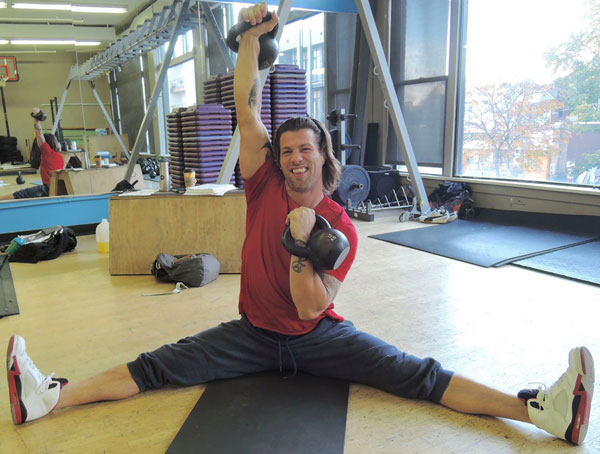
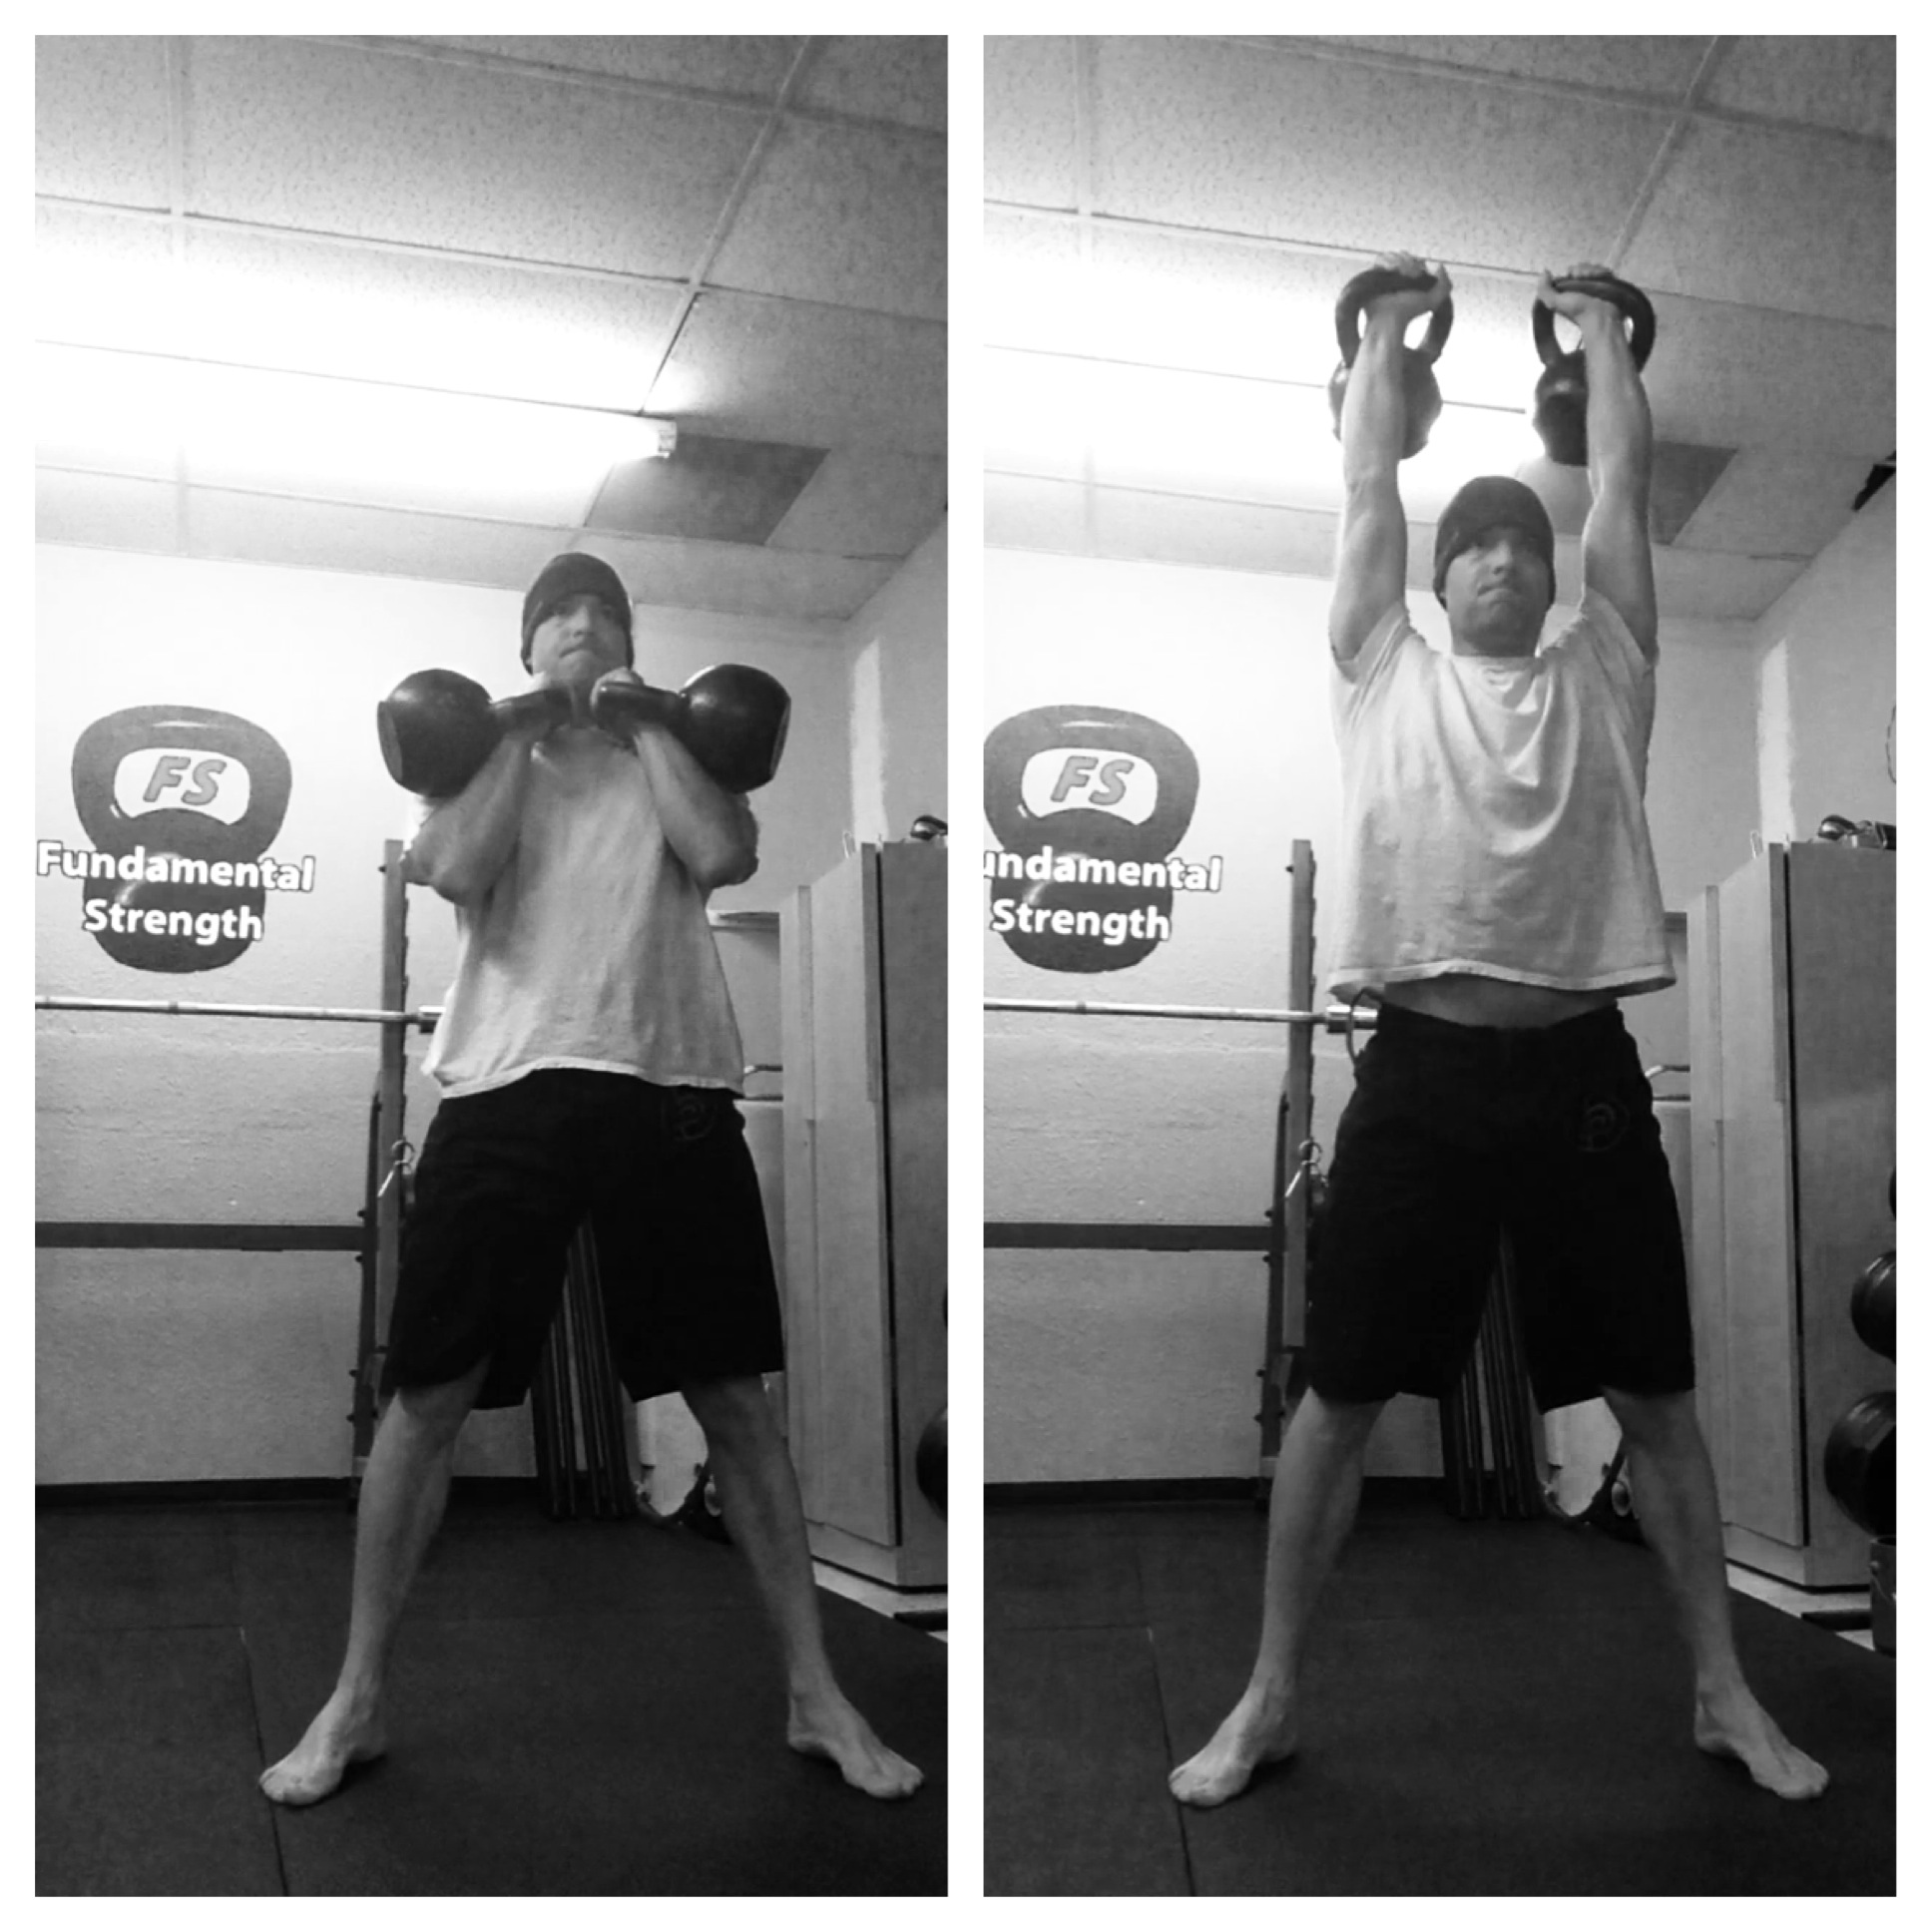
With strength on the rise, it’s time to volumize. So, double up every workout. Sets of double military presses will make your upper body, shoulders and arms more massive than single kettlebell work of the same volume. The same will hold true for all of your kettlebell skills and progressions. Two kettlebells are greater than one. Studies have shown that bi-lateral exercises are best for stimulating the most muscle hypertrophy. The beauty of training with kettlebells is that asymmetries are attacked since each weight must be unilaterally stabilized. Using a barbell can hide some of these asymmetries which can become imbalances over time. Using double kettlebells balances both sides of the body. With that said, I would still recommend barbell training at other points throughout the year. After all, we still want to follow the principles of The Purposeful Primitive.

Always train to improve your lifting technique. Perfect technique doesn’t just make you look cool, it is also the only way to achieve your strength or size goal. Your strength will build as you slowly increase the resistance, but be smart, if there is pain then stop. Check the ego. Technique is not about mental toughness. Good technique ensures that every increment of the movement, at every moment of the rep, for every rep of the set is intentional. The focus is on flawless architecture of the body; the machine as it moves. Marty Gallagher says, “We worship at the altar of technique.” If your technique is flawed with your training weights, then you may never reach your goal weight.

Training with a coach is the surest way to get rock solid technique in the shortest time possible. Other ways to check your technique are training with a partner or taking video of your lifts. You can learn a lot from an outside perspective. No matter how heavy the resistance or how fatigued your body, form and focus matter above all.

To force the muscles grow, this program will call for “heavy” lifts. Anything above 80% of your max is heavy, and ideal lifting technique must hold true on those heavy attempts to maximize muscle growth. Don’t sacrifice your results just to complete a rep. You’ll need to shore up your technique under these loads for even heavier loads in the future. This is the basic concept of progressive overload.

Finding the right work / life balance in a lifting program is important for continued progress. I recommend hitting a hypertrophic training plan twice a year. I like to split the year up in four periods and let my fitness goals change with the seasons. It is a harmonious to try to gain size in the fall, strength in the winter, hypertrophy in the spring, and then get ripped for the summer. For mass gaining programs, I would recommend lifting four days a week.

Organize the workouts in opposing modalities and muscle groups. For example, pair upper body pushing exercises with lower body pulling exercises. The next training session should look like the opposite with an upper body pull paired with a lower body push exercises. For mass, it’s best to do 4-6 sets organized into strength pyramids. Rep ranges should stay around 6-12 to optimize the growth response. Rest periods between sets are important for growth and can last from 1-4 minutes. It’s ok, breathe!

This template demonstrates the simplicity of working opposite modalities to push and pull your way to a bigger, stronger body. Increase the weights weekly as progress dictates.

Robert Miller’s RKC Mass Template:

Click here to download PDF

**Workout finishers are high intensity intervals for the last 10 minutes of the workout. Use a 0:50 second work period and a :10 rest period. Organize 5 opposing drills and do 2 rounds.

Example:

  • Jump lunges :50
  • Push Ups :50
  • Plank :50
  • Snatch (left) :50
  • Snatch (right) :50

Last, but equally important is recovery. You must focus on this phase of your training as well. After making progress with very rigorous training days, it’s necessary to bounce back. Size gains are made because the work causes microscopic tears in the muscle fibers; then the muscle fibers rebuild thicker and stronger. This rebuilding process takes proper nutrition and rest. Recovery grows muscles like rain grows flowers.

Here are a few simple tips to help shorten recovery time between training days: set a bed time, eat for recovery not flavor, drink a gallon of water everyday, stretch twice a day, nap daily, limit inflammatory foods like sugar and alcohol. Keep your eyes on the prize. Results are cool. Vices are not.

The only thing missing from this mass building plan is eating, abs and arms. In our training it is best to keep things simple and eliminate excess. Nutrition should be no different. I don’t really subscribe to fad diets. I just stick to a few simple principles to fuel muscle growth while keeping me lean in the process.

1) Drink a lot of water. Don’t drink calories. No more soda, beer, or juice. Just drink water and black coffee.

2) Eat leans, greens, fruits and nuts. Nourishment as nature intended.

3) Start every day with breakfast.

4) Eat frequent meals. Up to 6 small meals a day within your caloric ranges.

5) No excess. Garbage in is garbage out.

To make the abs visible, clean up your nutrition. Instead of ab isolating exercises in this program, the drills we chose are also some of the best core exercises out there. The abdominal muscles will grow in size. Many professional bodybuilders don’t do “ab” exercises. The heavy squats, weighted pull ups and other such drills require so much abdominal recruitment that accessory work is not necessary. A careful approach to nutrition is what makes the abs really pop.

While there are many diets and guidelines you could follow, most well-studied diets follow the aforementioned principles. Even though it is difficult to balance gaining mass and strength while keeping a lean physique, it can be done masterfully. This is also why it is important to periodize your programming throughout the year and eat to nourish your lifestyle. Focus on long term gains and sustainability—we must do this work for the rest of our lives.

There aren’t many accessory arm exercises in the program since the arms are integrally important to every compound drill. Similar to the abdomen, the arms are always working, so making them grow is as easy as adding a few extra sets and reps before or after your workout finishers. The two drills below do a great job of isolating and adding volume to the biceps and triceps.

Alternating Kettlebell Curl:

Kettlebell Skull Crusher:

Rome wasn’t built in a week, so take time building your physique. While there are many muscle building techniques and strategies out there to sort through, every expert I have asked for help has employed the principles in this post on some level.

This is how to grow muscle: lift heavy kettlebells, eat, sleep, repeat!


****

Robert Miller, Senior RKC trains individuals and groups at www.kettleprt.com 1750 n. Kingsbury Ave. Chicago IL 60612. Be sure to listen to his podcast StrongArguments.com

Filed Under: Kettlebell Training Tagged With: gain muscle mass, hypertrophy, hypertrophy program, kettlebell training, kettlebell training for muscle mass, Robert Miller, strength

Be More Human

January 6, 2016 By Josh Henkin Leave a Comment

Kettlebell One Arm Swing

I’m in a great position nowadays. I get to counsel many younger coaches and hopefully teach them the lessons I wish I’d known when I was first starting in fitness. Even so, I keep hearing the same question:

“Which book or program do I use… so I don’t make mistakes?”

I always have to explain that making mistakes is part of the learning process. Mistakes are only a problem if they’re repeated. That philosophy really resonates with me because I grew up in a family of teachers. My mother, father, grandmother, and my aunt were all teachers and professors.

This is why I don’t ever consider mistakes to be a bad thing. In fact, the mistakes I’ve made have helped me become the coach I am today! Through that evolution and experience, my thoughts on “strength training” have changed quite drastically.

I went through several stages of what I THOUGHT strength training was all about:

  • Lifting as heavy as possible
  • Getting as tired as possible
  • Doing the “magical” lifts

If you can name it, then I have probably tried it at one point or another. But, nothing ever felt quite right until now. Now, what I see as strength is actually inspired by the old ideas from physical culture. Originally, exercise was never solely a physical venture, but included the whole person.

Then I realized that the real purpose of strength training was to help people become better humans.

At every RKC and DVRT program, I ask the class, “Do you believe in functional training?” Almost everyone does, but they look puzzled when I ask them to define functional training. Usually I get answers like, “Functional training makes people better in their lives.”

Who could argue with such an answer, even if it is really vague. But, approaching a training methodology in this philosophical way gives us no clear vision. We often forget what makes us human. Yes, people will tell us that we squat, hinge, push, and pull, but a list of such general movements is almost as vague as the term “functional training”!

I ask our classes to think about THE most common movement they all perform. I get answers like squats and deadlifts—but how much of that do you really do during the course of a day? The answer I am REALLY looking for is “walking”! Did you just hit yourself in the forehead? Walking contains elements of many different movement patterns that most people would consider to be part of a training program. I bring up walking because most of our REAL human activities are not singular motions found in the gym, but a combination of simultaneous movement patterns.

I know, we think of walking as simple, while a swing or snatch is complex. Everyone can walk, but not everyone can do a Turkish get-up. Well, lets put it this way—not everyone walks well! To put things in perspective, my wife, a physical therapist, spent a whole semester learning gait analysis (watching and examining how people walk). And most experts agree that there are between six and eight phases to the act of walking. Not so simple, right?

Lifting more for the sake of lifting more doesn’t really do us any good unless it increases our movement efficiency. Renowned physical therapist, Gray Cook, had a really good statement about this type of training:

“In other words, we want adaptable strength that can work in changing environments. Adaptable strength is developed though complex movement patterns, not over-rehearsed, over-coached lifts in a never-changing environment. The athlete, warrior, outdoor enthusiast or physical adventurer embraces change and challenge, while the gym rat needs comfort and consistency for a happy workout.”

How does this idea apply to your strength training? We tend to live in a value system where the heavier weight is the better option, while we forget the benefits of moving to more complex movements.

https://youtu.be/Tqed0CCRhPY

A few weekends ago, I taught a sold out New York RKC. We were discussing the one-arm kettlebell swing, and I asked the class what real life movement it most resembled. People looked at each other, and a few shouted out answers before I simply said, “Walking”. You would have thought I had had a mic drop moment when I gave the answer in that context.

Why walking? Because it includes reciprocal arm swing. This basically means that your arm swings with the opposite leg. This movement pattern happens for many reasons, but we all do it. Walking also requires us to push down into the ground and project our bodies forward. Guess what else walking needs? (Hint: the answer is also one of the biggest reasons that we swing only to chest height and not over our heads.)

I’m not saying that the one-arm swing is EXACTLY like walking, but it involves the same foundational skills required in this very common human motion we perform every day. With this in mind, you might appreciate that the BEST exercise might not be the one that is only heavier, but the one which places a more complex demand on the body and requires us to become better moving humans!

***

Sign up for the Las Vegas RKC with Master RKC Josh Henkin

Josh Henkin, Master RKC, CSCS has been a RKC instructor since 2003 and has implemented kettlebell programs for major Division I programs, SWAT teams, and many different general fitness programs. Josh is also the creator of the DVRT Ultimate Sandbag Training system where he is a highly sought after presenter worldwide.

Master RKC Josh Henkin can be reached at info@ultimatesandbagtraining.com or http://DVRTFitness.com. Josh Henkin is also the author of DVRT, The Ultimate Sandbag Training System now available in paperback and ebook format.

Filed Under: Coaching, Kettlebell Training, Tutorial Tagged With: Coaching, foundational skills, human movement patterns, Josh Henkin, kettlebell swing, kettlebell swing progressions, kettlebell swings, Master RKC Josh Henkin, movement patterns, strength, strength training, walking

Why The Double Kettlebell Push Press

June 12, 2014 By Aaron Pierson Leave a Comment

aaron_pierson_dbl_kb_pushpress
Aaron Pierson performs a double kettlebell push press.

The double kettlebell push press may easily be one of the most under-used skills when it comes to training clients. In many circles it’s become known as the “cheater” press or the equivalent to a kipping pull up. For some individuals the push press may not always translate over to a stronger strict press and because of that, many people feel it’s a skill not worth working on.

Most people would agree that the best way to improve a strict press is to work the strict press on a regular basis. What about those who are not concerned with max strength or those who have a history of shoulder injuries? How about the athlete who needs to focus on strength endurance or power rather than raw strength? For those people, the push press may be the perfect answer.

The push press and the strict press have similarities. Both require an appropriate degree of shoulder mobility as well as core and shoulder stability. However the push press offers many qualities the strict press does not offer.

  1. The push press allows a heavier working weight and/or higher repetitions. Consider a person working the strict press with a basic ladder of 3 x (1-2-3-4-5) for a total of 45 reps with double 24kg kettlebell. That same person can nearly triple the amount of work completed with the same weight using the push press ladders of 3 x (2-4-6-8-10).
  2. Another benefit often forgotten about with the push press is the utilization of the legs. Instead of initiating the movement from the upper body, the push press utilizes the legs as it’s driving force. Add a clean between each push press and you have a very powerful full-body workout.
  3. The third piece the push press can offer is shoulder protection for those with a history of shoulder problems. Obviously this is dependent on shoulder mobility and injury history but let’s face it, not everybody is built to overhead press. In this case the push press may be the better alternative considering it bypasses the most risky part of the overhead press.

When building a program for yourself or clients, keep the big picture goal in mind. If the goal is to improve GPP, lose weight, increase muscle mass or increase power, the double kettlebell push press should be considered a top candidate for exercise selection.

***
About Aaron Pierson RKC Team Leader: Aaron has been apart of the RKC since 2010. He currently works full time as an EMT and owns Fundamental Strength in Fort Collins, Colorado. He can be reached at [email]aaron@fundamentalstrengthllc.com[/email] or by visiting www.fundamentalstrengthllc.com

Filed Under: Uncategorized Tagged With: Aaron Pierson, double kettlebell, dragon door, Kettlebell, kettlebells, push press, strength

Importance of the Overhead Lockout

June 4, 2014 By Tabitha Dearle Leave a Comment

tabitha1and2
So many kettlebell exercises go overhead.

Some move quickly like the Snatch (top left picture) and Jerk. Some move slowly like the Press (top right picture) and Bent Press. And some are simply just held overhead like the Turkish Get Up and Windmill but every single one of them should look identical in the lockout position.

When the kettlebell is overhead your body should have tension running through it from top to bottom, reaching the top of your movement is not a moment to relax. Keeping your lats activated, your belly and glutes tight, the arm sucked into the shoulder, wrist straight ensures safety and strength.

Breaking down the Overhead Lockout:

The Wrist:  When the wrist is in the correct position the muscle in your forearm remains active. Maintaining a straight wrist with knuckles facing the sky can be a challenge for some, especially when using a lighter kettlebell that sits higher on the wrist and presses on bone. If the pressure on the wrist is too much when you are starting out grab some sweatbands and cover the wrist for protection (not for continual use to cushion a kettlebell banging onto your wrist, that is a different issue altogether).

Keeping the wrist straight is essential in reducing injury, the “Broken Wrist” position will eventually lead to exactly that…

I asked fellow RKC and Physiotherapist Craig Soley for a breakdown of the dangers of incorrect wrist position, the following is his response –

“One of the most common mistakes in KB pressing activities is wrist position. So we can be clear, wrist (neutral) extension is described such that if I drew a line from your knuckles along the back of your hand and down your wrist is would be a perfectly straight line. If the wrist is flexed (a less common mistake) the knuckles would be in front of the wrist and forearm. If the wrist is extended then the knuckles would be located behind the bones of the wrist and forearm. Holding the KB in wrist neutral, the load is carried through the joint and held by muscular effort – this is good. In wrist extension, the load is carried on the joint, less muscle effort and the weight is resting upon the bony structures – over time this is bad and it is bad practice.

Why? Think collapsed arches and flat feet, hyperextended knees and hyperlorditic lumbar spines as other examples of resting on your joints. If you continually rest on your joints they will eventually wear out. Also, if you are training, train! Use your muscles to do the work and take the load off your joints! Keeping your wrist neutral trains for function and longevity.”

tabitha3and4
The Elbow: The elbow, as with the wrist, should maintain a straight alignment. The extended arm should run parallel to your head with your bicep inline with your ear. If you are hypermobile through the joint you will need to be more mindful of your movements as they are more likely to sustain injury due to the unstable nature of the joint.

Shoulder/Ear Poisoning: Over and over throughout all of my kettlebell learning I’ve heard the phrase “Your ears are poison to your shoulders”, simply meaning that if you’re overhead and the shoulder is close your ear then you’ve lost all stability and strength from the shoulder girdle being in a shrugged up position. Keep the arm securely in the socket and activate your lats for upper torso strength.

Core/Glutes: If you are planning to conquer The Iron Maiden Challenge (or for the fellas The Beast Tamer Challenge) you know that a good heavy Press comes from strong glutes and having your core locked tight. It is the solid base that stops you from leaking power and maintains control. Finish your lift strong by keeping them all engaged – meaning no disengaging in the middle.

Get moving before going overhead: Always warm up before any workout with your aim to target the muscles that are going to be used. PFE warm-up, Halos with Kettlebell, rotating all joints through their full range of movement.

Can’t Maintain Lockout? Thoracic Spine Extension Mobility plays a big part in maintaining posture in the overhead lockout. If you are lacking in thoracic mobility work on it with some of the following stretches/exercises –

  • Foam Roller on the thoracic spine
  • Armbar or Crooked Armbar
  • Thoracic Bridging

tabitha5

Always seek out professional help if you are suffering pain in any overhead position.

***

Tabitha Dearle, RKCII based in Perth, Australia, and is Co-owner of Perth Kettlebell School of Strength. She spent the first decade of her working life managing fast food restaurants before making a life-changing decision to become a Personal  Trainer. Since then she’s been helping many, from athletes to seniors to children, change their lifestyles to become fitter, healthier and more mobile mostly through using Kettlebells. You can follow her blog at http://tabidrkc.wordpress.com/

tabitha1

Filed Under: Uncategorized Tagged With: australia, best, body, dragon door, fitness, Kettlebell, kettlebells, lockout, overhead, RKC, strength, swing, trainer, trainers, women

Take Those Kettlebells Outside

May 14, 2014 By Laurel Blackburn Leave a Comment

Laurel_kb

It’s spring, the weather is warming up, the flowers are blooming and the sun is shining.

If you’ve been hibernating all winter and your workouts have gotten dull, now is the time to breathe new life into those workouts by taking your Kettlebells outside for some fun in the sun.

The possibilities for outdoor workouts are endless. I’ve been outside with my clients for several weeks working on some fun variations for outdoor workouts. Obviously, you need to be in a large grassy area or you could be liable for destroying property and we certainly don’t want that.

The workouts I’ve included are just a few of the fun variations that you can use. Get creative!

To get a full body workout, I start with bent over rows and push-ups. You can either do them once at the start of the workout or you can have them do the rows and push ups each time they pick up the bell.

Depending on how far you want to go down the field, you can vary the reps. If I plan to go far, then I will do 1 rep of each, swing, squat, curl and press before I throw the bell. If you want you can have your clients do several reps of swings, squats, curls and presses before they throw the bell.

Another option is to add a rep of each for every time they pick up their bell.

This can also be a time to work on form. At the end of the video, I included a “stop and throw” swing. This requires a very powerful hip snap in order to heave the bell as far as you can.

Hopefully this will give you some fun ideas and motivation to get you outside and enjoy the spring time.

***

 Laurel Blackburn is an RKC Team Leader and owner of Boot Camp Fitness and Training and Tallahassee Kettlebells.  Look for Laurel at www.bootcampstogo.com or www.tallahasseekettlebells.com.

In her early fifties, she is out to prove that age is just a number. Her goal is to motivate and inspire people everywhere, both young and old that strength, flexibility and mobility can get better with age. Follow her adventures on her blog: www.SuperStrongNana.com.

Filed Under: Uncategorized Tagged With: dragon door, exercises, fat, fitness, hips, Kettlebell, kettlebells, RKC, strength, swing, women, workout, workouts

What is the most versatile RKC movement?

February 19, 2014 By Shannon Scullin 2 Comments

Good and bad getupShannon demonstrates a good and a bad Get Up stance

The Turkish Get Up is the most versatile movement in the RKC system. It incorporates all seven of the FMS movement patterns  – squat, hurdle step, in line lunge, shoulder mobility, active straight leg raise, trunk and rotary stability – allowing us to utilise it as not only a strength building exercise but as a screening and rehab tool, making it the most valuable exercise to have in your arsenal of training drills.

I’ve been known to be a little bit of a perfectionist when it comes to teaching people how to do a get up.  I firmly believe that one repetition completed with good form is far more beneficial to you than completing ten reps with a half arsed attempt at the movement. But I am pedantic about technique for a very good reason…

I train and have taught a large number of people how to use kettlebells during my time as a trainer. From personal trainers to the self-taught and those who have never touched a weight before in their life. All of these people have one thing in common… As their get up improves, their mobility and stability improves. As their mobility and stability improves their coordination improves. As their coordination improves their strength improves and as their strength improves so does the rest of their training.

The get up is not a “simple” movement to teach or to learn. In fact as well as being the most versatile it’s actually one of the most complex of all the kettlebell exercises.

There are a few books on the market that delve deep into the get up, its technique and corrective drills to help you improve your form, the most famous being “Kalos Sthenos – Kettlebells From the Ground Up”. However, most people’s get up can be greatly improved by simply doing the following:

1)    Thoracic mobility and hamstring flexibility drills.

Two of the most common issues we see in the get up are caused by poor thoracic mobility (hunching forward or shoulder unpacking during the seated position) and hamstring flexibility (inability to keep the down leg straight or allowing the foot to rotate outward).

Often I see people grinding their way through the movement with bad posture in an attempt to improve. But why continue beating your head against a brick wall when there is an easier way.…

There are a number of drills that you can perform to help improve your mobility and flexibility in these areas, thus improving your get up and posture in general.

My favourite drills, and the ones I have found achieve the best results are all incorporated in to one simple mobility workout called the “Daily Dozen”.  This simple eight minutes of mobility, done consistently in conjunction with the get up, will not only vastly improve your movement and posture but they are the perfect way to prepare your body for the workout ahead.

I recommend starting your warm up by “testing” a get up on each side. Once you have completed your get up perform one round of the “Daily Dozen” and then perform another get up on each side. Repeat this process three times.

Pay attention to how your get up feels after performing the first round of mobility drills. If you are particularly tight in the thoracic region you may choose to focus solely on the armbar, bent armbar and kettlebell brettzel for the next round of mobility. Likewise, if you are feeling particularly tight from the hips down, you may choose to focus on the Cossack, can opener and lower limb drills.

For those of you who are beginners or may be a little daunted at the thought of doing a bent armbar or the kettlebell brettzel you can replace both of these movements with the “Brettzel” which will achieve the same results.

2)    Shift your weight.

From the moment you are born you commence a journey of movement. You learn how to shift your weight in order to roll over on to your belly, rock back and forth, crawl, stand and walk. Without this shift in weight movement becomes very difficult.

The get up is a similar journey of movement. Each stage you move to has a different centre of gravity. In order to perform the get up efficiently and gain maximum results you need to learn how and where to shift your weight in order to take the kettlebell from lying to standing position and back down again.

The easiest way to remember where the weight should be felt is to follow this zig zag pattern – elbow, hip, hand, knee.

As you roll to your elbow you should feel all the weight of your body and the bell going through your elbow in to the floor. As you straighten your arm out and progress to the seated position this weight should shift and be felt through your glute, where your femur meets your hip. As you progress to the bridge/low sweep, your arms should form a straight line from the kettlebell, through your shoulders and the weight should be felt through the hand that is connected to the ground. And finally, as you transition from the knee to hand through to the lunge position the weight should be felt through the knee that is connected to the ground. On the descent the weight shift works in the opposite order – knee, hand, hip, elbow.

3)    Do more reps.

This is important. In order to get better at something you need to practice it over and over again.

In an average workout you may complete anywhere between 25 to 100 repetitions of exercises such as swings, snatches, presses, deadlifts and squats however, the get up seems to get neglected when it comes to getting our repetitions in.

Instead of lumping the get up in with your warm up every time you train, why not try changing it up a little? Try spending an entire session focusing solely on the get up every now and then.

Mid last year I started using the get up as my recovery workout. Twice a week I would take a light kettlebell (nothing heavier than 14kg), set the Gymboss on sixty second intervals and then proceed to perform get ups for the next 100 minutes. One get up on the minute, every minute. The get up was to be slow and controlled, focusing on good form throughout the movement.  By the time I had completed twenty get ups all tightness had washed away from my body and any aches and pains that were rearing their ugly little heads prior to the session had retreated with tails between their legs. My movement felt strong, natural and effortless and the more repetitions I did the better everything felt.

Coincidentally, after incorporating the 100 get up recovery workout in to my routine, not only did I hit a new get up PR but I saw gains in all other areas of my training too.

Work on your mobility, shifting your weight and getting more reps in and I guarantee that your get up will not only get better but you will get stronger too!

***

Shannon Scullin is an RKC Team Leader and PCC Instructor based out of Dragon Door Australia.  As Australia’s first, and highest ranked female RKC Shannon brings a keen eye for technique to training and is renowned for being very focused on form ensuring that clients with previous injuries are able to train safely. As the head of Personal Training at Read Performance Training she uses the CK FMS to test and evaluate all clients before training, ensuring that not only will they look better from training, but they will also move better too. With a background in triathlon, adventure racing, rock climbing, cycling, hockey and running Shannon fell in love with kettlebells and the FMS system when she saw the immediate result that improving mobility, stability and strength has on sporting performance. She can be reached through: www.readpt.com

Filed Under: Uncategorized Tagged With: athletes, coordination, get up, ketllebells, kettlebells, mobility, RKC, stability, strength, turkish get up, women

Martial Artists and the Kettlebell Swing

February 5, 2014 By Jay Armstrong 3 Comments

Reverse PunchWhen I encountered the kettlebell, it was love at first swing.

I knew immediately that this was a tool that would complement (rather than interfere with) martial arts training.  Traditional efforts in the gym trying to develop big muscles made me strong, sore, and SLOW.

Swinging a kettlebell is clearly not traditional weight training.  It will help your martial arts practice if you have the proper technique and a clear understanding of what you are trying to master.  Two specific areas of martial arts skills that the kettlebell swing can help improve are:

  • Tense/Relax Cycling, and
  • Breath Control

If you feel you have been missing out on strength training or you want to add a different form of cardiovascular endurance training to your routine the kettlebell swing may be exactly what you need.  But, the kettlebell swing has even more to offer if you are a martial artist.

Tense/Relax Cycling

Exceptional athletes have the ability to rapidly contract their muscles, or create tension, and then just as quickly release that expression of energy.  In fact, one of the things that separates great athletes from good athletes is the ability to create a greater amount tension in a shorter period of time than their competitors and then to more quickly return to a relaxed state.  This makes them more efficient.  I call this skill the tense/relax cycling skill.  This is the ability to rapidly command the desired muscles, and only those muscles, to tense and then to release this tension.

Visualize your favorite professional athlete.  Would you characterize their best performances as tense or relaxed?  Do you think their impressive performances require no effort?  Of course not.  They just make it look easy because there is no unnecessary tension.

The kettlebell swing is an athletic skill.  It is one that requires tension, muscular control, balance, coordination and significant energy expenditure.  This is complex movement pattern that incorporates many practical elemental skills.

As the kettlebell descends down and behind the kettlebell athlete, the maximum amount of force is experienced.  The maximum amount of force is presented to the grip and the shoulders and then downward through the posterior chain and into the ground.  This moment of maximum exertion (or tension) requires that the kettlebell athlete strongly contract the muscles of the abdomen (or core).  The kettlebell doesn’t stay at the bottom position for long.  So, this contraction of the core is brief.

The big muscles of the hamstring group and the glutes drive the hips forward and upward to project energy into the kettlebell.  As the hips move forward, they must encounter an opposing force otherwise they will move far enough forward to put the lower back into excessive extension.  Repetitively doing this will probably make your back hurt.

As the kettlebell moves forward, the kettlebell athlete returns to the standing position.  This postural position is referred to as the “plank” position.  It is a neutral alignment of the neck, thoracic spine, and lumbar spine.  In order to achieve this position, there must be a significant, simultaneous contraction of many muscles.  There are few muscles excluded from this contraction.  The lats should be strongly contracted to connect the arms to the torso.  The abs and core muscles should be strongly contracted to transfer the power from the legs to the arms and to prevent hyperextension of the lower back.  The muscles of the legs should be strongly contracted to provide a strong base of support and rooting of the body to the ground.  The kettlebell is only floating at the top of the swing for a brief period of time, so this display of high tension is momentary.

Chair PlankHow do we improve on a particular skill?  Skills improve through focused and intelligent practice.  The rate of progress is also related to 1) the frequency of practice; 2) the number of repetitions; and 3) the load or intensity of the practice.

The kettlebell swing provides the martial artist with an excellent platform for improving the tense/relax cycling skill.  This is a drill that can be practiced with a large number of repetitions and with great frequency.  In addition, the drill is obviously practiced with a load that may sometimes be significant.  This all adds up to imply that swinging a kettlebell is an excellent way to improve the martial artist’s ability to rapidly and strongly tense muscles and then just as rapidly release this tension.

Focus on this aspect of the kettlebell swing and you will find you delivery more power in your kicks and strikes.  And, your newfound ability to quickly relax will greatly reduce your fatigue.

Breath Control

We have looked at the principle of tense/relax cycling and how a martial artist can use the kettlebell swing to improve this skill.  Now, we will look at how the kettlebell swing can be employed to give the martial artist better breath control.

The topic of breathing and breath control could take up several volumes.  We need oxygen to provide energy to our muscles and to our brain.  Carbon dioxide is a waste by-product of energy expenditure. Breathing is the mechanism by which oxygen is added to the blood during the inhalation phase and CO2 is expelled during the exhalation phase.  Both of these are important!  Inefficient breathing techniques will cause premature fatigue and adversely affect cognition.

Breath control is an essential skill for everyone but especially for martial artists.  Two of the breath control abilities that are required by a martial artist are: 1) a sharp, strong exhalation (or yell) to accompany a maximum contraction, breaking technique, or punch; and 2) the ability to effectively inhale while the core and abdominal muscles are contracted (as they are during a fight).

A forced exhalation through a restriction causes many of the abdominal muscles to contract strongly.  Imagine you are blowing up a very stubborn balloon.  This is what I mean by exhalation with restriction.  This effort develops a tension that spreads throughout the entire body.  Yelling simulates this effect and has been used for centuries in martial arts communities.  This practice has become commonplace in the world of tennis (among other sports) where many players yell each time they hit the tennis ball.  The technique of rapidly and forcefully expelling air through a restricted orifice will help you generate much more tension and power.

It is difficult to inhale when your abdominal muscles are contracted.  It is virtually impossible to do so with an inefficient, chest-breathing technique.  To breath when your stomach muscles are tight, you must pull the diaphragm downward.  Whenever you step into the ring to fight, your abdominal muscles automatically contract to help protect the vital organs behind them.  So, you should learn to breathe with these muscles contracted.  Even if you are not a martial artist, these muscles contract in the same way whenever you are under stress (at work, at home, or during sports) or whenever you are afraid.  Learning to breathe while your abdominal muscles are strongly contracted will improve your endurance whenever your are excited or under the stress of competition.

Both of these breathing techniques are skills. You can improve your breath control abilities through intelligent and focused practice.  The kettlebell swing provides an excellent training opportunity to improve these abilities.

The total tension position at the top of the kettlebell swing (or the plank position) is a great time to use the sharp exhalation to generate a bit more tension.  And, the quick sniff of air through the nose at the bottom of the kettlebell swing is an opportunity to practice inhalation with braced abdominal muscles.

Your skill will improve quickly if you practice with focus, if there are lots of reps, and if there is significant intensity.  The kettlebell swing provides the ideal scenario for all of these requirements.

Workout with Purpose

Often, we are given exercises with the sole purpose of working and strengthening a specific muscle group.  Or, perhaps the drills are designed to increase the size of a muscle.  While these activities are not necessarily bad, wouldn’t it be better if the purpose of an exercise was to help us improve our ability to perform in a real-world situation or in a sports activity?

The kettlebell swing can be utilized for just such a reason.  If you focus on the correct aspects of the technique, the kettlebell swing can improve your tense/relax cycling skill and improve your ability to use your breath to facilitate the development of tension.  These skills are essential to all martial artists.  I am sure you will see rapid progress if you focus on these goals during your kettlebell swings.

***

Jay Armstrong is a Senior RKC, 6 Degree Black Belt TKD, and Master Z-Health Trainer.  The past 30 years have been dedicated to helping others develop confidence through increased strength and pain-free, exceptional mobility.  His quest for knowledge continues.  He runs The Kettlebell Club in Houston, Texas and can be reached here.

Filed Under: Uncategorized Tagged With: artist, Jay Armstrong, Kettlebell, martial, power, senior rkc, strength, swing

The Only Three Ways to Build the Body

January 22, 2014 By Andrew Read 2 Comments

a_read_cartwheelThere are only three ways to build the body – intensity, volume, and density. So why is it that we often look to only change one variable when seeking to improve?

In textbook periodization the early phases of training are characterized by a steady increase in volume first. This continues until beginning the competition preparation phases and a subsequent rise in intensity. However in modern fitness planning it is far more common to see people try to increase either intensity via lifting more weight or density by trying to do more reps in a given time frame.

Back when I started lifting weights it was common for beginners to start in the gym with a simple plan that was full body, with each exercise being done for three sets of ten reps. It was common for there to be an exercise for major muscle groups, and this plan was repeated for three days each week. As the trainee improved it was normal to add an extra day of training, thereby increasing the total volume of work they did for the week.

This process of adding volume was repeated by adding another set or two into the workout, up until it got to the point where it was unrealistic in terms of time management to complete the session. At this point trainees were often put onto a plan called a split routine where they did different body parts on different days, or still did the whole body each time but performed different lifts. The trend of adding volume continued as people added more exercises to each body part, until they arrived at something like three to five exercises per body part, done for three to five sets of eight to fifteen reps each. It’s not uncommon for bodybuilders to hit as many as twenty-five sets of work for a big body part like the legs. As the total volume of the workout increased they kept dividing the workout into smaller and smaller groups of body parts starting with full body, then half body, and then into days where one major part per day was being worked such as legs, arms, or chest.

And the reason for all this is simple – because adding volume works.

But then we get to strength training and one of the things that everyone seems to always think is that plans need to be kept low volume. I don’t believe that to be the case for most people, and the reason is simple – because most haven’t broken through to the point where volume can no longer added. It’s only when you can no longer recover from your previous training that volume can no longer be added. This ultimately is because of only one thing – your training intensity is too high.

Two very noteworthy experts, from two different types of weight lifting, agree on one thing. That average intensity should be around 70%. Sheiko believes this to be the case for power lifters, and Medveydev claims this for nearly all lifters too (except those at International Master of Sports levels, i.e. those attending the Olympics. Obviously because these are rare genetic specimens, and the use of performance enhancing drugs must be considered, the rules that apply to them are slightly different). When two guys at the top of their fields are both saying the same thing we should all listen up.

Often people look at all the numbers in a lifting plan and see a mass of percentages but never take the time to consider how they add up.

Method #1

The simplest way to moderate intensity is to do as many sets above 70% as you do below. For example, doing a set at 60%, then at 70% and finally at 80% keeps the average intensity at 70%, as long as you do the same number of reps in each set.

For example: 60%/3, 70%/3, 80%/3.

If you want to do more sets at the top weight you need extra sets at the lower weights too. The lower weight sets are useful for building technical proficiency.

For example: 55%/3, 65%/3, 70%/3, 80%/3 x 2 will still give you an average intensity of 70%, while giving you exposure to higher loads too.

Method #2

When it comes to fixed weight objects, like kettlebells or sandbags, it becomes much harder to moderate the weight and a better method becomes moderating intensity through manipulating volume. Let’s say that you can press a 24kg bell five times just to make the math easier. If you do ladders of 2, 3, and 5 reps, then your average for each ladder comes out to 67%. That’s pretty good considering that kettlebells tend to come in large jumps in sizes and you can’t micro-load like you can with barbells.

The other way to do this is to play around with how many total ladders you do in a session. Let’s suppose that the maximum number of 2-3-5 ladders you can cope with at a given weight is five. If you have a week where you perform four ladders, then two ladders, and three ladders over successive workouts your average intensity is 60%. However, if you then perform five ladders, three ladders, and four ladders the following week you have an average of 80%. And when you look at the long-term effect of that you wind up back at our magic 70% intensity.

The magic thing about training at this seventy percent average is that you can train a lot. I mean A LOT. Dan John’s Forty Day Plan in Easy Strength is a classic example that allows you to train daily with an average intensity of 70%.

A further example that I’ve used personally was during helping Beth Andrews and Val Hedlund get ready for the Iron Maiden challenge. They both did workouts that featured twenty sets of five presses with a 16kg bell. With a projected max of 24kg, that 16kg works out to 67%. (That’s as close as you’ll likely get when using kettlebells because of the big jumps from one bell to the next).

The lesson here is simple – keep average intensity to seventy percent and try adding volume before you add intensity. This has the added benefit of not taxing the joints so much, nor needing to psyche oneself up for training efforts. There is no need for screaming at this stage of training – save that for game day. But get the volume in.

People like to talk about how strength is a skill. Well, skills need to be practiced a lot before they are polished and become second nature. Keeping the intensity moderate allows many, many practice sessions that would otherwise be missed due to muscle soreness or fatigue. All those extra reps will add up when you call on your strength to be there for you.

At this point you’re asking how do you know if you need more volume? Just ask yourself one question – are you getting the result you want? If not try doing more. I think you’ll be surprised at exactly how much you can do, and how quickly you improve, once you add more volume.

 ***

About Andrew Read, Master RKC, Dragon Door Australia: Andrew Read, Master RKC, is head of Dragon Door Australia and Read Performance Training. Recognized as Australia’s leading functional strength trainer he is a regular contributor to Blitz, Inside MMA, International Kickboxer, Oxygen, Ultrafit and Breaking Muscle. His coaching background spans nearly twenty years having worked with many Olympic and world championship level athletes.

Filed Under: Uncategorized Tagged With: australia, density, intensity, Kettlebell, load, master rkc, pressure, quitters, RKC drills, strength, trainers, volume

Combining RKC and FMS

January 8, 2014 By Andrew Read Leave a Comment

Andrew Read's 3 rulesThe FMS is a fantastic tool kit for any trainer, and when used in conjunction with RKC methods can provide a quick way to resolve almost any issue a client may have. But it can also be incredibly daunting once you start to peel back the layers of the systems and see everything that there is.

One of the best ways to use both systems together is to start to look at the framework that both provide and distil them down to their barest elements. In the case of the RKC drills our purpose is to lead a client in only a single direction, to an “a-ha” moment. A smart drill leaves them with only one direction to go in – the correct one, allowing them to instantly get the feeling or movement they were previously unable to connect with.

While there are many corrective exercises also within the FMS, and this is perhaps what it is best known for, people often forget that the purpose of the FMS is to not only screen for and correct asymmetries, but also to give us a path to follow once we go back to strength work. A simple framework that can be followed is that each movement has four steps –

No load, pattern assistance.
No load, no pattern assistance.
Load, with pattern assistance.
Load, with no pattern assistance.

Looking at how we teach the swing at the RKC you can see that this format is followed closely. We begin by teaching the hinge. This is often assisted in a variety of ways – either using the blades of the hands in the hips to help find the hip crease, pushing the butt back towards a wall, or using a dowel to teach how to keep neutral spine.

And here is where the “a-ha” drills fit in – we can go back and forth between the first and second steps as needed to reinforce the pattern. Our intent is to remove the pattern assistance and have the person do it unloaded but perfectly on their own. If form breaks down we can get them to return to the pattern assistance method (dowel, wall, etc.) until it becomes ingrained.

From there we can move to kettlebell deadlifts with the partner “reminding” the student how to keep the body tight via some tough love. Many people struggle to activate the right muscles to begin with and providing a cue that allows them to feel what muscles need to be switched is valuable. The final step in this process is to finish with deadlifting without any form of pattern assistance.

You can follow the same step for the swing itself. Begin with the hip hinge reinforced with a dowel. Move to hinging without any form of pattern assistance. Then onto the swing where we can assist in any number of ways from using a towel to teach timing, hip drive and straight arms, to putting the toes on a slight raise to teach people to avoid scooping, to having a target behind the student to have them hike the bell more, to spiked swings to reinforce the loading phase of the swing. Finally, once we have cleared all problems with our “a-ha” drills we can swing without pattern assistance.

The FMS also have a logical system of progression for loading and uses four postures that follow a developmental sequence. They start with lying, progress to quadruped, then onto kneeling and finally standing. If you look closely you’ll see that this sequence is the get up. That kind of symmetry between the two systems isn’t a mistake as both are about movement and strength.

But how can we apply our FMC framework to a skill like kettlebell pressing, using the postures too?

One of the issues people often have with pressing is an inability to stay tight through their midsection during the press putting their lower back at risk. If we begin lying supine (face up) we can do the backpressure crunch drill. To perform this have your partner place a rolled up towel under your lower back and lie down on it. Bring your knees to your chest and push your lower back into the ground while your partner tries to take the towel away as you extend your legs. This will teach how to stay tight through the midsection while keeping neutral spine. Retest with your press and see if it has improved.

The next step is to be in quadruped. For this drill we’re going to do bird dogs using a Cook band. Our single kettlebell press is fired on a diagonal and this drill will teach you to stay tight while your arm is moving. (To regress this drill slightly stay in the same position, but use a foam roller on the lower back to teach how to keep the natural curve of the spine). Retest again with your press and see if it has improved.

From here we can choose to press from kneeling and use either the tall kneeling or half kneeling postures. I would pick which one to use based on whether my client had asymmetries in their Inline Lunge or Hurdle Step tests (half kneeling in this case). If they were symmetrical then we could progress to tall kneeling. For pattern assistance we could do a core activation drill and press the kettlebell bottoms up. Again, perform the drill then retest your press to see what has improved. (Kneeling and bottoms up presses are taught and discussed at RKCII so if in doubt please see an RKCII for further information).

The final step is a standing single bell press without any assistance. At any point if the movement degrades there is the choice of regressing the posture used, or going back into the matrix and deciding if we need pattern assistance. Both answers can be right, depending on the person’s unique history.

Keep these simple rules in mind when training and you’ll find a lot of the confusion melts away. The takeaways are that the RKC uses “a-ha” drills to give a client only a single solution to their problem. If the drill you’ve picked doesn’t lead to the right answer then you picked the wrong drill. The FMS uses a simple four by four matrix to figure where training needs to be at any time. Follow the process and you’ll see that the system is very logical, and make sure to use the system.

Tying the two together leads to quick gains for your students and can often shine a light on the right path to take when someone just seems stalled in training.

 ***

About Andrew Read, Master RKC, Dragon Door Australia: Andrew Read, Master RKC, is head of Dragon Door Australia and Read Performance Training. Recognized as Australia’s leading functional strength trainer he is a regular contributor to Blitz, Inside MMA, International Kickboxer, Oxygen, Ultrafit and Breaking Muscle. His coaching background spans nearly twenty years having worked with many Olympic and world championship level athletes.

Filed Under: Uncategorized Tagged With: australia, back pressure, clients, fms, hinging, Kettlebell, load, master rkc, pattern assistance, quitters, RKC drills, strength

  • Page 1
  • Page 2
  • Page 3
  • Go to Next Page »

Primary Sidebar

Featured Products

previous arrow
BOOK-RKCBookofSnC
HardStyleKettlebellChallegeDanJohn700
BookCoverMasterTheKettlebell1
RKCiconKettlebell512
KettlebellGoddessdv040
next arrow

Recent Posts

  • RKC Big Six Workout
  • The Kettlebell Swing & Low Back Pain
  • Key Kettlebell Exercises To Help You Create Better Balance
  • How to Most Effectively Use Kettlebells to Meet Your New Year Goals
  • 1 Exercise That Checks All The Boxes
FOLLOW US ON TWITTER!

Archives

Copyright © 2025

Dragon Door Publications / The author(s) and publisher of this material are not responsible in any manner whatsoever for any injury that may occur through following the instructions or opinions contained in this material. The activities, physical and otherwise, described herein for informational purposes only, may be too strenuous or dangerous for some people, and the reader(s) should consult a physician before engaging in them.