• Skip to main content
  • Skip to primary sidebar
  • Home
  • Contributors
    • Matt Beecroft, Master RKC
    • Martijn Bos, Master RKC
    • Andrea Du Cane, Master RKC
    • Angelo Gala, Master RKC
    • Chris Holder, Master RKC
    • Steve Holiner, Master RKC
    • Dan John, Master RKC
    • Mike Krivka, Master RKC
    • Thomas Phillips, Master RKC
    • Robert Rimoczi, Master RKC
    • Phil Ross, Master RKC
    • Max Shank, Master RKC
  • Workshops
    • HKC Workshops
    • RKC Workshops
    • RKC-II Workshops
  • Find an RKC Instructor
  • Resources
    • Articles
    • Forums
    • Kettlebells
    • Products
  • Blogs
    • PCC Blog
    • Strong Medicine Blog
  • Archives

RKC School of Strength

Official blog of the RKC

Tutorial

Safely Applying the American Kettlebell Swing

August 31, 2016 By Angelo Gala 4 Comments


Angelo Gala American Swing

“The American Kettlebell Swing (AKBS) is the devil! You will get hurt if you practice this style of swing!” …at least that is what I have been told. Heck, I am guilty of muttering those words once or twice like countless other fitness enthusiasts. But, it’s generally not the tool or exercise selection that necessarily causes a problem. It is the misuse of the tool, and the poor application or inappropriate execution of the movement that can cause accumulated damage over time. When applied correctly, the American Kettlebell Swing can become an excellent addition to your movement catalogue!

In the RKC School of Strength, we teach a shoulder-height “Russian” style kettlebell swing (RKBS). The intent of our swing is to promote sustainable power production from the body’s drivetrain, the hips. We teach this style of swing since many competitive sports require athletes to propel their own bodies or an object forward. This is the direct application of the RKBS and its outwardly projecting force. In the sport of weightlifting or even in the “Sport of Fitness,” athletes are required to use their hips to propel a load overhead in movements like the clean and jerk, snatch and even a wall ball shot. Movements that finish with a load overhead utilize a more linear trajectory, and support the proper use of the AKBS.

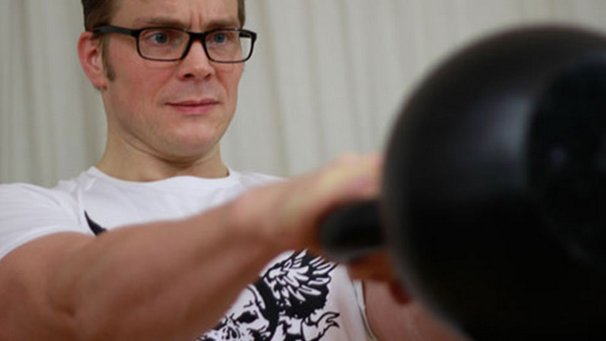
Before we run over to the boy-toy (a 24kg kettlebell) and start ripping it over our heads with two hands, let’s review some details of the movement.

First, the AKBS is NOT A SWING. Yes, I know it is called a swing, but by definition a movement that travels from the ground to overhead in one continuous motion is a snatch. The overhead swing has a much more linear trajectory, similar to the clean. Just understanding the kettlebell path will help clean up some common errors with this movement.

Practicing a snatch with a barbell or kettlebell can be very demanding. But, most people possess the requisite mobility to learn the RKBS, even as a beginner in fitness. They may not work on full swings in the first training session, but can start working with light deadlifts. Low volume swings are realistic progressions after a few short training sessions with an RKC Certified Kettlebell Instructor. This is generally not the case for the AKBS.

There are several requirements to safely practice the AKBS:

  • A demonstration of gross motor control and coordination
  • Requisite range of motion in the thoracic region (rib cage)
  • Significant overhead shoulder mobility and stability
  • A negative test for shoulder impingement on both shoulders (Seek out a CK-FMS certified instructor to help screen for impingement)

After acknowledging these safety standards, we can decide if the AKBS is appropriate, or if any additional preparatory homework is needed before practicing this movement. Keep in mind that when performing an AKBS, the hands are placed only 3-6 inches apart on the handle (depending on the size of the kettlebell). This requires a much greater amount of thoracic and overhead mobility to safely perform the lift compared to the barbell counterpart.


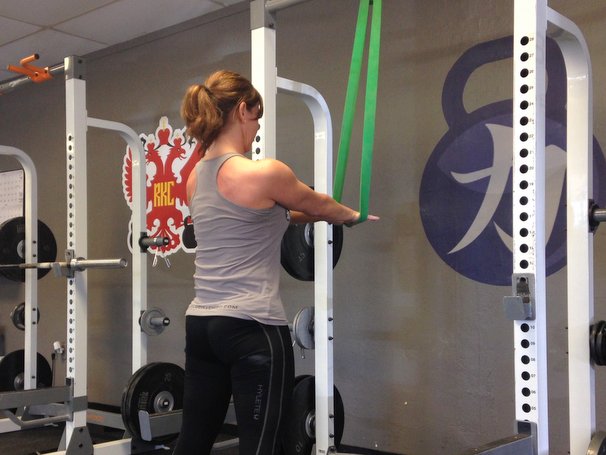
Required Range of Motion

Overhead Lock Out: modified hollow body with arms in full flexion

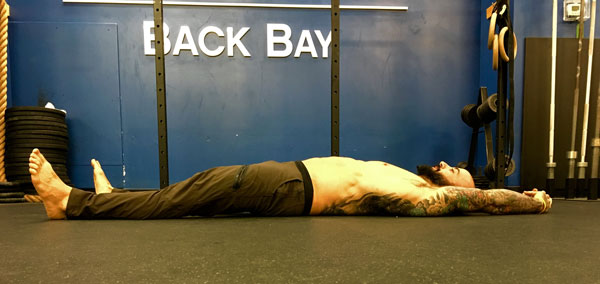
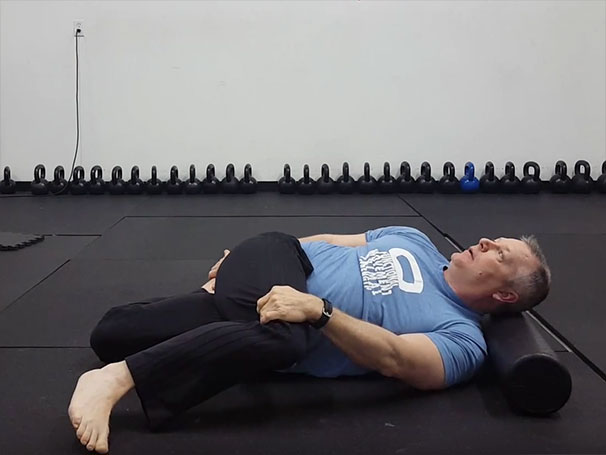
To determine if you possess the requisite range of motion for the AKBS, bring yourself to a supine position on the floor (lay down on your back). Separate your legs into a swing/squat stance and go into a hollowed body position by flattening your lower back to the floor. This will feel like you are pulling the front of your ribcage down to your belt line. Be sure to keep your legs tight like in the Hardstyle RKBS!

Now, raise both arms overhead while clasping both hands together. For a green light to practice the AKBS, you must be able to bring your forearms, lower back, and head to the floor in a comfortable state. Your elbows must remain completely straight and your shoulders must stay depressed (sucked down to the ribs, away from your ears).

test

AngeloGalaBadHollow2 
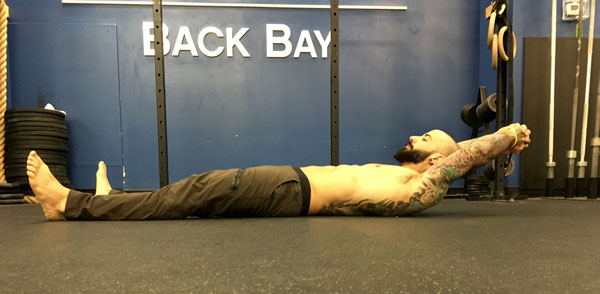
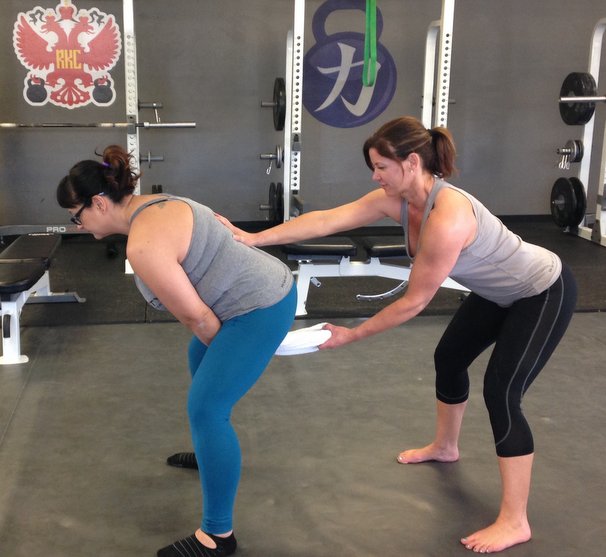
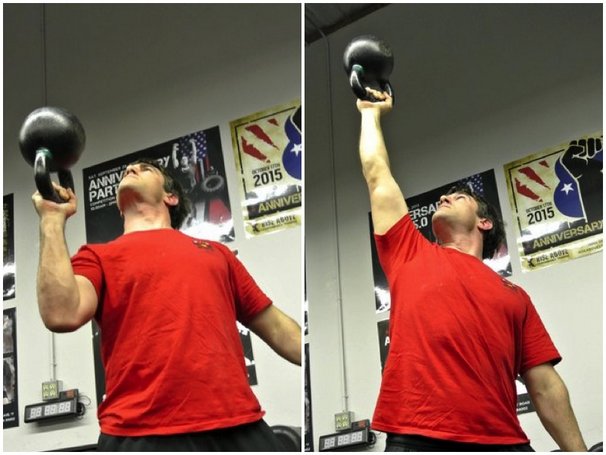
Both of these examples are failed overhead screens for the AKBS. Note: if you can see your arms in your peripheral vision, this indicates a failed overhead screen for the AKBS and more mobilization is required.

TIME TO SWING….. err snatch…….YES SWING!!

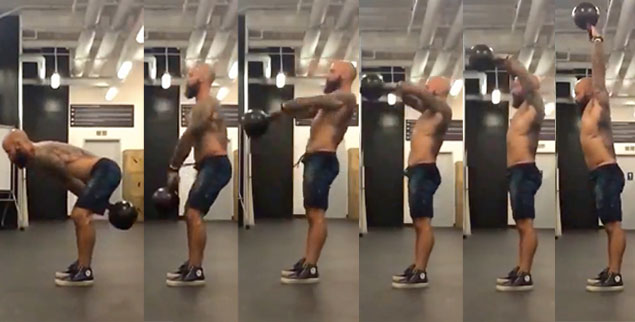
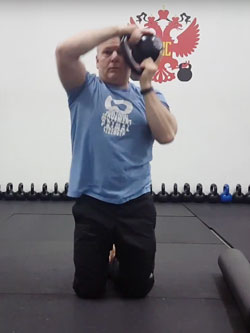
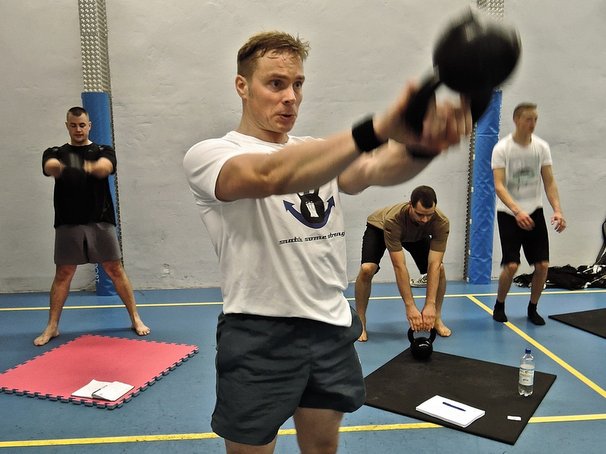
With both hands on the kettlebell, start in the athletic ready stance to prepare for the pre-swing or to “hike pass” the kettlebell through your legs. Nothing here deviates from the standards of the Russian kettlebell swing, yet. Your hips are lower than the shoulders. The spine is long and neutral. The hips and hamstrings are engaged.

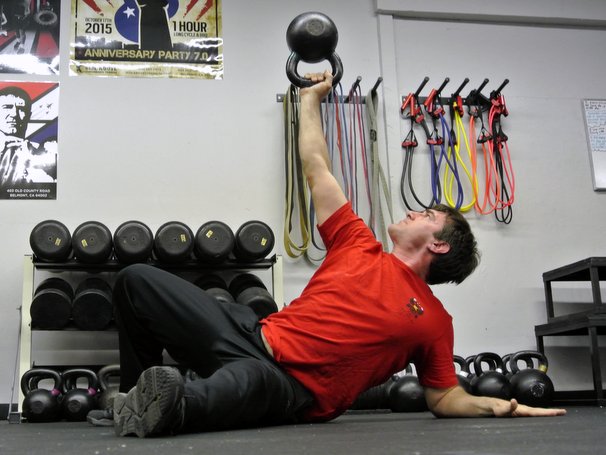
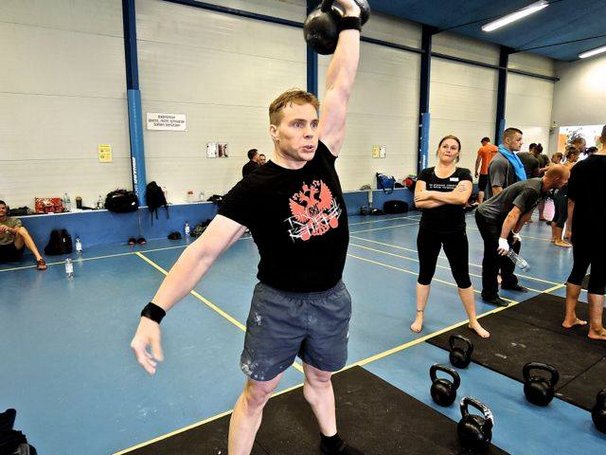
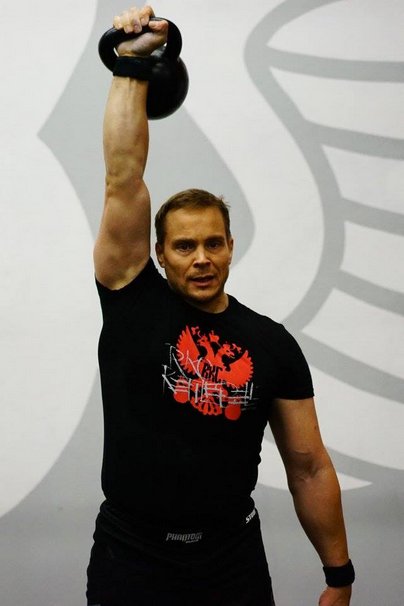
Now, hike the kettlebell back through your legs. Explosively and simultaneously extend your knees and hips creating a solid lockout in your entire body below your neck. This will power the kettlebell out in front of your hips. Once the kettlebell reaches your belly button, use your arms to pull the kettlebell in towards your chest and up over your head to the overhead lockout. Stop the momentum of the kettlebell by squeezing the handle in the overhead lockout position. The AKBS is completed when the bottom of the kettlebell faces “up” directly overhead and the arms are in alignment with your ears.

How To Apply the American Kettlebell Swing:

The American Kettlebell Swing should be carefully applied to your programming as a compliment, not as a replacement for the Russian Kettlebell Swing. Instead of assuming the American Kettlebell Swing is harder, understand that there are two main reasons to purposely include the AKBS in your program design.

  1. Longer cycle time: When planning aerobic power intervals, a slower cycle speed due to a longer range of motion will simply eat up more time on the clock.
  1. Compounded shoulder and grip fatigue: Pulling the kettlebell through a longer ROM over the head adds a greater degree of shoulder flexion and sustained grip activation compared to the RKBS. The AKBS creates a significantly higher accumulation of shoulder and grip fatigue. In a mixed modal environment, this movement coupled with push-ups, reverse wall climbs or even handstand pushups can dramatically improve overhead work capacity when safely and progressively programmed.

Safe Modifications:

Just like most people have the ability to safely perform the RKBS after demonstrating proficiency of proper hinge patterning and full body bracing, all practitioners can utilize an abbreviated version of the AKBS by simply expressing a shorter range of motion. If you were unable to pass the overhead screen because of signs of shoulder impingement, a safe variation of the AKBS would be to simply pull the kettlebell just above forehead level without committing to a straight-arm lockout of the elbows. With this abbreviated ROM, you will still be able to create a longer cycle time as well as induce increased shoulder and grip fatigue.

Give this swing variation a go and let me know how things work out for you!!

Angelo Gala, Senior RKC, PCC Team Leader


***

Angelo Gala is both a Senior RKC and PCC Team Leader. He has been a fitness professional in the Boston area for greater than 15 years working day to day with a wide range of clientele.  He helps the average “Joe” get fit and out of pain and prepares athletes to qualify and compete at the CrossFit Games. His specialties include improving restricted movement, getting strong(er) and energy system development (anything that elevates the heart rate). Angelo is available for remote coaching and on-site workshops. For scheduling he can be reached at a.angelo.gala@gmail.com.

Filed Under: Kettlebell Training, Tutorial Tagged With: American Swing, Angelo Gala, CrossFit, mobility, Senior RKC Angelo Gala, tutorial

A Superset Series for Shoulder Mobility

June 29, 2016 By Paul Britt, DC 3 Comments

Paul Britt Kettlebell RKC Arm Bar

I’ve screened many people with the Functional Movement Screen. In conducting all of those screens, I’ve observed typical patterns, one of which tends to be shoulder mobility issues. While this post is not a treatment plan or medical advice, it is the quick shoulder mobility series I use after the initial individual work and correctives. It’s a great way to open up thoracic and shoulder mobility after a long day of sitting or just living in today’s world.

I have my students perform the series as a superset. They move from one exercise to the next without a break. I typically have them perform the series three times. It’s a great mobility set and general warm-up for the session ahead.

We start with the RKC armbar. Use an appropriate weight for the movement. What is appropriate? I typically use a 14kg for the series as it is a warm-up / mobility drill and not strength focused. There are several versions of the RKC armbar, but I tend to have my knee bent at 90 degrees to keep my lumbar spine out of the exercise. This also focuses the exercise on the mid-thoracic area instead of rolling your hips into the ground. I like to take 3-5 breaths per side before moving on to the next drill.

Paul Britt's 67-year-old client practices the RKC armbar
Paul Britt’s 67-year-old client practices the RKC armbar

The next stop is the bretzel stretch. I rest my head on a roller or another padded surface to keep my neck free of tension so I can focus on the movement. I breathe to move through the stretch: I breath in, tighten up, then relax and exhale as I move deeper into the stretch. I typically practice for 3-5 breaths per side to move through the stretch.

Paul Britt Bretzel

The last move in the set is the kettlebell halo. Since this is still a mobility exercise and not a strength move, I keep the weight at 14kg. I like the half kneeling position as it also helps to teach the body how to be stable. You can also do the halo standing if your knees prevent you from kneeling. While I did not demonstrate it in the video below, you can also use half kneeling to develop stability. I perform ten halos in one direction and ten in the other.

Paul Britt Kettlebell Halo

After a 30 second rest, I begin the series again.

If you have shoulder pain, do not perform any of these exercises without medical evaluation. I also highly recommend that you see an FMS practitioner for screening to address any and all movement issues.

***
Senior RKC Paul Britt has been an RKC kettlebell instructor since 2006. He trains clients at Britt’s Training Systems, his award-winning Hardstyle Kettlebell Training Facility in Rockwall, Texas. Paul has served as an assistant instructor at many RKC and HKC Courses, is a Certified Kettlebell Functional Movement Specialist (CK-FMS) and works with some of the top Chiropractors in North Texas. Please visit his website brittstrainingsystems.com for more information.

Filed Under: Kettlebell Training, Mobility and Flexibility, Tutorial Tagged With: bretzel, mobility training, Paul Britt, RKC, RKC arm bar, shoulder mobility, superset, video

Why the Single-Leg Deadlift is a Go-To Leg Exercise

June 22, 2016 By Andrea Du Cane 2 Comments

Andrea Du Cane Single-Leg Deadlift

Why do I love single-leg deadlifts so much? For one thing, nothing works the butt and legs quite like it. Add the extra benefit to the back, core, lower legs and feet and you have a full body exercise. As Gray Cook likes to say, “Maintain your squat and TRAIN your deadlift.” I think this is especially true for the single-leg deadlift.

I have to share a personal story; I’ve had four patellar dislocations. Yes, FOUR! The first one happened after a two-hour ballet/pointe class. The second happened in the middle of a jazz dance class. The third happened when my tango partner hit my kneecap with his knee and the fourth happened when my shoe caught in an escalator and I fell. Yes, dance is a very dangerous sport!

The last two times, I popped it back in and rehabbed it myself. The single-leg deadlift was the most important exercise for strengthening and rehabbing my knee. So this is an exercise close to my heart!

Here’s why everyone should add this powerful exercise to their program:

The single-leg deadlift not only develops hip strength and power, but it also allows the muscles of the hips and legs to act as stabilizers. If you think about it, every time you stand on one leg, you’re using the same muscles for balance and stability that are generally used for force production.

Forcing the body to maintain stability on one leg allows the athlete and coach to see strength imbalances from left to right side. This is extremely important for athletes as well as special populations. And it can go a long way to help reduce injuries and improve performance.

Double Kettlebell Single-Leg Deadlifts:

Holding kettlebells in each hand is easier on your core because it balances out the load from side to side. This allows you to go heavy and train pure hip strength on one leg. You can then watch for and correct left/right strength asymmetries. The focus will be on initiating and driving forcefully with your glutes. This hip drive with stability is the same for both double kettlebells and single-arm kettlebell single-leg deadlifts.

Single-Arm Single-Leg Deadlifts:

Single-arm single-leg deadlifts have the advantage of requiring torso, pelvic, and hip stability as well as strength production. This exercise can be used as a corrective exercise because loading one size requires us to resist the rotational forces put on the body.

Holding the kettlebell on the opposite side of the working leg is the most common corrective use of the single-arm single-leg deadlift. However, holding a kettlebell on the same side as the working leg also has many benefits and challenges. Both versions of the single-arm single-leg deadlift challenge the body to restrict rotational forces from loading one side.

Interestingly, only half the people who try holding the kettlebell on the same side as the working leg will find it harder than holding it on the opposite side. And it may be different from left leg to right.

When using the single-leg deadlift as a corrective exercise, find your weakest link or most challenging combination and train the weak link 2-1.

Now let’s discuss how to perform single-leg deadlifts correctly. As I like to say, “Perfect Technique = Success”. Go to any gym and you’ll see lots of sloppy single-leg deadlifts. Are they getting the most from the exercise? Are they risking hurting themselves? The answer is “no” and “yes”, respectively.

These basics apply to both double and single arm single-leg deadlifts:

  1. The back MUST remain neutral throughout the lift. If your back rounds or flexes, you risk tweaking it. And if your back rounds or flexes, I guarantee you are not using your glutes.
  2. The hips HINGE and move back over your heels. This move is not about the torso bending forward, it’s about the hips moving backward.
  3. The front knee will bend, but it does not move forward excessively. Remember, we are deadlifting not squatting. Plus, this is not a straight-leg deadlift—straight-leg deadlifts shift the focus and load to the hamstrings and off the glutes. Think of the movement as an “elevator not a teeter-totter”.
  4. The shoulders and hips remain parallel to each other and the floor. Do not externally rotate your back leg, and don’t let your working hip sink or rise above parallel. The shoulders should also remain squared off and equal—for both the single or double arm variations.
  5. The arms move as a pendulum from the shoulders as the torso moves forward. The shoulders remain engaged at the lat, do not let your shoulders disconnect from your body as your torso moves forward. This helps the rotator cuff and shoulder stabilizers work during the movement. The elbows remain locked, no “pulling” with your biceps.
  6. The knee must track the toe; do not let the knee collapse inward or outward.
  7. The feet are active. The entire foot is loaded with a bit more weight towards the heel, with the big toe working and gripping the floor.
  8. The back foot is dorsiflexed and the toe is facing down to help keep the hips “closed”.
  9. The back leg is an extension of the spine, and the leg should not be higher or lower than the hips. The back leg should be in line with the hips, and active to help with balance.
  10. Squeeze your palms into the kettlebell handles, this increases shoulder and core stability and strength.
  11. Keep your eyes focused approximately 3-6 feet in front of you to help keep your head in alignment and to assist balance.
  12. Inhale as you stand back up. Power breathe as you drive your foot down into the ground and lift up.

All the elements listed above apply to both the two arm and single arm single-leg deadlift. For added focus, maintain level shoulders and torso at all times when performing single arm single-leg deadlift. You will need to fight the rotational pull with the weight.

A few other thoughts: If at all possible, perform your single-leg deadlifts barefoot. The proprioceptive, neurological information from your feet will assist your balance and make you stronger.

Modifications for Different Populations:

  • Use platforms to raise the kettlebell(s) so that they can be picked up safely AND with no spine flexion.
  • Start from the top instead of picking the kettlebells up from the ground. This way you are already loaded, instead of trying to find tension and stability at the bottom of the movement.
  • People with bad knees or balance issues can hold onto a wall or bar with one hand and hold the kettlebell in the other hand. They will not have to “fight” for balance and risking tweaking their knees or back.
  • Keep the back leg down as a “kick-stand”. This also helps with balance issues.
  • NEVER fight for balance! If you start to lose balance, simply place your back leg down on the ground and regroup.

When training, start with medium loads to get a feel for your weaknesses while developing single leg strength and balance. Try 6-8 reps 2-4 sets with this medium load. Then go heavy, especially with double arm single-leg deadlifts and drop the reps to 3-5.

This exercise should be performed slow and controlled—NOT fast and bouncy. If you’re bouncing up and down, you are either hiding weaknesses or you chose a kettlebell that is too light!

Here’s a short demo of a two-arm single-leg deadlift. As stated above, all points apply to using one kettlebell:

***

Andrea Du Cane is a Master RKC Kettlebell Instructor, CK-FMS, CICS, and RIST, ZHealth certified, she has a BA in Psychology from the University of Minnesota and is also a Pilates instructor. She is the author of several books and dvds including The Ageless Body, The Kettlebell Boomer, and The Kettlebell Goddess Workout.  She has over twenty years of aerobics, weight training and fitness experience, with an additional background in… Read more here.

Filed Under: Kettlebell Training, Tutorial Tagged With: Andrea Du Cane, how to do a single-leg deadlift, how-to, kettlebell exercise, kettlebell tutorial, kettlebells, One leg deadlift, single leg deadlift, tutorial

Improve Your Posture with the RKC Kettlebell Swing

June 8, 2016 By Beth Andrews and Jay Armstrong 7 Comments

Senior RKC Beth Andrews Kettlebell Swings

Postural correction is a hot topic. Spending too much time in a seated position while driving or working on a computer will adversely affect our ability to stand up straight.

Wouldn’t it be great if there was a time-efficient exercise that could counteract all the time you’ve spent in the seated position and help you develop good posture?

That exercise exists—it’s the kettlebell swing.

Swinging a kettlebell will help you develop strong muscles, bones, tendons and ligaments. It will also improve your endurance. But, one of the biggest benefits of the kettlebell swing is improvement in your posture. The kettlebell swing is a naturally corrective exercise which will help undo the maladaptive effects of too much sitting slumped over with a computer, tablet, or phone.

The following are some of the key postural issues that the RKC kettlebell swing can correct:

Problem #1: Your glutes are not working

Sitting down turns off your glutes. The RKC kettlebell swing includes a “hip drive” or “pop” that moves the tailbone under and drives the hips forward. The hips are a primary source of athletic power for many sports such as golf, tennis, baseball and boxing. This hip drive is fueled by a rapid and intense contraction of the glutes. Swinging a kettlebell can help you reactivate your glutes. Active glutes will also put the pelvis in a neutral position, increasing your athleticism and reducing your chances of developing chronic back pain.

Problem #2: Your back is rounded, and shoulders are hunched forward

When using a computer or driving a car, your arms are front of your body while you’re seated. This inevitably leads to the shoulders internally rotating and the chest collapsing. For most people, this also means they will look like a caveman when they finally stand up. The finish, or top position, of the RKC kettlebell swing features “packed” shoulders. This means that the shoulders are pulled back and down, the lats are activated, and the thoracic spine is in a neutral position.

The kettlebell swing also has the added advantage of teaching you to bend over and stand up into a correct postural position time after time, rep after rep. And each effort is performed under load. Using a weight means that the adaptive changes will take place faster. Even a short RKC kettlebell swing practice session will greatly improve your ability to go from a seated, computer desk position to an erect, well aligned standing position.

Problem #3 – Your core is weak and you cannot contract your abdominal muscles

Bad Computer Posture

Modern office furniture encourages us to relax everything while we type at the computer. This muscular relaxation includes the core and abs. But, when you stand up, your abs remain relaxed, your pelvis tips forward and all of your guts try to fall forward! Not very attractive. At the top position of the kettlebell swing, the spine is lengthened and aligned. In order to accomplish this alignment, the core must be stabilized with a balance of posterior and anterior tension. This simply means that the abs must be strongly contracted for a split second at the top of each swing. What could be a better way to relearn how to stabilize your core and contract your abs then to do this time after time with your RKC kettlebell swing.

One step we use while teaching the kettlebell swing is the RKC plank. Notice that opening your chest, contracting your abs, tightening your glutes and lengthening your spine into an ideal postural position are all part of the RKC plank exercise. The top position of a kettlebell swing should mimic the total body tension and spinal alignment of the RKC plank.

Beth Andrews RKC Plank

Focus on these points as you perform your RKC kettlebell swing. You will see fast and enormous postural improvements.

Stand tall my friend.

Beth Andrews and Jay Armstrong

****

Beth Andrews is a Senior RKC, PCC Team Leader, and CK-FMS. She leads HKC and RKC certifications, and assists at the PCC. She became the 5th Iron Maiden in 2013. Beth owns Maximum Body Training and a successful online training business. She has over 25 years of training experience. For online training or to host a certification, email Beth at: bethandrewsrkc@gmail.com. For more training tips and workouts subscribe to her YouTube channel, Beth Andrews RKC or visit her website at maximumbodytraining.com

Jay Armstrong is a Senior RKC, 6 Degree Black Belt TKD, and Master Z-Health Trainer.  The past 30 years have been dedicated to helping others develop confidence through increased strength and pain-free, exceptional mobility.  His quest for knowledge continues.  He runs The Kettlebell Club in Houston, Texas.

Filed Under: Kettlebell Training, Mobility and Flexibility, Tutorial Tagged With: beth andrews, Jay Armstrong, Kettlebell, kettlebell swing, kettlebell swings, kettlebells, plank, posture, posture correction, RKC, RKC plank

Rowing and Kettlebells

June 1, 2016 By Kathryn Taylor 2 Comments

Kathryn Taylor Kettlebells and Rowing

Indoor rowing is one of the fastest growing fitness trends in the US. Head to any major city and you’ll find rowing gyms. Even the local YMCAs are taking the rowing machines out of the corner and moving them to a prominent spot. But, with the rise of rowing, we also find many people rowing with poor technique. In addition to holding an RKC certification and regularly teaching kettlebells at FitWit Studio, I also started to teach rowing this past year and became a certified rowing instructor through UCanRow2. Many of my clients already have a background in kettlebells, and I’ve found that kettlebells can be a highly effective method to teach rowing.

First, a little bit about rowing… You may have seen athletes at the gym leaning all the way back at the end of a stroke and moving with lightning speed up and down the slide. For the most part, you’ve probably observed very poor form. Rowing, like kettlebell training, is highly technical. The power of the stroke comes from the push-back (legs) and the movement forward is all recovery. A goal is to set up for a strong push during the recovery. Basically, the movement pattern starting from the front of the erg is to push back with the legs, then the body goes back at a “one o’clock” position while the arms pull in. Return to the front of the erg by straightening the arms, hinging at the hips to the “eleven o’clock” position, before moving forward on the erg to the start or “catch” position. The order of the movement: legs, body, arms, arms, body, legs. Repeat this pattern one million times and you are rowing!

As I began to teach clients the rowing technique, I found myself moving them off the erg and over to the kettlebell so they could really learn how to properly row using the deadlift, goblet squat, and swing.

Kettlebell Deadlift: Hinge

When rowing, the body closely mimics the deadlift position. But, since it’s often difficult for clients to understand the concept of the hinge while on the machine, we practice our kettlebell deadlift set-up. We work on the hinge, and use the power of the legs to drive the kettlebell up. Then we get back on the erg and mimic the same position. The deadlift also helps clients really understand the correct shoulder position—rather than allowing the shoulders to round forward at the end of each stroke, they learn to keep their back in a strong position.

Kathryn Taylor Goblet Squat and Rowing

The Goblet Squat: Drive

Because most new rowers think that the power comes from the arms, it’s really important to teach them how to drive from their feet, and engage their glutes to push themselves back. I’ve used the goblet squat to reinforce this idea. My clients start with a fairly light kettlebell, and go deep into a goblet squat. They pause for 2-3 seconds at the bottom before standing up by driving hard thorough their feet. They do 5 reps, then do the next set with a heavier kettlebell. We repeat this process 2-3 times. The goal for this drill is to teach them that with heavier weight, they need to drive harder into the ground to stand up. After this drill, we get on the erg and practice the drive.

The Kettlebell Swing: Rhythm

Rowing has a certain rhythm to the stroke. You press back hard and fast, then recover slowly. Each individual has to find the right rhythm (stroke rate) for their most efficient row. If you go too quickly, your heart rate will spike too high. But if you go too slowly, you’ll burn out your legs. The kettlebell swing mimics the same rhythm that we are trying to find on the erg. A hard, fast drive gets the kettlebell up, before we allow the kettlebell to fall back down as we recover. All of the work happens on the way up. The swing has the additional benefit of reinforcing the hip hinge of the deadlift.

I’ve found that people who have practiced kettlebell training for a year or more tend to pick up rowing technique faster than those who haven’t. If you’re looking for a new cardio workout to add to your routine, I suggest trying rowing.

****

Kathryn Taylor, RKC, ACE-CPT, Oh Baby Fitness!, UcanRow2, TRX Level 1, is Studio Manager of FitWit Studio in Kirkwood/Decatur, Georgia.

Filed Under: Kettlebell Training, Tutorial Tagged With: Athletic Training, erg rowing, indoor rowing, Kathryn Taylor, kettlebell deadlift, kettlebell technique, kettlebell training, rowing

7 Steps to a Bang-Free Kettlebell Clean

May 11, 2016 By Steve "Coach Fury" Holiner 7 Comments

Steve Holiner Kettlebell Clean

Few movements in “kettlebell land” frustrate people like kettlebell cleans. Not everyone enjoys the bruising and soreness we often deal with while learning cleans. And, cleans can get stressful if we’re anticipating multiple slams to the arm.

In my years as an RKC Instructor, I’ve found kettlebell cleans to be one of the most challenging moves to truly own.

The common issues most people have with cleans fall well within the learning curve. Bruising, soreness, and forearm slamming stop as technique improves. Cleans should not hurt. However, you will need to invest some quality time to smooth out your clean. Patience and practice will go a long way!

Here are seven tips for achieving bang-free cleans:

1.    HINGE. People often begin to squat their cleans when they focus on getting the kettlebell up. From watching your backswing, I shouldn’t be able to tell if you’re going to do a swing, clean, or snatch. Keep the hinge consistent.

2.    GRIP. Loosen up folks! Your grip should be fairly relaxed. Think of your fingers as a hook and your thumb as a safety latch. The kettlebell handle must be able to move within your hand.

3.    ROTATE. As soon as your kettlebell is at the end of the backswing, begin to externally rotate your arm toward the rack position. Think “THUMB TO BUM” in the backswing—then, what my buddy Geoff Hemmingway calls “OLD TIMEY MAYOR” in the rack position. The kettlebell will actually make contact with the forearm during the float. This allows the kettlebell and arm to meet the torso at the same time. This tip will eliminate the big bang that can happen when the kettlebell lands last.

4.    VOLUME CONTROL. With practice you will learn to exert the right amount of force from the hamstrings, glutes, and hips to ease the kettlebell into the rack position. If the kettlebell is coming in too fast, and you can’t slow it down to prevent banging, then lower the volume. On the flip side, if you are using your biceps to curl the kettlebell into the rack, then you’ll need to turn the volume up. The kettlebell must float during the clean!

RKC Kettlebell Cleans

5.    LOW AND CLOSE. The path of the kettlebell should be low and close to you during the clean. If the kettlebell goes too high, it will arc down and slam into you. If the kettlebell goes too far away from you, it will whip into you. Keep your elbow close to your ribs. While some say to pin the elbow to your ribs, I’m not a huge fan of that cue, because when the focus shifts to the elbow, the arm will often get tense. Excess tension in the arm often leads to banging, curling, and eventual elbow discomfort.

6.    NEUTRAL WRIST. Keep your wrist neutral for a smooth bang-free clean. Own that rack position!

7.    REVERSE. Don’t over-think the eccentric part of the clean. Keep the kettlebell close, keep the grip relaxed, and rotate “thumb to bum” as the kettlebell goes into your hinge. Keep your shoulder in the socket as you spill the kettlebell into the backswing.

These seven tips will have a big impact toward removing the impacts on your arm! But, don’t try them all at once, or your brain will smoke. I suggest trying one drill at a time. You’ll have bang-free cleans in no time!

Let me know how these work for you.

Thanks for your time!

-Fury

***

Steve “Coach Fury” Holiner’s superhero headquarters is Mark Fisher Fitness in NYC. Fury’s a Master RKC, a DVRT Master Chief, and an Original Strength Instructor. He is available for classes, semi-privates, instructor training and programming at MFF. Check out coachfury.com, facebook.com/coachfury Instagram @iamcoachfury and Twitter @coachfury for more info.

Filed Under: Kettlebell Training, Tutorial Tagged With: Coach Fury, fixing kettlebell cleans, how to do a kettlebell clean, kettlebell clean, kettlebell cleans, kettlebell technique, Steve Holiner, video

Two Quick, Easy and Effective Kettlebell Exercises for Any Population

May 4, 2016 By Andrea Du Cane Leave a Comment

Andrea Du Cane, Master RKC

There is something to be said about simplicity of movement and reinforcing the fundamental patterns of our kettlebell lifting.

I’ve taken two basic exercises and by using two kettlebells and focusing on the correct alignment and movement, I have turned them into simple and effective exercises for all populations—including your brand new clients, older clients and those recovering from certain injuries.

Double Kettlebell Deadlift Drag

The first drill is a double kettlebell deadlift drag. Normally we do this exercise with one heavy kettlebell. By using two medium to heavy kettlebells (heavy enough to complete the movement correctly with each arm), you open up the upper body kinetic chain. This will illuminate asymmetries from one side of the body to the other. It also allows you to strengthen the weaker side. Start with the same size kettlebell in each hand and then use a kettlebell one size larger on the weaker side.

For the purposes of this article and video, I will be using the same size kettlebell.

Get into the set up position. The kettlebells are approximately an arm’s length in front of you. Grab the kettlebells and pull yourself back toward your heels. You should feel as though you would fall back on your butt if you let go of the kettlebells. Lock your lats down into a packed position and maintain a long and neutral spine. SLOWLY drag the kettlebells back towards your heels with your elbows straight. Feel how the movement is initiated by the lats and the triceps. Do not let your hips drop below your knees, and do not let your spine flex at all!

The key is to not use any momentum. In fact, it is best if the floor you are using is sticky or rubber—the more resistance the floor offers the better.

If you feel most of the tension in the quads, then you are not getting your hips back far enough and are trying to hold your position with your quads instead of your glutes and hammies. The abs must be braced the entire time, and you should use a long firm exhale as you drag the kettlebells back. Release, step back, and re-set for the next rep.

I go the length of my gym, or at least 8-10 drags. Repeat for 1 or 2 more sets as desired. Remember, never let your back round into flexion at any time during this exercise!

Double Kettlebell Straight-Leg Deadlift

The double kettlebell straight-leg deadlift, is another simple but effective exercise to challenge the posterior chain. It is an excellent exercise for the hamstrings and glutes. And as in the deadlift drag above, it utilizes the lats.

There is an interesting difference between these two exercises. The deadlift drag uses the lats to do the work by pulling the kettlebells back toward the heels, while the hips and legs maintain stable strength. With the straight-leg deadlift, the lats are held stable while the hips and hammies initiate the movement through hinging. In other words, the movements and stabilization are reversed, but both are working the same muscles. Pretty cool huh!

Here’s how to do the double kettlebell straight-leg deadlift:

Pick up two moderately heavy kettlebells using good deadlift technique. Stand with your feet between hip and shoulder width apart. Keep your elbows straight and locked, and your lats retracted and contracted. Begin to send your hips back into a hinge. Keep your knees as straight as you can manage while maintaining a neutral spine at all times.

The amount of knee flexion and the depth of your torso forward relate to your hamstring flexibility. The more flexible you are, the straighter you can keep your knees and the lower you can fold forward without any flexion in your spine.

Inhale into your belly as your chest comes forward. Pause briefly at the bottom, keeping the glutes and hamstrings contracted. Tighten a little more and then exhale as you come back up to the starting position.

You will feel a deep stretch/contraction from your glutes down through your hamstrings. This exercise can be considered a loaded stretch for the glutes and hamstrings. It is a very powerful hamstring developer.

As usual, there should be NO flexion in the spine. Start with a limited range of motion until you can use the full range of motion with a neutral spine. You can adjust the amount of knee flexion as well—just don’t allow yourself to turn it into a regular deadlift, you’ll be cheating yourself out of the main benefit of this exercise.

As I mentioned above, the lats, back and core are working very hard to stabilize during this exercise, so they are benefiting too!

Start with 3 sets of 8 moving slow and controlled.


****

Andrea Du Cane is a Master RKC Kettlebell Instructor, CK-FMS, CICS, and RIST, ZHealth certified, she has a BA in Psychology from the University of Minnesota and is also a Pilates instructor. She is the author of several books and dvds including The Ageless Body, The Kettlebell Boomer, and The Kettlebell Goddess Workout.  She has over twenty years of aerobics, weight training and fitness experience, with an additional background in… Read more here.

Filed Under: Kettlebell Training, Tutorial Tagged With: Andrea Du Cane, deadlift, deadlift drag, double kettlebell, kettlebell drills, kettlebells, master rkc, Master RKC Andrea Du Cane, straight leg deadlift, tutorial, video

How to Increase Your Grip Strength for Better Kettlebell Swings and Snatches

April 27, 2016 By Doug Fioranelli 4 Comments

Doug Fioranelli, RKC-II, Bottoms-Up Get-Up

Train Your Weakest Link…

If I had a quarter for every person I’ve trained who blurted out, “That wasn’t too hard, I could have done more but my grip was giving out,” after a difficult set, then I would have enough money to pack a pair of shorts, my 32kg kettlebell, and then swing my way through retirement on a sandy beach.

As the true professional I (mostly) am, I simply smile to give a false sense of empathy. But, grip strength is a foundational component of strength. It’s the balancing point which determines our success with many movements.

In the past—especially with assisted weight machines—grip strength was not required or emphasized, so many people forgot its importance. Grip strength is often the weakest link that determines if someone will have difficulty performing pull-ups, kettlebell swings—or even passing the legendary RKC Snatch Test.

If their grip wasn’t holding them back, most people are strong enough to pull themselves up over a bar repeatedly. Their legs and cardiovascular systems are also more than capable of performing hundreds of swings and snatches with a sub-maximal weight. Grip is the foundation for many upper body and repetitive dynamic exercises, and shouldn’t just be an afterthought.

Grip strength can be the limiting factor that rears its ugly head to compromise your technique and cut your sets short. Or it can be the bedrock of strength, something to train so that you are stronger, fitter, and more successful at the gym.

In this post, I will present some strategies for focusing on grip strength in your training so that you can do more kettlebell swings and snatches. I will explain two types of grip training: one focused on increasing strength and the other on endurance. Both types should be in your program to ensure success.

Use Your Grip

If you are a true practitioner of Dragon Door Hardstyle training, using your grip should be a common occurrence. Whether you are performing a kettlebell exercise or practicing traditional weight training, your grip should be engaged.

At the gym, it’s common to see people loosely holding their dumbbells when lunging, performing step ups, and even during rows! The idea is simple—when you are moving, grip the weight and engage as many muscles as possible. Not only is this safer because you body will be in a more stable position, it will make you stronger by activating more muscles to assist in every lift.

Adopt this training principle: anytime you grab a bar or weight, make sure your grip is prioritized and utilized throughout the movement.

Ditch the Two-Arm Swing

This might sound a bit blasphemous, but hear me out! Yes the two-arm kettlebell swing is an excellent movement for learning the proper hip hinging movement, and the safest way to dynamically move a relatively heavy weight. But it can sacrifice grip strength—if it’s the only swing we do.

When learning the two-arm kettlebell swing, the grip is involved. But as we become more proficient, grip strength becomes a secondary focus, and takes a back seat to the hip drive and timing of the movement. You might be surprised at your lack of grip strength development if you do too many two-arm swings instead of the one-arm variety.

Most of us have a finite amount of time to train. And since I am a “training simpleton” I want to get the most “bang-for-my-buck”. One-arm swings provide that for me. Whether you use one kettlebell at a time, or one in each hand, the one-arm swing is the foundation for many exercises since it can easily transition to the clean or snatch.

The one-arm swing also calls for more grip activation, since you are no longer relying on two arms. The one-arm kettlebell swing also allows the trainees to train each side individually. Similarly, you will do your leg strength a huge disservice by performing only squats and deadlifts without challenging your strength and stability with lunges and step ups. Training with only two-arm swings will not balance your grip strength in each hand.

If your time is tight and your goal is to perform more swings or to pass an endurance event like the RKC Snatch Test, it is in your best interest to focus more on the one-arm swing and its variants.

Doug Fioranelli, RKC-II, Bottoms-Up Press

Utilize the Magnificent Versatility of the Kettlebell

Even though it is fairly obvious that kettlebells are more versatile that dumbbells, how many of us actually take advantage of this fact? We all know that a kettlebell military press builds a strong shoulder joint and works the grip. Even though the weight is held in a slightly different way, the same effect is achieved by performing the movement with a dumbbell.

A kettlebell is very versatile, you can flip it upside down and perform bottoms-up presses, which are a whole new ball game. I have seen strong individuals easily press a 32kg kettlebell overhead—only to be completely unable to do a 16kg bottoms-up press. This usually happens because of a lack of grip strength. Someone may have the strength to press the kettlebell upward, but when their grips gives out, the kettlebell flops over like a deflated balloon.

Add bottoms-up presses to your routine to strengthen your grip. Instead of overdoing them, simply add in one set after your regular sets of presses as a finisher. If you’re a real glutton for punishment, try the bottoms-up variations of other classic kettlebell exercises like farmers walks, windmills and the get-up. Be careful and consider the risk-to-reward ratio—when grip strength fails, the kettlebells fall in a hurry. A good benchmark goal is to bottoms-up press a kettlebell that’s one half the weight of your standard military press weight.

Don’t Neglect Endurance

When I was training for a kettlebell sport competition last year, I signed up for a biathlon event—five minutes of double kettlebell jerks, then five minutes of snatches with a 24kg kettlebell. I am usually better at snatches than double jerks, but doing them after the jerks when I was tired presented a new problem. My grip was fatigued, and I could not do as many snatches as when I was fresh.

After one of my workouts, my coach, John Wild Buckley, said to do a six minute double kettlebell farmer’s walk with the competition weight. In my mind, I didn’t want to do it because it would be painful, but I knew that it was exactly what I needed to do.

Adding grip endurance sets are not technically difficult, and they substantially challenge and train the grip along with your mental fortitude. I added most of my endurance sets at the end of my workout or I did shorter endurance sets after a set of squats or deadlifts.

I found the farmer’s walks with the kettlebells to be a great grip strength builder along with bar hangs. I switched grips in both, sometimes using a bottoms-up kettlebell position for the farmer’s walk and alternating between an over and underhand grip for the bar hangs. If you can perform one-minute endurance sets with farmer’s walks or bar hangs, your grip endurance will significantly improve.

Now you have some ideas on how to increase your grip strength and turn a potentially weak link into an asset. For more information, check out the video below:

***

Doug Fioranelli, RKC II, PCC, holds a Master’s degree in Kinesiology and is the owner of Rise Above Performance Training™ in Belmont, CA. Check out his blog for more training articles and videos at DougFioranelli.com

Filed Under: Kettlebell Training, Tutorial Tagged With: advanced drills, Doug Fioranelli, grip strength, grip training, kettlebell grip training, kettlebell technique, Rise Above Performance Training

How to Dominate the RKC Snatch Test

April 20, 2016 By Frank Delventhal 7 Comments

Frank Delventhal Snatch Test

For many, the Snatch Test is a fearsome obstacle to RKC certification. But it does not have to be that way. When you start training frequently enough and have acquired good technique, you will be able to beat the challenge. It’s like learning vocabulary in school—you know what is expected of you, so it becomes more a question of diligence than talent.

What is the RKC Snatch Test?

You must snatch your kettlebell 100 times in 5 minutes. The weight of the kettlebell depends on your bodyweight, age and gender. The average gentleman will use a 24kg and the average lady usually uses a 16kg kettlebell (be sure to check the rules link below to find your exact weight class)

You are allowed to switch hands as often as you like, and can even (carefully) rest the kettlebell on the floor. Click here for the exact rules and kettlebell weight requirements.

What are the Prerequisites for the Snatch Test?

Before you attempt to snatch a kettlebell, you need a solid foundation in the two-hand Hardstyle swing, the one-arm swing, and the clean. These are the preliminary steps of the snatch. “OK” is not good enough—you must be good at these before you begin training for the Snatch Test.

As a general rule you should be able to do 100 one-arm swings within 5 minutes, with a kettlebell at or close to the weight of the kettlebell required for your test. For example, If you have to use a 24kg kettlebell for your test, you should be able to do 100 swings with a 20kg before you begin to specifically train for the snatch.

What Equipment Do I Need?

  • Assorted kettlebells ranging from very light up to your goal-sized kettlebell. (Hopefully your gym is well stocked and also has an RKC-Certified Instructor!)
  • Chalk
  • Optional hand protection: socks, tape, Dragon Skins™, minimalist gloves (cotton gardening gloves)
  • Optional sweat bands for the wrists
  • Your soundtrack
  • Hand care items for after training
  • You may not use belts, thick or padded-gloves, wrist wraps or any other equipment designed to support your body

Chalk

When doing 100 snatches, your hands will need to withstand a lot of friction. A little chalk can help, and will also dry your skin. If you have sweaty hands during the test, you can end up with “burger meat” for hands without chalk. But, too much chalk is also not good, so be sure to discover the right amount that just keeps your hands dry enough. I found that I do very well with just a couple of drops of liquid chalk or by rubbing a piece of chalk. Since chalk generally dries up your skin, it can cause excessive calluses—see the hand care section below.

Socks, Tape, Dragon Skins™, Minimalist Gloves

You are allowed to use sock strips, tape, DragonSkins™, or minimalist gloves (cotton gardening gloves) to protect your hands. If you really need them, that’s ok, but honestly I do better without them. I think you trade an important tactile connection for a little extra protection. But, I also have relatively tough hands that are conditioned to take a beating!

You may not even need these protective items if you train with the following method: begin with a very light weight and slowly progress to heavier weights (which also create more friction) so that your hands have plenty of time to adapt.

Thin Sweatbands or Long Sleeves

I sweat a lot during the test, so I need to wear sweatbands on my wrists—when I don’t have them sweat floods down my arms onto my hands, turning them to “burger meat” by the end of the test. Remember that wraps to protect or support the wrist are not allowed, so make sure that you only use thin sweatbands. Be sure to ask your instructor or judge at the RKC if your sweat bands are ok.

Alternately, you may want to wear a long sleeve compression shirt. The instructor must be able to see if your elbow is really locked out, so make sure that your compression shirt is extremely light and thin. It’s also common sense to use a dry shirt, not one already quenched in your own sweat!

Your Personal “Snatch Test Soundtrack”

The right music can give you extra power. My favorite track has plenty of power, but is not too fast. It’s 5:12 long, so I figured out exactly when to start during the song’s intro.

Listen to that song every time you practice the test. That has nothing to do with enjoying the music, it’s more about training your subconscious to feel the passing time. The song will also help you focus, giving you additional power. Each time you hear the song or imagine it in your head, you’ll KNOW that you will pass the snatch test. If you’re interested in learning more about the mental side of training, check out Logan Christopher’s Mental Muscle. Even though your snatch test at the RKC will be without music, all you need to do is hum the first notes of your song, and you are ready to rock and roll.

Hand Care After Training

The snatch test is also challenging for your hands. Be sure to start your training soon enough before the RKC workshop so that your hands have plenty of time to adapt.

After every workout, check to see if your calluses are hardening. These hardened areas must be removed carefully with a callus remover. Please make sure that you only remove the hard spots. The callus itself is important because it protects your hands from friction and pressure. If you used chalk (especially liquid chalk) you may also want to use a drop of lotion to soften up your hands.

Frank Delventhal Swings

Why should I train specifically for the Snatch Test? Isn’t it enough to prepare with plenty of swings?

This is a question of faith, and it is possible to gain enough power with swings to pass the test. In an objective comparison of the swing and snatch, you will discover that the swing is safer than the snatch. Using the swing to train is generally justified. Additionally, some argue that the Snatch Test is so strenuous that you should not do it very often. Under certain circumstances, I agree with that argument, especially when the student starts with his snatch size kettlebell and tries to work up to the volume of the test. But the title of this post is “How to DOMINATE the Snatch Test”! So, I have a “secret” training plan for you. 😉

Train Success

Start with a kettlebell that you can snatch 100 times in 5 minutes. It doesn’t matter if the kettlebell is very light—even as light as 6kg! The key is to practice the test two to three times a week after your normal workout, and you must succeed each and every time.

Before you do the 100 snatches, take 3 to 5 minutes to actively relax your muscles and visualize completing the test. The more detail you can imagine in your mind, the better. Mentally, you have already finished the test, before you even touch the kettlebell.

It is essential that you succeed each and every time! The goal is to become so accustomed to doing 100 snatches that it nearly becomes boring.

Frank Delventhal InstructingSnatch as precisely as Swiss Clockwork

Watch your form. Every “no count” is discouraging, and many candidates have lost their focus during the test because of it. Take care that you practice strict form. Take a mini break at the top lockout position, when the kettlebell is held over your head. You will have a small rest, and the instructor watching will absolutely know that you are in control of the movement. Your arm should point straight at the ceiling. Your wrist must be straight, and your legs have to be locked out as well. You will look like a “hardcore version of the Statue of Liberty” holding a kettlebell instead of a torch. 😉

Pull your shoulder down to stabilize it. Normally I do not like mirrors while training, but they can be useful for checking your lockout position.

A Tip For the Overhead Lockout Position

If it is difficult to hold the correct overhead arm position, try the “downward dog” yoga pose. Let the tips of your thumbs touch each other, this will increase your mobility—and the ability hold your arms straight overhead. While a yogi will straighten their legs in “downward dog”, that isn’t necessary for our purposes. We want a straight line from the wrists on the floor towards the hips. It takes some practice to achieve that position (at least for most males, the ladies are generally better at this). If you can maintain that straight line, push your shoulders to the floor and over time, increase your range of motion. Improvement may take five minutes to several months, depending on your general mobility.

Changing Hands

Changing hands uses up precious time. It is an advantage if you can use fewer changes—but that also requires more conditioning. Fortunately with kettlebells, you can train cardio and power at the same time! Work up to more reps before switching hands slowly over time. It doesn’t make sense to do more than 20 snatches with one arm before you switch, as that would be unnecessarily fatiguing.

During the live test, your instructor will count for you. While you train, you should have enough concentration to count for yourself. When in doubt, just do ten extra reps.

Rep Schemes

Use your strong hand last as a “secret weapon”. This will make the end of the test will be much easier for you. For example, I am right handed, so I start with my left hand and finish the test with my right hand.

Scheme A: 9 Hand Changes

Let’s start simply. Do 10 snatches, then change hands until you reach 100 reps. If you can complete this scheme in under 4:30, then try Scheme B.

  • 10/10 (10 left / 10 right)
  • 10/10
  • 10/10
  • 10/10
  • 10/10

Scheme B: 7 Hand Changes

This scheme is slightly more challenging, but if you have completed Scheme A with enough spare time, the extra challenge will only be marginal.

  • 15/15
  • 15/15
  • 10/10
  • 10/10

Scheme C: 7 Hand Changes

This scheme allows you to complete 20 snatches with one arm safely. It is possible that you do not need this scheme, and can jump directly to Scheme D, but try it out at least once. As it gets progressively easier, many people like it.

  • 20/20
  • 15/15
  • 10/10
  • 5/5

Scheme D: 5 Hand Changes

The “master level”

  • 20/20
  • 20/20
  • 10/10

When you can easily complete the test with this scheme, and your time is always somewhere between 4:00-4:30 minutes, then you can progress to the next heavier kettlebell. You will probably be faster just because you need fewer hand changes. With the heavier kettlebell, start with the 10 x 10 (Scheme A). It will be more difficult, but you can do it. Progress the same way until you reach your goal weight kettlebell. Do not rush, just use a weight that allows you to succeed every time and the Snatch Test will become easy for you!

Create a Cardio Surplus

Even with your snatch size kettlebell, you should be able to complete scheme D. With extra gas in your tank, you can do the snatch test any time. If you have a bad day (or a cold), just drop to an easier scheme (such as C).

Does it make sense to use a kettlebell heaver than required by the test? No, and I would advise against using a much heavier kettlebell. “Enough is enough!” (Thank you Dan John.)

The RKC certification requirements include more than just the Snatch Test, so use your energy wisely. After you can do scheme D, only train the test once a week or every two weeks to maintain your skill and conditioning.

After your RKC certification workshop, you can work up to more if you want. Now you know how!

Good Luck!

You will greatly benefit from preparing for the test, whether you want to pass it as a personal goal or for your certification. Now that you know how to tackle it, it isn’t a “boss battle”.

Understand that just watching a video about snatching on YouTube does not mean that you can do a snatch! Get an RKC instructor to teach you the right technique. This is safer and saves time. The snatch is the last exercise of the RKC Big Six (swing, get-up, clean, military press, squat, snatch) because the other five build the essential foundation. Enjoy your journey.

“First use your brain, then train!” 😉

Frank Delventhal, RKC-II

***

Frank Delventhal, RKC2, PCC, 1 Dan Aikido. Visit his website: https://hamburg-kettlebell-club.de/

Filed Under: Kettlebell Training, Tutorial Tagged With: Frank Delventhal, kettlbell snatch test, Kettlebell, passing the RKC, RKC snatch test, RKC workshop prep, Snatch Test

The Standing Power Band Plank

April 13, 2016 By Robin Sinclear 2 Comments

Robin Sinclear Standing Band Plank

Solidifying the top and bottom positions of the kettlebell swing are key components to teaching someone to swing correctly. I have two go-to drills: one is part of the RKC manual and curriculum (the towel pull drill), and the other is something I had been using as a core activation drill. I found the standing power band plank had a lot of carryover for teaching the top position of the swing.

The Standing Power Band Plank:

With good cueing and proper positioning, this drill can teach rooting to the floor, solid core engagement, shoulder packing, and how to “breathe behind the shield”.

Here’s how to do it:

Loop a thick resistance band around a pull-up bar. Stand facing the resistance band with your feet hip distance apart. With your arms extended straight out in front, place your hands inside the band with your palms facing down—just like they are at the top of the swing. From this point, the cueing is nearly identical as for the Hardstyle plank.

  1. Your body should form a straight line from the top of your head down to your heels.
  2. Flatten your lower back. Imagine that you are bringing the tailbone and belly button together. Lift the pelvic floor.
  3. Squeeze your glutes tight.
  4. Pull up your kneecaps, and tighten your quads.
  5. Now, engage the lats and upper back by pressing down on the band, while packing and pressing the shoulders down and away from the ears.
  6. Breathe shallowly into a tight stomach.
  7. Hold this position for 10- 30 seconds.

Follow the standing power band plank with an isometric hold of the towel-pull drill from the RKC manual.

Quick review of the towel-pull drill:

Robin Sinclear Towel Pull Drill

Have the student hold each end of a towel and pass the center section of the towel between their legs, pretending they are on the backswing. The instructor grabs the center section of the towel. Using one hand to brace the student on the low back (so they don’t fall backward), the instructor pulls the towel until the student’s hips are fully loaded and most of their weight shifts toward their heels. Holding this isometric contraction for ten seconds or more can help the student feel where the bottom position of the swing should be. You would also choose the towel-pull drill as a corrective for someone who fails to load the hips and hamstrings.

Use the standing power band plank as a corrective drill for anyone who is…

  1. Not contracting their glutes maximally at the top of the swing
  2. Leaning back at the top of the swing
  3. Not packing the shoulders
  4. Using their arms to lift the kettlebell

After teaching the hip hinge and deadlift, performing a few isometric holds of these drills can help lock in the proper top and bottom positions of the kettlebell swing. Incorporate some one-arm isometric holds as well. Happy swinging!


***

Robin Sinclear, RKC-II, is the co-owner of Velocity Strength and Fitness in Chico, California. Her website is VelocityChico.com. She can be reached by email at velocitystrong@gmail.com or by phone at 530-520-2297. Follow Velocity Strength and Fitness on Facebook, Instagram, and Twitter.

Filed Under: Kettlebell Training, Tutorial Tagged With: core activation, corrective exercises, kettlebell cues, kettlebell technique, RKC technique, Robin Sinclear, standing plank, standing power band plank, teaching cues, towel-pull drill

  • « Go to Previous Page
  • Page 1
  • Interim pages omitted …
  • Page 3
  • Page 4
  • Page 5
  • Page 6
  • Page 7
  • Page 8
  • Go to Next Page »

Primary Sidebar

Featured Products

previous arrow
BOOK-RKCBookofSnC
HardStyleKettlebellChallegeDanJohn700
BookCoverMasterTheKettlebell1
RKCiconKettlebell512
KettlebellGoddessdv040
next arrow

Recent Posts

  • RKC Big Six Workout
  • The Kettlebell Swing & Low Back Pain
  • Key Kettlebell Exercises To Help You Create Better Balance
  • How to Most Effectively Use Kettlebells to Meet Your New Year Goals
  • 1 Exercise That Checks All The Boxes
FOLLOW US ON TWITTER!

Archives

Copyright © 2025

Dragon Door Publications / The author(s) and publisher of this material are not responsible in any manner whatsoever for any injury that may occur through following the instructions or opinions contained in this material. The activities, physical and otherwise, described herein for informational purposes only, may be too strenuous or dangerous for some people, and the reader(s) should consult a physician before engaging in them.