• Skip to main content
  • Skip to primary sidebar
  • Home
  • Contributors
    • Matt Beecroft, Master RKC
    • Martijn Bos, Master RKC
    • Andrea Du Cane, Master RKC
    • Angelo Gala, Master RKC
    • Chris Holder, Master RKC
    • Steve Holiner, Master RKC
    • Dan John, Master RKC
    • Mike Krivka, Master RKC
    • Thomas Phillips, Master RKC
    • Robert Rimoczi, Master RKC
    • Phil Ross, Master RKC
    • Max Shank, Master RKC
  • Workshops
    • HKC Workshops
    • RKC Workshops
    • RKC-II Workshops
  • Find an RKC Instructor
  • Resources
    • Articles
    • Forums
    • Kettlebells
    • Products
  • Blogs
    • PCC Blog
    • Strong Medicine Blog
  • Archives

RKC School of Strength

Official blog of the RKC

Kettlebell Training

Is Certification Worth It?

July 13, 2017 By Michael Krivka and Adrienne Harvey 3 Comments

Master RKC Michael Krivka Kettlebell Swing

Education, training, and certification are expensive propositions. Training certifications can last several days and cost well into thousands of dollars—even before adding in the cost of time away from your business and family, transportation to and from the certification, hotels and other extraneous expenses. So, if you are going to invest your hard earned cash in a certification, it sure as heck needs to be worth it and then some! I’m not talking about making back your initial investment, but making back the costs several times over. With those parameters in mind, it makes sense to think twice about seeking additional certifications.

Which Certification Should I Attend?

How do you sift through all of the certifications out there to find ones that you can: a) afford to attend, b) allow you to make back your initial investment several times over, and c) provide you with information that will benefit your athletes today and tomorrow?

Consider these items before attending:

  • Location
  • Instructor
  • Certifying organization
  • Credential status
  • Content
  • Can you use the techniques, tips, correctives, regressions and progressions?
  • Does the certification fit the abilities and goals of your client demographic?
  • Can you immediately apply what you’ve learned at the certification to your current clients?
  • Does the certification provide actionable content or is it too specialized, obscure or advanced for your current (or projected) clients?

While all of these criteria are important to consider—and should play a role in the decision making process—what is the most important thing to consider? Far and above all of these considerations should be the contents of the course and how it applies to your clients.

A good certification will provide you with eighty to one hundred percent actionable material. That’s a pretty high percentage, but it also shows that the certification is dialed in and not just hours of “fluff” or useless content. It also shows the maturity of the content, the instructor and the organization behind it. An ideal certification workshop will have little or no wasted time, and the majority of the time will be spent on training and hands-on work to reinforce the principles and techniques taught.

A poor certification will provide you with very little actionable material; less than fifty percent actionable and a high percentage of theory, conjecture and anecdotes. These certifications are “personality-driven” and are usually nothing more than a handful of tips. The remaining time is often spent listening to stories and fluff to fill in the time.

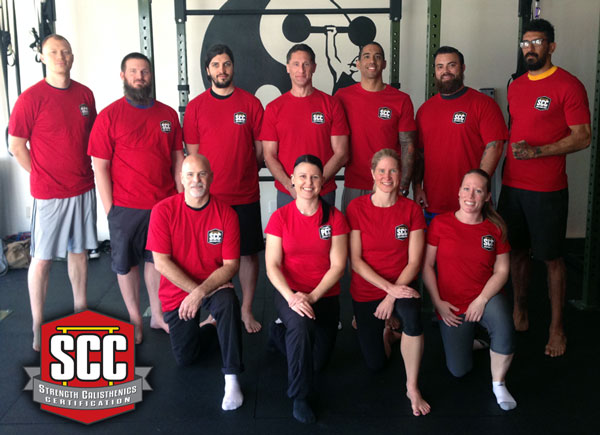
Along with the RKC and PCC, two examples of excellent one-day certifications which provide near one hundred percent actionable material are the HKC (Hardstyle Kettlebell Certification) and the SCC (Strength Calisthenics Certification). Both of these certifications are tremendously powerful and provide attendees with a high percentage of actionable material that they can immediately apply to their current (and future) clients.

Focus on the HKC

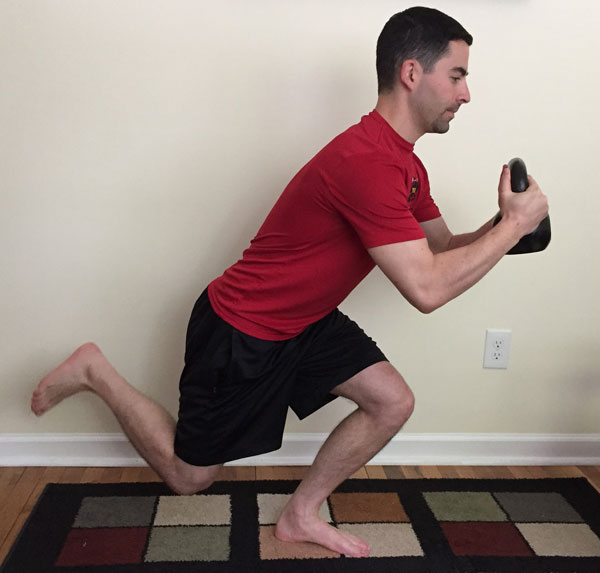
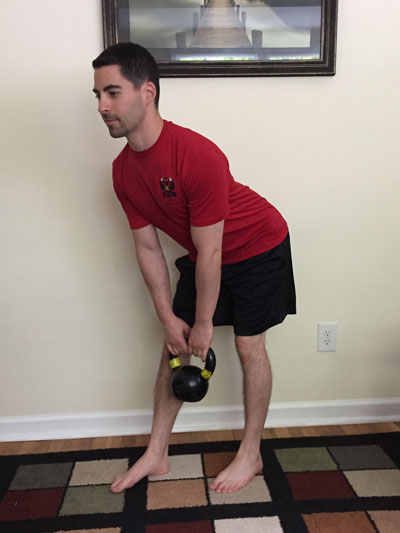
The HKC focuses on a very precise number of core techniques; the kettlebell swing, the kettlebell goblet squat and the get-up. These three techniques are individually very powerful, but together are game-changers for athletes of all levels and clients of any caliber.

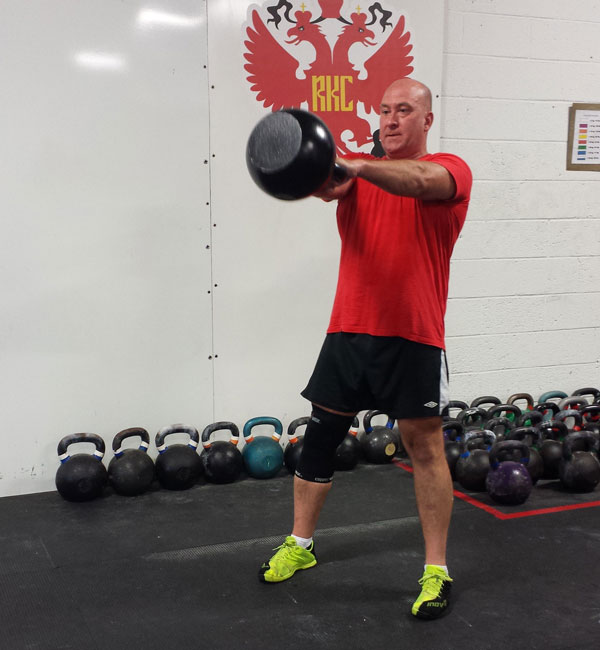
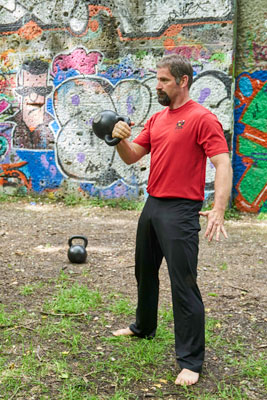
The kettlebell swing is the foundational ballistic of Hardstyle kettlebell training. It is the base that all ballistic techniques are built upon. Errors and bad habits with the swing will be transferred to all of the other ballistics, so it is imperative that the swing is base lined and solid. The swing has tremendous carryover to athletics and is an amazing conditioning tool. The swing trains and teaches the athlete how to add explosiveness to movement. It “fills in the blanks” of any client’s strength and conditioning program.

Michael Krivka goblet squat
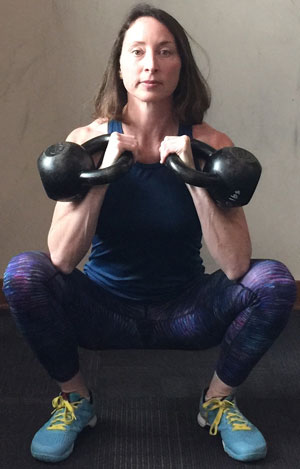
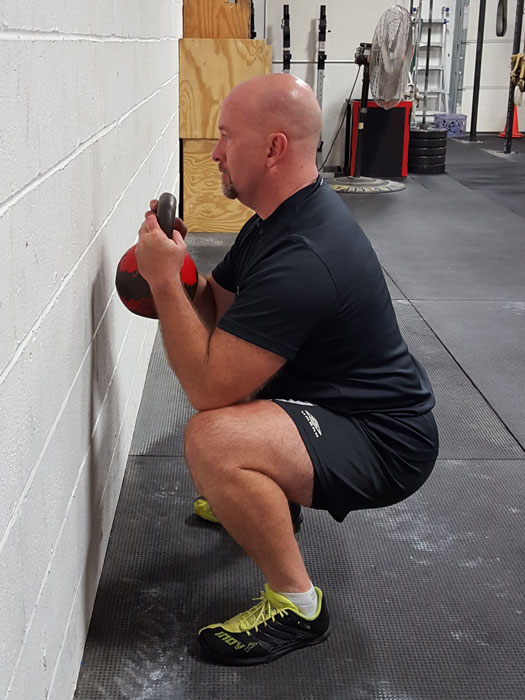
The goblet squat is the foundational grind in Hardstyle kettlebell training. Squatting, while a basic human movement pattern, has become a difficult competency for most people of ANY age. Training with weight machines and avoiding the movement altogether has only exasperated the problem. The goblet squat will help restore lost functionality in those who currently don’t squat and will create a new baseline for those who are currently training with squats.

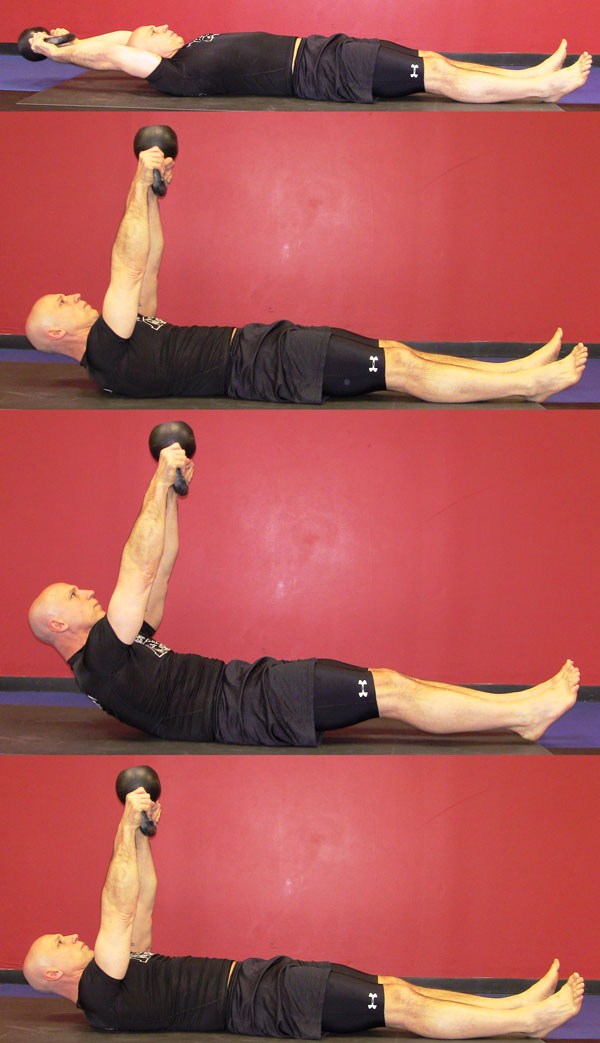
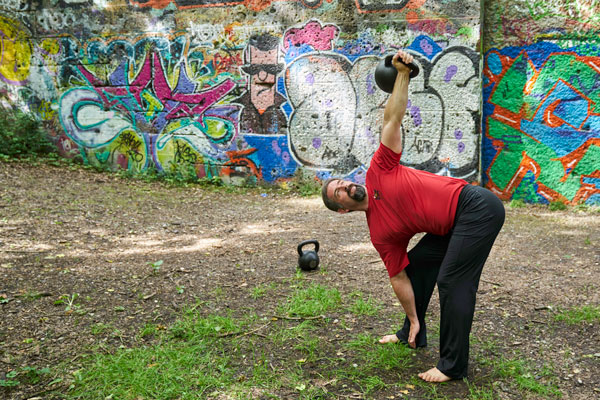
The get-up is neither a ballistic nor a grind, but rests solidly in the realm of functional movement patterns that set the foundation for excellent movement and mobility. The get-up is unique in that it establishes linkages across the entire body. It trains the athlete to establish positional and transitional strength from the ground to standing, and develops exceptional mobility and range of motion in the hips and shoulders.

In addition to the swing, goblet squat and get-up there are several other techniques that are introduced at the HKC. These techniques reinforce loading and unloading principles, mobility issues, and bracing. In particular, the deadlift, the RKC plank and the “naked” get-up are taught and examined so that the trainer has an even greater understanding of the three primary kettlebell techniques.

Focus on the SCC

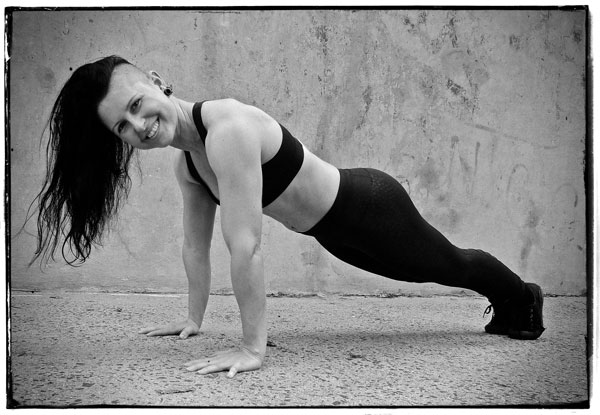
Like the HKC, the SCC focuses on a very specific group of techniques: push-ups, pull-ups, squats, inversions, leg raises and bridges. Even though these techniques are well known—at least superficially—they are infrequently fully explored or understood. At the SCC, these seemingly simple techniques are taught, examined and developed in such a way that a trainer can apply them to any training situation with any client. Key elements of the SCC provide trainers and instructors with the knowledge, tools, and cues to help even the most de-conditioned clients begin their calisthenics journey. Likewise these same elements can be used to continually progress the same basic exercises to elite levels. Body awareness, muscular tension, and coordination are common threads throughout all the drills taught and coached at the SCC.

SCC Austin Group Photo 2017

Push-ups: While nearly everyone has performed a movement called or presented as a push-up, few have really been taught how to do the push-up in a way that will safely and effectively build usable strength. The SCC teaches participants how to coach this powerhouse movement from the ground up. Far from just being an “upper body” exercise, participants are shown how a properly performed push-up engages the whole body.

Pull-ups: The SCC brings this challenging-to-general-populations exercise down to earth. Get your clients of any level started towards this empowering strength and confidence-builder. Even if a client is very de-conditioned, they can still get on the pull-up bar to begin the powerful lead-up drills taught at the SCC.

Squats: As in the HKC, the essential human movement–the squat–is taught in great detail and is regressed and progressed for nearly anyone who walks through the door to train with you. Desk jobs and sedentary lifestyles have robbed many people of their human birthright to squat. The SCC can teach a trainer how to get their clients past bad habits and movement difficulties over time. Basic bodyweight squats have the potential to improve your clients’ quality of life, strength, and injury resistance.

Inversions: Let’s face it, many of our clients will be very uncomfortable getting “upside down”. The SCC teaches several important steps to ease our clients into these healthy, fun, and empowering positions. Crucial cues even experienced trainers may not know will be introduced for headstands and handstands along with gentle alternatives for clients who may not yet be ready.

Leg raises: the leg raise family both on the ground and from the bar are taught at the SCC in great detail. While all the movements taught at the SCC engage the midsection (aka the core or the abs), the leg raises really focus on the area. Desk-bound and sedentary clients often find great relief after conquering the first few steps of the leg raise series. Building a strong midsection—and giving your client the “ab focus” they want (which helps keep them coming back) has so much more benefits beyond an aesthetically pleasing six-pack.

Bridges: While the full bridge is taught, the real gold with the bridge series lies in the earlier steps. Instead of breezing past these powerful mobility and strength enhancers, the SCC teaches the details of these steps. How many of your clients have tight hip flexors and forgotten glutes? The bridge series can be a surprising secret weapon. The very first step is a game changer!

Programming principles and creative modifications are taught for all of the movements in the SCC. Likewise the manual includes sample workouts which will no doubt give you many ideas for creating group and individual programs. When you go back to the gym on Monday to lead your clients or groups, you can bring a new plan of attack.

Adrienne Harvey Senior PCC, RKC-II Push-Up

Summary

At the beginning of this post it was stated that you should be evaluating a certification by looking for one that provides a high percentage of the material being actionable and applicable to your clients. If you look carefully at the content of the HKC and SCC you will see that fully one hundred percent of the material will benefit your clients. This includes clients who previously have experience training with weights or were competitive athletes in the past. It also includes clients who have never had any training, or enough time has passed, that the training is in the distant past and all the skills need to be dusted off and reintroduced. All of techniques can be scaled or modified to meet the needs of your clients, by either making them easier or more difficult, and all contribute to their overall athleticism, mobility and movement. In addition, most of the techniques can be modified or scaled to help work around common injuries/complaints i.e., back pain, knee pain, shoulder pain, etc.

Before you decide to spend your time and money on any certification be sure to take some time to evaluate what actionable and applicable skills you are walking away with. Are you going to get skills and understanding that you can use daily with your clients? Bottom line: look for certifications that will allow you to help all of your clients (in a number of areas) as well as give you skills that will help enhance your reputation and increase your income.

Join Master RKC Michael Krivka and Senior PCC, RKC-II Adrienne Harvey at the upcoming SCC/HKC workshop in Gaithersburg, MD February 2018, or look for an SCC/HKC combination workshop weekend in your area.

***

Michael A. Krivka, Sr. – Master RKC: Michael A. Krivka, Sr. is a Washington, DC native who has been involved in Kettlebell training for over a decade and is currently a Master RKC and member of the RKC Board of Advisors and the RKC Leadership Team under Dragon Door (where he has been listed as one of the top reviewed RKC’s in the world for the last five years). He is also the author of a bestselling eBook entitled “Code Name: Indestructible” and is in the process of finishing up several other eBooks on Kettlebells, body weight, and the integration of other tools into an effective strength and conditioning program. Mike has traveled extensively throughout the United States teaching Russian Kettlebells to military (USMC, USN, USA and USAF) and law enforcement personnel (FBI, DEA, USSS and CIA)… read more here.

Adrienne Harvey, Senior PCC Instructor, RKC-II, CK-FMS, has been RKC Certified since 2010, and RKC Level 2 certified since 2011. Kettlebell and bodyweight training have been crucial in Adrienne’s personal quest for fitness.  A core member of the PCC team, Adrienne loves sharing her knowledge with small groups and individuals. She also loves to develop recipes and workout programs to further support performance, body composition, and of course—FUN. Go to http://www.giryagirl.com for more information about Adrienne.

Filed Under: Coaching, Fitness Business, Kettlebell Training Tagged With: Adrienne Harvey, calisthenics, certification, Coaching, fitness instructor, hkc, instructor education, kettlebells, leadership, Michael Krivka, personal training, SCC

How to Replace Expensive Equipment with Kettlebells

June 21, 2017 By Laurel Blackburn 4 Comments

Laurel Blackburn and Adrienne Harvey Diy Fitness

I started my boot camp business in 2005 on a little patch of grass in front of a gymnastics gym. I didn’t have much money and spent what little I had on a few bands. Our workouts were mostly bodyweight with a few exercises done on the picnic table in front of the gym.

I had to be creative and think outside of the box. Before the TRX came out, I was already doing many of the exercises with beach towels wrapped around trees. I also bought PVC pipes and filled them with sand to use for presses, squats and deadlifts.

As my business grew, I spent almost all of my money on purchasing more equipment. I bought some kettlebells, I picked up logs on the street, and used whatever else I could find as exercise equipment.

Slowly as I earned more money, I bought more equipment. Once we moved from the patch of grass into an 800sqft space, I bought a few more kettlebells, some medicine balls, and I had a friend build a pull up bar.

After a year, we outgrew that space and I moved to a 2,100sqft building—then we moved up to my current 5,000sqft location. Now, I was able to buy a lot of equipment and I spent a fortune on stocking my gym. Every cent I made went back into the gym as I bought more equipment.

As a fitness professional and gym owner, I constantly receive tons of catalogs in the mail full of equipment to buy. I started looking at how I could use what I had to replicate new exercises but at a fraction of the cost. Soon, I became a regular at Home Depot and Lowes!

I found that I could replace everything from sleds to the popular earthquake bars dirt cheap.

A couple of months ago, I went to Orlando and met up with Adrienne Harvey. I packed my car with name brand portable sleds, my earthquake bar, kettlebells and my homemade equipment.

Adrienne and I filmed exercises using my expensive equipment and then filmed the same exercises with better options using my homemade equipment and kettlebells.

I wanted to show gym owners and exercise enthusiasts how they can get creative on the cheap by using kettlebells and a few items from a hardware store.

Here is what I used to make the equipment I used for part 1 of this series.

For sleds:

Lowes SmartStraps 2-in x 20-ft Tie Down ($19.98)

Watch the video, go to the hardware store, grab some kettlebells and get creative.

I’d love to hear how you’ve improvised, created new exercises and workouts with your kettlebells.

Stay tuned for part 2. I will show you how to make your own earthquake bars at 1/8th of the cost.


****

Senior RKC, Laurel Blackburn owns Boot Camp Fitness and Training and Tallahassee Kettlebells.  Look for Laurel at www.bootcampstogo.com or www.tallahasseekettlebells.com.

In her early fifties, Laurel is out to prove that age is just a number. Her goal is to motivate and inspire people everywhere, both young and old that strength, flexibility and mobility can get better with age. Follow her adventures on her blog: www.SuperStrongNana.com.

Filed Under: Fitness Business, Kettlebell Training, Tutorial Tagged With: creative fitness, creative training, DIY fitness equipment, DIY sled, fitness equipment, Kettlebell, kettlebells, Laurel Blackburn, Senior RKC Laurel Blackburn

Why I Like Hardstyle Kettlebell Training

June 14, 2017 By Florian Kiendl 1 Comment

Florian Kiendl RKC Kettlebell Pistol

Whenever I use the phrase “Hardstyle kettlebell”, I find it funny that it is very descriptive if you know the style of training, but at the same time it’s very confusing for someone new to kettlebell training.

An outsider might infer that Hardstyle is a very harsh and intense style of kettlebell training. But, this is not the case. Obviously, any kettlebell work is relatively intense—and the only limit to that intensity is your own physical ability. But, that’s not the point of Hardstyle.

Hardstyle doesn’t defined how hard we train, instead it describes how hard we move. How hard a given workout seems will depend on the volume (total reps), density (time) and intensity (weight or variation) you choose. On the other hand, how hard you execute every single movement does not describe the overall intensity of your training session. A single Hardstyle swing feels more intense than its competition style counterpart, but that still does not depict the whole training session. In the Hardstyle community, we frequently joke about “being lazy” since we do fewer reps harder instead of more reps with lower intensity.

There Are No Hardstyle Kettlebell Competitions…

With Hardstyle technique, it is difficult to compare one athlete with another. For example, performing 100 true Hardstyle swings is a challenging workout, while doing the same number of 90% less than Hardstyle swings will feel much easier. An athlete using competition style technique might choose the same 100 swings as warm-up because his movements are intended to conserve energy.

Even in our well known and feared RKC snatch test, we do not ask for 100 true Hardstyle reps. This is not because it’s nearly impossible to work at the required pace with 100 % pure Hardstyle technique, but because it takes a very experienced referee to see the difference between 90 % snatches and 100 % snatches. The test is still hard enough—believe me. You can’t “win” the snatch test, it’s pass or fail only.

Florian Kiendl RKC Kettlebell Windmill

Why I Like Hardstyle Kettlebell Training

As Max Shank regularly says, “We are all unique little snowflakes and therefore everyone is different.” Some people can work with the same three exercises for years and make incredible progress, while others need to switch their program every four weeks to stay on track. Some people will need a clearly defined goal to work towards, while others work like mules day in and day out. Competitions can be a strong motivation for training, but that same motivation can come at a high price. Whenever you compare yourself with others (who naturally may be younger, bigger, faster, etc.) you will need to overcome your own limitations to defeat them. It is one thing to move past your limits through dedicated training as opposed to working past them by sheer will, or guts to win a competition. It all gets easier with practice, but you must pay your dues. Considering that most elite athletes quit competing before age thirty, the physical price must be high.

Florian Kiendl RKC Kettlebell CleanIn my opinion, it is wiser to train in a way that gradually builds you up over time. Work for your health while prepare yourself for whatever might come.

Are You Against All Competitions?

No. If you are motivated by competition, then you should definitely make that personality trait work for you. And even if you don’t like competing, it is still a good idea to try it now and then to gain a better understanding of your strengths and weaknesses. But don’t compete in your training. Hardstyle kettlebell training can provide you with the physical and mental fortitude to succeed in almost any athletic discipline. Use it to prepare yourself for competing in your chosen sport. Obviously, you will also need to train the skills of your sport, but be careful not to mix skill training and physical preparedness. To improve your skills, you should always try to train when you are relatively fresh. When physical preparedness is the goal, you will need more load to force your body to adapt.

Have fun, train safely, and compete wisely!

***

RKC Team Leader Florian Kiendl is a second degree black belt in Tae Kwon Do and runs a Martial Arts Gym in a small town close to Munich (Germany). He made it his mission to help his students to improve their movement and overall health. In his search for ways to overcome the movement restrictions of his students (and his own) he found the RKC and now works together with Master RKC Robert Rimoczi and others to help as many people as possible to gain back their Strength and Agility. He writes a regular Blog at blog.kettlebellgermany.de and offers workshops all over Germany teaching the RKC kettlebell exercises: KettlebellGermany.de. If you have questions or comments on the article feel free to email him at florian@kettlebellgermany.de. 

Filed Under: Kettlebell Training Tagged With: Athletic Training, competition, Florian Kiendl, Hardstyle, Hardstyle kettlebell, Hardstyle kettlebell training, kettlebell training, kettlebells

Swinging Through Pregnancy, Prenatal Kettlebell Training – Part 2

June 7, 2017 By Kathleen Walters Leave a Comment

Kathleen Walters RKC Kettlebell Snatches

This is the second part of a two-part series about top tips for trainers working with expecting mamas. In part one, we covered the first 3 tips for training pregnant women, and today we take a look at three more important points of advice for coaching women during pregnancy.

  1.     While each client’s needs will be individual, know what to look watch out for with exercise choices for pregnant women. Each pregnant woman will have her own limitations, but there are some common issues to watch for with your prenatal clients, such as Diastasis Recti or DR. DR is a separation between the right and left sides of the rectus abdominis muscle that affects approximately two-thirds of pregnant women. Unfortunately, most will not know that they have this problem, and most trainers do not know what to do about it.

Early in my pregnancy, I noticed that my belly was “coning” when I performed exercises like push-ups and planks—even though those are commonly recommended moves for pregnant women. After doing my own research, I realized that this was a sign of DR. When I mentioned this to my doctor, he told me not to worry about it since there was nothing I could do to fix it until after I had the baby. While my research confirmed I could not fix the problem during pregnancy, it also revealed that I could prevent making the problem worse by avoiding certain exercises.

When working with an expecting mom, assess her for DR several times as her pregnancy progresses. Avoid incorporating exercises in your programming that strain or twist the abdominals which can worsen the abdominal separation. Examples of exercises to avoid are: the get-up, windmill, push-ups, and traditional core exercises such as standard planks, sit-ups, crunches, Russian twists, v-ups, leg raises, etc. Additionally, clients should steer clear of exercises that create a risk of falling, such as box jumps. They may also not feel comfortable doing other “jumping” exercises like jumping jacks or jump rope, since these movements can cause increased pressure on the bladder.

Kathleen Walters double kettlebell Front Squat
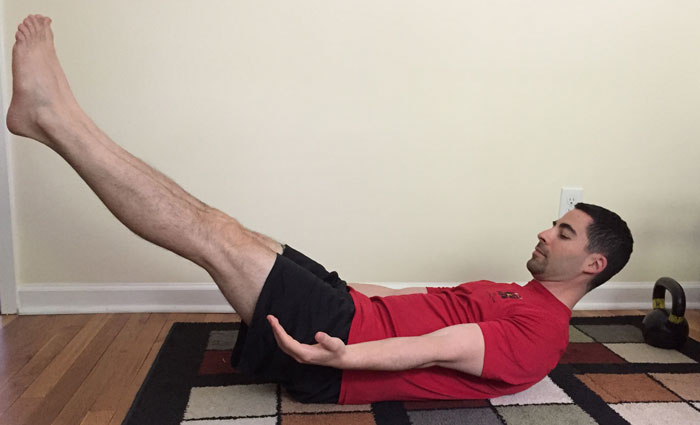
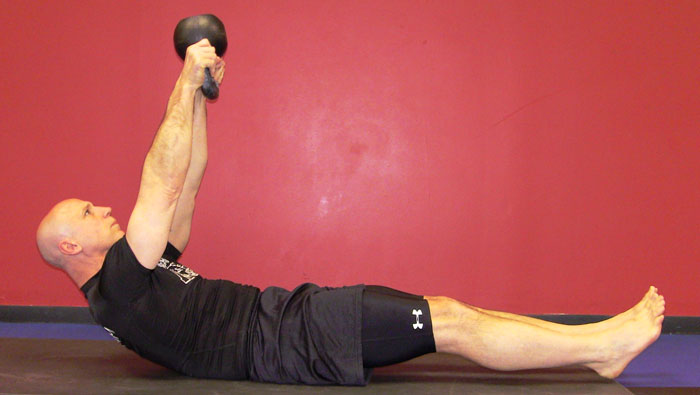
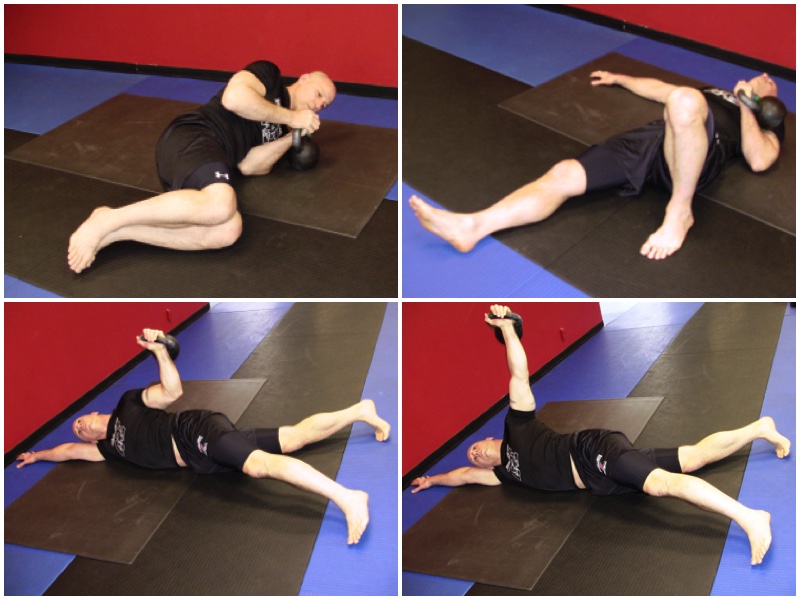
Beginning in the second trimester, it is also important to avoid exercises that require your client to lie flat on her back. This precaution can prevent the weight of the uterus from compressing the vena cava—a major blood vessel—potentially disrupting blood flow to the baby and leaving mom dizzy and short of breath. An easy way to work around this issue is to instruct your client to do these prone exercises, such as floor presses, on an incline instead.

Some of the best exercises to incorporate into a prenatal client’s programming include: goblet squats (which help prepare for labor), seated one-arm military presses, kettlebell deadlifts, suitcase deadlifts or sumo deadlifts, kettlebell swings (as the belly grows, single arm kettlebell swings may be more comfortable), single arm bent-over rows, and alternating reverse lunges. Single-leg deadlifts may also be appropriate earlier in a pregnancy, but it is best to avoid exercises that require great balance as the pregnancy progresses since balance will become compromised as the belly grows.


  1.     Remind your client that pregnancy is not the time to pursue personal records, instead she can work on improving her skills or beginning her journey with kettlebells. Prior to my pregnancy, I had never done a kettlebell snatch, but I spent a lot of time studying and practicing the movement while I was pregnant. My training focused on perfecting the movement’s form, and I never used a weight heavier than 8 kg. I also kept my training lower in volume.

Pregnancy is simply not a time to try to pursue a weight or endurance PR. While there are lots of photos and videos online of women who are nine months pregnant squatting and deadlifting very heavy weights, I discourage clients from doing these types of feats. Very heavy lifting can put unnecessary pressure on their pelvic floor, which can cause complications both during and after pregnancy. Pregnancy is also not a time to try to beat your previous times in high endurance sweat sessions. I remind clients that when it comes to strength and conditioning, the goal during pregnancy should be “to maintain and not gain”. Focus on skill development and form.

Kathleen Walters Kettlebell Hike

You might have a new client who is expecting but who was not physically active prior to pregnancy. It is still possible for this client to begin a training regimen, as long as she consults with her doctor, and you avoid programming strenuous and complex exercises. Instead, focus on foundational movements such as bodyweight squats, bodyweight stationary lunges, kettlebell deadlifts, seated military presses and bent-over rows.

Walking is also an excellent exercise to add to an expecting mom’s program, whether she is new to exercise or an advanced athlete. Walking is a full-body exercise that is generally safe to do throughout pregnancy. The intensity can be adjusted based on the client’s fitness level. Additionally, walking has been shown to lower the risk of certain complications such as gestational diabetes and pre-eclampsia. Walking can also help to relieve stress, elevate your client’s mood and give her some much-needed “me time.”

  1.     Encourage your client to listen to her own body. Training while pregnant requires a woman to be more in tune with her own body than ever before. When I was expecting, I avoided any movements that felt uncomfortable or strained, and I never allowed myself to become overheated or dehydrated. Prior to getting pregnant, I was always eager to push myself to exhaustion. After learning I was having a baby, I prided myself on taking it “low and slow”. Ultimately, this change allowed me to train consistently 4-5 days a week up until the day before I gave birth. I kept my weight gain within a healthy level, which helped me return to my pre-pregnancy weight less than a month after giving birth. Additionally, although I had never formally trained with kettlebells prior to pregnancy, my focus on skill and form prepared me earn my RKC certification just 7 ½ months after giving birth.

I look forward to sharing the knowledge I gained through this experience to help other expecting moms swing through pregnancy and beyond.


Be healthy, happy and strong,

Kathleen Walters

****

Written in collaboration with Master RKC Michael Krivka

Kathleen Walters, RKC is known as the “Kettlebell Mama”. She is a lifelong athlete based in Washington, DC, who specializes in coaching busy moms and moms-to-be in-person and remotely, helping them incorporate healthy fitness and nutrition habits into their chaotic “mom life.” To learn more about Kathleen and her coaching services, email her at kathleen@bellsandpeppers.com, or visit her website and popular blog at http://www.bellsandpeppers.com.

Filed Under: Coaching, Kettlebell Training Tagged With: Kathleen Walters, kettlebell training, prenatal kettlebell training, prenatal training

11 Specialized Variety Methods For Blasting Through Overhead Pressing Plateaus

May 31, 2017 By Matt Beecroft 3 Comments

Matt Beecroft BU Press

A heavy kettlebell press—or any overhead press for that matter—will always be a super impressive feat of whole-body strength. For some, getting heavy things overhead is the meaning of life, and I can understand why! There are few better feelings than locking out a heavy overhead grind.

You have probably heard the phrase, “To press well, you have to press a lot.” Technically, this statement is true. But, when you regularly work heavy grinds like the press, or any high tension, high threshold lift for high reps like ladders, it can be pretty unforgiving on the body—especially the shoulders. Like many in our RKC community, I am a big fan of push-presses and jerks, especially since they seem to be a little more forgiving on the shoulders.

Enter one of the programming principles taught in the RKC: specialized variety. This important concept allows us to avoid plateaus, improve a skill (like pressing), and can also help us avoid injury.

The biological law of accommodation holds that the more you repeat a given movement, the less effective it will be for achieving your goals. A biological object’s response to a given constant stimulus decreases over time. Accommodation is your body’s decreasing response to a constantly continued stimulus—so, we will need to vary our training a little.

Another training principle—which seems to be the opposite—is the SAID principle. The specific adaptations to imposed demands (SAID) principle states that the more something specific is practiced, the more that specific skill will improve. In other words perfect practice makes perfect when it comes to developing skills.

With specialized variety, we want to choose exercises that are very similar, but are slight variations so we can keep training a movement without reaching a plateau.

Principle One: Change Your Foundation

Changing your lower body position is a simple way to add specialized variety to your pressing. With the regular press we usually stand in a bilateral stance with our feet square and roughly shoulder width apart. But, when we change position?

In real life and especially in sports, we’re very rarely in a perfect bilateral stance. More often, we’re in lunge like or single leg stances. Some of these variations can also have crossover for better sports performance.

  1. Feet Together

By narrowing your base, your body really has to zip everything up. Pressing with your feet together ensures that you think about drawing everything into your center, while stopping any tension “leaks” of throughout the body.

  1. Inline Lunge

Similar to pressing with the feet together, but place one leg behind the other (kettlebell on same side as the rear leg). This stance introduces a lateral balance demand and forces the body to zip everything up. You can self-limit the balance demand of this technique—make it harder or easier—by changing the distance or width between the two feet.

  1. Contralateral and Ipsilateral Stances

Even though these stances are very rarely seen or used, I love using them to strengthen the body contra-laterally (think of an X across the body from shoulder to hip) or ipsilaterally (shoulder to hip on the same side). If you are interested in fascia and slings (see Thomas Myers) then this will be right up your alley. These press variations are done on one leg and can be really challenging. For the contralateral version, the kettlebell in the opposite hand of the foot you are standing on, and for the ipsilateral version, press and stand on the same side.

  1. Tall Kneeling and Half Kneeling

Without going down the rabbit hole of corrective exercise, both the tall and half kneeling positions give us great pressing options. By taking the knees and ankles out of the movement, we can focus on letting the hips and the core do their work. The goal of the tall and half kneeling positions is to help us create more stability and control while pressing. They can prompt us to tie the upper and lower body together as in the two previous options. The half kneeling option is also self-limiting. Narrowing your base of support (as in the inline lunge press) in the kneeling lunge position creates more instability—and an environment where you will need to stabilize more to keep your balance—just like the standing inline lunge. If you decide to work from a half or tall kneeling position, you really need to make sure your set up in these positions is spot on—a poor setup will not allow you to gain the benefits of these movements.

  1. V-Seated Press

One of my all time favorite all pressing positions is sitting down in semi side split/pancake position with my legs in a V. This is an amazing variation that really helps to tie in the core with the shoulders, lats, and triceps. Watch your lumbo-pelvic positioning in the V-seated position, so your back and lower back stay in a neutral position.

Matt Beecroft V-Seated Press

  1. The Sots Press

The Sots press is a tough variation for those with great squatting technique and good overhead shoulder mechanics. The press is performed by cleaning the kettlebell, pulling yourself down into a squat, bracing, and then pressing from the deep squat position.

  1. Side Press

Often overlooked as an option to improve the basic press, the side press is an awesome variation that again can really challenge the core. It also requires crazy lat firing, or creating a “shelf” with your lat behind your elbow. This tough variation starts with the feet in a windmill position. The press begins at the bottom position—or after coming down to the bottom position—of the windmill, pressing to lockout and then standing up with the bell just like in the windmill. The windmill is taught at the RKC-II with the kettlebell in the top hand already in lockout and then descending up and down—there’s also a version with kettlebells in both hands. If you are not proficient with the windmill yet, I would suggest waiting to try this press variation until you have trained with an RKC-II instructor.

The setup for this lift is the same as the windmill style setup for the bent press (as opposed to the squat variation of the bent press) taught at the RKC Level-II. Unlike the bent press, where you press your body away from the kettlebell, when performing the side press, you are actually pressing the kettlebell away from you.

  1. The Get-Up Press

Want to strengthen each position of your get-up while training for a stronger press? Try pressing at each stage of the get-up for a real challenge. Even in the half kneeling/windmill position, you can bring your elbow behind your body to the lat, as a progression to help your bent press and kettlebell windmill. The get-up press will really highlight any weakness in your get-up, it will really force you to be more stable in each position.

Principle Two: Change Your Grip

  1. The Bottoms-Up Press

If you’ve seen Master RKC Max Shank perform a bottoms-up press, it’s easy to see that it’s a great pressing variation. While the kettlebell’s groove and body positioning are slightly different, the benefits of this pressing variation are huge. Not only does this variation improve your grip strength, core activation, and reflexive stability, it can also be the safest way for those with troublesome shoulders to press a kettlebell without discomfort or pain. Set up for this lift by placing the webbing of the thumb and first finger in the middle of the kettlebell handle so you can balance it on the heel of your palm. Even though the groove of this press is different, it will encourage you to keep your forearm vertical, which can be helpful for improving your regular press. Since you can’t press very heavy kettlebells with the bottoms-up press, it is a great variation to use when you don’t have a heavy kettlebell to press.
Max Shank Bottoms-up press in Master the Kettlebell

  1. The Stacked Press

The stacked press variation really changes the center of gravity—the position—of the weight/load. To perform this lift, stack a lighter kettlebell on top of a heavier one by carefully cleaning both together and around the wrist. The grip requirement for this variation is huge. You have to crush both handles to complete the press. This is also an awesome option when you only have access to smaller kettlebells or if you only have a few big kettlebell sizes, and want to work on something in between. Because the center of gravity of the load and grip are different than a regular press, you probably won’t be able to press as much with this lift.

Matt Beecroft Stacked Kettlebell Press

Side note: there is a bottom’s up stacked press where you can do a bottoms up press with another kettlebell sitting on top. While I like variety, this is probably taking it a bit too far, and is usually only manageable with very light weight. Even then, it’s a very risky lift, and you probably don’t want to be remembered as an epic “gym fail” on YouTube after a kettlebell falls on your head.

  1. The Waiter’s or Palm Press

When performing a waiter’s press (palm press), you hold the body of the kettlebell, not the handle in the palm of your hand. Your palm is facing up, just like a waiter’s when carrying a tray on the palm of the hand. This variation feels really weird, but encourages surprisingly strong shoulder “packing” and lat activation during the press.

Matt Beecroft Waiters Press

Lastly, it can be really cool to pick an option from principle one and combine it with an option from principle two. For example, you could try a bottoms up press from tall or half kneeling, or a stacked press from the V-seated position. The options are endless and they all lead to a better press.

Don’t forget to base your rep ranges on your goals:

For strength aim for total 6-20 reps and 1-5 reps per set: 3 x 3, 3 x 5, 2 x 5, 5 x 3, 10x 1 etc.

For strength and muscle mass aim for 20-40 total reps and 3-8 reps per set: 7 x 3, 8 x 4, 4 x 8, 5 x 5 (my favorite), 6 x 4, 10 x 4, 6 x 6 etc.

When it comes to pressing, apart from the regular single, double or alternating and see-saw pressing with the feet square and roughly shoulder width apart, these two principles will really help you burst through your current plateau without hours and hours of pressing ladders. Especially when there are no heavy bells to press, we can make the press more challenging and get gains in strength by using complexity instead of load and volume.


****

Matthew Beecroft is a Master RKC, PCC Instructor, and CK-FMS certified instructor. He is also a GFM and Animal Flow instructor and Expert Level 2 instructor with Krav Maga Global and a Muay Thai coach who has trained amateur and professional Muay Thai champions. He can be contacted through his website www.realitysdc.com.au or Facebook page: facebook.com/MeetLifeHeadOn/

Filed Under: Kettlebell Training, Tutorial Tagged With: advanced drills, advanced press, kettlebell training, Master RKC Matt Beecroft, Matt Beecroft, specialized variety

How to Build Muscle Mass with Kettlebells

May 24, 2017 By Robert Miller 10 Comments

Robert Miller Beast Kettlebell Press

The number one rule for lifting—since lifting is life, it’s also the rule number one for life—is always look cool. This accounts for every variable of the workout and all the choices which come with it. Looking cool requires flawless technique, accounting for all safety points, and training with intention.

Training with purpose is the only way to get your peak physique. Let’s face it, we got into training to get jacked and stacked. Improving your physical appearance is an important exercise goal. Strength is a skill, sure. The stronger you become, the more you will get out of life. It is pretty safe to say we can accept this as a universal truth. However, since strength is a function of mobility and stability, we must pay homage to the details of healthy movement.

No other tools in modern history have offered more for dynamic strength gains than kettlebells. For some people, strength is a side effect of training. For others, strength is their only goal. Certainly there are trade offs in training which must be considered when setting goals, and more strength should always be a top priority. But, wanting to look like the prototypical athlete isn’t vanity—it is strength on display. And it takes a truck load of work. When we’ve put in the work, our bodies show it. People will check us out or size us up. How we look communicates our work ethic, discipline, overall health, confidence, and other aspects of our character. This is the cover of the book by which every other human judges our stories.

Robert Miller Kettlebell Racked
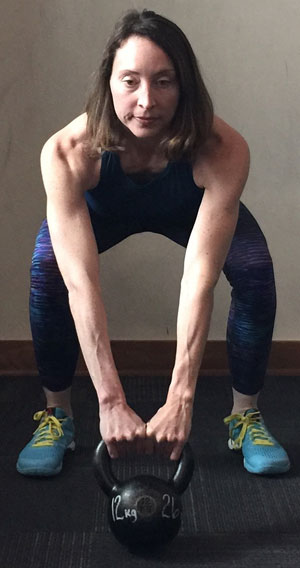
On some level, we all try to make ourselves more presentable. We’ve bought designer jeans from boutique stores and tried designer workouts at twice the price for half the results. If you haven’t reached this conclusion yet, let me help enlighten you: it’s not the clothes on your body that matter, it’s the body in your clothes. So, let’s tune up our bodies and spend our time wisely. Male or female it is important to maintain our muscle mass as we age and the kettlebell gets results. That’s why we train with kettlebells for massive shoulders, thick arms, solid legs, ripped abs and athletic skills for any task.

It’s grind time! Kettlebell ballistics are fun and one of the best ways to increase your conditioning and stamina but if you’re looking to bulk up, then kettlebell grinds are the answer.

Two key variables in the strength and hypertrophy equation are “X” (the speed of the work) and “Y” (time under tension). We want to simplify this equation and solve for X and Y. Every rep of our hypertrophy training program, becomes about decreasing X and increasing Y as we increase the resistance across the sessions. This is why kettlebell ballistics take a back burner during this period of training. To grow our muscles, we also need to choose the right movements. We don’t want to isolate the targeted muscles, because that approach doesn’t yield as much mass. Compound exercises are universally accepted as the most effective way to build muscle and strength. This still holds true at universities and “bro-science labs” around the world. Luckily for us 99% of kettlebell exercises are compound exercises.

Compound movements involve more than one muscle group, and usually use two or more joint systems. With all this tension, we won’t need much variety in our program. Since each exercise supports the next, there isn’t much need for accessory drills. With double servings from a simple menu of exercises, we will stimulate the growth environment.

These eight kettlebell drills are essential for building mass:

Kettlebell Front Squat:

Double Kettlebell Deadlift:

Military Press:

Renegade Row:

See-Saw Press:

Weighted Pull-up:

Back Lunges (Kettlebells Racked):

Single-Leg Deadlift:

Bent Press:

To keep growing muscle while combating training plateaus, we must attempt to master the training tactics of irradiation and lifting tempo. The concept of irradiation is important for creating tension and linking tensing muscles together. Strongly tensing a muscle will recruit nearby muscles to assist and support. However, this does not happen automatically. One must force neuromuscular activity to call as much of the muscle fibers into the workload through a full range of motion.

By making light training weights feel heavier during your reps, you force more supporting muscle tissue into activation. This is one of the central themes of the RKC. This type of training takes more focus, more attention to detail, and it isn’t easy—but training isn’t easy, nor should it be. We demand results, and that’s why we crush the handles tightly for the entire set. That’s why we force our inhales and exhales on time. That’s why we flex our glutes, quads and abs as we stand through the top of our squats. When we make our training more difficult by adding tension, we will force more hypertrophic adaptation with 85% resistance for sets of eight to twelve reps.

The tempo of the lift and instructions for maintaining tension throughout the set are the missing pieces from most mass building plans. We must focus during all three phases—eccentric, isometric, and concentric—of the working muscle’s stretch-shortening cycle to maximize growth.

The tempo of the lift is the amount of time spent in each phase under the added tension of the load. Add tension and stay active as the resistance is loaded through the eccentric or “negative” phase. Don’t rush this part, stretching the muscle combined with overload is the most effective stimulus for muscle growth. Pause and hold at the fully loaded position for at least one full second, sometimes up to five. Exploiting this isometric position under great resistance yields significant results.

Robert Miller Straddle See-Saw Press

The concentric phase of the lift is usually the most difficult phase since the muscle fibers are shortened under the resistance. When the muscles shorten, they get dense and pumped from the work. People often confuse this phase as the growth phase because it is difficult, but many studies have shown that it is not the most important phase for hypertrophic response. To make the muscles grow, place great emphasis on the negative phase.

A lifting tempo of 5-2-2 is a five second negative, a two second isometric pause, and a two second focused contraction until there is a full squeeze of the working muscle groups. That is how every rep is executed. A tempo of 3-2-1 is quicker: three second eccentric, two second isometric, and one second on the concentric phase. Your breathing may need to change with the longer duration lifts, but never lose your structure. “Breathing behind the shield” is an important cue to remember, especially when briefly holding those isometric positions.

What about the get-up and snatch? The get-up is a great drill to set up a strong and stable body. I would never discount the get-up. I think it’s the best exercise in the history of fitness. It will get your shoulders fully functional, fortify strength, and build coordination throughout the entire kinetic chain. This is why I prefer to use the get-up in beginning of my workouts. Instead of a warm-up, I call it a gear-up for getting everything grinding at the right speed.

I also love the kettlebell snatch. Throughout this muscle-building program, the snatch is best used as a workout finisher. Since we’re striving to train the muscles to generate more force, maintaining tension through the concentric phase, and especially the eccentric phase is the best way stimulate muscle growth. The snatch does a great job of eccentrically loading the posterior, but it happens so quickly that barely any time is spent under that tension. This is why it is not the greatest “muscle building” exercise even though what it does for the glutes, legs and abs is incredible. The snatch still is the Tsar of kettlebell exercises, but use it at the end of your session.

Having a wide range of kettlebells is necessary for double kettlebell drills and heavier progressions. Heavy weights will be necessary. As I mentioned earlier, strength will always be a central focus of all our programming. To achieve this most effectively, training weights should be in the calculated ranges of 80%, 90-95% and even beyond 100-105% efforts. It’s great that Dragon Door manufactures the “in between” weights in increments of two kilograms. Having these options will help smooth out the growth curve so the jump up to a bigger kettlebell won’t take nearly as long as before.

RobertMiller Kettlebell Overhead Press
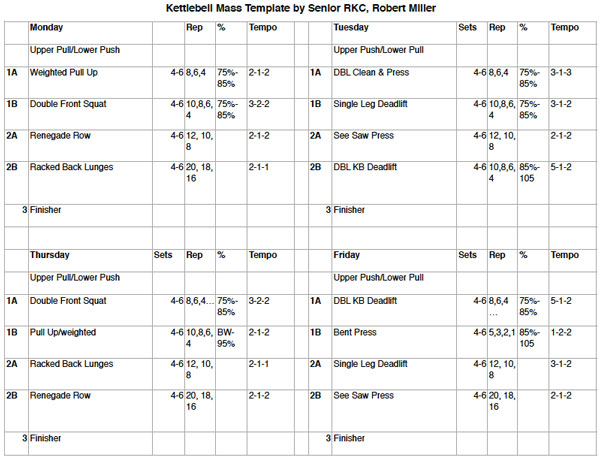
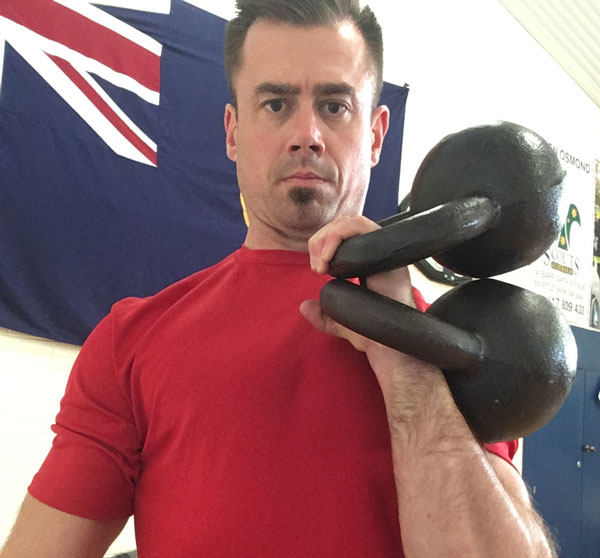
With strength on the rise, it’s time to volumize. So, double up every workout. Sets of double military presses will make your upper body, shoulders and arms more massive than single kettlebell work of the same volume. The same will hold true for all of your kettlebell skills and progressions. Two kettlebells are greater than one. Studies have shown that bi-lateral exercises are best for stimulating the most muscle hypertrophy. The beauty of training with kettlebells is that asymmetries are attacked since each weight must be unilaterally stabilized. Using a barbell can hide some of these asymmetries which can become imbalances over time. Using double kettlebells balances both sides of the body. With that said, I would still recommend barbell training at other points throughout the year. After all, we still want to follow the principles of The Purposeful Primitive.

Always train to improve your lifting technique. Perfect technique doesn’t just make you look cool, it is also the only way to achieve your strength or size goal. Your strength will build as you slowly increase the resistance, but be smart, if there is pain then stop. Check the ego. Technique is not about mental toughness. Good technique ensures that every increment of the movement, at every moment of the rep, for every rep of the set is intentional. The focus is on flawless architecture of the body; the machine as it moves. Marty Gallagher says, “We worship at the altar of technique.” If your technique is flawed with your training weights, then you may never reach your goal weight.

Training with a coach is the surest way to get rock solid technique in the shortest time possible. Other ways to check your technique are training with a partner or taking video of your lifts. You can learn a lot from an outside perspective. No matter how heavy the resistance or how fatigued your body, form and focus matter above all.

To force the muscles grow, this program will call for “heavy” lifts. Anything above 80% of your max is heavy, and ideal lifting technique must hold true on those heavy attempts to maximize muscle growth. Don’t sacrifice your results just to complete a rep. You’ll need to shore up your technique under these loads for even heavier loads in the future. This is the basic concept of progressive overload.

Finding the right work / life balance in a lifting program is important for continued progress. I recommend hitting a hypertrophic training plan twice a year. I like to split the year up in four periods and let my fitness goals change with the seasons. It is a harmonious to try to gain size in the fall, strength in the winter, hypertrophy in the spring, and then get ripped for the summer. For mass gaining programs, I would recommend lifting four days a week.

Organize the workouts in opposing modalities and muscle groups. For example, pair upper body pushing exercises with lower body pulling exercises. The next training session should look like the opposite with an upper body pull paired with a lower body push exercises. For mass, it’s best to do 4-6 sets organized into strength pyramids. Rep ranges should stay around 6-12 to optimize the growth response. Rest periods between sets are important for growth and can last from 1-4 minutes. It’s ok, breathe!

This template demonstrates the simplicity of working opposite modalities to push and pull your way to a bigger, stronger body. Increase the weights weekly as progress dictates.

Robert Miller’s RKC Mass Template:

Click here to download PDF

**Workout finishers are high intensity intervals for the last 10 minutes of the workout. Use a 0:50 second work period and a :10 rest period. Organize 5 opposing drills and do 2 rounds.

Example:

  • Jump lunges :50
  • Push Ups :50
  • Plank :50
  • Snatch (left) :50
  • Snatch (right) :50

Last, but equally important is recovery. You must focus on this phase of your training as well. After making progress with very rigorous training days, it’s necessary to bounce back. Size gains are made because the work causes microscopic tears in the muscle fibers; then the muscle fibers rebuild thicker and stronger. This rebuilding process takes proper nutrition and rest. Recovery grows muscles like rain grows flowers.

Here are a few simple tips to help shorten recovery time between training days: set a bed time, eat for recovery not flavor, drink a gallon of water everyday, stretch twice a day, nap daily, limit inflammatory foods like sugar and alcohol. Keep your eyes on the prize. Results are cool. Vices are not.

The only thing missing from this mass building plan is eating, abs and arms. In our training it is best to keep things simple and eliminate excess. Nutrition should be no different. I don’t really subscribe to fad diets. I just stick to a few simple principles to fuel muscle growth while keeping me lean in the process.

1) Drink a lot of water. Don’t drink calories. No more soda, beer, or juice. Just drink water and black coffee.

2) Eat leans, greens, fruits and nuts. Nourishment as nature intended.

3) Start every day with breakfast.

4) Eat frequent meals. Up to 6 small meals a day within your caloric ranges.

5) No excess. Garbage in is garbage out.

To make the abs visible, clean up your nutrition. Instead of ab isolating exercises in this program, the drills we chose are also some of the best core exercises out there. The abdominal muscles will grow in size. Many professional bodybuilders don’t do “ab” exercises. The heavy squats, weighted pull ups and other such drills require so much abdominal recruitment that accessory work is not necessary. A careful approach to nutrition is what makes the abs really pop.

While there are many diets and guidelines you could follow, most well-studied diets follow the aforementioned principles. Even though it is difficult to balance gaining mass and strength while keeping a lean physique, it can be done masterfully. This is also why it is important to periodize your programming throughout the year and eat to nourish your lifestyle. Focus on long term gains and sustainability—we must do this work for the rest of our lives.

There aren’t many accessory arm exercises in the program since the arms are integrally important to every compound drill. Similar to the abdomen, the arms are always working, so making them grow is as easy as adding a few extra sets and reps before or after your workout finishers. The two drills below do a great job of isolating and adding volume to the biceps and triceps.

Alternating Kettlebell Curl:

Kettlebell Skull Crusher:

Rome wasn’t built in a week, so take time building your physique. While there are many muscle building techniques and strategies out there to sort through, every expert I have asked for help has employed the principles in this post on some level.

This is how to grow muscle: lift heavy kettlebells, eat, sleep, repeat!


****

Robert Miller, Senior RKC trains individuals and groups at www.kettleprt.com 1750 n. Kingsbury Ave. Chicago IL 60612. Be sure to listen to his podcast StrongArguments.com

Filed Under: Kettlebell Training Tagged With: gain muscle mass, hypertrophy, hypertrophy program, kettlebell training, kettlebell training for muscle mass, Robert Miller, strength

How to Use RKC Level-II Skills with Everyday Clients

May 17, 2017 By Ryan Jankowitz Leave a Comment

Ryan Jankowitz Cossack Squat with Kettlebell

I’m writing this blog while on a train back to DC from New York where I had the privilege of assisting Steve “Coach Fury” Holiner at the RKC-II at Catalyst Sport. The weekend before, I had just recertified as an RKC-II in Atlanta with Andrea Du Cane. This has been a whirlwind “East Coast RKC-II tour” and I’ve loved every minute. Needless to say, I have absorbed a lot of great information from many great people, which has given me plenty of food for thought.

One of the many things I really enjoyed during my recent RKC-II experiences was the programming aspect of the course. During my RKC-II recertification, I was tasked with designing a program for a fellow attendee who is within a demographic I usually don’t train—powerlifters. This challenging assignment forced me out of my wheelhouse to look at programming from a different angle. Then I was also able to hear many different program explanations from great minds in the fitness industry. I came away with many ideas and an interesting question for myself: “Ryan, how will you incorporate this awesome RKC-II information into a typical client’s workout program?”

My typical client is a working professional whose goals might include:

  • Getting out of pain
  • Preparing for a 5k
  • Losing weight and improving muscle definition

The client may be dealing with one or several of the following challenges:

  • Lack of mobility/tightness
  • Stress
  • Lack of time

I wanted to know how to incorporate challenging moves like tactical pull-ups, pistols, windmills, or jerks into a program for my clients. The answer lies in the progressions toward these technical and demanding movements.

For example, the tactical pull-up is a movement many of my clients can’t do yet, or aren’t interested in learning—and that’s okay. But, the different hollow positions on the ground are great for EVERY SINGLE CLIENT. My clients want core work and I want them to create a solid cylinder of muscle. Boom, done! When the time is right to approach the bar for hollow hangs, leg raises or pull-ups, they will already understand how to stay tight.

Ryan Jankowitz Hollow Hold
Hollow hold
Ryan Jankowitz Back pressure crunch with leg raise
Back pressure crunch with leg raised.

The pistol is an awesome movement for developing serious leg strength and it’s a great party trick. But, is it a goal that my clients want to achieve? Unfortunately not, and no one has ever told me they wanted to learn the pistol. However, the progressions leading up to the pistol are fantastic for many clients. The Cossack squat and close stance squat both provide new challenges to the squat pattern and add variety to our training sessions. I really love the airborne lunge in every form—assisted, counter balanced with a kettlebell, and bodyweight. It’s a challenging movement that requires focus and balance. The movement also requires hip dissociation—one hip goes into flexion while the other is extended. Since everyone experiences hip dissociation when they walk or run, training the airborne lunge can help improve our clients’ gait patterns.

Ryan Jankowitz Airborne Lunge

The windmill is a fantastic movement for improving hip and thoracic spine mobility while stabilizing the shoulder. I love the progressions because they can be easily added to any warm-up. These thoracic spine mobility drills can be done on the floor without any equipment and added to a naked get-up practice. The good morning stretch—with feet forward and pointed at 45 degrees—is a valuable drill since it really stretches the hamstrings and calves while preparing the lower body for any hinge movements in the session.

Ryan Jankowitz Good Morning

Lastly, the jerk has quickly become one of my favorite exercises due to its high metabolic demand on the body and required athleticism. The jerk can be a challenging movement to learn, but again the progressions are useful for everyday clients. I have successfully taught the long push press and push press to the many clients who have owned the front squat and overhead press. While these progressions are definitely for clients with an advanced skill level, that skill level is absolutely attainable for those who have built a solid foundation of strength and mobility.

As a fitness professional I feel that it’s important to evolve, expand my knowledge, and add more tools to my “toolbox”. The RKC-II curriculum has done just that for me and I highly recommend pursuing this great certification.

Stay Strong,
Ryan Jankowitz

***

Ryan Jankowitz, RKC-II Instructor, CK-FMS, is a life-long athlete who can’t imagine sitting behind a desk. He enjoys sharing his passion for fitness and spreading the RKC knowledge. Ryan operates a remote fitness coaching service, RJ Kettlebell, and is available for private kettlebell workshops as well. You can reach him at rjankowitz@gmail.com. He also works with clients and teaches kettlebell classes at Fitness on the Run in Alexandria, Virginia. If you’re in the area, come swing some bells with Ryan.

Filed Under: Coaching, Kettlebell Training Tagged With: Coaching, everyday clients, kettlebell coaching, personal trainer, personal training, progression and regression, RKC Level 2, RKC Level II, RKC-II, RKC2, Ryan Jankowitz

RKC: The Community of Fitness

May 10, 2017 By William Sturgeon 4 Comments

RKC-II NYC at Catalyst With Steve Holiner

I recently assisted at an RKC Level Two certification in New York at Catalyst Sport with Master RKC Steve “Coach Fury” Holiner. This was a unique event—of the ten candidates in attendance, Steve knew all but three of them. Seven had attended the previous RKC with Steve or had worked with him in the past. In a matter of minutes, Steve approached these three new faces and made them feel as welcome as if they were long lost friends. I love and admire the sense of community and belonging in the RKC.

The workshops offer more than just a learning experience for candidates wishing to understand how to coach and teach kettlebells, everyone also has the opportunity to learn from other coaches. The RKC is a great way to grow your network and learn from other professionals in the field. Each time I have either assisted or attended an RKC workshop, I have always been able to learn something useful from someone else in attendance. I’ve learned new drills to help correct common flaws, or a different cue to coach an exercise. Everyone will have a different perspective on teaching, even if the end result is the same. Learning from each other is very beneficial because it gives you more tools to add into your coaching tool box.

Along with the coaching aspects of the weekend, strong relationships develop between all the candidates and instructors. The instructors and assistants are at your side throughout the weekend to help better yourself. We are never intentionally trying to fail you, we want to make sure we are delivering the best possible education. We want to help you become the best teacher you can be, so you can better serve your clients. I am always amazed at how willing the instructors at RKC certifications are in giving candidates opportunities to ask—and answer—any questions they may have about coaching, programming, client interactions, business and more.

The RKC is a mentally and physically challenging weekend, but what stands out is how supportive everyone is of each other. During the snatch test you will be encouraged by your colleagues, because they want you to succeed. Then, during the coaching drills, you will interact and help each other learn, which is great since backgrounds range from coaching, training, physical therapy, chiropractic, and sometimes even psychology. Regardless of these different backgrounds, the setting allows you all to interact as equals—we are all here to learn and become better. This is an environment of great knowledge and solid support. This is what we should bring back with us when the weekend is over.

When I went through my first RKC in 2014, I specifically remember going through the graduation workout and hearing one of the candidates I had worked with that weekend yell out “Keep it up guys, you can do this, we are in this together!” (Cue High School Musical soundtrack). Those words have stuck in my head since that day. That challenging rite of passage was tough, but knowing that everyone else was experiencing it too encouraged me to succeed. Even before the grad workout, hearing the encouragement from my peers during my testing was comforting. If I hadn’t passed that weekend, I would have been completely okay with it because I would have still left with a lot of knowledge and many new friends.

William Sturgeon's First RKC Workshop

Many people still think that the RKC has a military style of training, but we have separated ourselves from that image and now have a greater emphasis on education and practical purpose. Our focus is to educate and help people. Instructors and assistants will not be impressed by a 3:30 snatch test or a 44kg kettlebell press, but they will be impressed by how well you demonstrate an exercise and how well you can coach. The other feats are impressive, but they do not show us how well you can teach.

There is a greater sense of belonging when you treat the candidates as family, just like Steve did with the candidates he didn’t already know. Most new candidates come in with big knots of fear in their stomachs because of the testing. But when the instructors take the time to get to know the candidates while being sure to teach in the areas where they need help, the stress of testing lowers automatically. When you find a community that welcomes you with open arms and a willingness to give you everything in their power to help you succeed, you know that you are in the right place. We want to set up all of our candidates for success, so we take the extra time to review techniques or drills so everyone fully understands.

The RKC community has some of the nicest, most helpful people I have ever had the pleasure of meeting. When I started the process of opening my facility, Restored Strength, I reached to some RKCs who own their own businesses, and they were willing to take the time to answer my emails and phone calls. Some of these people I have only met on social media, but I also knew them as a part of the RKC community. Without hesitation, everyone I reached out to responded to my questions, and shared what had and had not worked for them when opening their facilities. Where else can you speak to nationally known coaches and get advice like this?

When I assisted at the RKC-II Steve taught, he offered to host me at his place for the weekend. We’ve known each for a few months because he has been coaching me online. He invited me to assist him and offered to let me stay with him. This is the type of community that’s a family with the same goal in mind: helping others. It really connected with me when he said, “It’s amazing how many people I get to reach. If I work with ten coaches and they each work with thirty people that means I have connected with 300 people in some way”. The power to teach and influence this many people is tremendous.

Becoming an RKC is more than just earning a certification, it’s about becoming part of a family with a common goal in mind: educating the world with proper kettlebell training. We spend hours with strangers who become friends with the shared experience of becoming educators in strength. You are never alone while earning your certification, you have the support of a strong community which wants you to succeed more than you know. We all return from these weekends with many memories and stories to share. Each time I have had the privilege to assist, I end up with more friends to add to this extended family.

****

William Sturgeon, RKC II trains clients at his gym, Restored Strength. Contact him through his website at RestoredStrength.com or follow him on Facebook: facebook.com/restoredstrength

Filed Under: Kettlebell Training, Workshop Experiences Tagged With: kettlebell certification, NYC workshop, RKC, RKC Community, RKC Workshop, RKC-II, RKC-II Workshop, Russian Kettlebell Certification, Steve Holiner, William Sturgeon, workshop experience

Swinging Through Pregnancy, Prenatal Kettlebell Training – Part 1

April 26, 2017 By Kathleen Walters 2 Comments

Kathleen Walthers Kettlebell With Baby

“You need to avoid any high-impact exercises, running, and lifting heavy anything heavier than about 10-15 pounds.” As an avid CrossFitter, Boston Marathon-qualifier and finisher, triathlete and fitness enthusiast, these words from my doctor were difficult to digest. But having just confirmed I was pregnant at nearly 43 years of age, and with multiple high-risk factors, including two miscarriages within the prior two years, he did not want me to take any chances. I decided not to take the advice—or spend my pregnancy—lying down. Instead, I set out to find a way to stay fit and active within these safety parameters.

I had first been introduced to kettlebells a few years earlier at my CrossFit box, but the only formal training I had was a 90-minute seminar taught by an RKC-certified instructor at another fitness certification earlier that year. The seminar showed me the power of the kettlebell and sparked my interest. But after the seminar, I went back to my regularly scheduled programming—CrossFit and running, until my doctor put the kibosh on both of these activities. I asked my doctor what he thought about kettlebells, and he admitted to not knowing much about them. He asked if they were a high-impact activity (no) and whether I could keep the weight low (yes, I could). So, with his blessing, I picked up a kettlebell and started swinging.

Eight months later, I gave birth to a gorgeous, healthy baby girl. My love for her and for kettlebells continues to grow every day. Throughout my pregnancy, I spent my free time reading, researching and following experts on kettlebells and prenatal fitness. I focused on learning the proper form of the six foundational RKC moves, while designing a balanced program that took into account the limitations associated with my pregnancy.

It is likely you have or will have a client who is pregnant, and I want to share the top six lessons I learned through my own trial-and-error. Hopefully this will help you coach them effectively and safely throughout their pregnancy while avoiding the common pitfalls even top trainers make when working with moms-to-be.

Kathleen Walthers 3 days before giving birth
Kathleen Walters, 3 days before giving birth.

1. Encourage your client to partner with her doctor about fitness and nutrition. Doctors are medical professionals; most are not fitness or nutrition professionals. As a Precision Nutrition Level 2-certified nutrition coach and lifelong athlete, early on it became clear that I was more knowledgeable about fitness and nutrition than my doctor. He also admitted it! While respecting my doctor’s advice and prioritizing my own health and safety and the health and safety of my baby, I challenged some of his fitness recommendations, providing research and data to support my position.

Because of our back-and-forth, I was able to create a pregnancy fitness program that satisfied my own needs and interests but addressed my doctor’s concerns. It is critical that your client has clearance to train from a medical professional prior to beginning a prenatal program. Partnering with the doctor can help you and your client navigate pregnancy in a way that keeps her healthy, happy and fit.

2. Keep the workouts short and simple. Pregnancy is not the time for lengthy and complicated workouts. Throughout a pregnancy, women often experience bouts of fatigue (particularly in the first and third trimesters) and nausea (most prevalent in the first trimester aka “morning sickness,” though mine hit in the late afternoon and evening). Expectant moms are also usually juggling numerous career and household responsibilities while preparing for the baby. I programmed workouts that lasted as little as 15 minutes, and supplemented these sessions with daily walks with my puppy. This allowed me to easily fit 4-5 workouts a week into my busy schedule.

3. Stay flexible with your clients’ programming and give them options for when they are not feeling 100% or are stressed. My workouts during pregnancy followed my “3S System” of programming: include skill, strength, and sweat in each session. Instead of a specific number of sets to complete in a workout, each workout section was time-based (As Many Rounds As Possible or AMRAP-style). This allowed me to adjust the length of my workouts according to my schedule on any given day.

A typical workout looked something like this:

Warm-up:
Squat-to-stand: 5
Bodyweight single-leg deadlift: 5 R/L
Light halo: 5 R/L

Skill Work:
(5-10 minute AMRAP)
Bodyweight single-leg squat-to-box (pistol practice): 2-3 R/L

Strength Work:
(5-15-minute AMRAP)
One-arm rows: 6-8 R/L
Double kettlebell suitcase deadlift: 6-8
Seated one-arm military press: 6-8 R/L

Sweat Work:
(5-10 minute EMOTM Every Minute On The Minute) complete:
Two-hand kettlebell swings: 5
Double kettlebell farmer’s carry: 20 seconds

Cool Down:
Hamstring stretch
Hip flexor stretch
Diaphragmatic breathing

Stay tuned for part 2, where I will cover the next 3 tips for trainers working with expecting mamas.

Be happy, healthy and strong,
Kathleen Walters, RKC


****

Written in collaboration with Master RKC Michael Krivka

Kathleen Walters, RKC is known as the “Kettlebell Mama”. She is a lifelong athlete based in Washington, DC, who specializes in coaching busy moms and moms-to-be in-person and remotely, helping them incorporate healthy fitness and nutrition habits into their chaotic “mom life.” To learn more about Kathleen and her coaching services, email her at kathleen@bellsandpeppers.com, or visit her website and popular blog at http://www.bellsandpeppers.com.

Filed Under: Kettlebell Training, Mobility and Flexibility Tagged With: Kathleen Walters, kettlebell training, pregnancy, prenatal kettlebell training, prenatal training

How Well Do You Move?

April 19, 2017 By Phil Ross 4 Comments

Master RKC Phil Ross, Kettlebell Pullover

How well do we—as humans—move? When we move are we trying to avoid or minimize pain? There seem to be three major areas of pain, have you wondered why these areas are so afflicted, even with people who are “in shape”?

The low back (lumbar region), the knees (distal femur, proximal tibia, fibula and patella) and the shoulders (glenohumeral and sterno-clavicular joints) are the pain points for many people. Why?

Two words need to be considered: stability and mobility. Certain joints of the body prefer stability and others favor mobility. Feet, knees, the low back and scapular regions favor stability. Ankles, hips, the thoracic spine (middle back) and glenohumeral joints (shoulders) flourish with mobility. The joints need to do what they are designed to do. If not, then asymmetries and injuries occur. And here’s the double whammy—not only will the misaligned joint be affected, the ones above and below it will too! For example, if a person has tight hips, their hip movement will be compromised. The movement will need to take place in other parts of the body, usually the knees and low back, both of which are stability-favoring joints above and below the hips. This creates instability in these joints, resulting in pain and anomalies.

Many people have low back pain. They might stretch their backs, get chiropractic adjustments, or take pain pills, but the issue will still not be addressed. The real issue be that the hips are tight and immobile, and/or the hamstrings are too tight. They may also have immobility issues if their thoracic spine (t-spine) is not strong enough or mobile enough to move safely. Are the erector spinea and the multifidi muscles (muscles that connect the vertebra) strong and engaged? Are the rhomboids, trapezius and other muscles of the scapula developed? Does the individual know how to keep them engaged? On many occasions, low back issues really lie in the areas above and below. Addressing the strength and flexibility of these major joints often significantly relieves back pain.

How do we address and avoid these issues? First, if you are not training, start. You’ll move better, feel better and live a longer (and often more productive) life. Next, consider that type of training, is it cardio, mobility or strength based? Are you getting the correct balance for optimal health? With your strength training or resistance training, are you using closed chain or open chain exercises? Closed chain movements involve more joints of the body and tend to be better for you. Open chain movements are more isolated and can have a shearing effect on the joint.

For example, let’s compare bodyweight squats and leg extensions. Bodyweight (or weighted for that matter) squats are a closed chain movement. The major joints and muscle groups addressed are the hips, knees and ankles, and the glutes, quadriceps, hamstrings and gastrocs (calves) are on the muscle side of the equation. Other muscles and stabilizers are involved at lesser degrees along with a good deal of core engagement for bracing. When performing squats, the feet are firmly planted and positive joint compression is employed. In contrast, leg extensions only address the quadriceps with concentric and eccentric contractions. The other leg muscles are virtually dormant and only the knee joint is involved. There is a shearing effect on the knee joint which may cause injury over time. In my estimation, this machine should be disassembled, melted down and repurposed as something useful, like a kettlebell! Just ask yourself, when you walk, run or jump, do you isolate a muscle or use your whole limbs and torso? In a rehabilitation situation or in bodybuilding, then muscle isolation may be appropriate, but otherwise multi-joint movements are superior.

There are many reasons why kettlebell training is my central mode of training. With kettlebells, all of the facets of fitness are addressed: strength, explosive power, flexibility, durability, muscular endurance, cardiovascular training, and mobility. Let’s consider mobility. Outsiders (I’m referring to those not acquainted with bonafide kettlebell training), only view kettlebell training as strength, explosive power and muscular endurance, but not necessarily promoting healthy mobility.

Along with the bo staff, freehand mobility and calisthenics I lead on a daily basis in my classes, there are three kettlebell based complexes we use to prepare for the rigors of the training session. We execute 10 repetitions of each movement on each side, or in each direction where applicable. The first complex is figure-8, then low, middle, and high halos. The second complex is bottoms-up crescent swings, kettlebell good mornings, and goblet squats. The third complex is the RKC armbar, lying side swings, and kettlebell pullovers.

Let’s discuss the third complex: the RKC armbar, lying side press and the kettlebell pullover. Generally, we do 10 repetitions of the armbar, 10 reps of the lying side press on both sides, and then 10 reps of the kettlebell pullover. Two sets of each.

The Armbar packs the shoulder and prepares the participant for overhead work. Lie on your side in the fetal position as if you were starting a get-up. Grasp the kettlebell by the handle, bring it to your shoulder, then roll onto your back. With two hands, press the kettlebell upward. Make sure that your wrist is straight, your elbow is locked, and your shoulder is packed. If the kettlebell is in your right hand, take your right leg and bring it to the other side of your body so that your hip is facing the floor and most of your anterior is in the prone position. Do all of this while maintaining a relaxed neck and while rotating kettlebell in space. Attempt to bring your right hip as close to the floor as possible as you keep your arm and wrist locked. Once you’ve settled into the bottom of this movement, bring your right leg across the body until you are supine with the kettlebell above. This movement needs to be performed slowly, to maximize the opening of the hips and packing of the shoulders. Relish the time under the kettlebell as your thoracic region savors the mobility!

The Lying Side Press is to be done as soon as you have completed the armbar. As you are on your side, press the kettlebell upward. It is imperative to maintain a straight wrist and vertical forearm throughout this exercise. Pull the kettlebell down so that your elbow is slightly behind your hip. Keep the kettlebell steady and feel your rhomboids working. If you feel stress in your anterior deltoid, you are doing the movement incorrectly and most likely not keeping your forearm vertical.

Phil Ross Lying Side Press Sequence

The Kettlebell Pullover is a movement that’s very easy to cheat! Don’t be “that guy” or “that girl”. The kettlebell is on the ground above your head as you lie in the supine position. Grasp the kettlebell in both hands at the horns and bring it overhead. Now, lock your arms. While you lower the kettlebell, remember the phrase “sometimes, always, never”. Sometimes your thoracic region comes off of the ground, Always have your head and cervical spine off of the ground and Never let your lumbar spine or hips come off of the ground. So, lower the bell with your head off of the mat and do not allow the kettlebell to touch the ground. As you keep the bottom of the kettlebell facing away from you, raise it so that it is perpendicular to the floor. Pause. Next, contract your abdominals as you bring the kettlebell straight upward while keeping your lumbar spine on the floor. Repeat this process for 10 repetitions.

PhilRoss Kettlebell Pullover Sequence

If you have any questions regarding this RKC blog post or any other kettlebell or fitness related matter, please feel free to contact me.

Strength and Honor!

Coach Phil 


***

Phil Ross Master RKC, 8th Degree Black Belt, CK-FMS, PCC and ACE Certified. Author of Ferocious Fitness and Survival Strong, producer of The Kettlebell Workout Library. He is also the Chief Instructor at American Eagle MMA & Kettlebells

Filed Under: Kettlebell Training, Mobility and Flexibility Tagged With: kettlebell training, Master RKC Phil Ross, mobility, mobility training, mobility warmup, phil ross, warmups

  • « Go to Previous Page
  • Page 1
  • Interim pages omitted …
  • Page 4
  • Page 5
  • Page 6
  • Page 7
  • Page 8
  • Interim pages omitted …
  • Page 16
  • Go to Next Page »

Primary Sidebar

Featured Products

previous arrow
BOOK-RKCBookofSnC
HardStyleKettlebellChallegeDanJohn700
BookCoverMasterTheKettlebell1
RKCiconKettlebell512
KettlebellGoddessdv040
next arrow

Recent Posts

  • RKC Big Six Workout
  • The Kettlebell Swing & Low Back Pain
  • Key Kettlebell Exercises To Help You Create Better Balance
  • How to Most Effectively Use Kettlebells to Meet Your New Year Goals
  • 1 Exercise That Checks All The Boxes
FOLLOW US ON TWITTER!

Archives

Copyright © 2025

Dragon Door Publications / The author(s) and publisher of this material are not responsible in any manner whatsoever for any injury that may occur through following the instructions or opinions contained in this material. The activities, physical and otherwise, described herein for informational purposes only, may be too strenuous or dangerous for some people, and the reader(s) should consult a physician before engaging in them.