• Skip to main content
  • Skip to primary sidebar
  • Home
  • Contributors
    • Matt Beecroft, Master RKC
    • Martijn Bos, Master RKC
    • Andrea Du Cane, Master RKC
    • Angelo Gala, Master RKC
    • Chris Holder, Master RKC
    • Steve Holiner, Master RKC
    • Dan John, Master RKC
    • Mike Krivka, Master RKC
    • Thomas Phillips, Master RKC
    • Robert Rimoczi, Master RKC
    • Phil Ross, Master RKC
    • Max Shank, Master RKC
  • Workshops
    • HKC Workshops
    • RKC Workshops
    • RKC-II Workshops
  • Find an RKC Instructor
  • Resources
    • Articles
    • Forums
    • Kettlebells
    • Products
  • Blogs
    • PCC Blog
    • Strong Medicine Blog
  • Archives

RKC School of Strength

Official blog of the RKC

women

Importance of the Overhead Lockout

June 4, 2014 By Tabitha Dearle Leave a Comment

tabitha1and2
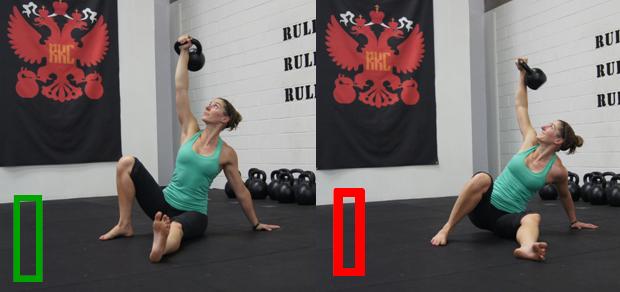
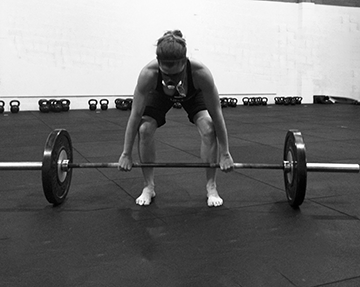
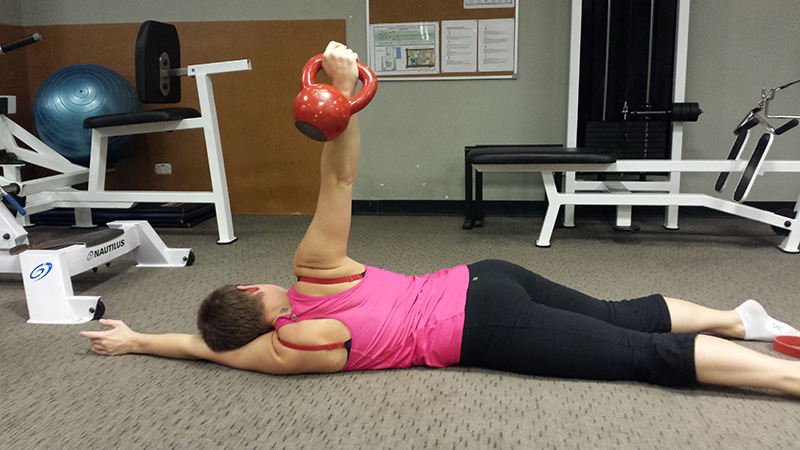
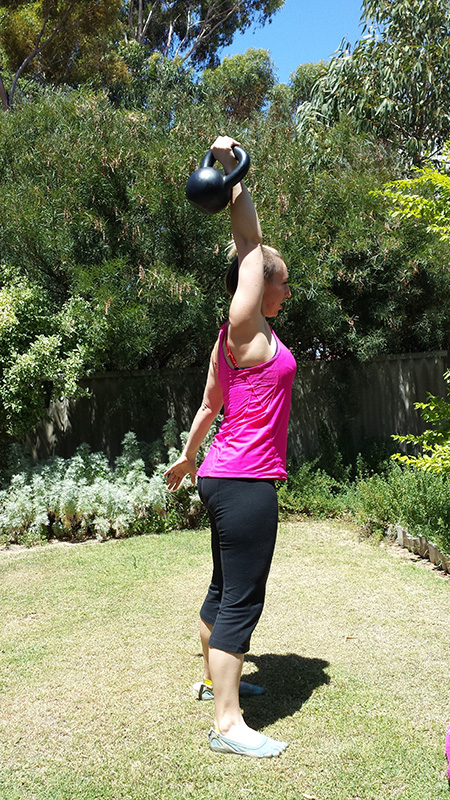
So many kettlebell exercises go overhead.

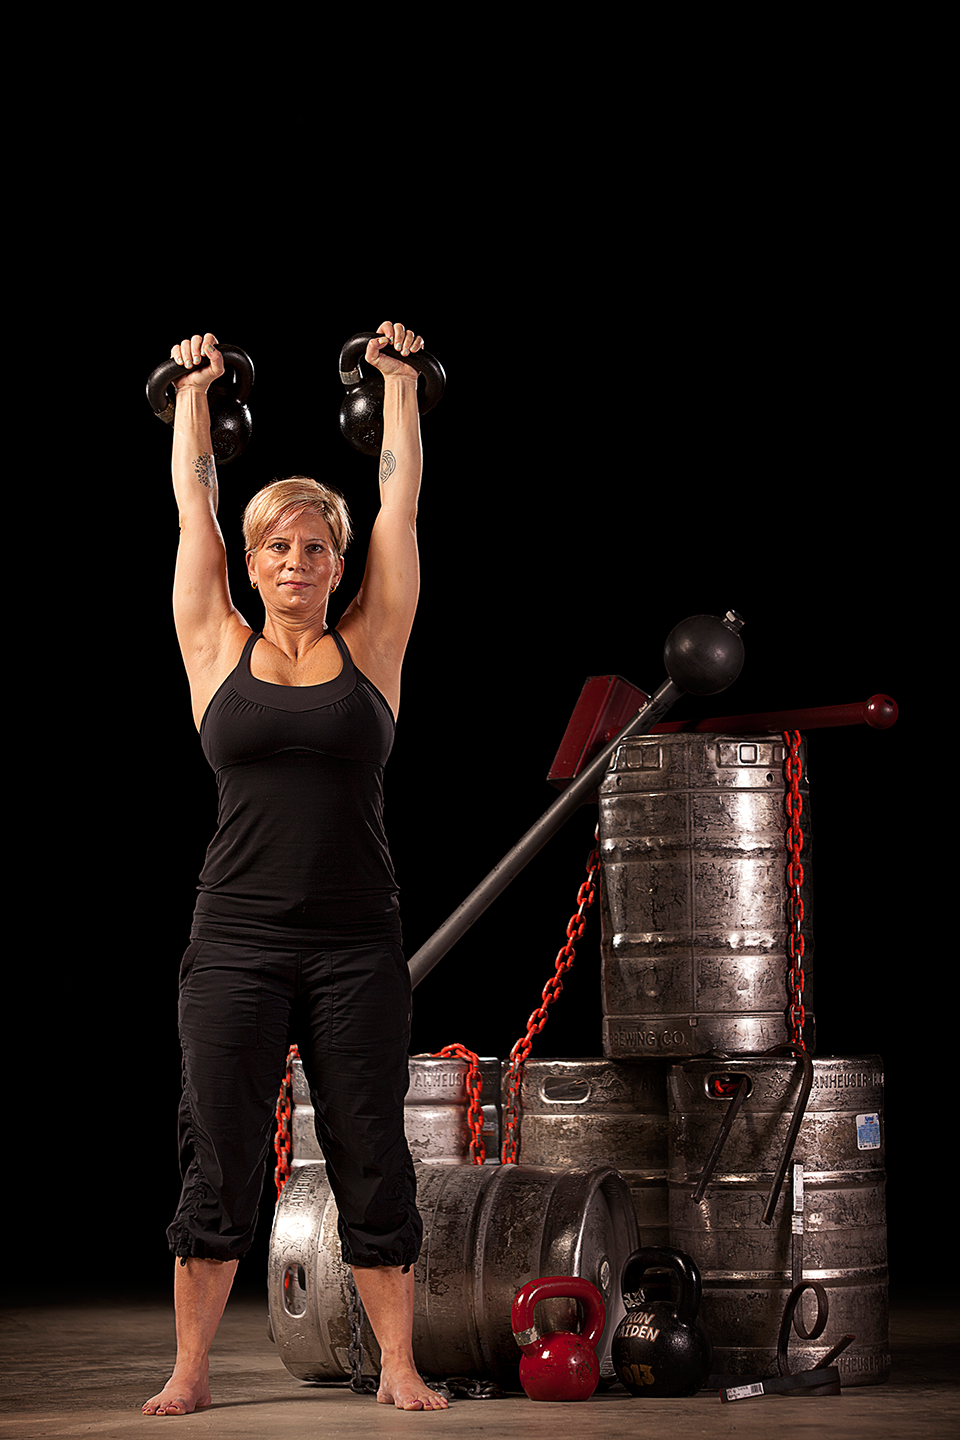
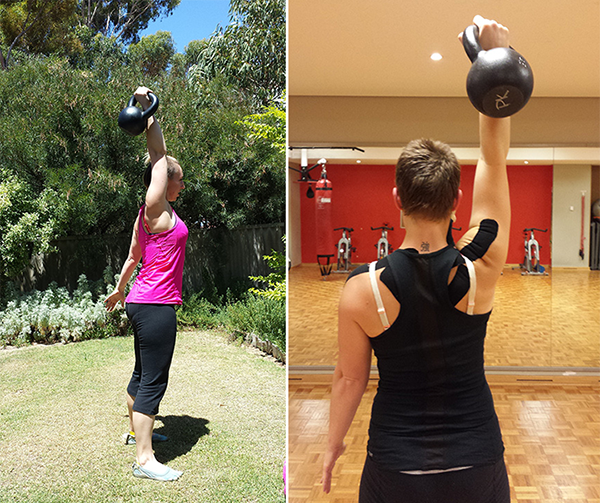
Some move quickly like the Snatch (top left picture) and Jerk. Some move slowly like the Press (top right picture) and Bent Press. And some are simply just held overhead like the Turkish Get Up and Windmill but every single one of them should look identical in the lockout position.

When the kettlebell is overhead your body should have tension running through it from top to bottom, reaching the top of your movement is not a moment to relax. Keeping your lats activated, your belly and glutes tight, the arm sucked into the shoulder, wrist straight ensures safety and strength.

Breaking down the Overhead Lockout:

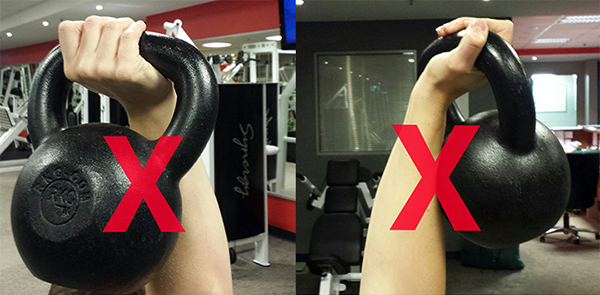
The Wrist:  When the wrist is in the correct position the muscle in your forearm remains active. Maintaining a straight wrist with knuckles facing the sky can be a challenge for some, especially when using a lighter kettlebell that sits higher on the wrist and presses on bone. If the pressure on the wrist is too much when you are starting out grab some sweatbands and cover the wrist for protection (not for continual use to cushion a kettlebell banging onto your wrist, that is a different issue altogether).

Keeping the wrist straight is essential in reducing injury, the “Broken Wrist” position will eventually lead to exactly that…

I asked fellow RKC and Physiotherapist Craig Soley for a breakdown of the dangers of incorrect wrist position, the following is his response –

“One of the most common mistakes in KB pressing activities is wrist position. So we can be clear, wrist (neutral) extension is described such that if I drew a line from your knuckles along the back of your hand and down your wrist is would be a perfectly straight line. If the wrist is flexed (a less common mistake) the knuckles would be in front of the wrist and forearm. If the wrist is extended then the knuckles would be located behind the bones of the wrist and forearm. Holding the KB in wrist neutral, the load is carried through the joint and held by muscular effort – this is good. In wrist extension, the load is carried on the joint, less muscle effort and the weight is resting upon the bony structures – over time this is bad and it is bad practice.

Why? Think collapsed arches and flat feet, hyperextended knees and hyperlorditic lumbar spines as other examples of resting on your joints. If you continually rest on your joints they will eventually wear out. Also, if you are training, train! Use your muscles to do the work and take the load off your joints! Keeping your wrist neutral trains for function and longevity.”

tabitha3and4
The Elbow: The elbow, as with the wrist, should maintain a straight alignment. The extended arm should run parallel to your head with your bicep inline with your ear. If you are hypermobile through the joint you will need to be more mindful of your movements as they are more likely to sustain injury due to the unstable nature of the joint.

Shoulder/Ear Poisoning: Over and over throughout all of my kettlebell learning I’ve heard the phrase “Your ears are poison to your shoulders”, simply meaning that if you’re overhead and the shoulder is close your ear then you’ve lost all stability and strength from the shoulder girdle being in a shrugged up position. Keep the arm securely in the socket and activate your lats for upper torso strength.

Core/Glutes: If you are planning to conquer The Iron Maiden Challenge (or for the fellas The Beast Tamer Challenge) you know that a good heavy Press comes from strong glutes and having your core locked tight. It is the solid base that stops you from leaking power and maintains control. Finish your lift strong by keeping them all engaged – meaning no disengaging in the middle.

Get moving before going overhead: Always warm up before any workout with your aim to target the muscles that are going to be used. PFE warm-up, Halos with Kettlebell, rotating all joints through their full range of movement.

Can’t Maintain Lockout? Thoracic Spine Extension Mobility plays a big part in maintaining posture in the overhead lockout. If you are lacking in thoracic mobility work on it with some of the following stretches/exercises –

  • Foam Roller on the thoracic spine
  • Armbar or Crooked Armbar
  • Thoracic Bridging

tabitha5

Always seek out professional help if you are suffering pain in any overhead position.

***

Tabitha Dearle, RKCII based in Perth, Australia, and is Co-owner of Perth Kettlebell School of Strength. She spent the first decade of her working life managing fast food restaurants before making a life-changing decision to become a Personal  Trainer. Since then she’s been helping many, from athletes to seniors to children, change their lifestyles to become fitter, healthier and more mobile mostly through using Kettlebells. You can follow her blog at http://tabidrkc.wordpress.com/

tabitha1

Filed Under: Uncategorized Tagged With: australia, best, body, dragon door, fitness, Kettlebell, kettlebells, lockout, overhead, RKC, strength, swing, trainer, trainers, women

Take Those Kettlebells Outside

May 14, 2014 By Laurel Blackburn Leave a Comment

Laurel_kb

It’s spring, the weather is warming up, the flowers are blooming and the sun is shining.

If you’ve been hibernating all winter and your workouts have gotten dull, now is the time to breathe new life into those workouts by taking your Kettlebells outside for some fun in the sun.

The possibilities for outdoor workouts are endless. I’ve been outside with my clients for several weeks working on some fun variations for outdoor workouts. Obviously, you need to be in a large grassy area or you could be liable for destroying property and we certainly don’t want that.

The workouts I’ve included are just a few of the fun variations that you can use. Get creative!

To get a full body workout, I start with bent over rows and push-ups. You can either do them once at the start of the workout or you can have them do the rows and push ups each time they pick up the bell.

Depending on how far you want to go down the field, you can vary the reps. If I plan to go far, then I will do 1 rep of each, swing, squat, curl and press before I throw the bell. If you want you can have your clients do several reps of swings, squats, curls and presses before they throw the bell.

Another option is to add a rep of each for every time they pick up their bell.

This can also be a time to work on form. At the end of the video, I included a “stop and throw” swing. This requires a very powerful hip snap in order to heave the bell as far as you can.

Hopefully this will give you some fun ideas and motivation to get you outside and enjoy the spring time.

***

 Laurel Blackburn is an RKC Team Leader and owner of Boot Camp Fitness and Training and Tallahassee Kettlebells.  Look for Laurel at www.bootcampstogo.com or www.tallahasseekettlebells.com.

In her early fifties, she is out to prove that age is just a number. Her goal is to motivate and inspire people everywhere, both young and old that strength, flexibility and mobility can get better with age. Follow her adventures on her blog: www.SuperStrongNana.com.

Filed Under: Uncategorized Tagged With: dragon door, exercises, fat, fitness, hips, Kettlebell, kettlebells, RKC, strength, swing, women, workout, workouts

Stumped on Warm-ups?

April 16, 2014 By Laurel Blackburn 5 Comments

Laurel Blackburn StretchI remember being a newly minted RKC back in 2009. I couldn’t wait to get back and start training clients. I had a head full of knowledge and a heart full of pride and excitement.

One of the things that stumped me a bit was doing warm ups and movement prep for my classes. Yes, we learned some basics such as the pumps and hip flexor stretches, but after doing that class after class, I was looking for something more. Something my clients and I wouldn’t get bored with doing before every class.

As I continued with my education through Dragon Door and the RKC, I was able to add to my knowledge and my toolbox. By taking the CK-FMS in 2010, I learned about compensations for proper movement, and how to correct them. I added many of the correctives to my own movement prep/warm up as well as my classes.

I noticed that my client’s movement improved and their performance skyrocketed. The workouts that followed a good movement prep helped them perform the Kettlebell exercises with much better form. The better the form, the more they got out of our workouts.

My classes are thirty minutes and many of my personal training sessions are thirty to forty minutes, so I was looking for something that I could do with them that didn’t take a lot of time. The movement prep had to hit all of the areas that are crucial to getting the most out of their workouts. The movement prep also had to give me the most “bang for my buck” in addressing some of the most common problems I see in many of my clients such as ankle, thoracic spine mobility and proper breathing techniques.  Again, I added to my arsenal by continuing my education by taking the Primal Move certification. This certification was the final piece of the puzzle in providing my clients and myself with everything needed to address the biggest movement and mobility issues.

I took everything I’ve learned through certifications and workshops and came up with my own movement flows. They are quick and easy and my clients enjoy them.

I’ve included one of my favorites and I will be posting a lot more in the near future. I hope you enjoy this, more importantly, I hope your clients enjoy them. Let me know what you think and please let me know if you have any special cases or issues with your clients that need specific drills. Chances are I have a movement flow that will address these issues.

Have fun and get moving!

***

 Laurel Blackburn is an RKC Team Leader and owner of Boot Camp Fitness and Training and Tallahassee Kettlebells.  Look for Laurel at www.bootcampstogo.com or www.tallahasseekettlebells.com.

At 51, she is out to prove that age is just a number. Her goal is to motivate and inspire people everywhere, both young and old that strength, flexibility and mobility can get better with age. Follow her adventures on her blog: www.SuperStrongNana.com.

Filed Under: Workout of the Week Tagged With: bootcamp, group fitness, Laurel Blackburn, mobility, RKC, self-esteem, senior, trainer, tutorial, video, warm-up, women

What is the most versatile RKC movement?

February 19, 2014 By Shannon Scullin 2 Comments

Good and bad getupShannon demonstrates a good and a bad Get Up stance

The Turkish Get Up is the most versatile movement in the RKC system. It incorporates all seven of the FMS movement patterns  – squat, hurdle step, in line lunge, shoulder mobility, active straight leg raise, trunk and rotary stability – allowing us to utilise it as not only a strength building exercise but as a screening and rehab tool, making it the most valuable exercise to have in your arsenal of training drills.

I’ve been known to be a little bit of a perfectionist when it comes to teaching people how to do a get up.  I firmly believe that one repetition completed with good form is far more beneficial to you than completing ten reps with a half arsed attempt at the movement. But I am pedantic about technique for a very good reason…

I train and have taught a large number of people how to use kettlebells during my time as a trainer. From personal trainers to the self-taught and those who have never touched a weight before in their life. All of these people have one thing in common… As their get up improves, their mobility and stability improves. As their mobility and stability improves their coordination improves. As their coordination improves their strength improves and as their strength improves so does the rest of their training.

The get up is not a “simple” movement to teach or to learn. In fact as well as being the most versatile it’s actually one of the most complex of all the kettlebell exercises.

There are a few books on the market that delve deep into the get up, its technique and corrective drills to help you improve your form, the most famous being “Kalos Sthenos – Kettlebells From the Ground Up”. However, most people’s get up can be greatly improved by simply doing the following:

1)    Thoracic mobility and hamstring flexibility drills.

Two of the most common issues we see in the get up are caused by poor thoracic mobility (hunching forward or shoulder unpacking during the seated position) and hamstring flexibility (inability to keep the down leg straight or allowing the foot to rotate outward).

Often I see people grinding their way through the movement with bad posture in an attempt to improve. But why continue beating your head against a brick wall when there is an easier way.…

There are a number of drills that you can perform to help improve your mobility and flexibility in these areas, thus improving your get up and posture in general.

My favourite drills, and the ones I have found achieve the best results are all incorporated in to one simple mobility workout called the “Daily Dozen”.  This simple eight minutes of mobility, done consistently in conjunction with the get up, will not only vastly improve your movement and posture but they are the perfect way to prepare your body for the workout ahead.

I recommend starting your warm up by “testing” a get up on each side. Once you have completed your get up perform one round of the “Daily Dozen” and then perform another get up on each side. Repeat this process three times.

Pay attention to how your get up feels after performing the first round of mobility drills. If you are particularly tight in the thoracic region you may choose to focus solely on the armbar, bent armbar and kettlebell brettzel for the next round of mobility. Likewise, if you are feeling particularly tight from the hips down, you may choose to focus on the Cossack, can opener and lower limb drills.

For those of you who are beginners or may be a little daunted at the thought of doing a bent armbar or the kettlebell brettzel you can replace both of these movements with the “Brettzel” which will achieve the same results.

2)    Shift your weight.

From the moment you are born you commence a journey of movement. You learn how to shift your weight in order to roll over on to your belly, rock back and forth, crawl, stand and walk. Without this shift in weight movement becomes very difficult.

The get up is a similar journey of movement. Each stage you move to has a different centre of gravity. In order to perform the get up efficiently and gain maximum results you need to learn how and where to shift your weight in order to take the kettlebell from lying to standing position and back down again.

The easiest way to remember where the weight should be felt is to follow this zig zag pattern – elbow, hip, hand, knee.

As you roll to your elbow you should feel all the weight of your body and the bell going through your elbow in to the floor. As you straighten your arm out and progress to the seated position this weight should shift and be felt through your glute, where your femur meets your hip. As you progress to the bridge/low sweep, your arms should form a straight line from the kettlebell, through your shoulders and the weight should be felt through the hand that is connected to the ground. And finally, as you transition from the knee to hand through to the lunge position the weight should be felt through the knee that is connected to the ground. On the descent the weight shift works in the opposite order – knee, hand, hip, elbow.

3)    Do more reps.

This is important. In order to get better at something you need to practice it over and over again.

In an average workout you may complete anywhere between 25 to 100 repetitions of exercises such as swings, snatches, presses, deadlifts and squats however, the get up seems to get neglected when it comes to getting our repetitions in.

Instead of lumping the get up in with your warm up every time you train, why not try changing it up a little? Try spending an entire session focusing solely on the get up every now and then.

Mid last year I started using the get up as my recovery workout. Twice a week I would take a light kettlebell (nothing heavier than 14kg), set the Gymboss on sixty second intervals and then proceed to perform get ups for the next 100 minutes. One get up on the minute, every minute. The get up was to be slow and controlled, focusing on good form throughout the movement.  By the time I had completed twenty get ups all tightness had washed away from my body and any aches and pains that were rearing their ugly little heads prior to the session had retreated with tails between their legs. My movement felt strong, natural and effortless and the more repetitions I did the better everything felt.

Coincidentally, after incorporating the 100 get up recovery workout in to my routine, not only did I hit a new get up PR but I saw gains in all other areas of my training too.

Work on your mobility, shifting your weight and getting more reps in and I guarantee that your get up will not only get better but you will get stronger too!

***

Shannon Scullin is an RKC Team Leader and PCC Instructor based out of Dragon Door Australia.  As Australia’s first, and highest ranked female RKC Shannon brings a keen eye for technique to training and is renowned for being very focused on form ensuring that clients with previous injuries are able to train safely. As the head of Personal Training at Read Performance Training she uses the CK FMS to test and evaluate all clients before training, ensuring that not only will they look better from training, but they will also move better too. With a background in triathlon, adventure racing, rock climbing, cycling, hockey and running Shannon fell in love with kettlebells and the FMS system when she saw the immediate result that improving mobility, stability and strength has on sporting performance. She can be reached through: www.readpt.com

Filed Under: Uncategorized Tagged With: athletes, coordination, get up, ketllebells, kettlebells, mobility, RKC, stability, strength, turkish get up, women

Learning About Eating Disorders

November 6, 2013 By Laurel Blackburn Leave a Comment

Laurel1pngI wrote my last blog just over a month ago. I was scared, no terrified of the responses I might get. My biggest fear was that people would not see me as being trainer material, much less an RKC Team Leader. Boy, I was wrong!

I was overwhelmed with positive responses and support. I found that I am certainly not alone in my struggles. I received emails, texts and comments from women and men who shared their own struggles and applauded me for putting it all on the line.

The best response was from a friend who is a Social Worker. She is working with a woman who is suffering from an eating disorder. She shared my blog in a therapy session and had a major breakthrough with her client.

Putting myself out there like I did was worth it. My goal was to help others and start a conversation amongst trainers in dealing with their clients who struggle with eating disorders and food.

I am not one to sit in my problems and I hope you aren’t either. There is no sense in blogging about something so personal without looking for answers. So I went in search of answers and I got them.

Last year, I had the privilege of leading a team through the RKC in San Jose. One of the ladies that was on my team, Traci Hayes, is a registered Dietitian that specializes in eating disorders. I knew she would be a great resource for getting answers not only to help myself, but to help others.

Although I knew many of the things we discussed, it was an eye-opening interview.

First of all and most importantly, she stressed the importance of taking the focus off of calories and instead, focus on your health and strengths. Appreciate your body and what it can and does for you instead of how it looks.

For me, I have many strengths and I have many things my body does for me. At 51 years old, I can still do the splits, backbends and crazy feats of strength including bending nails and flipping tires. I can do so many things that others cannot do. I and you and your clients have strengths that have nothing to do with how they look and how much they weigh. Focus on those things. Celebrate strength gains and performance gains. What are your strengths?

Traci also discussed the scale, saying that there is no number we will be happy with, we always want more. The scale is a horrible indicator of who we are. It’s just a number. It doesn’t know how much of that number is muscle, fat, water, bones etc. It can’t tell you how strong you are, how kind you are or what kind of awesomeness you possess. It won’t tell you how smart you are and it won’t tell you how many successes you have in life. It’s just a number; a number we will never be happy with.

Getting on the scale sets our standard for the day and sets us up for misery.

This just doesn’t happen. Traci emphasizes that we must make a choice to focus on ourselves as a whole, healthy, strong, competent person. I think many of us are not willing to make that simple choice. We may have to do it many times through out the day, day after day before it becomes a habit. Just like any other habit, we must be consistent.

We discussed eating when not hungry and binge eating, one of my biggest struggles.

I don’t know about you, but I find myself standing in front of my refrigerator, looking for something, hoping that something suddenly appeared that will take the edge off. Yes, it’s emotional eating and it needs to be dealt with.

Many of my clients talk about eating when they aren’t hungry. After a satisfying dinner, they continue to eat until bedtime. Maybe it’s during the workday. Things get stressful and next thing you know, you have run to the snack machine or emptied out a co-workers candy dish.

Traci suggests sitting with those feelings, acknowledge them and deal with them. Feelings are just feelings, nothing more and they will pass if we give them enough time. The problem is that many of us just want to medicate our feelings and go for the quick fix, rather then just being ok with them. If you find yourself in this situation; tend to your feelings. Ask yourself if you are really hungry or are you trying to avoid feelings. This may be a good time to journal, take a walk, do some breathing and refocus. Success builds on success. The more you can redirect and deal with feelings without food, the easier it will be the next time.

Think of food as fuel, rather than a coping mechanism. Eat to nourish your body, not to punish it.

Choose health, mental health and strength. Focus on what your body can do for you each day. Our body shows up for us everyday. Give it what it needs to function. Traci promised me that by changing my focus, I will intuitively begin to eat healthier to fuel my body. The key word here is CHOOSE.

We discussed the negative self-talk and self hate. One of the things she asked was would I talk that way to someone I loved or to my own child. The answer is absolutely not! One of the things that hit home for me is that she said, is that the way we talk to ourselves is the way we will treat ourselves.

If you choose to break the cycle of self abuse, take these steps everyday.

  1. Don’t get on the scale…better yet, get rid of it.
  2. Feed your body healthy, non -processed foods to fuel your activities, health and wellbeing.
  3. Make a choice everyday to celebrate the many great things your body does and can do for you.
  4. Sit in your feelings, ask yourself what you are trying to avoid. Deal with that and know that feelings will pass if given enough time.
  5. Put a positive spin on your goals. Instead of making weight loss a goal, make a performance or strength goal.
  6. Refrain from negative self-talk. Focus on positive.
  7. Try something different. If you have been in a cycle of losing and gaining over and over, do something different. Get a new workout, try new healthy recipes, keep a journal.
  8. Eat healthy, clean foods and exercise. Doing this consistently will enable our bodies to get where they need to be.

Traci says that the diet industry fails us. It makes promises it can’t keep and never teaches us about living healthy and learning about our bodies. Once you place restrictions and rules on your eating, you are setting yourself up for failure and shame and then the cycle begins again.

I received so much great information during our interview but the most important thing I came away with is that I HAVE to make a choice to do things differently or I will never get out of this self destructive cycle.

***

 Here’s how Traci can be reached:  Traci Haynes, RD, RKC, SFG

Nutrition Therapist Specializing in Eating Disorders, Co-owner of VELOCITY Strength and Fitness, Chico, CA

***

 Laurel Blackburn is an RKC Team Leader and owner of Boot Camp Fitness and Training and Tallahassee Kettlebells.  Look for Laurel at www.bootcampstogo.com or www.tallahasseekettlebells.com.

At 51, she is out to prove that age is just a number. Her goal is to motivate and inspire people everywhere, both young and old that strength, flexibility and mobility can get better with age. Follow her adventures on her blog: www.SuperStrongNana.com. 


Filed Under: Uncategorized Tagged With: bootcamp, eating disorders, examples, Laurel Blackburn, RKC, self-esteem, senior, trainer, women

Top 3 Strength Exercises That Carry Over Into Other Training Areas

October 23, 2013 By Shannon Scullin Leave a Comment

sandbag carryThroughout my life I have trained for a variety of different reasons, competing in events such as team sports and endurance racing, to further my knowledge as a trainer by attending certifications such as the RKC and PCC as well as training simply to improve my own personal strength, mobility and coordination.

Quite often I like to I bite off more than I can chew, booking into and training for multiple events at the same time. As a result it is important that I follow a smart strength training program that carries over into all other areas of my training, including not only strength training but also rehab and mobility work too.

finish lineAs I look back through my years of training diaries there are three staple strength building exercises that I have always reverted to, not only for my own training but for my clients too.

The trifecta of training, as I like to call them, not only builds strength but they compliment and carry over into all other areas of training. They can be regressed or progressed, depending on your level of skill, slightly varied or coupled with other drills to ensure that I get the strength, mobility and rehab work required for me to continue training efficiently, yet are basic enough that it does not take up hours of my day to train them or severely fatigue me neurally. The trifecta are:

  • Deadlift
  • Press
  • Pull Up

Whether you are male or female, beginner or advanced, the deadlift, press and pull up, combine to form a well-rounded training template.

PastedGraphicpngA basic guideline for programming works the following – push/pull movements, legs and abdominals. The beauty of the deadlift, press and pull up is that it not only meets these guidelines but they are exercises in which the entire body is required to synchronise and utilise multiple muscle groups in order to perform these movements. This synchronisation is referred to as intermuscular coordination.

Intermuscular coordination is what we should be aiming for in training. The more synchronised your muscles are the more strength you can recruit to lift heavier weights, in order to get stronger, faster, and more explosive.

The press, pull up, and deadlift are commonly referred to as “grind” movements. This means that they are performed slowly, like a truck grinding its way up a hill in a low gear. The slow “grind” allows you time to focus on keeping your form throughout the movement while creating as much tension as possible, linking your upper and lower body together via the core, teaching it to synchronise and function efficiently as one unit.

So how do you program these exercises to get the most out of your training?

I structure my workouts in 2 different ways:

1) Warm up – mobility/stability drills; these drills should be exercises that work the mobility/stability
required for the exercises in the main set of your workout:

Armbar x 5/5

Hard rolls x 5/5

Towel toe touch x 10

TGU x 1/1

**repeat x 3

Main workout
– strength building or sport specific skills; this is where I train the deadlift OR press and pull up:

Deadlift x 5-3-2 (increase weight each time)

** repeat x 2-3 – at the start of each new round add 5kg to the starting weight. If you are using kettlebells and you started with

the 24kg start the next round with the 28kg.

Finisher – core/ballistics:

Because once your core is fatigued your session is finished.

Push press x 1-2-3-4-5

Pull up x 5-4-3-2-1

** repeat x 2-4. Complex – no rest until each ladder is complete. If you cannot do pull ups then do chin ups. If you have not yet progressed to chins then do hanging leg raises. If you cannot do hanging leg raises do knee raises….

The other method of programming I use is:

2) Mobility/stability + strength exercise – With this method I couple 2 x mobility/stability exercises with one strength exercise. This allows me to focus a little more on rehabbing specific areas of concern. It also allows me to actually feel the effect the corrective drills have on each exercise.

Armbar x 5/5

Bretzel x 5/5

Half kneeling press x 5/5

** repeat x 3

Towel toe touch x 10

Single leg deadlift x 5/5

Deadlift x 5

Hard rolls x 5/5

Hollow body hold x 30 sec (squash towel under lumbar spine to ensure hollow position is achieved)

Pull up x 3-5

Which program I use is dependent on the amount of time I have as well as the way my body is feeling at the time. If I am feeling good I go to work on structure #1. If I am lacking in time and/or am feeling a little fatigued structure #2 is my go to program.

For those of you who love to participate in a variety of sports and fitness events, get your variety from your events not your training. A solid training plan transfers to a variety of events. Remember, smart training provides a general physical foundation for all things, not just for one thing.

Happy training 🙂

Pull Ups***

Shannon Scullin is an RKC Team Leader and PCC Instructor based out of Dragon Door Australia.  As Australia’s first, and highest ranked female RKC Shannon brings a keen eye for technique to training and is renowned for being very focused on form ensuring that clients with previous injuries are able to train safely. As the head of Personal Training at Read Performance Training she uses the CK FMS to test and evaluate all clients before training, ensuring that not only will they look better from training, but they will also move better too. With a background in triathlon, adventure racing, rock climbing, cycling, hockey and running Shannon fell in love with kettlebells and the FMS system when she saw the immediate result that improving mobility, stability and strength has on sporting performance. She can be reached through: www.readpt.com

Filed Under: Uncategorized, Workout of the Week Tagged With: athletes, australia, extreme, instructors, kettlebells, pcc, recommended, RKC, strength areas, top 3, trainers, women

Why the Get Up?

October 9, 2013 By Beth Andrews 13 Comments

Beth_andrews

I love the Get Up, it’s one of my favorite exercises. I think it’s the ultimate show of strength to lie on your back holding a weight at arms length toward the ceiling and then  methodically move through various movements to a standing position, still holding the weight at arms length above your head. And then reverse the maneuver.

The GU builds tremendous shoulder strength, stability, and mobility. The isometric contraction from packing the Humerus into the socket will build strength that will carry over into other lifts. Plus, this exercise is possibly the best choice in developing pure athleticism, due to the movement transitions from one position to the next under load and tension. Because this exercise engages the entire body, it builds flexible strength. It is crucial that all Athletes that play sports possess this type strength. Athletes that can move in and out of quick explosive unpredictable positions during a play with flexible strength can possibly reduce the chances of injury. Not an Athlete? The same benefits will carry over to the general public that must handle the activities of daily life.

The GU builds linkage strength and works the stabilizers to correct many asymmetries to improve movement patterns. To quote Gray Cook, “The Get Up is the perfect example of training primitive movement patterns, rolling, kneeling, standing, and reaching.” Studies have shown heavy Get Ups activates all four of the “core” muscles. The Get Up builds resiliency and also embraces “Kalos-Sthenos”, beautiful strength.

Here are some of my favorite GU combinations. I practice these combos for 5-10 minutes straight through without putting the bell down.

  • The first is a GU to standing, then a windmill, then back down and switch sides.
  • The second one starts with a Snatch, then reverse the GU down, then back up, then switch to the other side with a snatch and repeat.
  • The last one is a GU to standing, then lower the bell to a front squat and press, then reverse the GU and repeat on the other side.

You can do any one of these three combos as a warm up, used with a medium sized bell to work on movement patterns, or go for heavy singles.

Here’s a few workout burner’s I play around with.

50 Swings- 5/5 GU.
40 Swings- 4/4 GU.
30 Swings- 3/3 GU.
20 Swings- 2/2 GU.
10 Swings- 1/1 GU.

Start with a light bell and increase to a heavier bell each set. Or you can keep the same bell all the way through. Next time, try the reverse sets from 10- 1/1 up to the 50- 5/5. Then lastly, mix it up, start with 20-2/2, then 40-4/4, 10-1/1, 50-5/5, 30-3/3.

Did I mention the goal is to NOT put the bell down all the way through except to switch sides? Try it once/week for 6 weeks and test your GU weight at the end.

Here’s a tip that I used to get a 36kg GU-Windmill combo.

Heavy overhead holds 1x/week. I increased the time until I got the 36kg for 1 minute.

1 min- 28kg R/L
45sec- 32kg R/L
30sec- 36kg R/L

Some say, “What can you bench?” I say, “What’s your heaviest get up?” Give these a try and let me know what you think.

***

Beth is the owner of Maximum Body Training. She became an RKC Sr. Instructor in Feb 2013 and the 5th Iron Maiden in June 2013. You can visit her website at www.maximumbodytraining.com

Filed Under: Uncategorized Tagged With: beth andrews, get up, kettlebells, trainers, training, women

My Journey to the 1 Arm, 1 Leg Push Up

April 17, 2013 By Beth Andrews 3 Comments

I’ve always been interested in mastering body weight exercises. There is a fascination with athletes that are able to push and pull their body around with total body strength as opposed to those that can only lift a heavy object. When I began kettlebell training, and more specifically, when I got certified in RKC, I began drifting towards the body weight challenges.

At my RKC2 in April 2012, I bought the Convict Conditioning book and signed up for the Naked Warrior cert held in October. Females were required to do a 1 arm push up to pass. I didn’t know much about the technique of the 1 arm push up and with only a few months to prepare, I dug into the CC book for guidance. My program design was centered on training Pull ups, HLR, OAPU, Pistols, Handstands, and Bridge work.

Just prior to the cert, the results were: HLR- 2 sets 27reps, Pistols- 37right/37left, Uneven Pull Ups- 5sets 5reps, Bridges improved, and even though I was hesitant in kicking up a Handstand, I had help getting up and then would hold the position. And of course, sets of 1 arm assisted push-ups. I had actually gotten an ugly 1APU . The strength was there but the mechanics of tension, engaging hollow, breathing, etc., was missing.

The Naked Warrior cert went into details with creating tension, engaging hollow, breathing, shoulder positioning, etc. and it all came together for me. I was able to achieve the 1 arm push up.

Here’s a demonstration video, followed by some cues:


Cues to Use: Root hand in floor. Pack the shoulder. Wrap arm around low back and squeeze fist creating tension. Engage the hollow position. Quick breath in and hold. Chest to floor. Let just enough air out to push up.

The following week, I designed a thirty day program for the 1 Arm 1 Leg Push Up using ladders. I paired variations of pull-ups with OAOLPU assisted ladders. I only laddered up to three on each side but varied the rounds each day I trained. I also varied the intensity by using a basket ball on easier days and using a towel/Frisbee as a harder variation. I didn’t over complicate things with different variations I picked 2 and stuck with it.


MONDAY- 3 rounds

BW pull ups- 10

OAOLPU ladders- 1-1,2-2,3-3 (towel assisted)

WEDNESDAY- 4 rounds

L-sit Baseball grip pull ups- 8

OAOLPU ladders- 1-1,2-2,3-3

FRIDAY/SATURDAY- 3 rounds

Weighted pull ups- 5

OAOLPU ladders- 1-1,2-2,3-3 (Towel assisted)


I kept it simple. I never went to failure. I always could have done a few more reps. I never forced reps. If I needed a day of rest I took it. I waited thirty days before testing to see the progress.

On Tuesday, Thursday, and Sunday, the workout consisted of bridges, handstands, hollow drills, pistols, cossack pistols, weighted push ups, HLR, and OAOL plank holds. I also snatched twice a week.

After 30 days, I achieved the OAOLPU.

Here’s a video and cues:


Cues to Use: Root hand in floor. Pack the shoulder. Lift opposite leg and push contact foot into floor. Wrap arm around low back and squeeze fist creating tension. Engage the hollow position. Quick breath in and hold. Chest to floor. Let just enough air out to push up.

Next up is the PCC, as Al Kavadlo says on the Progressive Calisthenics blog… ”We’re Working Out.”

 ***

More about Beth Andrews: Beth Andrews, Senior RKC,  is a gym owner and instructor at Maximum Body Training in Cartersville, Georgia.  She can also be reached through her website: http://www.wix.com/drruss21/mbt.


Filed Under: Uncategorized, Workout of the Week Tagged With: beth andrews, body, bodyweight, exercises, fitness, oaolpu, one arm, one leg, pushups, RKC, senior, weight, women, workout

Primary Sidebar

Featured Products

previous arrow
BOOK-RKCBookofSnC
HardStyleKettlebellChallegeDanJohn700
BookCoverMasterTheKettlebell1
RKCiconKettlebell512
KettlebellGoddessdv040
next arrow

Recent Posts

  • RKC Big Six Workout
  • The Kettlebell Swing & Low Back Pain
  • Key Kettlebell Exercises To Help You Create Better Balance
  • How to Most Effectively Use Kettlebells to Meet Your New Year Goals
  • 1 Exercise That Checks All The Boxes
FOLLOW US ON TWITTER!

Archives

Copyright © 2025

Dragon Door Publications / The author(s) and publisher of this material are not responsible in any manner whatsoever for any injury that may occur through following the instructions or opinions contained in this material. The activities, physical and otherwise, described herein for informational purposes only, may be too strenuous or dangerous for some people, and the reader(s) should consult a physician before engaging in them.