• Skip to main content
  • Skip to primary sidebar
  • Home
  • Contributors
    • Matt Beecroft, Master RKC
    • Martijn Bos, Master RKC
    • Andrea Du Cane, Master RKC
    • Angelo Gala, Master RKC
    • Chris Holder, Master RKC
    • Steve Holiner, Master RKC
    • Dan John, Master RKC
    • Mike Krivka, Master RKC
    • Thomas Phillips, Master RKC
    • Robert Rimoczi, Master RKC
    • Phil Ross, Master RKC
    • Max Shank, Master RKC
  • Workshops
    • HKC Workshops
    • RKC Workshops
    • RKC-II Workshops
  • Find an RKC Instructor
  • Resources
    • Articles
    • Forums
    • Kettlebells
    • Products
  • Blogs
    • PCC Blog
    • Strong Medicine Blog
  • Archives

RKC School of Strength

Official blog of the RKC

RKC

A Superset Series for Shoulder Mobility

June 29, 2016 By Paul Britt, DC 3 Comments

Paul Britt Kettlebell RKC Arm Bar

I’ve screened many people with the Functional Movement Screen. In conducting all of those screens, I’ve observed typical patterns, one of which tends to be shoulder mobility issues. While this post is not a treatment plan or medical advice, it is the quick shoulder mobility series I use after the initial individual work and correctives. It’s a great way to open up thoracic and shoulder mobility after a long day of sitting or just living in today’s world.

I have my students perform the series as a superset. They move from one exercise to the next without a break. I typically have them perform the series three times. It’s a great mobility set and general warm-up for the session ahead.

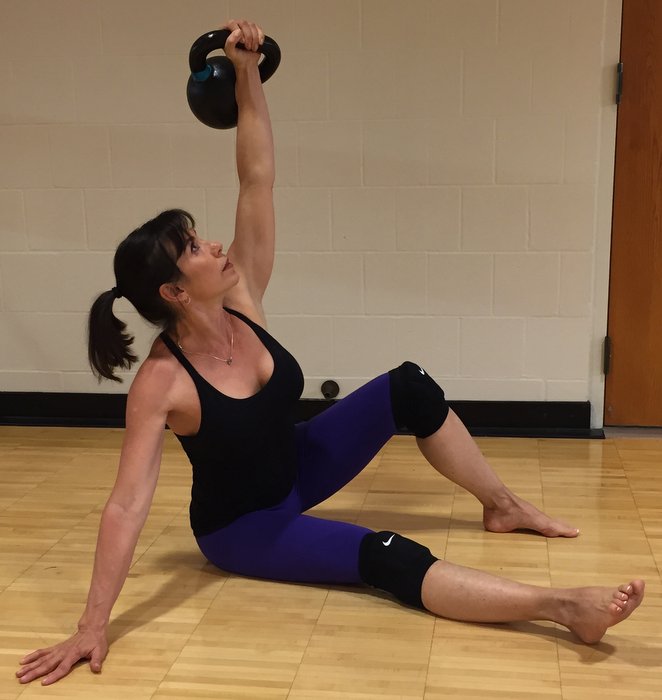
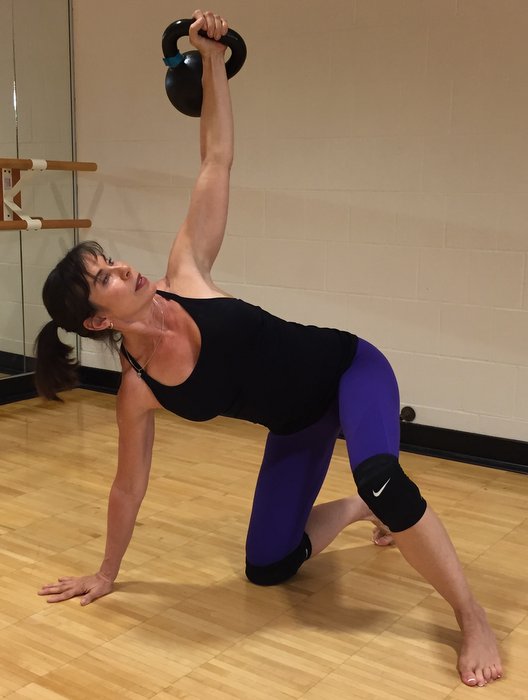
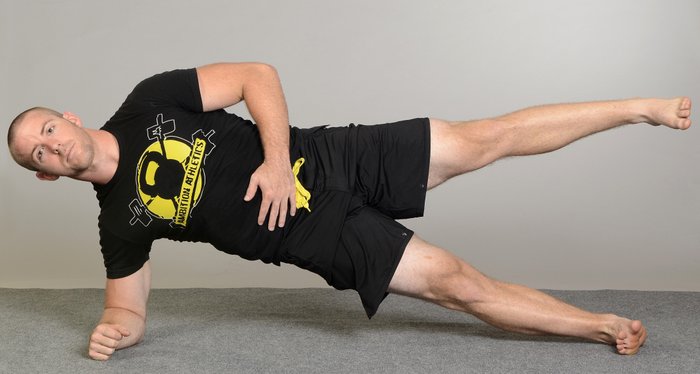
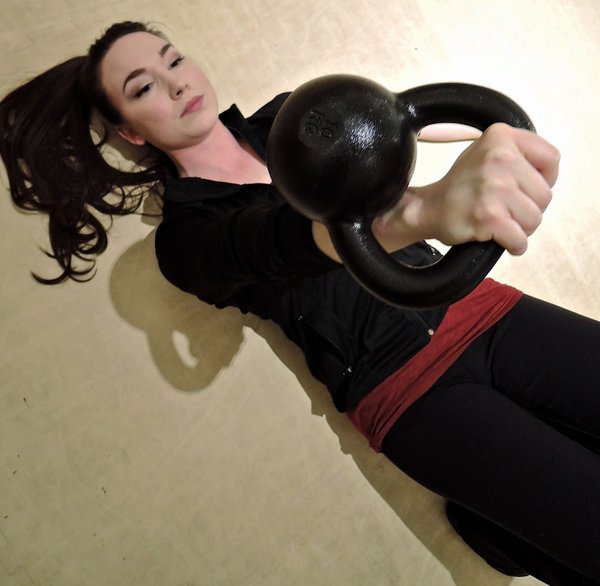
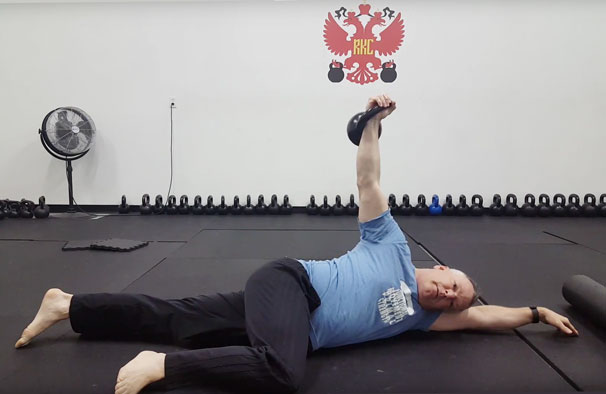
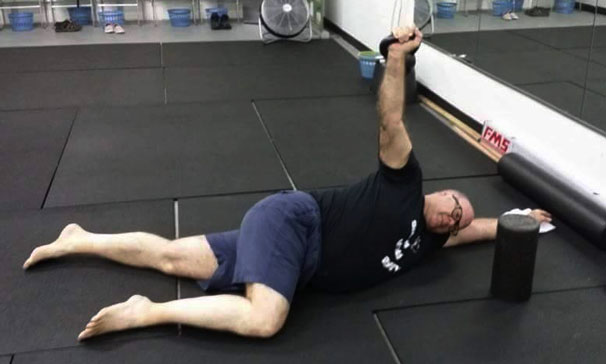
We start with the RKC armbar. Use an appropriate weight for the movement. What is appropriate? I typically use a 14kg for the series as it is a warm-up / mobility drill and not strength focused. There are several versions of the RKC armbar, but I tend to have my knee bent at 90 degrees to keep my lumbar spine out of the exercise. This also focuses the exercise on the mid-thoracic area instead of rolling your hips into the ground. I like to take 3-5 breaths per side before moving on to the next drill.

Paul Britt's 67-year-old client practices the RKC armbar
Paul Britt’s 67-year-old client practices the RKC armbar

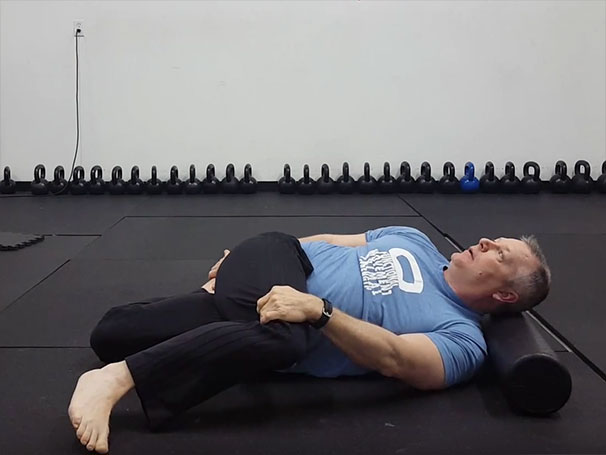
The next stop is the bretzel stretch. I rest my head on a roller or another padded surface to keep my neck free of tension so I can focus on the movement. I breathe to move through the stretch: I breath in, tighten up, then relax and exhale as I move deeper into the stretch. I typically practice for 3-5 breaths per side to move through the stretch.

Paul Britt Bretzel

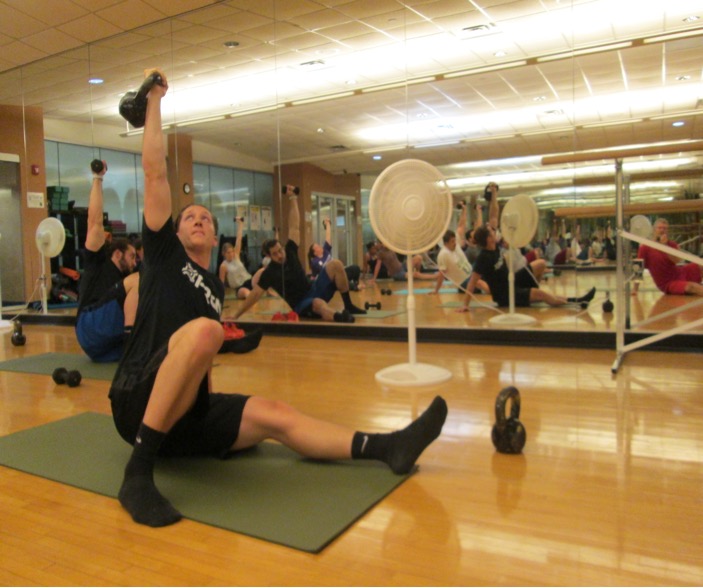
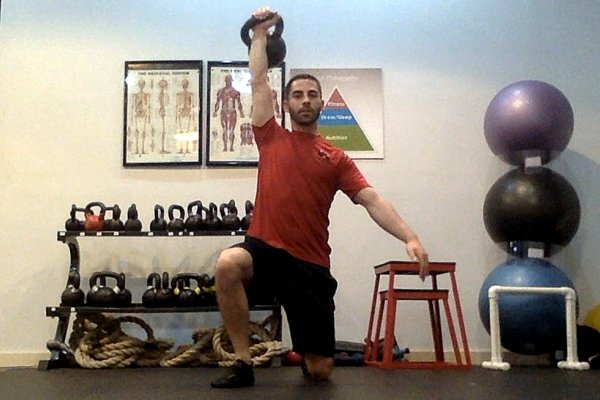
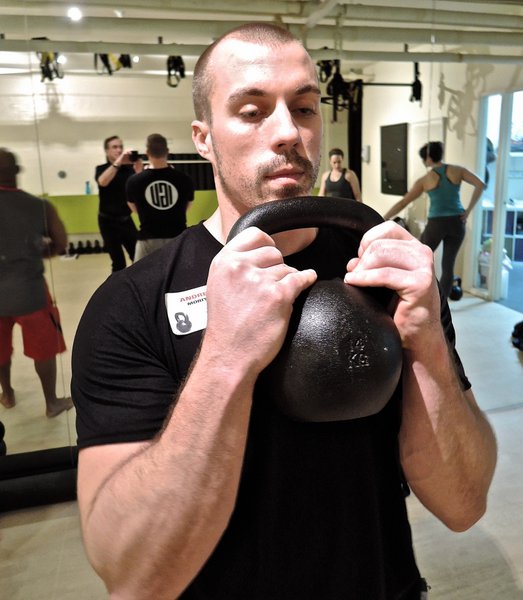
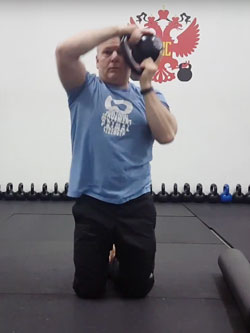
The last move in the set is the kettlebell halo. Since this is still a mobility exercise and not a strength move, I keep the weight at 14kg. I like the half kneeling position as it also helps to teach the body how to be stable. You can also do the halo standing if your knees prevent you from kneeling. While I did not demonstrate it in the video below, you can also use half kneeling to develop stability. I perform ten halos in one direction and ten in the other.

Paul Britt Kettlebell Halo

After a 30 second rest, I begin the series again.

If you have shoulder pain, do not perform any of these exercises without medical evaluation. I also highly recommend that you see an FMS practitioner for screening to address any and all movement issues.

***
Senior RKC Paul Britt has been an RKC kettlebell instructor since 2006. He trains clients at Britt’s Training Systems, his award-winning Hardstyle Kettlebell Training Facility in Rockwall, Texas. Paul has served as an assistant instructor at many RKC and HKC Courses, is a Certified Kettlebell Functional Movement Specialist (CK-FMS) and works with some of the top Chiropractors in North Texas. Please visit his website brittstrainingsystems.com for more information.

Filed Under: Kettlebell Training, Mobility and Flexibility, Tutorial Tagged With: bretzel, mobility training, Paul Britt, RKC, RKC arm bar, shoulder mobility, superset, video

Improve Your Posture with the RKC Kettlebell Swing

June 8, 2016 By Beth Andrews and Jay Armstrong 7 Comments

Senior RKC Beth Andrews Kettlebell Swings

Postural correction is a hot topic. Spending too much time in a seated position while driving or working on a computer will adversely affect our ability to stand up straight.

Wouldn’t it be great if there was a time-efficient exercise that could counteract all the time you’ve spent in the seated position and help you develop good posture?

That exercise exists—it’s the kettlebell swing.

Swinging a kettlebell will help you develop strong muscles, bones, tendons and ligaments. It will also improve your endurance. But, one of the biggest benefits of the kettlebell swing is improvement in your posture. The kettlebell swing is a naturally corrective exercise which will help undo the maladaptive effects of too much sitting slumped over with a computer, tablet, or phone.

The following are some of the key postural issues that the RKC kettlebell swing can correct:

Problem #1: Your glutes are not working

Sitting down turns off your glutes. The RKC kettlebell swing includes a “hip drive” or “pop” that moves the tailbone under and drives the hips forward. The hips are a primary source of athletic power for many sports such as golf, tennis, baseball and boxing. This hip drive is fueled by a rapid and intense contraction of the glutes. Swinging a kettlebell can help you reactivate your glutes. Active glutes will also put the pelvis in a neutral position, increasing your athleticism and reducing your chances of developing chronic back pain.

Problem #2: Your back is rounded, and shoulders are hunched forward

When using a computer or driving a car, your arms are front of your body while you’re seated. This inevitably leads to the shoulders internally rotating and the chest collapsing. For most people, this also means they will look like a caveman when they finally stand up. The finish, or top position, of the RKC kettlebell swing features “packed” shoulders. This means that the shoulders are pulled back and down, the lats are activated, and the thoracic spine is in a neutral position.

The kettlebell swing also has the added advantage of teaching you to bend over and stand up into a correct postural position time after time, rep after rep. And each effort is performed under load. Using a weight means that the adaptive changes will take place faster. Even a short RKC kettlebell swing practice session will greatly improve your ability to go from a seated, computer desk position to an erect, well aligned standing position.

Problem #3 – Your core is weak and you cannot contract your abdominal muscles

Bad Computer Posture

Modern office furniture encourages us to relax everything while we type at the computer. This muscular relaxation includes the core and abs. But, when you stand up, your abs remain relaxed, your pelvis tips forward and all of your guts try to fall forward! Not very attractive. At the top position of the kettlebell swing, the spine is lengthened and aligned. In order to accomplish this alignment, the core must be stabilized with a balance of posterior and anterior tension. This simply means that the abs must be strongly contracted for a split second at the top of each swing. What could be a better way to relearn how to stabilize your core and contract your abs then to do this time after time with your RKC kettlebell swing.

One step we use while teaching the kettlebell swing is the RKC plank. Notice that opening your chest, contracting your abs, tightening your glutes and lengthening your spine into an ideal postural position are all part of the RKC plank exercise. The top position of a kettlebell swing should mimic the total body tension and spinal alignment of the RKC plank.

Beth Andrews RKC Plank

Focus on these points as you perform your RKC kettlebell swing. You will see fast and enormous postural improvements.

Stand tall my friend.

Beth Andrews and Jay Armstrong

****

Beth Andrews is a Senior RKC, PCC Team Leader, and CK-FMS. She leads HKC and RKC certifications, and assists at the PCC. She became the 5th Iron Maiden in 2013. Beth owns Maximum Body Training and a successful online training business. She has over 25 years of training experience. For online training or to host a certification, email Beth at: bethandrewsrkc@gmail.com. For more training tips and workouts subscribe to her YouTube channel, Beth Andrews RKC or visit her website at maximumbodytraining.com

Jay Armstrong is a Senior RKC, 6 Degree Black Belt TKD, and Master Z-Health Trainer.  The past 30 years have been dedicated to helping others develop confidence through increased strength and pain-free, exceptional mobility.  His quest for knowledge continues.  He runs The Kettlebell Club in Houston, Texas.

Filed Under: Kettlebell Training, Mobility and Flexibility, Tutorial Tagged With: beth andrews, Jay Armstrong, Kettlebell, kettlebell swing, kettlebell swings, kettlebells, plank, posture, posture correction, RKC, RKC plank

Moving Strong(er) Equals Training Strong(er)

May 25, 2016 By Russell Andrews 2 Comments

Russ Andrews Group Class

First, let’s consider the human movement system. What parts are involved? What is moving? What initiates the movement?

The human movement system is comprised of the nervous system, skeletal system, and the muscle system—including all the connective soft tissues: tendons, ligaments, and fascia. The nervous system is the master control center of the entire body. It coordinates every function, contraction, and every movement. The nervous system is a super highway of sensory and motor output controlling proper functions, compensating for deficiencies, and altering positions and patterns to maintain homeostasis. The human body is a global tensegrity unit.

Tensegrity

Nerve impulses contract muscles. Muscles and tendons tug on the bones. Ligaments connect bones to other bones, and fascia covers a great portion of the entire system. The skeleton can’t generate movement without muscle contractions. The soft tissue cannot contract to move the bones without the neural input firing impulses into the muscles. It takes all three systems to generate movement.

In perfect human movement, every muscle would be the perfect length, have perfect tension, and have perfect flexibility. The skeletal system would be perfectly uniform and aligned to move with precision and accuracy. The joints would have freedom of movement and quality mobility.

But we aren’t perfect.

Throughout life, we encounter interruptions and interference to our movement system. Here are just a few of them:

  • Congenital issues
  • Traumas and injuries
  • Altered growth patterns
  • Diseases
  • Poor nutrition
  • Lack of quality water
  • Lack of quality sleep
  • Sedentary lifestyles
  • Excess stress
  • Poor air quality and pollution
  • Lack of movement and exercise (of any type)

These interruptions force the human system to rearrange its alignment, compensate for imbalances, alter movement patterns, and adapt to dysfunctions—all to maintain homeostasis so we can perform in our daily lives. The body will maintain this re-arrangement until there’s a breakdown, an overload, or some type of system collapse. How can we maintain our systems and facilitate efficient function with minimal breakdowns? In other words, how can we move strong(er) in hopes of avoiding catastrophe?

I teach a wonderful class at Life University in the Chiropractic Science Department called Wellness, Movement Assessments, and Conditioning. In this class, we assess movement patterns then determine the soft tissue connections involved in dysfunctional patterns. After collecting all the data, we begin re-training the dysfunctional movement patterns by introducing corrective mobilization exercises and drills. We begin with simple ball rolling on the involved muscles.

Russ2SimpleBallRollingWhen using many of the kettlebell and bodyweight exercises in Dragon Door’s philosophy of addressing the total athlete, the improvements and results are phenomenal. When improving dysfunctional movement patterns, it is important to introduce corrective patterns through sensory input. This way, the brain can begin rewriting the movement patterns recorded in the cerebellum.

Some of the exercises we use are the get-up, windmill, one-leg deadlift, goblet squat, cossack stretch, renegade row, bear crawl, and arm bar. These movements are the “backbone” corrective exercises. We also mix in crawling patterns, diaphragmatic breathing, and bodyweight core-engagement exercises.

teaching...
Teaching the kettlebell exercises to Chiropractic students peaks their interest in the versatility and advantage of knowing how to incorporate the kettlebell in correcting movement patterns.

As my good friend Max Shank has repeatedly said, “To improve movement at a certain joint, say the gleno-humeral joint, work from the inside out.” That’s where the focal point of the corrections begin. Strengthen the core, next work on proper diaphragmatic breathing, address scapula stability and mobility, and then arrive at the gleno-humeral joint for strength and mobility. The same formula of working inside out also applies to the lumbo-pelvic-hip complex.

Along with teaching and instructing at Life University, I work with a local high school building quality athletes with kettlebells and movement exercises. These young players are experiencing the increase in strength and mobility that the kettlebell exercises deliver.

Moving Strong(er)             Training Strong(er)
Moving Strong(er) Training Strong(er)

Lastly, at Train Strong Gym, I work with local athletes. We use kettlebells to develop athletic strength and mobility. The benefits from kettlebell training is almost endless.

RussTrainingHighSchoolAthletes

In these three platforms, I have the privilege of introducing the value that the kettlebell exercises delivers to all these students and athletes. The knowledge and experience gained at all these levels is invaluable.

Russ Andrews Fingertip Pushup

****

Russell Andrews, Chiropractor (23 years), Assistant Professor at Life University, RKC, FMS, 30 years in Strength and Conditioning, certified in kinesiotaping. Previous speaker for the Glazier Football Coaches Clinics, lecturer, future author, co-instructor with Beth Andrews, Senior RKC at Trainstronggym.com

Filed Under: Uncategorized Tagged With: fascia, fms, human movement, kettlebell exercises, movement patterns, muscular system, RKC, Russell Andrews, soft tissue, tensegrity

Dan John, Dr. Chris Holder and Chris White instruct at the San Jose RKC

April 15, 2016 By John Du Cane, CEO and founder, Dragon Door 5 Comments

SanJoseRKCGroup

I recently saw a terrific movie at one of our local Indie theaters, called Tangerine by Sean Baker (who has now become one of my favorite directors).

Tangerine is about transgender prostitutes in Los Angeles. Shot in a raw, neo-realistic, “street-doc” style, it’s funny, endearing, soulful, sad and enlightening. And beautifully shot. I loved it!

All very wonderful…but what has Tangerine got to do with kettlebells and the RKC?

Answer: it inspired me to start filming RKC and PCC events that I attended…

Why?

Because Tangerine was filmed entirely on an iPhone—and still looked fantastic on the big screen!

So I bought an iPhone 6 and shot with it at the recent San Jose RKC, taught by Dan John, Chris Holder and Chris White. I handed over all the footage to Adrienne Harvey and asked her to compose an initial short video—to give you a taste of the RKC culture in action.

Here it is:

You can see that Adrienne did a fantastic job editing from the mass of footage I dumped on her… 🙂

We hope to use more of the footage in future blogs and articles. But this is a start…

Filed Under: Kettlebell Training, Workshop Experiences Tagged With: Chris Holder, Chris White, Dan John, John Du Cane, RKC, RKC Workshop, Russian Kettlebell Certification, San Jose RKC, video, Video recap, workshop experience

The Journey Doesn’t End with the Title

March 30, 2016 By Shari Wagner 11 Comments

Shari Wagner RKC Team Leader
My RKC workshop was in April 2009, and I didn’t pass at the workshop due to a failed snatch test. I submitted a video one week later to earn my RKC title. I recently stumbled across that fateful video and of course, I watched it.

I watched it with a little bit of shock and awe at the poor technique I displayed. I also watched it with a lot of pride. Pride for the hard work I have put in to improve my technique since then and pride for all I have accomplished over the years.

When I first learned the snatch, it was in the days of first learning the high pull. This caused me to have a very significant corkscrew. I worked and worked at fixing this corkscrew before attending the RKC to no avail, and it was one of the biggest worries I had going in to the workshop. It wasn’t the typical worry of not completing the reps, my worry was all about the technique.

I did improve my technique at my RKC workshop, but I still had some of that darn corkscrew. At the time, while not ideal, it was still considered passable technique. I kept plugging away at the technique, but that corkscrew still remained.

I eventually sought out some additional instruction, which helped quite a bit. I also started watching videos of other instructors doing the snatch. I watched the timing very intently, along with the arm position and the path the kettlebell took. I noticed that when they snatched, you could see the bottom of the kettlebell as it flipped over and it looked so smooth and effortless. When I snatched with the corkscrew, my arm was turning out the side, therefore the bottom of the kettlebell was turning out to the side. It also looked anything but smooth and effortless. It certainly felt like a lot more effort too.

I took all of these visual and verbal cues and turned them inward, so I could feel it and visualize what it should look like. I snatched in front of the mirror because at the time I didn’t have a way to video myself. The short story is that it worked! I was finally able to snatch without a corkscrew. However…

I still had work to do to improve my technique. I was now keeping my arm a bit too straight and casting the kettlebell out a bit too much. More training and more work ahead, but I took it all in and worked hard because I was determined to get better. Being a type-A perfectionist and a Capricorn served me well in this case. Not only would this extra work help me get better, but it would help me help my students.

I later assisted at an RKC for the first time and it was the first time with the new RKC. When I tested my requirements for Keira Newton, she gave me a few additional tips that added to the improvements I had already made.

Then I witnessed how we now teach the snatch from the top down. I was amazed at its simplicity, yet it was extremely effective. It seemed so much easier to learn and to teach others this way. I even told the participants how lucky I thought they were to now be taught this way.

Each of these improvements I learned and made over the years has helped make the snatch feel more fluid yet more powerful. My big a-ha with the cumulative effects of each of these improvements is in how much it has helped the efficiency in my movements. I was expending so much additional energy in the way I was snatching before. Watching that video from 2009 now, I can see that so clearly. It honestly looks painful to me.

My moral of this story is that our journey of learning and improving doesn’t stop once we earn our RKC. The RKC helps give us our foundation and our starting point for teaching. But there is so much more to learn and so much more to do after we become an RKC. What makes us really good instructors is our quest to always do more, always be better and always serve our students.

Keeping our certification current is not about paying money to re-certify and keep the letters behind our name. We must improve our own skills, which in turn helps make us better instructors. We can only help our students improve when we help ourselves improve. We can also better help our students when we have access to the most current teaching standards, combined with all the tools we learned before.

If I had never learned the current way of teaching the snatch and if I had never corrected my own technique, I certainly could have still taught people. But I believe that I wouldn’t be serving my students to the best of my ability. That is, after all, the reason why we seek out those 3 letters in the first place, right? Never give up, never stop trying to improve and don’t let the journey end with the letters.

****

Shari Wagner, RKC-II, CK-FMS owns Iron Clad Fitness in Denver, Colorado. She can be contacted through her website at IronCladFit.com, email: info@ironcladfit.com or by phone 720-900-4766. Follow her on Facebook: facebook.com/IronCladFitness and Twitter: twitter.com/IronCladFitness.

Filed Under: Kettlebell Training, Motivation Tagged With: Kettlebell, kettlebell certification, kettlebells, RKC, RKC Workshop, Shari Wagner, Snatch Test, workshop experience

The Clean Viking Salute, a New Spin on a Kettlebell Classic

March 16, 2016 By Ryan Jankowitz 5 Comments

Ryan Jankowitz Kettlebell Clean Viking Salute

As a kettlebell instructor, I love performing kettlebell complexes and chains. I also enjoy putting my clients through complexes and chains—though they may not love them as much as I do.

Complexes and chains allow you to string several movements together without putting the kettlebell down. Complexes and chains create a very time efficient, heart-pumping workout that hits many different movement patterns. Not only do we train several different movement patterns, but we are also able to explore the “time under tension” concept. The more time we spend holding tension, the stronger we become.

With that being said, I want to share one of my favorite chains. Gus Petersen’s “Viking Salute Workouts”, from the RKC Book of Strength and Conditioning, inspired this chain.

Gus Petersen’s Viking Salute Chain:

  • Snatch x 1
  • Overhead Lunge x 1
  • ½ Kneeling Press x 1
  • Overhead Lunge back to standing x 1
  • Repeat

If you have not read the RKC Book of Strength and Conditioning, I highly recommend you pick it up. It contains some really great programs and workouts that will spice up your training.

Gus Petersen’s “Viking Salute Workout” is great for intermediate to advanced kettlebell practitioners, but what about beginners?

My variation may work very well for those new to kettlebells, or instructors working with beginner clients. Instead of performing a snatch to start the chain, we begin with a clean.

Here’s the Clean Viking Salute chain:

  • Clean x 1
  • Rack Lunge x 1
  • ½ Kneeling Press x 1
  • Rack Lunge back to standing x 1
  • Repeat

I have used this chain successfully with individual clients and classes alike. With this chain, we explore a pull, hinge, lunge and vertical push all within one workout. I usually have my clients perform 5 reps on each side and anywhere from 3-5 sets in a training session.

Feel free to get creative with this chain and turn it into a complex or even add some rack carries. Give this workout a whirl and let me know what you think.

Stay Strong.

****

Ryan Jankowitz, RKC-II Instructor, CK-FMS, is a life-long athlete who can’t imagine sitting behind a desk. He enjoys sharing his passion for fitness and spreading the RKC knowledge. Ryan operates a remote fitness coaching service and is available for private kettlebell workshops as well. You can reach him at ryan@rjkettlebell.com or through his website rjkettlebell.com. He also works with clients and teaches kettlebell classes at Fitness on the Run in Alexandria, Virginia. If you’re in the area, visit fitnessontherun.net and come swing some bells with Ryan.

Filed Under: Kettlebell Training, Workout of the Week Tagged With: Gus Petersen, kettlebell chain, kettlebell complex, kettlebell video, kettlebell workout, kettlebell workout video, kettlebells, RKC, Ryan Jankowitz, video, viking salute

Fine-Tuning the Get-Up

January 27, 2016 By Andrea Du Cane 14 Comments

Master RKC Andrea Du Cane Get-Up Lead Photo

How and when to use the high bridge and when to use the “step-across” instead of the “windshield wiper”

At every HKC and RKC, I’m asked why we test the low sweep instead of the high-bridge. I also get a lot of questions regarding the “windshield wiper” vs. the “step-across” to transition in and out of the kneeling windmill to the lunge position. It’s time to explore each movement and gain a deeper understanding of some of the benefits of the get-up.

When I first became certified and started teaching the get-up, it was referred to as the “Turkish get-up”. Here’s the criteria that was given and tested at that time:

  1. Keep both shoulders packed.
  2. Keep the wrists neutral at all times.
  3. Keep the elbow locked at all times.
  4. Keep your eyes on the kettlebell.

Oh and well…. get-up! That was it, get up anyway you can.

Let’s just say the get-up has come a long way, baby. It’s transitioned from having very little explanation and direction to (for a time) elaborate direction, with a focus on corrective uses and advanced movement patterning.

You can say that now we have found a happy medium, erring on the side of explanation and points of movement. But, we have also found a good balance and an easier way to teach the get-up to newer kettlebell instructors and users.

The High Bridge or the Low Sweep

One area of confusion with the get-up is whether to use the high bridge or low sweep.

First, let me explain where the high bridge came from, and why it was initially introduced as a teaching and testing skill. The high bridge came from the FMS concept of using movement as a screen. When it was first introduced into the RKC curriculum, the high bridge was used as a screen for tight hip flexors. However, we began to notice that when people were doing the high bridge, their lumbar spine was actually in hyper-extension instead of full hip extension. I remember discussing this with Gray Cook, and he agreed with that it was one problem with using the high bridge as a screen, since it is easily cheated. It does not actually demonstrate whether the person is in full hip-extension or hyper-extension of the lumbar spine.

Secondly—and more importantly—you would not put a client, with a kettlebell in their hands, into a high bridge and then say, “Aha! You have tight hip-flexors”. Of course not. Long before they do that high bridge, you have deduced that they have tight hip-flexors from other screens. And from a safety perspective, you would not let someone perform a high bridge until they had opened up their hip flexors and could perform the movement correctly without a kettlebell.

Since one of the end goals of the get-up is to go heavy, for the purpose of safety and efficiency, you will want to pull your leg back and get your hips under the load as quickly as possible. The high bridge takes unnecessary risks with a heavy load during the transition.

That said, the high bridge is great with a moderate to light weight for a more advanced kettlebell user. Done correctly, it demonstrates shoulder stability, hip flexibility and control.

Master RKC Andrea Du Cane Get-Up Kneeling Windmill

Performance Tip: Think of the high bridge and sweep through as a tall side plank. When moving into a high bridge, post over towards the side, your shoulders should be stacked over each other. The hips will rotate slightly upwards, but the shoulders and t-spine are stacked vertically. Practice lots of side planks from the elbow and tall side planks, before moving onto the high bridge.

The “Step Across” Variation

Moving on to the next modification, using the “step across” instead of a windshield wiper. As stated earlier, the body needs to transition from the tall-sit position smoothly and with control all the way to lunge. That means the hips need to get under the kettlebell as quickly and safely as possible—this includes the sweep through and transitioning to the lunge.

From the kneeling windmill position, the torso is moving from a horizontal position to upright, as the hips are coming under the torso and kettlebell. The hips need to fully extend with the glutes tight as you move into the lunge position. That’s a LOT of movement happening at the same time. The more stable and connected to the ground the body is, the safer and smoother the transition.

That is why the windshield wiper is taught and tested. Both legs remain firmly on the ground and the hips easily and fully extend.

Performance Tip: think about finishing at the top of a swing. The glutes contract hard and fast and the hips fully extend, allowing your body to find stability in the lunge position as soon as you hit it.

A potential problem with this movement is the pressure and friction placed on the knee. Obviously, if the knee is feeling pain, this could jeopardize the movement. The ground you are training on becomes an issue, and individual knee sensitivities should be taken into account as well.

One way to solve the issue is to use the “step-across” modification. From the kneeling windmill, you simply lift your torso up and then step your loaded foot across into a lunge position. This will take the windshield wiper out of the movement and “save” the knee.

The downside to this modification is the inherent lack of stability as you lift your loaded leg up and step it across. You are also changing the orientation of your head and body, which can also cause us to lose stability and control.   Lastly, it is much harder to keep your glute and hip tight and contracted as you move the leg, leading to another possible loss of control.

As we say in the RKC, “safety trumps performance”, so if you have sensitive knees or are training on a hard or rough surface, the step-across is a modification you can use to protect your knee and stay in control.

My personal recommendation is to buy a $20 pair of knee pads or have your clients purchase them for training. I do a lot of kneeling training and take knee pads with me everywhere to use for all kneeling training and stretching. $20 knee pads are a cheap and easy way to protect your knees and increase the effectiveness of your kettlebell training.

****

Andrea Du Cane is a Master RKC Kettlebell Instructor, CK-FMS, CICS, and RIST, ZHealth certified, she has a BA in Psychology from the University of Minnesota and is also a Pilates instructor. She is the author of several books and dvds including The Ageless Body, The Kettlebell Boomer, and The Kettlebell Goddess Workout.  She has over twenty years of aerobics, weight training and fitness experience, with an additional background in… Read more here.

Filed Under: Coaching, Kettlebell Training, Tutorial Tagged With: Andrea Du Cane, get up, get ups, Getup, kettlebell technique, kettlebell training, RKC, RKC kettlebell training

Friend Zone Exercises

December 30, 2015 By Max Shank 8 Comments

Max Shank Side Plank With Leg Lift

Ladies, you have that friend who is awesome in every way but just doesn’t excite you. He’s funny, smart, nice, and doesn’t look horrifying–but for some reason he just doesn’t strike passion in your heart.

Because of this, whether he knows it or not, he is stuck in the friend zone.

Let’s take a moment of silence for all the gentlemen before us who have fallen into the friend zone.

In today’s world, the same thing has happened with certain exercises. Because social media is now a window into people’s lives, you’d think that training was all back flips and heavy deadlifts. The problem is that anyone who doesn’t have a thorough understanding of exercise and building a well-balanced program, doesn’t see the important foundational stuff.

The following exercises get no love because they just aren’t that sexy.

  • Rows
  • Split Squats
  • Push Ups
  • Side Planks
  • Single Leg Deadlift
  • Mobility training in general

Rows always get cast aside in favor of pull-ups or chin-ups. This is not to say that these exercises are bad, but rows are actually the better choice for most people. The postural benefits along with the promotion of shoulder health and biomechanics from rows far outweigh pulls or chins. Consider adding rows to your session either as a big strength movement or as a high rep accessory work movement toward the end of your session. Then, even if it’s not considered all that cool, post it on Instagram with the hashtag #IDoRows.

Split squats, walking lunges, rear foot elevated split squats, jumping lunges are all great exercises. The humble split squat is another exercise that gets little to no love. First, they are extremely user friendly. Second they do a terrific job of mobilizing the hip flexor/quadriceps and ankle/toes of the rear leg. The toe and ankle mobility is easy to avoid during normal lunges and other substitute exercises. Lastly they also are crucial for owning split-stance balance which will have a good carryover to other areas of life.

Push-ups… if you’re not clapping your hands or spinning around like a whirling dervish, then push-ups just don’t have that “shiny-thing” appeal. However, if done properly, the push-up will help you get stronger upper body pushing muscles. Also, push-ups train the abs to maintain stability–which has been proven to help prevent back problems. The push-up also allows for full scapular movement–important for maintaining shoulder health–unlike the bench press.

Side planks don’t look that cool, but they really turn on your lateral chain. The oblique and gluteus medius are important for stabilizing the pelvis (especially while you’re on one leg). This is sometimes a magic bullet for improving function in the upper and lower body.

Master RKC Max Shank Single Leg Deadlift with Barbell

The single leg deadlift is another exercise that is absolutely awesome for improving mobility, strength, balance, and coordination–all which have great carryover to athletics. The main criticism is that it’s just not heavy enough.

I beg to differ (barbell and kettlebell examples):

https://www.youtube.com/watch?v=SbsETxo8Vps

Wake up your glutes and get to work on some single leg deadlifts. They are especially challenging if you hold the weight in the hand opposite of the leg you are standing on.

Joint circles for mobility training aren’t all that cool looking, but they are a key component of a well rounded health and strength plan. In the RKC we take care to mobilize the joints before heavy lifting to prevent injury and enhance strength. Most people are too stiff, not too loose–you have to mobilize those joints every day if you want to be able to stay loose.

Side note: Mobility drills actually look kind of cool at 4x speed in my #5minuteflow video:

https://www.youtube.com/watch?v=k3ZD8s15ckc

Don’t forget the exercises that will stand by you through thick and thin, and reward you with sustainable progress through your whole life.

Better every day,
-Max

****

Master RKC Instructor Max Shank is the owner of Ambition Athletics in Encintas, California. He is very active in martial arts, competes in the Highland Games, and promotes a holistic approach to overall fitness. For more information about Max please visit www.ambitionathletics.com.
Max Shank is also the author of Master the Kettlebell, now available in ebook and paperback format.

Filed Under: Kettlebell Training Tagged With: forgotten exercises, foundational exercises, kettlebell rows, Master RKC Max Shank, max shank, mobility training, push-ups, RKC, rows, side plank, single leg deadlift, split squats

So, You Want to Train Athletes…

December 9, 2015 By Laurel Blackburn 2 Comments

Tallahassee 2015 RKC Group Photo

Recently, I had the pleasure of assisting Master RKC, Keira Newton at the Tallahassee RKC. We spent a lot of time talking about and practicing drills, modifications and regressions for training the average client. By average, I am referring to the clients most likely to come to you for training.

When I began my journey as a trainer and gym owner in 1998, I had visions of training elite athletes. I fantasized about working with high school, college and professional teams. I had visions of taking athletes to the “next level” and eventually being hired as a trainer with a professional football team—preferably, the Indianapolis Colts.

I know I am not the only trainer or coach who doesn’t fantasize about this.

Several years ago, I set up an appointment with the new strength coach at Florida State. Go Noles!! I remember being both scared to death and excited at the prospect of bringing kettlebell training to the football team. I arrived at my appointment totally prepared to wow the staff with my knowledge and skills. When I arrived, the coach was in a meeting so I waited and waited. After about an hour, I left. My dreams were dashed and my hopes were crushed.

Then I got a call from the strength coach at the University of Florida. Boo Gators! Yes, they were our biggest rival but I couldn’t give up this opportunity. They placed a big order with me for kettlebells, so I loaded up my truck and headed down to Gainesville. I sat with the coach and we talked about training with kettlebells and all the benefits that would help the team. He even had me doing Turkish get-ups in his office. I drove back to Tallahassee, planning my new life as part of the training team for the Gators.

I waited for the call that never came. I knew from my conversations with the assistant strength coach, that he had been training with kettlebells while at Texas Tech. Although he wasn’t certified, I knew that he felt he could train the guys with kettlebells. With my dreams dashed again, I continued training average clients.

My average clients are people who have many issues including obesity, very poor movement and the over 50 crowd.

I found I couldn’t do anything fancy. Most of the time I had to progress them very slowly and come up with my own creative ways to help them learn the kettlebell basics while improving their movement and overall strength. One of those clients, Helen, is an 82-year-old woman who suffers from a rare bone disorder, Hereditary Multiple Exostoses.

She required multiple surgeries to remove excessive bone growths. She has some bones that are shorter than others as well as bowed limbs. She has the inability to fully straighten her arms and legs—and of course, all of that affects her movement and ability to do many of the exercises I would normally use in training. To top it all off, she was run over by farming equipment and suffered severe injuries. Helen is one tough broad!

I began each session with ankle mobility. She sat and I manipulated her ankles and feet until she was able to do it herself. One of her main goals was to lose weight and be able to complete a .6 mile walk around the park without stopping. My workout program for her included full body strength and conditioning. An important goal for older clients (that I think many of us miss) is to regain the ability to get up off the ground.

Most of the injuries in the elderly result from falls. There are many horror stories out there about people who fall and can’t get up. I’m sure we all remember the commercial, “I’ve fallen and I can’t get up”. So, I make getting up from the floor a priority.

We did a lot of squats. In the beginning, I put her on a box with bumper plates to raise her high enough so she could stand up without much trouble. I set up elevated boxes about 10 feet from each other so that she could get up, walk and sit back down. I progressed her by lowering the height and adding small hurdles or cones to help her with agility. Yes, older people need agility!

We did very modified get-ups using a wedge so she didn’t have to lay flat on the floor. We did a lot of band work and then started adding kettlebells. Doing swings and goblet squats were out of the question. We worked deadlifts, lots of deadlifts.

A sample-beginning workout that I have used with Helen and other elderly clients would look like this:

  • Seated mobility drills beginning with ankles
  • Seated thoracic spine mobility
  • Seated cervical spine mobility
  • Box squats elevated to client’s ability x5
  • Box squats with walk to another box x2
  • Deadlifts with kettlebell elevated enough to allow good form x5  (or behind-the-back deadlifts)
  • Band pull-downs x8
  • Band presses or wall push-ups x8
  • Elevated get-ups x2/2
  • Getting off the ground x2 (They can do whatever they need to do, including grabbing on to something)

Depending on the client, I might do add exercises that are a little more challenging:

  • Kettlebell rows from an elevated plank position x5/5
  • Rolling to a get-up x3/3
  • Suitcase deadlift with kettlebell elevated to allow good form x5/5

This is just a sample. I encourage you to use a lot of creativity to progress your client safely while focusing on workouts that will improve function in their day-to-day living.

When I began my RKC journey, I thought I wanted to train athletes. But, training my “average” clients has helped me grow and become a better trainer. I have experienced incredible joy watching them get stronger, move better and live healthy, productive lives.

****

Senior RKC, Laurel Blackburn owns Boot Camp Fitness and Training and Tallahassee Kettlebells.  Look for Laurel at www.bootcampstogo.com or www.tallahasseekettlebells.com.

In her early fifties, Laurel is out to prove that age is just a number. Her goal is to motivate and inspire people everywhere, both young and old that strength, flexibility and mobility can get better with age. Follow her adventures on her blog: www.SuperStrongNana.com.

Filed Under: Coaching, Kettlebell Training Tagged With: Laurel Blackburn, RKC, RKC Workshop, special populations, Training Athletes, training for the elderly

Why The HKC Is The Answer To (Almost) Everything

November 11, 2015 By Dan John 10 Comments

HKCKettlebellGetUp1

Sometimes, when I repeat the same answer to a question more than a few times, I begin to wonder why people even ask me questions.

Exercise for Fat Loss?
“Swings, goblet squats and Turkish get-ups.”

Elderly clients?
“Swings, goblet squats and Turkish get-ups.”

Travel related issues for elite athletes and collision occupations?
“Swings, goblet squats and Turkish get-ups.”

Most people come to coaches and trainers wanting a magic wand treatment, Harry Potter and the Six Pack Abs, but what they NEED is hip flexor stretching, t-spine mobility, rotary stability and basic movements. They NEED to move. They NEED to open the hips and spine and shoulders.

They need the information from the HKC.

I have spent my life trying to understand weightlifting. It seems to me that there are three important keys:

  • Fundamental Human Movements
  • Reps and Sets
  • Load

Sadly, I think this is the correct order that we should approach weightlifting. First, we need to establish the correct postures and patterns, then work around reasonable “numbers” of movements in a training session. Finally, we should discuss the load. Sadly, the industry—and I am guilty of this as well—has switched the order and made a 500 pound deadlift the “answer” to improving one’s game or cutting some fat.

And, please note, I said “training session.” Oh, I can work you out:

“Hey, go run to Peru!”
“Hey, go do 50,000 burpees.”
“Hey, go swim to Alaska.”

But, please don’t think any of that is going to improve your skill set or your long term ability to do anything from sports to simply aging gracefully.

At the HKC, we learn what I consider to be the key patterns to human movement: the swing, the goblet squat and the get-up. The “Hip Displacement Continuum” (HDC) is a term I invented to discuss hip movement. The HDC has two ends: the swing and the goblet squat. The swing demands maximal hip hinge and minimal knee bend while the goblet squat demands maximal hip hinge along with maximal knee bend.

HKCNicoleKettlebellGetUp

They are the same—but different—in their ability to remind the body of the most powerful movements it can perform. The get-up (not the “Turkish sit-up” as I often note) is a one-stop course in the basics of every human movement from rolling and hinging to lunging and locking out.

So, the HKC covers basic human movements in a way that is unlike any other system or school. As I often argue, add the push-up and, honestly, you might be “done.” Here are the basics of proper training:

  1. Training sessions need to be repeatable.
  2. Training sessions should put you on the path of progress towards your goals.
  3. Training sessions should focus on quality.

So what it the key to quality? I have a simple answer for most people: control your repetitions.

In teaching the get-up, or when using this wonderful lift as a tool to discover your body, keep the reps “around” ten. Now, you can think about this as a total of ten with five on the right and five on the left, or you can try ten right and ten left. But, please don’t make a war over the numbers. Do the get-ups, feel better and move along.

I have noted that if I do get ups as part of my warm up along with some get up drills for “this or that” (the highly technical name I use for correctives), I am sweating and pushing into a “workout” around ten total reps. Certainly, at times you can do more. But, week in and week out, think “around” ten reps for the get-up.

The goblet squat seems to lock in around 15-25 reps per workout. I offer you the “Humane Burpee” as a way to try this concept:

10 Swings
5 Goblet squats (put the bell down between your feet under control)
Inchworm out to the push-up position (walk on your hands)
5 Push-ups
Inchworm back to starting position
10 Swings
4 Goblet squats (put the bell down between your feet under control)
Inchworm out to the push-up position (walk on your hands)
4 Push-ups
Inchworm back to starting position
10 Swings
3 Goblet squats (put the bell down between your feet under control)
Inchworm out to the push-up position (walk on your hands)
3 Push-ups
Inchworm back to starting position
10 Swings
2 Goblet squats (put the bell down between your feet under control)
Inchworm out to the push-up position (walk on your hands)
2 Push Ups
Inchworm back to starting position
10 Swings
1 Goblet squat (put the bell down between your feet under control)
Inchworm out to the push-up position (walk on your hands)
1 Push-up
Inchworm back to starting position

Finished!

That’s 50 swings, 15 goblet squats and 15 push-ups. 8-5-2 will give you the same results with less swings, if you need to do less (Only 30!).

One of the great insights, among many, that I picked up at the RKC is the idea of doing twenty swings with one kettlebell and ten swings with two kettlebells. After doing literally hundreds of swings a day, I noted that my technique held up fine in that ten and twenty range. It is the basic teaching of sports: don’t let quantity influence quality. In other words, ten good reps is far better than dozens of crappy reps. If you want more volume, just do more sets.

Absolutely, there are times when you should do more than twenty. There are times when you want to do all kinds of things. But, most of the time you just want to keep moving ahead. I usually call these the “Punch the Clock” workouts and I think they are the key to staying in the game.

So, you may ask, is this enough?
Over time, yes!

Tim Ferris, RKC-II, tells us in his excellent book, The Four Hour Body that there is a minimum effective dose (MED) of everything fitness related. Although the number I am about to share has a bit of wiggle room, it seems that 75-250 swings a day is the “wheelhouse” for the swing MED. Yes, you can do more, but you want to be able to do it literally day in, day out, year in and year out.

Finally—and don’t take this as a joke, I mean it—if it is too light, go heavier. And, if you went too heavy, try a lighter bell. Doing the little “Humane Burpee” with a big kettlebell is a killer workout. But, it is simple to scale it up or down by simply changing the kettlebell, it’s that simple. When you look at movement first, then reps, then for whatever reason, the loading makes more sense too.

This is the essence of the HKC and I love it. In a one-day course, we learn and do (a lot of “do”) the three core movements of the kettlebell world.

Prepping for the HKC is not as complex or deep as the three-day RKC. Showing up “in shape” and ready to learn would be ideal, but I would also recommend include some additional mobility work and perhaps some work on the hinge, squat and some basic rolling to prep for the event.

The time you spend prepping for the event pales in comparison to what you do AFTER the HKC. I always send along the following Twenty Day Program to guide our attendees deeper along the RKC path.

(One note: during the HKC, I always include waiter walks and rack walks as part of the get-up section. From there, I show the one arm press and introduce the kettlebell clean. This way, the participant has the tools to prep for the RKC. I trained for the RKC with clean and press, swings and what I thought were snatches at the time. So, I ask people to press as soon as they can with kettlebells.)

HKCKettlebellGobletSquat

The First Twenty Days

Fresh from a new learning experience, there is always a tendency to want to do everything at once. But that approach is tough to do and fraught with long and short term issues. The first twenty days after the HKC experience should be a time to strive for mastering the movements and training the positions. Don’t add speed and volume to poor movements—take your time to practice.

These twenty workouts can be done five days a week (for a total of four weeks) or three days a week (sneaking up on two months) or any way you choose. These will provide the ground work for a solid base. Strive for mastery.

Daily Warm Up

It is generally a good idea to go through some mobility drills especially for these areas:

  • Neck
  • Shoulders
  • Thoracic mobility
  • Hips

Each week, take one day to do a full “toes to top” mobility workout.

It is recommended that you do the hip flexor stretch during each warm up and cool down period; it can be done very well with an easy set of goblet squats. Many find a few easy sets of swings, a few goblet squats and a weightless set of one to five get-ups on both sides to be enough of a warm up.

Day One

3 Get-ups right, 3 Get-ups left

Practice hip hinge

Goblet squats: 2-3-5-2-3-5-2-3-5

15 Two hand swings
1 Goblet squat
Ten reps of high knees “March in Place” (Each time the right foot hits is “one rep”)
Recovery breathing (up to two minutes)
Do this for a total of 3 rounds.

5 Minutes of pressing practice.

Day Two

2 Get-ups right, 2 Get-ups left

One hand press (Start with “less strong arm” and alternate arms. “One rep” is one arm right hand press and one arm left hand press)
1-2-3-1-2-3-1-2-3-1-2-3

Day Three

1 Get-up right, 1 Get-up left

30 Seconds of two hand swings/30 Seconds of “Fast-Loose” drills
20 minutes total time

Practice goblet squat

Day Four

10 Minutes of get-ups (alternate right and left)

15 Two hand swings
1 Goblet squat
10 Reps of high knees “march in place” (each time the right foot hits is “one rep”)
Recovery breathing (up to 2 minutes)
For a total of 3 rounds

Day Five

5 Get-ups right, 5 Get-ups left

One hand press (Start with “less strong arm” and alternate arms. “One rep” is one arm right hand press and one arm left hand press)
1-2-3-1-2-3-1-2

Day Six

3 Minutes of get-ups (alternate right and left)

30 Seconds of two hand swings/30 Seconds “Fast-Loose” drills
10 minutes total

Goblet squat: Several sets of 5 with a pause at the bottom

Day Seven

1 Get-up right, 1 Get-up left

One hand press (Start with “less strong arm” and alternate arms. “One rep” is one arm right hand press and one arm left hand press)
2-3-5-2-3-5-2-3-5

Day Eight

10 Minutes of get-ups

Practice hip hinge

Practice goblet squat

Practice press

Day Nine

15 Two hand swings
One goblet squat
10 Reps of high knees “march in place” (Each time the right foot hits is “one rep”)
Recovery breathing (up to 2 minutes)
For a total of 5 rounds

One hand press (Start with “less strong arm” and alternate arms. “One rep” is one arm right hand press and one arm left hand press)
1-2-3-1-2-3-1-2

Day Ten

5 Get-ups right, 5 Get-ups left

30 Seconds of two hand swings/30 Seconds “Fast-Loose” drills
5 Minutes total

Goblet squats
2-3-5-2-3-5

Day Eleven

5 Minutes of get-ups (Alternate right and left)

One hand press (Start with “less strong arm” and alternate arms. “One rep” is one arm right hand press and one arm left hand press)
1-2-3-5-1-2-3-5-3

15 Seconds of two hand swings/15 Seconds “Fast Loose” drills
10 Minutes total

Day Twelve

1 Get-up right, 1 Get-up left

30 Seconds of two hand swings/30 Seconds “Fast-Loose” drills
5 Minutes total

Goblet squats
1-2-3-1-2-3-1-2

One hand press (Start with “less strong arm” and alternate arms. “One rep” is one arm right hand press and one arm left hand press)
1-2-3-1-2-3-1-2

Day Thirteen

10 Minutes of get-ups (Alternate right and left)

15 Two hand swings
One goblet squat
10 Reps of high knees “march in place” (Each time the right foot hits is “one rep”)
Recovery breathing (up to 2 minutes)
For a total of 10 rounds

Day Fourteen

1 Get-up right, 1 Get-up left

One hand press (Start with “less strong arm” and alternate arms. “One rep” is one arm right hand press and one arm left hand press)
2-3-5-2-3-5-2-3-5

Day Fifteen

1 Get-up right, 1 Get-up left

30 Seconds of two hand swings/30 Seconds “Fast-Loose” drills
5 Minutes total

Goblet squats
1-2-3-1-2-3-1-2

One hand press (Start with “less strong arm” and alternate arms. “One rep” is one arm right hand press and one arm left hand press)
1-2-3-1-2-3-1-2

Day Sixteen

15 Two hand swings
5 Goblet squats
1 Push-up
10 Reps of high knees “march in place” (Each time the right foot hits is “one rep”)
Recovery breathing (up to 2 minutes)
For a total of 10 rounds

Day Seventeen

5 Minutes of get-ups (Alternate right and left)

One hand press (Start with “less strong arm” and alternate arms. “One rep” is one arm right hand press and one arm left hand press)
2-3-5-2-3-5-2-3-5

Day Eighteen

3 Get-ups right, 3 Get-ups left

30 Seconds of two hand swings/30 Seconds “Fast-Loose” drills
20 Minutes total

Day Nineteen

Goblet squats
5-10-5-10-5

One hand press (Start with “less strong arm” and alternate arms. “One rep” is one arm right hand press and one arm left hand press)
2-3-5-2-3-5-2-3-5

Day Twenty

1 Get-up right, 1 Get-up left

30 Second of two hand swings/30 Seconds “Fast-Loose” drills
5 Minutes total

Goblet squats
1-2-3-1-2-3-1-2

One hand press (Start with “less strong arm” and alternate arms. “One rep” is one arm right hand press and one arm left hand press)
1-2-3-1-2-3-1-2

HKCKettlebellSwing

So, there you go! The HKC is more than just the entry into the kettlebell world. It is the foundation of everything you will learn. The three movements of the HKC are the core to conditioning, mobility and goal achievement.

Welcome aboard.

***

Master RKC, Dan John is the author of numerous fitness titles including the best selling Never Let Go and Easy Strength.

Register for the Upcoming 2016 San Jose, California RKC taught by Master RKC Dan John with Senior RKC Chris Holder, and RKC Team Leader Chris White

Dan has spent his life with one foot in the world of lifting and throwing, and the other foot in academia. An All-American discus thrower, Dan has also competed at the highest levels of Olympic lifting, Highland Games and the Weight Pentathlon, an event in which he holds the American record.

Dan spends his work life blending weekly workshops and lectures with full-time writing, and is also an online religious studies instructor for Columbia College of Missouri. As a Fulbright Scholar, he toured the Middle East exploring the foundations of religious education systems. For more information visit: http://danjohn.net

Filed Under: Kettlebell Training, Workout of the Week Tagged With: 20 workouts, Dan John, hkc, Humane Burpee, kettlebell training, kettlebells, post HKC, RKC, RKC Prep

  • « Go to Previous Page
  • Page 1
  • Page 2
  • Page 3
  • Page 4
  • Page 5
  • Interim pages omitted …
  • Page 7
  • Go to Next Page »

Primary Sidebar

Featured Products

previous arrow
BOOK-RKCBookofSnC
HardStyleKettlebellChallegeDanJohn700
BookCoverMasterTheKettlebell1
RKCiconKettlebell512
KettlebellGoddessdv040
next arrow

Recent Posts

  • RKC Big Six Workout
  • The Kettlebell Swing & Low Back Pain
  • Key Kettlebell Exercises To Help You Create Better Balance
  • How to Most Effectively Use Kettlebells to Meet Your New Year Goals
  • 1 Exercise That Checks All The Boxes
FOLLOW US ON TWITTER!

Archives

Copyright © 2025

Dragon Door Publications / The author(s) and publisher of this material are not responsible in any manner whatsoever for any injury that may occur through following the instructions or opinions contained in this material. The activities, physical and otherwise, described herein for informational purposes only, may be too strenuous or dangerous for some people, and the reader(s) should consult a physician before engaging in them.