• Skip to main content
  • Skip to primary sidebar
  • Home
  • Contributors
    • Matt Beecroft, Master RKC
    • Martijn Bos, Master RKC
    • Andrea Du Cane, Master RKC
    • Angelo Gala, Master RKC
    • Chris Holder, Master RKC
    • Steve Holiner, Master RKC
    • Dan John, Master RKC
    • Mike Krivka, Master RKC
    • Thomas Phillips, Master RKC
    • Robert Rimoczi, Master RKC
    • Phil Ross, Master RKC
    • Max Shank, Master RKC
  • Workshops
    • HKC Workshops
    • RKC Workshops
    • RKC-II Workshops
  • Find an RKC Instructor
  • Resources
    • Articles
    • Forums
    • Kettlebells
    • Products
  • Blogs
    • PCC Blog
    • Strong Medicine Blog
  • Archives

RKC School of Strength

Official blog of the RKC

Andrea Du Cane

How and Why to Fix the “Drinking Bird” Kettlebell Swing Mistake

December 2, 2021 By Andrea Du Cane 2 Comments

The Drinking Bird Toy in motion

When the kettlebell swing was first introduced, the idea of ballistically moving weight was a novelty. Other than Olympic Lifting, heavy weights were not lifted explosively. And the ability of moving the load behind the hips was unthinkable.

We take this for granted now after 20 years or more of kettlebell training. We all know the advantages of this type of ballistic training and the unique way it trains our posterior chain, a godsend for all athletes.

Teaching the Swing for Optimal Performance

Because it was so new and unique, we ran into problems with how to teach and perform the swing for optimal performance and effect. With many people quad dominant, it naturally turned into more of a squat style swing.

We worked hard to change that pattern and bring the swing into the hip-hinge dominant pattern it is today. There was lots of experimentation and drills used to find the right movement pattern. And I think for the most part we have succeeded. Today nearly everyone walking into an HKC or RKC Workshop knows the swing is a deadlift/hinge style pattern. Please note that I am not talking about the American (CrossFit) swing, which is meant to be an anterior and quad dominate movement pattern. That swing was developed to specifically mimic the Olympic lifting movement of a barbell snatch.

The “Drinking Bird” Kettlebell Swing Problem

The problem with something being “too good to be true”, is also that “too much of a good thing is no longer so good.” The swing has swung (pun intended) from a too squatty swing to a straight-legged swing, or as I call it the “Drinking Bird Swing”.

It seems that in every video I see, in every workshop I teach, my clients, even myself, people have been overcompensating for the squatty swing, by swinging with nearly straight legs. You could say we have taken the easy road to loading. Let’s face it, it’s more work to sit back deeper, I call it the “lazy butt syndrome”. And if you have flexible hamstrings like some of us, it is way easier.

Swinging with nearly straight legs puts all the power and loading into the hamstrings. It takes away from the quads, but it also takes away from deep glute engagement at the backswing, right where we need the most power. In other words, a “drinking bird” swing will have much less power.

If the hamstrings are on stretch at the backswing, the glutes are not back and down enough to fully engage, so the power in the upswing is diminished.

Imagine doing a lot of snatches only using your hamstrings? No wonder, the arms and back are doing so much of the work, they must make up for loss of power from the hips.

Troubleshooting the Kettlebell Backswing

Look at the photos below, in which position do I look the most loaded? I call this the “Goldilocks” of the backswing position.

1) My knees are very bent, and my hips and knees are nearly level.
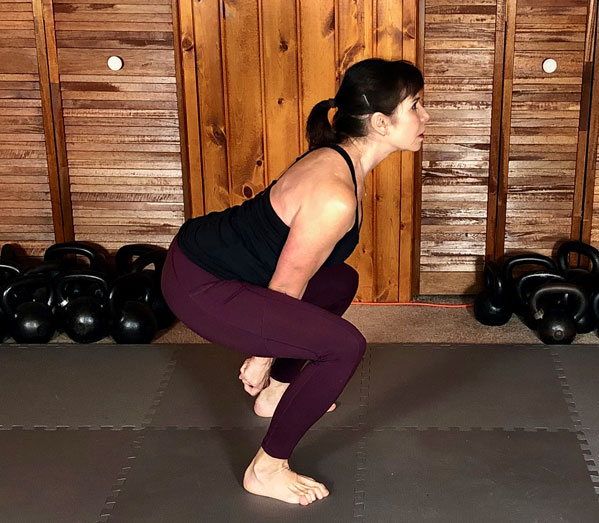
An incorrect squatty kettlebell swing mistake
A “too squatty” kettlebell backswing

2) My knees are nearly straight, my chest down, my hips and shoulders are level.
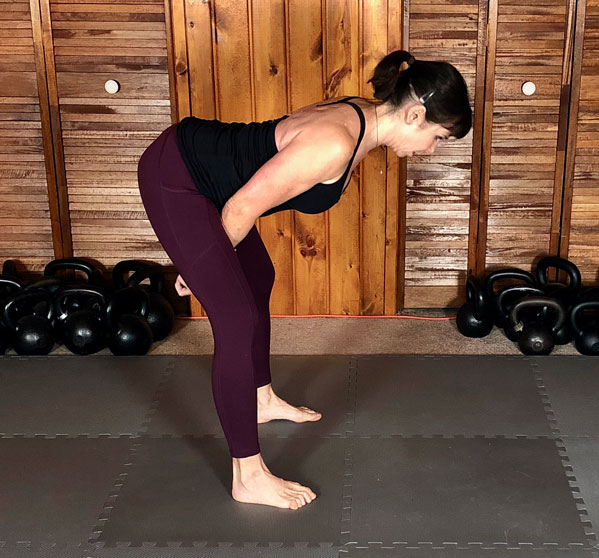
A legs too straight "drinking bird" kettlebell swing mistake
A “drinking bird” kettlebell backswing

3) My knees are bent, my hips back and down, my chest and shoulders lifted slightly.
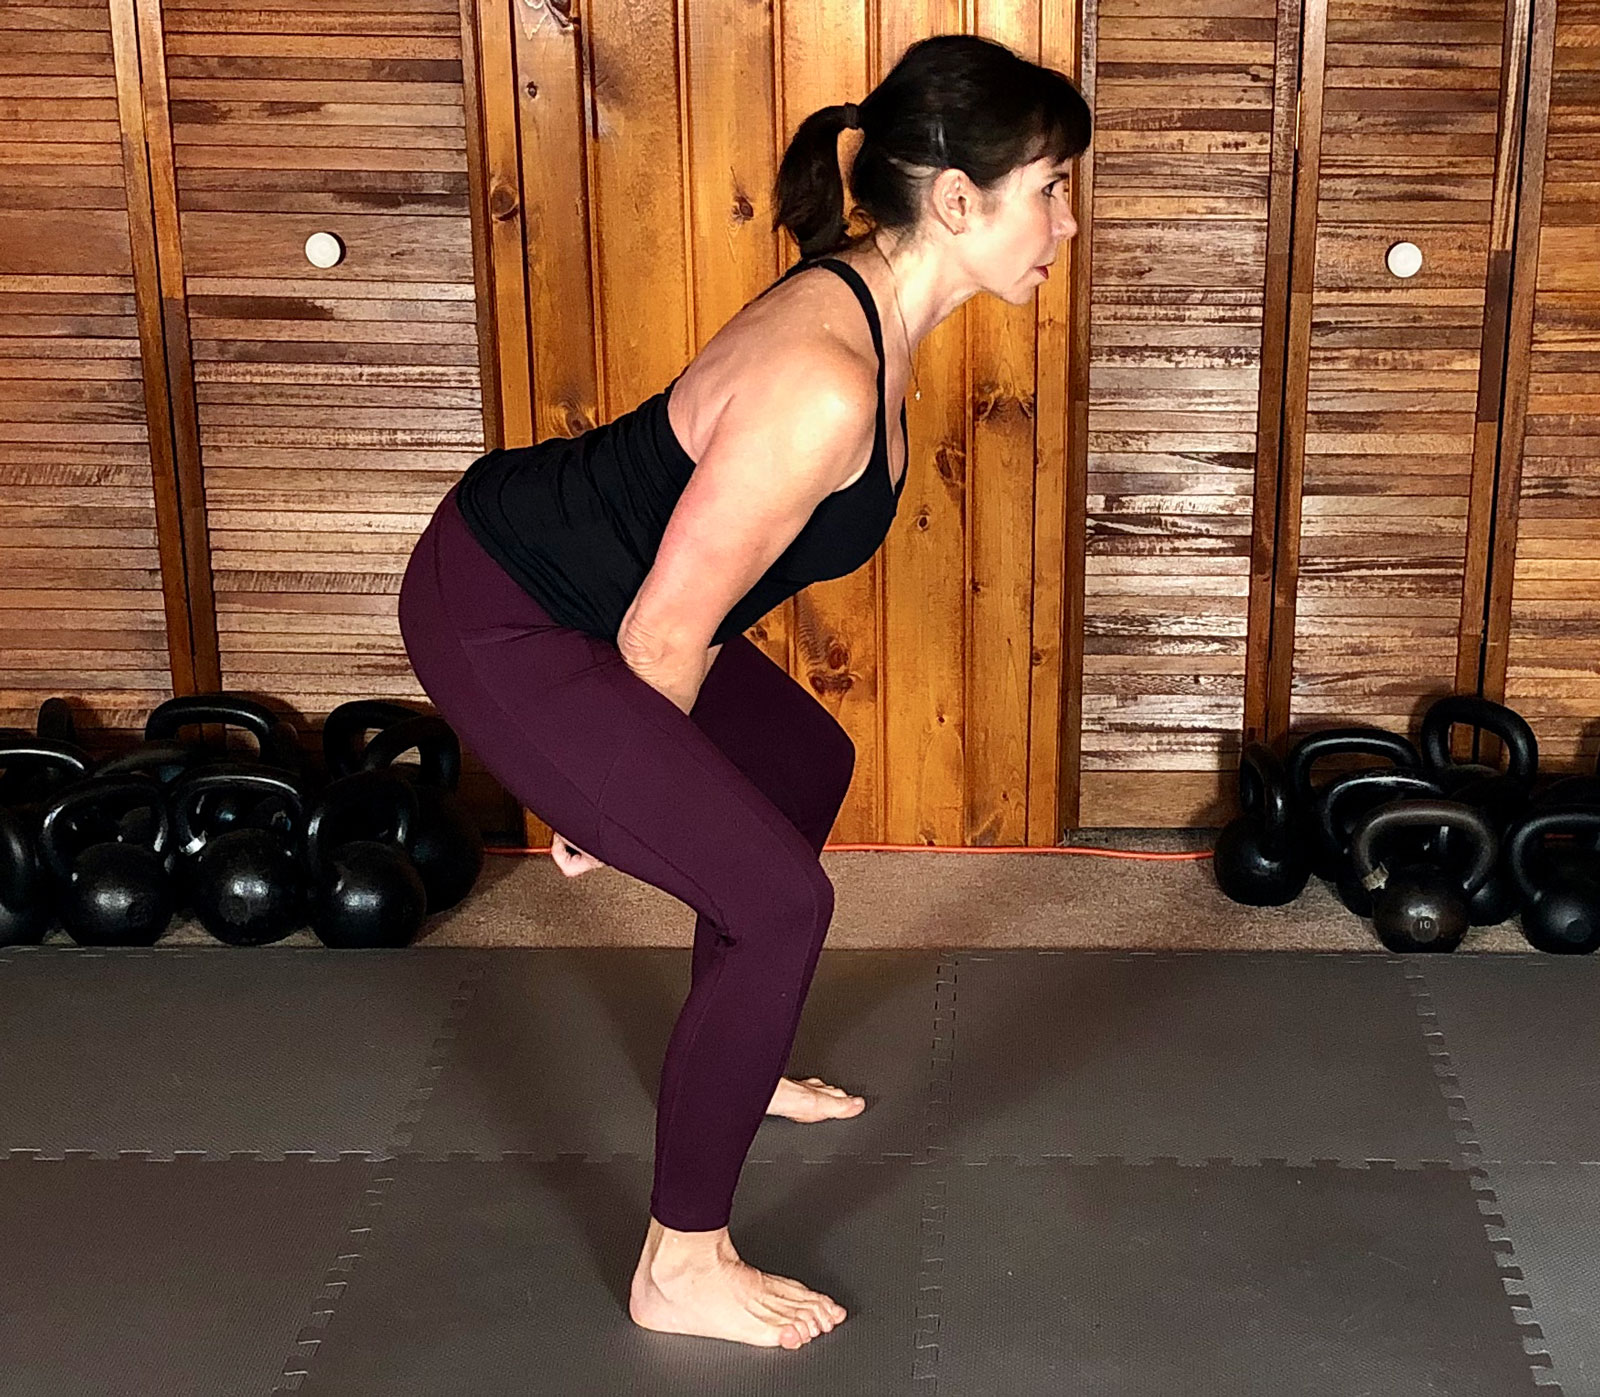
Andrea Du Cane, Master RKC Performs a correct RKC Hardstyle Kettlebell Swing Backswing
A correct RKC Hardstyle kettlebell backswing

Stand up and try each of these positions:

1) Stand feet shoulder distance, both arms in a back swing position, knees very bent, and hips in line with knees. What does it feel like? Where do you feel the most loading?

2) Same stance, this time hinge and keep the knees nearly straight, push the hips back, let the chest/head/shoulders face the ground- shoulders and hips level. What does it feel like? Where do you feel the most loading?

3) Same stance, this time sit back with hips, let the knees bend like you’re sitting back on a medium height chair, keep the chest/shoulders lifted. What does it feel like? Where do you feel the most loading?

My guess is that when you followed #1 you felt the most in your quads; #2 most of the loading is in the hamstrings; #3 you felt a little in the quads, a lot in the hips/glutes and some hamstrings. Picture #3 is the classic back swing position we teach at the RKC: Shoulders above hips and hips above knees.

How to Produce the Most Strength and Power with Your Kettlebell Swings

One of the key principles of Hardstyle kettlebell training is full body tension when we want to produce strength and power. If you don’t engage your glutes and quads and rely primarily on the hamstrings, are you not breaking that Hardstyle principle and losing power?

Yes indeed.

That’s Goldilocks for you. She lets us find the best position to get the most power. Try sitting back deeper into your backswing, I guarantee you’ll have more power, the kettlebell will fly, and you’ll feel your glutes more than you have in a long time.

***

Andrea Du Cane is a Master RKC Kettlebell Instructor, CK-FMS, CICS, and RIST, ZHealth certified, she has a BA in Psychology from the University of Minnesota and is also a Pilates instructor. She is the author of several books and dvds including The Ageless Body, The Kettlebell Boomer, and The Kettlebell Goddess Workout.  She has over twenty years of aerobics, weight training and fitness experience, with an additional background in… Read more here.
Filed Under: Kettlebell Training, Tutorial Tagged With: Andrea Du Cane, coaching kettlebell swing, drinking bird swing, fix kettlebell swing mistakes, Hardstyle Kettlebell Swing, Kettlebell swing mistake, kettlebell swing technique, kettlebell technique, kettlebell tutorial, Master RKC Andrea Du Cane, swing technique

Where and How To Grab The Kettlebell Handle

December 14, 2016 By Andrea Du Cane 5 Comments

Andrea Du Cane coaching rack position

As I travel around the country, I find there is a lot of confusion about where to grab the kettlebell handle—in the middle or in the corner? It is understandable that people are confused. After all, kettlebell training is still reasonably new to the broader public and it IS a very unique training tool. I hope to clarify some of this confusion and explain why certain grips are better for certain exercises, while some are definitely not appropriate for others.

The simplest way to break it down is to look at where you grab the kettlebell on the handle: the center or the corner. I’ll refer to this as the Center Grip or the Corner Grip.

This is very important. Unfortunately, many people do not pay attention to where they are grabbing the kettlebell. This is part of what I call the “set-up”. Every single kettlebell exercise has a set-up. This is where you stop and look at your feet, then determine where you place the kettlebell—in front of you for a swing/clean, or directly between your feet for a deadlift. You need to pay attention to where you place your hand on the kettlebell handle, and this too is determined by which exercise you are planning to practice.

Let’s begin by breaking down the different kettlebell grips, their uses, and advantages.


The Center Grip or Parallel Grip:

Grab the kettlebell in the center of the handle. The handle will generally lie across your callus pads with a slight downward angle toward the pinky side of the hand.

Rule of Thumb:

Anytime a kettlebell is held overhead, the kettlebell should be gripped in the middle of the handle.

Exercises:

presses, get-ups, kettlebell carries, windmills, snatches

Instructors at the Chicago RKC demonstrate kettlebell center grip

Why to Use the Center Grip:

1) The center grip keeps the kettlebell balanced so it won’t roll in either direction around the forearm. When the kettlebell is locked out overhead, the handle should be balanced in the palm. I have seen people lose control of the kettlebell and let the kettlebell roll around the forearm, not fun!

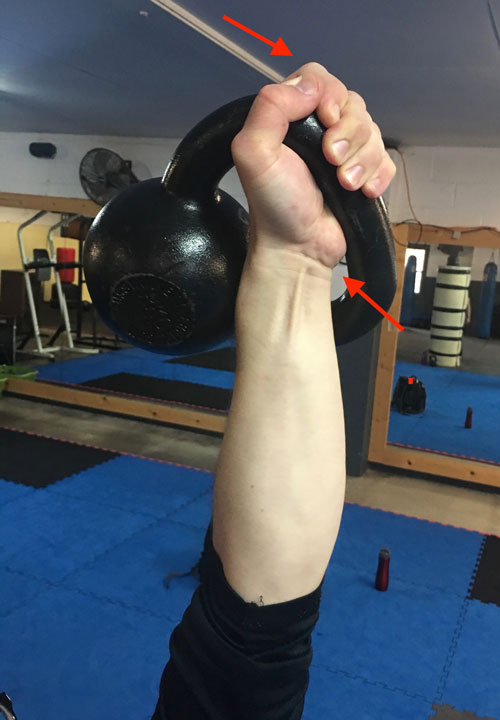
2) It helps to keep the wrist neutral. In contrast, a corner hold tends to pull the wrist into lateral flexion as well as flexion. This is very hard on the wrist. We want a strong forearm and wrist. An angled kettlebell tends to pull the wrist out of alignment.

3) During snatches a corner grip encourages the KB to spiral around the forearm, instead of the hand going through the middle and the kettlebell moving straight over the hand. A corner grip turns the snatch into a kind of GS spiral. This in turn, makes the landing less stable, the kettlebell is harder to control, and the shoulder can move around and become unpacked. Remember our snatches are Hardstyle, we use the force and speed of the hips to outrun the arm, and the fist punches through the handle fast. Once mastered, the kettlebell snatch using a center grip is both powerful and smooth, with no unnecessary movement at the lock out.

4) We need ALL our muscles to press heavy. If we hold the kettlebell at an angle during heavy presses, it puts the emphasis on the pinkie side of the palm which turns on mostly the triceps and lats. The corner grip turns off the part of the hand (thumb side) that facilitates the neurological connection with the pecs, biceps and anterior delts. When we press we don’t want to leave anything on the table, so we use the center grip.

Diagram of kettlebell corner grip
The corner grip turns off the part of the hand (thumb side) that facilitates the neurological connection with the pecs, biceps and anterior delts. When we press we don’t want to leave anything on the table, so we use the center grip.

The Neurology of Grip:

I’m sure many of you have heard about the studies that link grip strength to overall health and longevity. Because of how our bodies are wired, there is also a correlation to grip strength, shoulder health, and pressing strength.

If you’ve ever seen the picture of the Cortical Homunculus you can easily see how important the hands are. There are two particular “buttons” on the lower palm, one on the pinkie side of the fleshy palm and one on the thumb side.

The lateral side (pinkie) correlates to the triceps and lats. The medial side (thumb) relates to the pecs and biceps. When we press heavy kettlebells overhead, we want to “push all the buttons”. By grabbing the kettlebell in the center with the handle flat across the line of the calluses, we are able to activate both buttons.

Try this little exercise: Get down into a tall pushup position. Slowly lower yourself down while only contacting the ground on the outsides of your hands (pinkie), and then come back up. Next, try it again, but this time put the weight on your thumb/index side of the palm. If you listen closely to your body, the first time you tried the exercise, you should have felt more activation in your lats and triceps and the second time more muscles firing with your biceps and pecs.

Andrea Du Cane center grip rack hold

While we are on the subject of kettlebell grips, I’d like to touch on the different pressures we use:

Crush Grip: Used for heavy presses and bent presses.

Soft Grip: Used for get-ups, overhead carries, windmills. The fingers are closed around the handle and there is a light squeeze. This helps with shoulder stability and keeps control of the kettlebell on the forearm.

Closed Grip: Used for snatches and jerks. The fingers are closed around the handle with no pressure, to facilitate shoulder stability. It can also help with timing. When time is a factor as in the snatch test, keeping the fingers on the kettlebell handle will save time.

Open Grip: This is probably the most misused and misunderstood grip. There are certain populations of kettlebell lifters who will benefit from opening the fingers at the top of the snatch. When the fingers open at the top of a snatch, it allows the hand and grip to relax at the lockout. This is especially good for people with tight shoulders who need more mobility at the lockout and for high volume of snatching where the grip fatigues. And it can help while learning to snatch, for those having trouble over gripping the handle throughout the snatch.

Opening the hand at the top of a snatch rep can also help to slow people down if they are rushing through the lock-out. However, if someone is running out of time during a snatch test, make sure they keep their hands closed, as it will give back a second more for each rep.

As a side note, those who tend to over grip the kettlebell handle are often not using their hips and glutes to drive the movement, instead they are pulling with their arms and back. So fix the hips first, and that may alleviate the need to open the hand at the top of the snatch. In general, fix problems from the ground up!

Secondly, the open grip should only be used during high volume snatches, never for grinds like presses or get-ups, windmills or carries.

When pressing heavy and/or for reps, always keep the hand closed and with at least light pressure on the handle. If you open the hand at the top of a press, it signals the nervous system to relax–which we do NOT want to do during heavy presses!

The Diagonal Grip (or Corner Grip):

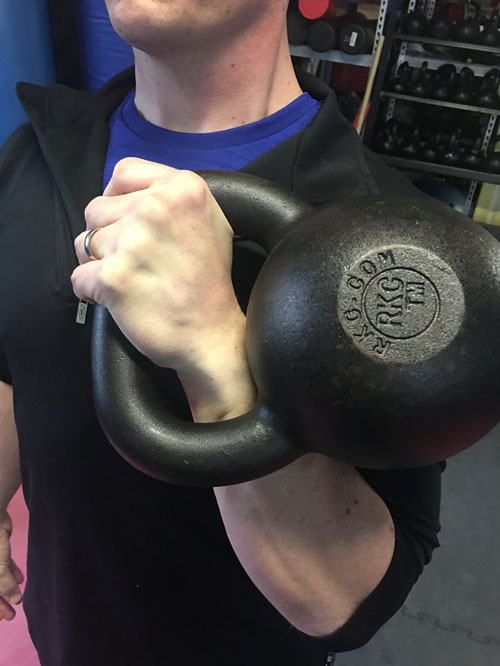
The diagonal grip is only used for cleans, or the combination of clean and squats together. Because there is no overhead holding, grinding or stability needed, the corner grip is fine—and in some cases preferred.

The corner grip is also encouraged for clean & jerks, since the triceps and lats are doing most of the overhead work to finish the lock out. For jerks and push presses, the lower body initiates the movement and drives the kettlebell overhead. You actually want the arms relaxed—because it is NOT a press.

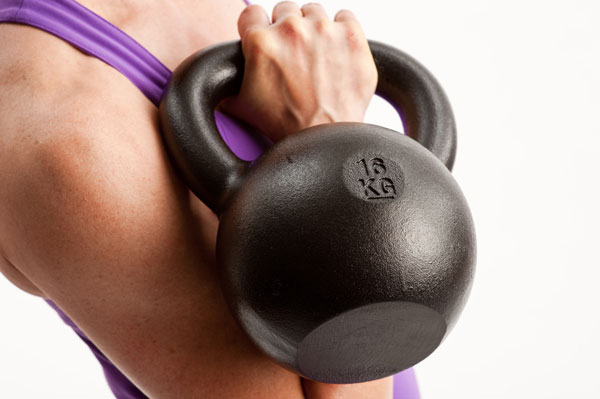
Corner grip rack hold

Forearm Discomfort—the Causes and Solutions

Lastly, I’d like to discuss the issue of discomfort on the forearm. In some cases, depending on an individual’s build and structure, adjusting the kettlebell in the hand and adopting a slightly angled hold during presses etc., may be necessary. The intention should still be to grab the kettlebell in the middle, but also allow it to angle down toward the pinky-side of the hand. It is still important to try and feel the thumb side with a solid contact as described above.

A few populations often have sensitive forearms, but there are methods to help them stay as comfortable as possible while not sacrificing technique:

The first reason for forearm discomfort is being new to kettlebell lifting. It is a new sensation and takes a bit of time to get used to pressure on the forearm. Also, because beginners are typically using smaller, lighter kettlebells which sit higher on the forearm where it is more sensitive. We used to say “If it hurts your arm, get a bigger kettlebell”. That’s not a particularly sensitive thing to say, even though it is true. But, the bigger kettlebells really do sit lower on the forearm and are more comfortable to hold in the rack and overhead.

The problem is that you have to use the appropriate size kettlebell for a given client and a given exercise. Which means beginners, or other populations will still need to use the lighter kettlebells.

In this case, the best solution will be to have your clients use wrist guards to protect the wrist and forearm. The more experienced the person becomes, the more their technique improves—and the more likely they will find a comfortable position. At the same time, they will be working up to larger kettlebells and the problem will go away.

The second and most common reason for people to have problems holding kettlebells—especially in overhead positions—is a lack of shoulder and T-spine mobility. Remember, the more vertical that the arm holding the kettlebell is (either in the rack or locked out overhead), the less weight will be placed on the forearm.

If someone’s lock out is forward of the shoulder, then most of the weight of the kettlebell will go directly into the forearm. Shoulder flexibility and T-spine mobility should be addressed as part of their daily programming. Until the mobility issues are addressed, they will continue to feel the pressure from the kettlebell on their arm.

Big-chested men and women, powerlifters or bodybuilder physiques, might find it hard to hold a kettlebell in the rack position. There is not much that can be done, because it is a structural or body-type problem. They will need to move the kettlebell around until they find the most comfortable arm angle and kettlebell placement. In some cases, the rack position will never be comfortable for them and they should limit holding the rack position for any length of time.

In all these examples, using a wrist guard can help protect the forearm and make the kettlebell position safer and more comfortable. Shoulder mobility work should be done regularly. In some instances, adjusting the grip slightly to angle it off a sensitive point can help. However, keeping good exercise technique in mind, the correct form should be followed as much as possible for safety of the client and the effectiveness of the exercise.


***

Andrea Du Cane is a Master RKC Kettlebell Instructor, CK-FMS, CICS, and RIST, ZHealth certified, she has a BA in Psychology from the University of Minnesota and is also a Pilates instructor. She is the author of several books and dvds including The Ageless Body, The Kettlebell Boomer, and The Kettlebell Goddess Workout.  She has over twenty years of aerobics, weight training and fitness experience, with an additional background in… Read more here.
Filed Under: Kettlebell Training, Tutorial Tagged With: Andrea Du Cane, grip technique, kettlebell grip, kettlebell technique, kettlebell tutorial, Master RKC Andrea Du Cane, tutorial

A Sensible Approach To RKC Prep

July 27, 2016 By Andrea Du Cane 3 Comments

Andrea Du Cane Kettlebell Snatch Test

What’s the first thing you think of when preparing for the RKC? Most people instantly think of the dreaded SNATCH Test! It’s understandable—after all, the RKC Snatch Test is a test of a candidate’s conditioning, and how well they’ve trained to complete 100 snatches within 5 minutes with the appropriate kettlebell for their weight class. It is meant to be a challenge. Everyone will agree, you have to earn your RKC—it’s not just given away to anyone who attends an RKC workshop.

So, it’s no surprise that most of the questions and information out there about preparing for an RKC workshop are focused on how to successfully sail through the Snatch Test. As a Master instructor who has seen thousands of Snatch Tests and who has tested the skills of more RKCs than I can count, I can tell you most people are focusing on the wrong thing in their RKC prep!

I always remind candidates that the Snatch Test is not the same as the Snatch Technique Test. The Snatch Test examines the mental and physical conditioning of the candidate. The Snatch Technique Test is all about technique—so each rep should be as perfect as possible. We let a fair amount of sloppy form pass with the Snatch Test because it is nearly impossible to perform 100 PERFECT reps within 5 minutes. But, we DO expect 5 perfect reps on each side during the technique test.

So, if someone has focused all of their preparation on pounding out 100 reps without any attention to the technique of the movement, then they could be in for a surprise if they fail the Snatch, Swing, or Clean Technique Tests. Which brings me to the point of this article; your preparation should be all about the basics—like the swing!

Before their RKC workshop, many candidates think their swing is pretty good. But, nearly everyone soon learns that they had “leaks” in their swing technique! And when the extra pull of the arm to the overhead lockout for the snatch is added, many candidates lose their hips, or their breath since with bad technique, the snatch can become a back and shoulder pull, instead of a hip-driven exercise.

My Advice:

Practice all the skills, work on your volume and conditioning using heavy swings and practice your snatch and cleans with a focus on perfect form. Develop your pressing and squatting strength. Spend a lot of time working on the Get-Up—starting with lighter kettlebells and then increasing the load to your snatch test size kettlebell. Last but not least, work on your mobility and flexibility! You will not pass the RKC if you have neglected your movement skills!

The best way to ensure you are training and performing the exercises correctly is to attend an HKC Workshop as part of your prep—and/or work with a local RKC Instructor to keep you on track.

Attempting to use YouTube as your “teacher” will give limited to negative results. Anyone who has ever attempted to teach someone how to hinge and swing knows, this is a very difficult movement for many people and it is very easy to cheat—without even knowing it!

Below, I will outline a very simple program template. It is a general guideline that you will need to adjust for your individual needs. If you are working with an RKC, they will no doubt design a specific program with you in mind.

How much time should I give myself to prepare for an RKC?

Generally, if you have not been certified as an HKC, we recommend spending six months to a year preparing for the RKC. If you are HKC certified, allow for three to six months.

This may seem like a lot of time, but remember, in order to train safely and build up your overall conditioning you will need plenty of time to push hard and rest. At every RKC workshop, there are always people who have needed to postpone their attendance due to injury during their preparation training.

Spend 3-4 days each week on swing and technique practice. Alternate days of heavy two-hand swings with single arm work with a snatch size or one size lighter kettlebell. At first, keep the volume of your cleans and snatches low. As your technique and conditioning improve, increase your reps. The get-up can be used as a warm up, active rest, and as an exercise to practice with load.

Andrea Du Cane Kettlebell Get-up

Only attempt the full five minute Snatch Test after a full month of consistent training. After that first month, perform the full Snatch Test once a week at most.

At about 4-6 weeks out from your RKC Workshop, start peaking your intensity. Then at or within 2-3 weeks out, taper down to focus on general conditioning with lots of rest. You should also continue attempting your Snatch Test weekly and continue to practice your skills. For the final week before your RKC, you should focus on basic swings. It is important to rest and eat well during the last five days before your RKC Workshop. You will need all your energy and focus to make it through the weekend.

Hand care should be addressed from the VERY beginning of your training. Keep your calluses trimmed, filed and moisturized. Use as little chalk as possible, too much chalk can cause your calluses to tear. If necessary, use some thin hand protection—but only during your snatch and clean practice.

Each workout should begin with mobility and movement practice and should end with flexibility and stretching. The biggest weak link we see with RKC candidates is a lack of good hip and shoulder mobility. In fact those mobility weaknesses are the biggest reasons for failing the snatch, get up, press and squat!

Your rest days should be active. Continue to work on your mobility and flexibility as well as any other corrective drill or foam-rolling you need on your rest days.

Example Preparation Plan:

Day One:

  • 30 seconds work/rest intervals: heavy two-hand swings. Build up to 15 minutes total.
  • Get-up practice: 5–10 minutes of alternating get-ups.
  • 3 sets of 8-10 goblet squats or single kettlebell rack squats with your Snatch Test size kettlebell.
  • Kettlebell carries: 30 seconds for two sets each arm (single kettlebell), then double kettlebell carries for 2 sets of 30 seconds.

Day Two:

  • Press ladders (start with a kettlebell you can press at least 5 times). If the 1-2-3-4 ladder pattern is easy, then you chose a kettlebell that was too light. Stop if you can’t make each rung with good technique. If you can add a fifth rung to the press ladder, go ahead.
  • 3 sets of 5 double kettlebell front squats. Pick a pair of kettlebells which are challenging, but still allow you to complete the sets with proper form.
  • 10 L/R for 10 sets single-arm swings with a kettlebell snatch size or one lighter. Rest as needed between sets.

Day Three:

  • 5 sets of 15-20 double kettlebell swings with heavy kettlebells (rest as needed between sets).
  • Practice snatches for 5 reps L/R for 5 or more sets. Use a lighter kettlebell or fewer reps or sets if your technique slips or if you are banging your forearms.
  • Practice cleans for 5 reps L/R for 5 sets. Focus on good technique. Use a lighter kettlebell, or fewer reps or sets if your technique slips or if you are banging your forearms.
  • Hardstyle push-ups 5-10 reps for 2-3 sets (monitor your technique, drop reps or sets or drop down to your knees if your technique slips)

Day Four: Snatch test practice

Option 1: If you are already comfortable using your snatch size kettlebell, try performing as many reps within 5 minutes as possible. Keep count, and try to get closer to reaching 100 reps each week.

If you are not yet comfortable using your snatch size kettlebell, choose one that is one or two sizes lighter and try the Snatch Test with it. Once you’ve reach 100 reps within 5 minutes, move up to the next size kettlebell.

Option 2: Snatch for 50-60 reps in 10 minutes (rest as needed) with a heavier than snatch size kettlebell.

Option 3: Try 2, 3 or 4 minute snatch tests with 40, 60, 80 reps with your snatch size kettlebell if the 100 snatches in 5 minutes is too hard. Slowly work up to the full 100 reps in 5 minutes.

Practice get-ups with a light kettlebell, breaking the movement into sections, and repeating the transitions. Spend extra time in the kneeling windmill position and during the transitions up and down.

Finish with bent-over rows, 6-8 reps for 3 sets with a light kettlebell focusing on keeping the shoulder away from the ear and the lat engaged during the movement. Or practice the variety exercises in the next sentence.

Practice the following variety exercises either on a separate day or at the end of days 1, 2, 4: single-leg deadlift, HardStyle push-ups, kettlebell carries, lunges, bent-over rows etc.


***

Andrea Du Cane is a Master RKC Kettlebell Instructor, CK-FMS, CICS, and RIST, ZHealth certified, she has a BA in Psychology from the University of Minnesota and is also a Pilates instructor. She is the author of several books and dvds including The Ageless Body, The Kettlebell Boomer, and The Kettlebell Goddess Workout.  She has over twenty years of aerobics, weight training and fitness experience, with an additional background in… Read more here.
Filed Under: Kettlebell Training, Workout of the Week Tagged With: Andrea Du Cane, rkc test, RKC Testing, RKC Workshop Prep. RKC Workshop Preparation, Snatch Test

Why the Single-Leg Deadlift is a Go-To Leg Exercise

June 22, 2016 By Andrea Du Cane 2 Comments

Andrea Du Cane Single-Leg Deadlift

Why do I love single-leg deadlifts so much? For one thing, nothing works the butt and legs quite like it. Add the extra benefit to the back, core, lower legs and feet and you have a full body exercise. As Gray Cook likes to say, “Maintain your squat and TRAIN your deadlift.” I think this is especially true for the single-leg deadlift.

I have to share a personal story; I’ve had four patellar dislocations. Yes, FOUR! The first one happened after a two-hour ballet/pointe class. The second happened in the middle of a jazz dance class. The third happened when my tango partner hit my kneecap with his knee and the fourth happened when my shoe caught in an escalator and I fell. Yes, dance is a very dangerous sport!

The last two times, I popped it back in and rehabbed it myself. The single-leg deadlift was the most important exercise for strengthening and rehabbing my knee. So this is an exercise close to my heart!

Here’s why everyone should add this powerful exercise to their program:

The single-leg deadlift not only develops hip strength and power, but it also allows the muscles of the hips and legs to act as stabilizers. If you think about it, every time you stand on one leg, you’re using the same muscles for balance and stability that are generally used for force production.

Forcing the body to maintain stability on one leg allows the athlete and coach to see strength imbalances from left to right side. This is extremely important for athletes as well as special populations. And it can go a long way to help reduce injuries and improve performance.

Double Kettlebell Single-Leg Deadlifts:

Holding kettlebells in each hand is easier on your core because it balances out the load from side to side. This allows you to go heavy and train pure hip strength on one leg. You can then watch for and correct left/right strength asymmetries. The focus will be on initiating and driving forcefully with your glutes. This hip drive with stability is the same for both double kettlebells and single-arm kettlebell single-leg deadlifts.

Single-Arm Single-Leg Deadlifts:

Single-arm single-leg deadlifts have the advantage of requiring torso, pelvic, and hip stability as well as strength production. This exercise can be used as a corrective exercise because loading one size requires us to resist the rotational forces put on the body.

Holding the kettlebell on the opposite side of the working leg is the most common corrective use of the single-arm single-leg deadlift. However, holding a kettlebell on the same side as the working leg also has many benefits and challenges. Both versions of the single-arm single-leg deadlift challenge the body to restrict rotational forces from loading one side.

Interestingly, only half the people who try holding the kettlebell on the same side as the working leg will find it harder than holding it on the opposite side. And it may be different from left leg to right.

When using the single-leg deadlift as a corrective exercise, find your weakest link or most challenging combination and train the weak link 2-1.

Now let’s discuss how to perform single-leg deadlifts correctly. As I like to say, “Perfect Technique = Success”. Go to any gym and you’ll see lots of sloppy single-leg deadlifts. Are they getting the most from the exercise? Are they risking hurting themselves? The answer is “no” and “yes”, respectively.

These basics apply to both double and single arm single-leg deadlifts:

  1. The back MUST remain neutral throughout the lift. If your back rounds or flexes, you risk tweaking it. And if your back rounds or flexes, I guarantee you are not using your glutes.
  2. The hips HINGE and move back over your heels. This move is not about the torso bending forward, it’s about the hips moving backward.
  3. The front knee will bend, but it does not move forward excessively. Remember, we are deadlifting not squatting. Plus, this is not a straight-leg deadlift—straight-leg deadlifts shift the focus and load to the hamstrings and off the glutes. Think of the movement as an “elevator not a teeter-totter”.
  4. The shoulders and hips remain parallel to each other and the floor. Do not externally rotate your back leg, and don’t let your working hip sink or rise above parallel. The shoulders should also remain squared off and equal—for both the single or double arm variations.
  5. The arms move as a pendulum from the shoulders as the torso moves forward. The shoulders remain engaged at the lat, do not let your shoulders disconnect from your body as your torso moves forward. This helps the rotator cuff and shoulder stabilizers work during the movement. The elbows remain locked, no “pulling” with your biceps.
  6. The knee must track the toe; do not let the knee collapse inward or outward.
  7. The feet are active. The entire foot is loaded with a bit more weight towards the heel, with the big toe working and gripping the floor.
  8. The back foot is dorsiflexed and the toe is facing down to help keep the hips “closed”.
  9. The back leg is an extension of the spine, and the leg should not be higher or lower than the hips. The back leg should be in line with the hips, and active to help with balance.
  10. Squeeze your palms into the kettlebell handles, this increases shoulder and core stability and strength.
  11. Keep your eyes focused approximately 3-6 feet in front of you to help keep your head in alignment and to assist balance.
  12. Inhale as you stand back up. Power breathe as you drive your foot down into the ground and lift up.

All the elements listed above apply to both the two arm and single arm single-leg deadlift. For added focus, maintain level shoulders and torso at all times when performing single arm single-leg deadlift. You will need to fight the rotational pull with the weight.

A few other thoughts: If at all possible, perform your single-leg deadlifts barefoot. The proprioceptive, neurological information from your feet will assist your balance and make you stronger.

Modifications for Different Populations:

  • Use platforms to raise the kettlebell(s) so that they can be picked up safely AND with no spine flexion.
  • Start from the top instead of picking the kettlebells up from the ground. This way you are already loaded, instead of trying to find tension and stability at the bottom of the movement.
  • People with bad knees or balance issues can hold onto a wall or bar with one hand and hold the kettlebell in the other hand. They will not have to “fight” for balance and risking tweaking their knees or back.
  • Keep the back leg down as a “kick-stand”. This also helps with balance issues.
  • NEVER fight for balance! If you start to lose balance, simply place your back leg down on the ground and regroup.

When training, start with medium loads to get a feel for your weaknesses while developing single leg strength and balance. Try 6-8 reps 2-4 sets with this medium load. Then go heavy, especially with double arm single-leg deadlifts and drop the reps to 3-5.

This exercise should be performed slow and controlled—NOT fast and bouncy. If you’re bouncing up and down, you are either hiding weaknesses or you chose a kettlebell that is too light!

Here’s a short demo of a two-arm single-leg deadlift. As stated above, all points apply to using one kettlebell:

***

Andrea Du Cane is a Master RKC Kettlebell Instructor, CK-FMS, CICS, and RIST, ZHealth certified, she has a BA in Psychology from the University of Minnesota and is also a Pilates instructor. She is the author of several books and dvds including The Ageless Body, The Kettlebell Boomer, and The Kettlebell Goddess Workout.  She has over twenty years of aerobics, weight training and fitness experience, with an additional background in… Read more here.
Filed Under: Kettlebell Training, Tutorial Tagged With: Andrea Du Cane, how to do a single-leg deadlift, how-to, kettlebell exercise, kettlebell tutorial, kettlebells, One leg deadlift, single leg deadlift, tutorial

Two Quick, Easy and Effective Kettlebell Exercises for Any Population

May 4, 2016 By Andrea Du Cane Leave a Comment

Andrea Du Cane, Master RKC

There is something to be said about simplicity of movement and reinforcing the fundamental patterns of our kettlebell lifting.

I’ve taken two basic exercises and by using two kettlebells and focusing on the correct alignment and movement, I have turned them into simple and effective exercises for all populations—including your brand new clients, older clients and those recovering from certain injuries.

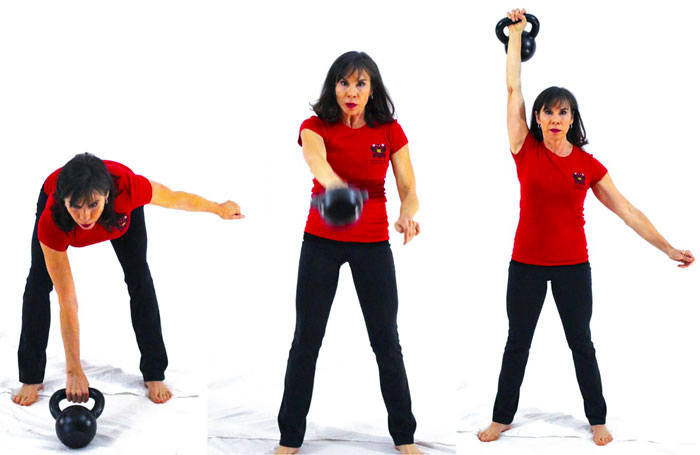
Double Kettlebell Deadlift Drag

The first drill is a double kettlebell deadlift drag. Normally we do this exercise with one heavy kettlebell. By using two medium to heavy kettlebells (heavy enough to complete the movement correctly with each arm), you open up the upper body kinetic chain. This will illuminate asymmetries from one side of the body to the other. It also allows you to strengthen the weaker side. Start with the same size kettlebell in each hand and then use a kettlebell one size larger on the weaker side.

For the purposes of this article and video, I will be using the same size kettlebell.

Get into the set up position. The kettlebells are approximately an arm’s length in front of you. Grab the kettlebells and pull yourself back toward your heels. You should feel as though you would fall back on your butt if you let go of the kettlebells. Lock your lats down into a packed position and maintain a long and neutral spine. SLOWLY drag the kettlebells back towards your heels with your elbows straight. Feel how the movement is initiated by the lats and the triceps. Do not let your hips drop below your knees, and do not let your spine flex at all!

The key is to not use any momentum. In fact, it is best if the floor you are using is sticky or rubber—the more resistance the floor offers the better.

If you feel most of the tension in the quads, then you are not getting your hips back far enough and are trying to hold your position with your quads instead of your glutes and hammies. The abs must be braced the entire time, and you should use a long firm exhale as you drag the kettlebells back. Release, step back, and re-set for the next rep.

I go the length of my gym, or at least 8-10 drags. Repeat for 1 or 2 more sets as desired. Remember, never let your back round into flexion at any time during this exercise!

Double Kettlebell Straight-Leg Deadlift

The double kettlebell straight-leg deadlift, is another simple but effective exercise to challenge the posterior chain. It is an excellent exercise for the hamstrings and glutes. And as in the deadlift drag above, it utilizes the lats.

There is an interesting difference between these two exercises. The deadlift drag uses the lats to do the work by pulling the kettlebells back toward the heels, while the hips and legs maintain stable strength. With the straight-leg deadlift, the lats are held stable while the hips and hammies initiate the movement through hinging. In other words, the movements and stabilization are reversed, but both are working the same muscles. Pretty cool huh!

Here’s how to do the double kettlebell straight-leg deadlift:

Pick up two moderately heavy kettlebells using good deadlift technique. Stand with your feet between hip and shoulder width apart. Keep your elbows straight and locked, and your lats retracted and contracted. Begin to send your hips back into a hinge. Keep your knees as straight as you can manage while maintaining a neutral spine at all times.

The amount of knee flexion and the depth of your torso forward relate to your hamstring flexibility. The more flexible you are, the straighter you can keep your knees and the lower you can fold forward without any flexion in your spine.

Inhale into your belly as your chest comes forward. Pause briefly at the bottom, keeping the glutes and hamstrings contracted. Tighten a little more and then exhale as you come back up to the starting position.

You will feel a deep stretch/contraction from your glutes down through your hamstrings. This exercise can be considered a loaded stretch for the glutes and hamstrings. It is a very powerful hamstring developer.

As usual, there should be NO flexion in the spine. Start with a limited range of motion until you can use the full range of motion with a neutral spine. You can adjust the amount of knee flexion as well—just don’t allow yourself to turn it into a regular deadlift, you’ll be cheating yourself out of the main benefit of this exercise.

As I mentioned above, the lats, back and core are working very hard to stabilize during this exercise, so they are benefiting too!

Start with 3 sets of 8 moving slow and controlled.


****

Andrea Du Cane is a Master RKC Kettlebell Instructor, CK-FMS, CICS, and RIST, ZHealth certified, she has a BA in Psychology from the University of Minnesota and is also a Pilates instructor. She is the author of several books and dvds including The Ageless Body, The Kettlebell Boomer, and The Kettlebell Goddess Workout.  She has over twenty years of aerobics, weight training and fitness experience, with an additional background in… Read more here.
Filed Under: Kettlebell Training, Tutorial Tagged With: Andrea Du Cane, deadlift, deadlift drag, double kettlebell, kettlebell drills, kettlebells, master rkc, Master RKC Andrea Du Cane, straight leg deadlift, tutorial, video

Fine-Tuning the Get-Up

January 27, 2016 By Andrea Du Cane 14 Comments

Master RKC Andrea Du Cane Get-Up Lead Photo

How and when to use the high bridge and when to use the “step-across” instead of the “windshield wiper”

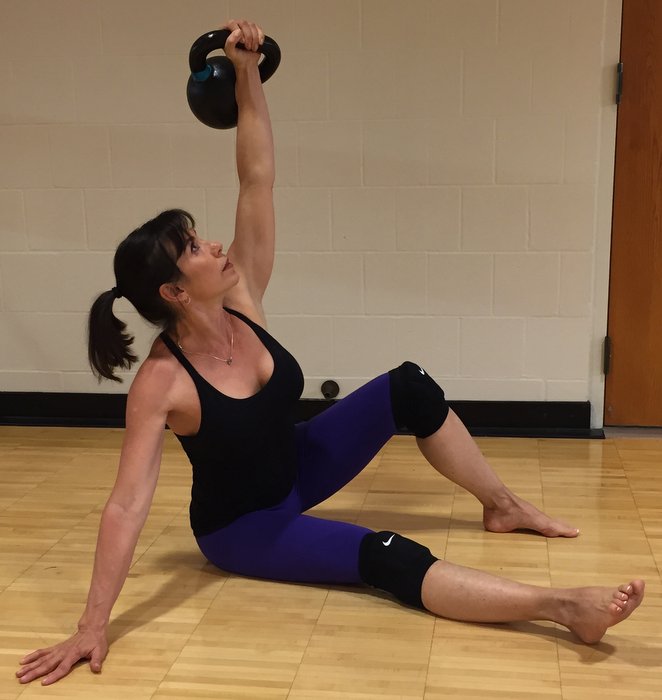
At every HKC and RKC, I’m asked why we test the low sweep instead of the high-bridge. I also get a lot of questions regarding the “windshield wiper” vs. the “step-across” to transition in and out of the kneeling windmill to the lunge position. It’s time to explore each movement and gain a deeper understanding of some of the benefits of the get-up.

When I first became certified and started teaching the get-up, it was referred to as the “Turkish get-up”. Here’s the criteria that was given and tested at that time:

  1. Keep both shoulders packed.
  2. Keep the wrists neutral at all times.
  3. Keep the elbow locked at all times.
  4. Keep your eyes on the kettlebell.

Oh and well…. get-up! That was it, get up anyway you can.

Let’s just say the get-up has come a long way, baby. It’s transitioned from having very little explanation and direction to (for a time) elaborate direction, with a focus on corrective uses and advanced movement patterning.

You can say that now we have found a happy medium, erring on the side of explanation and points of movement. But, we have also found a good balance and an easier way to teach the get-up to newer kettlebell instructors and users.

The High Bridge or the Low Sweep

One area of confusion with the get-up is whether to use the high bridge or low sweep.

First, let me explain where the high bridge came from, and why it was initially introduced as a teaching and testing skill. The high bridge came from the FMS concept of using movement as a screen. When it was first introduced into the RKC curriculum, the high bridge was used as a screen for tight hip flexors. However, we began to notice that when people were doing the high bridge, their lumbar spine was actually in hyper-extension instead of full hip extension. I remember discussing this with Gray Cook, and he agreed with that it was one problem with using the high bridge as a screen, since it is easily cheated. It does not actually demonstrate whether the person is in full hip-extension or hyper-extension of the lumbar spine.

Secondly—and more importantly—you would not put a client, with a kettlebell in their hands, into a high bridge and then say, “Aha! You have tight hip-flexors”. Of course not. Long before they do that high bridge, you have deduced that they have tight hip-flexors from other screens. And from a safety perspective, you would not let someone perform a high bridge until they had opened up their hip flexors and could perform the movement correctly without a kettlebell.

Since one of the end goals of the get-up is to go heavy, for the purpose of safety and efficiency, you will want to pull your leg back and get your hips under the load as quickly as possible. The high bridge takes unnecessary risks with a heavy load during the transition.

That said, the high bridge is great with a moderate to light weight for a more advanced kettlebell user. Done correctly, it demonstrates shoulder stability, hip flexibility and control.

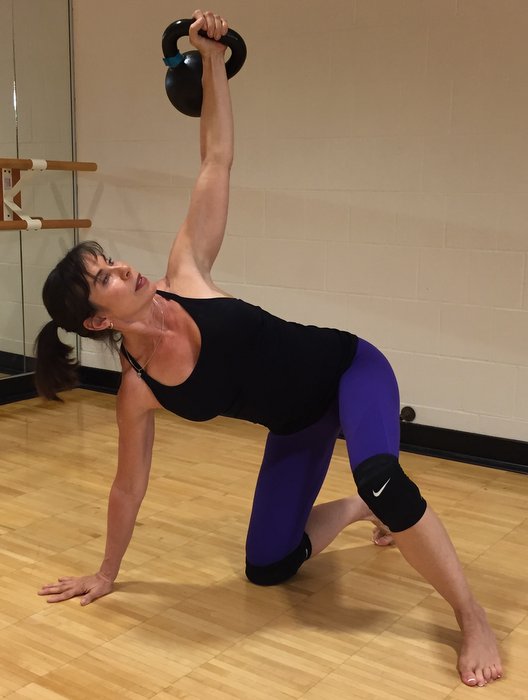
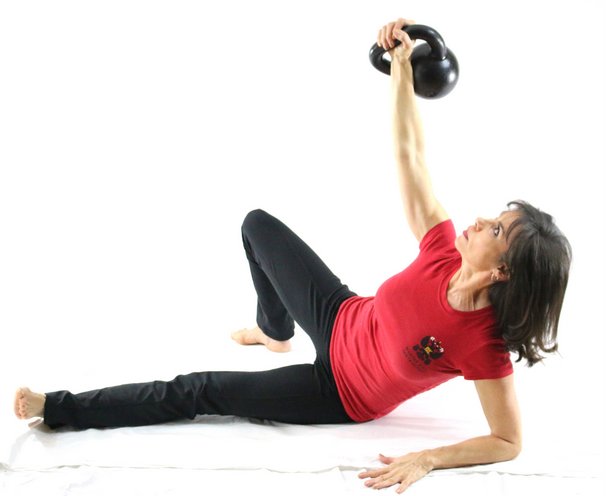
Master RKC Andrea Du Cane Get-Up Kneeling Windmill

Performance Tip: Think of the high bridge and sweep through as a tall side plank. When moving into a high bridge, post over towards the side, your shoulders should be stacked over each other. The hips will rotate slightly upwards, but the shoulders and t-spine are stacked vertically. Practice lots of side planks from the elbow and tall side planks, before moving onto the high bridge.

The “Step Across” Variation

Moving on to the next modification, using the “step across” instead of a windshield wiper. As stated earlier, the body needs to transition from the tall-sit position smoothly and with control all the way to lunge. That means the hips need to get under the kettlebell as quickly and safely as possible—this includes the sweep through and transitioning to the lunge.

From the kneeling windmill position, the torso is moving from a horizontal position to upright, as the hips are coming under the torso and kettlebell. The hips need to fully extend with the glutes tight as you move into the lunge position. That’s a LOT of movement happening at the same time. The more stable and connected to the ground the body is, the safer and smoother the transition.

That is why the windshield wiper is taught and tested. Both legs remain firmly on the ground and the hips easily and fully extend.

Performance Tip: think about finishing at the top of a swing. The glutes contract hard and fast and the hips fully extend, allowing your body to find stability in the lunge position as soon as you hit it.

A potential problem with this movement is the pressure and friction placed on the knee. Obviously, if the knee is feeling pain, this could jeopardize the movement. The ground you are training on becomes an issue, and individual knee sensitivities should be taken into account as well.

One way to solve the issue is to use the “step-across” modification. From the kneeling windmill, you simply lift your torso up and then step your loaded foot across into a lunge position. This will take the windshield wiper out of the movement and “save” the knee.

The downside to this modification is the inherent lack of stability as you lift your loaded leg up and step it across. You are also changing the orientation of your head and body, which can also cause us to lose stability and control.   Lastly, it is much harder to keep your glute and hip tight and contracted as you move the leg, leading to another possible loss of control.

As we say in the RKC, “safety trumps performance”, so if you have sensitive knees or are training on a hard or rough surface, the step-across is a modification you can use to protect your knee and stay in control.

My personal recommendation is to buy a $20 pair of knee pads or have your clients purchase them for training. I do a lot of kneeling training and take knee pads with me everywhere to use for all kneeling training and stretching. $20 knee pads are a cheap and easy way to protect your knees and increase the effectiveness of your kettlebell training.

****

Andrea Du Cane is a Master RKC Kettlebell Instructor, CK-FMS, CICS, and RIST, ZHealth certified, she has a BA in Psychology from the University of Minnesota and is also a Pilates instructor. She is the author of several books and dvds including The Ageless Body, The Kettlebell Boomer, and The Kettlebell Goddess Workout.  She has over twenty years of aerobics, weight training and fitness experience, with an additional background in… Read more here.
Filed Under: Coaching, Kettlebell Training, Tutorial Tagged With: Andrea Du Cane, get up, get ups, Getup, kettlebell technique, kettlebell training, RKC, RKC kettlebell training

The Single Rep Dead Stop Swing, Clean, Snatch Workout

July 1, 2015 By Andrea Du Cane 13 Comments

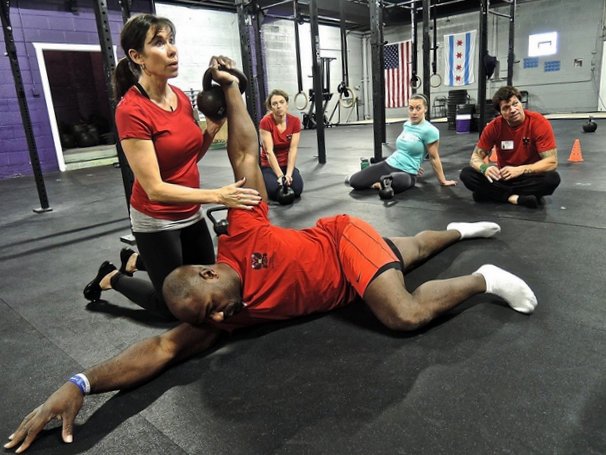
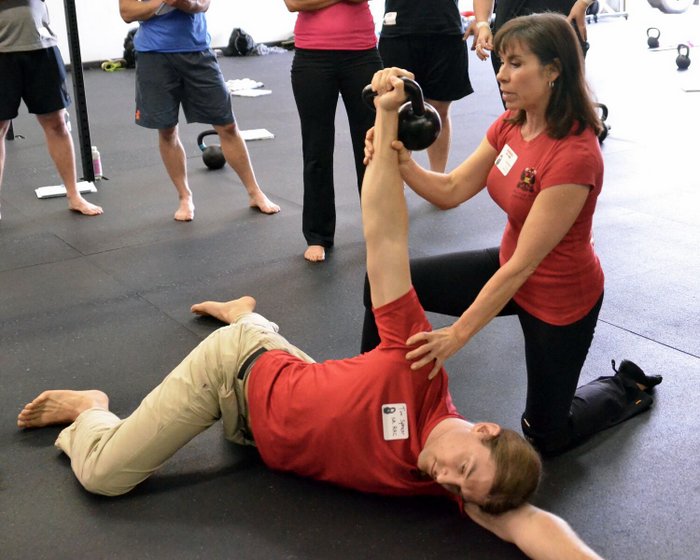
Master RKC Andrea Du Cane and Senior RKC Timothy Spencer Demonstrate the RKC Arm Bar

As I travel around teaching HKC and RKC workshops, I notice a common problem (theme – challenge), the sloppy start/stop of a kettlebell ballistic lift.

Imagine this scenario: someone is getting set up to swing; it doesn’t matter if it’s 2-handed, single arm or double. They stand over the kettlebell, lift it up, and rock it back a couple of times between their legs and THEN swing it back far enough to load their hips and explode up.

What’s wrong with this picture? The set-up was not correct. It was not focused or properly executed. There must be an intention and preparation before the start of the pull—before anything happens.

I like to say in regards to all kettlebell lifts, “You’re only as good as your set-up”.

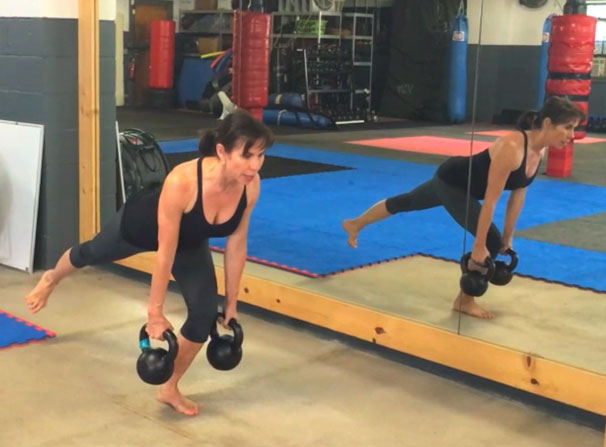
Here is the correct way to start a swing (clean or snatch):

  • Place the kettlebell a foot or two in front of you.
  • Bend forward and grab the kettlebell handle.
  • Pull the kettlebell slightly toward you, while engaging your lats.
  • Set your weight way back on your heels, while keeping your feet planted & spine neutral.
  • “Hike” the kettlebell back behind you—fast.
  • Explode your hips forward and feet down into the ground. Let your arms be propelled forward by the force of the hips.

That’s it. Simple. No lifting the kettlebell up and rocking it a couple of times before hiking it back and exploding up. One crisp explosive hike pass and forward movement is all it takes!

This is the same for ALL the kettlebell dynamic lifts; including double kettlebell swings and cleans.

Scenario #2: someone has just finished a great set of swings, but on the last rep they fall forward while rounding their back and then dropping the bell down in front of them.  They nearly topple forward.

No further explanation is needed here, this is simply dangerous. The most common time for an injury to occur during any kettlebell exercise is on the last rep or while the kettlebell is being set down.

In both cases—the first rep or the last rep of a set—the lack of focus, intention and safety is to blame.

The answer to this problem is to training your single-rep or dead-stop swings. In essence that is what the single-rep is: the start and end of a swing, clean or snatch.

Programming single-rep sets is an easy way to reinforce good technique throughout a set of any ballistic lift.

The truth is, they are HARDER than continuous reps because you lose the assistance of gravity during the backswing. With single-rep workouts, each rep is initiated by the power of the lifter. The hips and lats have to work that much harder to generate the force to project the kettlebell up. Hence, an additional bonus is increased force production and explosive power. So this type of training is perfect for any athlete.

You can also modify single-rep workouts for any level kettlebell lifter.

Single-rep 2-handed swings are a progression to learning continuous swings, but for the advanced lifter, doing single rep heavy cleans or snatches or double swings and cleans, puts the burn in your butt!

Here are some workout examples (note: “SR” stands for Single Rep):

Beginner:

SR-Swings:   2-handed for 5 reps

Continuous:   2-handed for 10 reps

Repeat as long as you wish

OR use timed sets for 25-30 seconds of work to equal rest


Intermediate: (proficient with cleans and snatches)

SR-Swings 1-arm   5-10 reps left/right

Continuous 1-arm   10 reps left/right

SR- Cleans 1-arm   5-10 reps left/right

Continuous 1-arm   10 reps left/right

Repeat as long as desired or timed sets


2nd workout

SR-Swings 1-arm   5-10 left/right

SR- Cleans 1-arm   5-10 left/right

SR-Snatch 1-arm   5-10 left/right

Repeat as long as desired or timed sets


Advanced

SR-double swings   5-10 reps

SR-double cleans   5-10 reps

Repeat as desired or timed sets

***

Andrea Du Cane is a Master RKC Kettlebell Instructor, CK-FMS, CICS, and RIST, ZHealth certified, she has a BA in Psychology from the University of Minnesota and is also a Pilates instructor. She is the author of several books and dvds including The Ageless Body, The Kettlebell Boomer, and The Kettlebell Goddess Workout.  She has over twenty years of aerobics, weight training and fitness experience, with an additional background in… Read more here.
Filed Under: Kettlebell Training, Tutorial, Workout of the Week Tagged With: Andrea Du Cane, dead stop swing, dead swing, hkc, kettlebell swing, kettlebell technique, kettlebell training, kettlebell workout, kettlebell workouts, kettlebells, RKC, RKC kettlebell training, workout of the week

My RKC Experience

April 22, 2015 By Neal DenHartog 2 Comments

Neal DenHartog Snatch Test

Last weekend I had the opportunity to undertake one of the most rewarding endeavors of my burgeoning fitness career. I attended a three day workshop to become an RKC instructor. I knew going in that it was going to be both physically demanding and extremely educational in terms of refining not only my own technique, but how to teach the skills properly to others. The workshop did not disappoint in either regard and it was easy to see why the RKC is still the Gold Standard when it comes to kettlebell certifications.

I had some reservations going in regarding my readiness. A low back injury in February took away a good chunk of my preparation time. I wasn’t feeling fully recovered until just a week or two out from the weekend. I waited until the last minute to not defer my spot to a later date. If anything, I’m stubborn and when I commit to something I follow through. So, despite my less-than-ideal preparation, I showed up in Ohio ready to learn.

As we met that first day and started introducing ourselves I began to feel even more nervous. Our small class of nine people had pretty diverse backgrounds. Many of them had some coaching experience and most had trained with an experienced RKC instructor. I had done neither and was starting to feel like a bit of an impostor. I was self taught with books, DVDs and good old “YouTube University”, and had been programming my own workouts since January. Was I really ready for this?

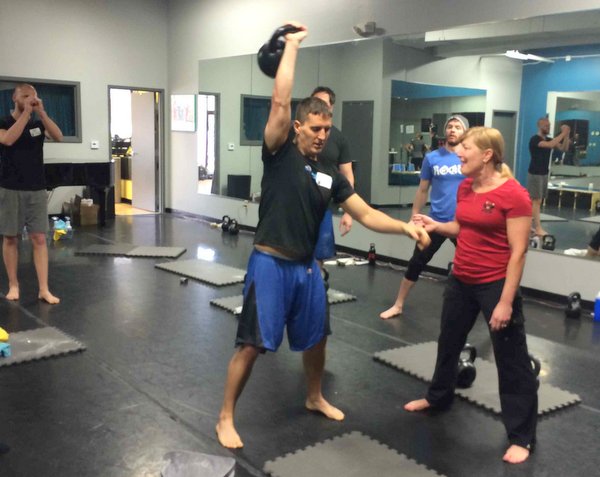
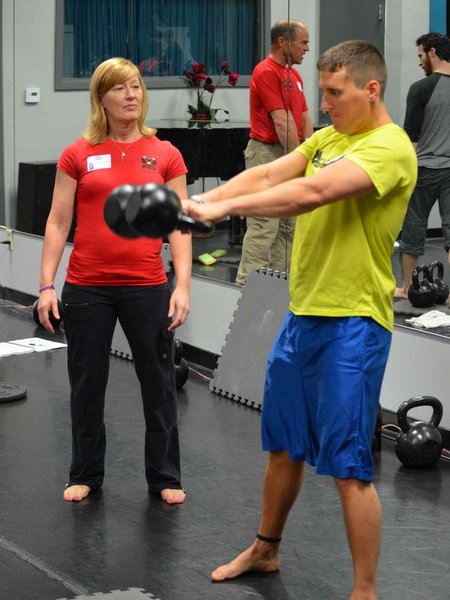
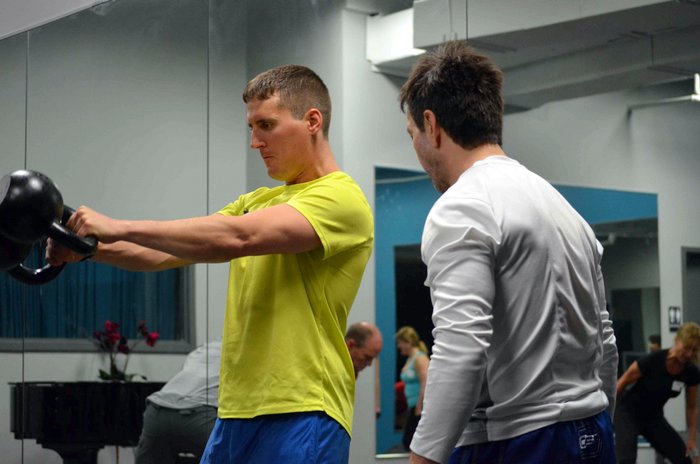
My fears were quickly quelled as we started receiving instruction on the basic skills. I have to hand it to the trio of great instructors–they were able to present the various intricacies of each skill in an easy to learn, and easy to assimilate manner. I had to treat myself as a blank slate and erase all of the bad habits I’d formed over the past year and a half, and then build myself back up according to their instruction. We were presented with a plethora of coaching cues and drills that allowed the refinements to slowly integrate into our form.

By the end of the first day I had survived the endless drilling, a couple of workouts, and felt like my skills were improving to the point that I may just pass some of the tests on the final day. The second day was shaping up to be even tougher, with the vaunted snatch test to be thrown into the middle of more drilling, learning, and workouts.

Lori Crock coaching Neal DenHartog

Waking up sore and tired that second day made the idea of surviving a little more far fetched. This is where the magic of the group mission started to take over. We were all in the same boat. We were all sore and tired. At the same time we were all striving toward a common goal of becoming a certified instructor and that common purpose raised the energy of the group. The camaraderie and support was growing and each of us fed off that energy to push past the points of physical and mental fatigue that were threatening to take over.

None of this was more evident that when it came time to execute the snatch test. The snatch test is a simple, but nasty five minutes of work. The goal: complete 100 snatches in less than five minutes. I had done it a few times in training, but it’s not a test that ever gets easy. Add in the additional fatigue from a day and a half of kettlebell training and it’s no wonder many of us were nervous going in.

We had each other’s backs though. There was hooting and hollering, fist bumps, high fives, and boisterous cheers as each and every one of us passed our test. It was a sight to witness and a testament to the character of each participant.

My test was a struggle, as I knew it would be. Much like my endurance racing career, I went out fast and struggled to hold on in the latter stages of the test. I set the bell down late and had to give myself a mental kick the pants to fight through the fatigue and pick it up to finish my last few reps. I’m not sure how, but I knocked out rep 100 a split second before the timer hit five minutes. Success!

As ecstatic as we all were, there was still work to be done further refining our skills for the evaluation the next morning. I woke up even more sore that third day, but there was a light at the end of the tunnel, with the possibility of fulfilling a dream by the end of the day.

The skill evaluation was nerve-wracking, knowing every minute nuance of our technique was being scrutinized by our instructors. With that over, the focus turned to coaching, where we designed and took both a class member and a brave volunteer from the community through a workout. It was our chance to apply what we had been taught to someone else. Every skill, assessment, drill, cue, stretch, correction, progression, and regression we had learned was at our disposal to create a helpful session.

Neal Den Hartog Kettlebell Swing

To top the weekend off, we ended with our graduate workout. It was a brutal session of cleans, presses, swings, and squats. Twenty-five minutes of shear work, where we were only allowed to put the kettlebell down a couple of times. It was the single toughest kettlebell workout I have been through, and the perfect test of physical and mental strength and endurance. Again, the will and determination of the group carried us through the workout and by the time we cranked out our final swing we knew the hard part was over.

After that it was just a matter of awaiting our results from the instructors. There were more tears, smiles, and hugs from the group as we learned our fate. Unfortunately I did not receive passing marks on all of my skills. In the end the get-up got me, but it’s not the end of the road. I will have a chance to retest and ultimately earn my certification.

I won’t lie and say that I’m not a little disappointed, but looking back at where I was at the beginning of the weekend I’m quite proud of what I accomplished. None of it would have been possible if not for the great leadership provided by Master RKC Andrea Du Cane, RKC Team Leader Lori Crock, and RKC Chris Meredith. Their insight, encouragement, and direction over the course of the weekend was invaluable.

My classmates were equally amazing, contributing to the coaching and encouragement as we progressed. Who knew you could have so much fun during such a draining weekend of work?

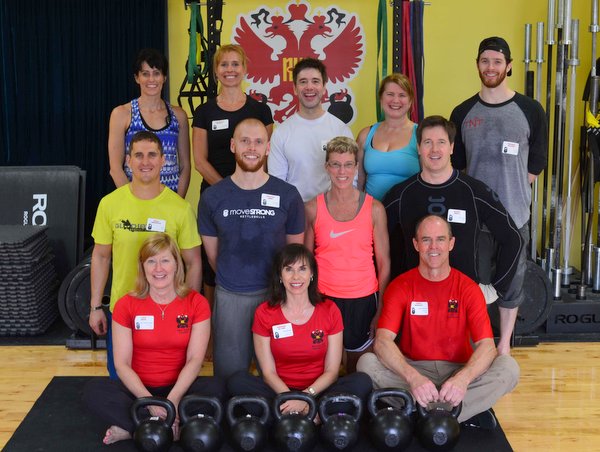
RKC Group Photo Dublin Ohio

I walked away from the workshop with my confidence at an all time high. Although I still have some work to do on my get-up, I know that I can teach these skills to others, and do a good job of it. I no longer feel like an imposter. It is not a question of “if” I will earn my certification.

It is simply a matter of when.

****

Neal DenHartog is an RKC candidate from Ames, Iowa who recently attended the RKC event in Dublin, Ohio. He is currently refining his Turkish Getup in hopes of achieving his RKC within the next 90 days. He can be reached at disturbed275@yahoo.com. His blog is http://iron2ironfitness.com.

Filed Under: Motivation Tagged With: Andrea Du Cane, certification workshop, kettlebell certification, kettlebell snatches, kettlebell training, Lori Crock, Neal DenHartog, RKC Workshop, snatches, snatching, workshop experience

Primary Sidebar

Featured Products

previous arrow
BOOK-RKCBookofSnC
HardStyleKettlebellChallegeDanJohn700
BookCoverMasterTheKettlebell1
RKCiconKettlebell512
KettlebellGoddessdv040
next arrow

Recent Posts

  • RKC Big Six Workout
  • The Kettlebell Swing & Low Back Pain
  • Key Kettlebell Exercises To Help You Create Better Balance
  • How to Most Effectively Use Kettlebells to Meet Your New Year Goals
  • 1 Exercise That Checks All The Boxes
FOLLOW US ON TWITTER!

Archives

Copyright © 2025

Dragon Door Publications / The author(s) and publisher of this material are not responsible in any manner whatsoever for any injury that may occur through following the instructions or opinions contained in this material. The activities, physical and otherwise, described herein for informational purposes only, may be too strenuous or dangerous for some people, and the reader(s) should consult a physician before engaging in them.