• Skip to main content
  • Skip to primary sidebar
  • Home
  • Contributors
    • Matt Beecroft, Master RKC
    • Martijn Bos, Master RKC
    • Andrea Du Cane, Master RKC
    • Angelo Gala, Master RKC
    • Chris Holder, Master RKC
    • Steve Holiner, Master RKC
    • Dan John, Master RKC
    • Mike Krivka, Master RKC
    • Thomas Phillips, Master RKC
    • Robert Rimoczi, Master RKC
    • Phil Ross, Master RKC
    • Max Shank, Master RKC
  • Workshops
    • HKC Workshops
    • RKC Workshops
    • RKC-II Workshops
  • Find an RKC Instructor
  • Resources
    • Articles
    • Forums
    • Kettlebells
    • Products
  • Blogs
    • PCC Blog
    • Strong Medicine Blog
  • Archives

RKC School of Strength

Official blog of the RKC

Quiet Coaching Lends Itself to Loud Results

August 20, 2014 By Nick Lynch Leave a Comment

Nick Lynch Training With Lawrence Dunning

By definition ‘coach’ and ‘bully’ are seemingly opposites—a coach is a teacher, while a bully intimidates. Yet, there are many coaches that haven’t triumphed over the juvenile act of bullying. I’ve certainly had a coach who (in an effort to gain my respect) bullied me. If a coach uses intimidation tactics to scare you into respecting their methodology, I can guarantee the coach hasn’t earned your respect and will lose their students and athletes to another team or organization.

Many of the athletes I mentor first entered my studio with downcast eyes, slumped shoulders and a sense of fear. Why? It’s evident that somewhere in their athletic careers, these athletes had a coach who filled them with doubt rather than confidence. These talented students and athletes should be fearless, skilled and motivated. Any coach can aggressively yell or throw tantrums in a fit of rage to get the attention of a pupil. But, what’s the true cost of antagonistic coaching?

Remember Rutgers’s ex-coach Mike Rice? Rice’s coaching style led to an overall losing record. Since then, many studies have been done on the effects of aggressive coaching techniques. Studies have shown between 45%-50% of teachers and coaches bully students and/or athletes. Head of the Rice studies, Dr. Joseph P. Mazer comments, “The research we found now lends in many ways empirical support for the fact that athletes were transferring out of Rutgers because they may have been reacting negatively to Mike Rice’s behavior as a coach and were significantly less motivated and as a result did not want to be on the team.”

A coach who’s earned a high level of respect from colleagues and athletes doesn’t have to a rarity. To gain respect, a coach must show respect. Respectful coaches have winning records and yield amazing results. They tend to focus on the big picture. Duke University’s Mike Krzyzewski illustrates this, “The thing I loved the most—and still love the most about teaching—is that you can connect with an individual or a group, and see that individual or group exceed their limits.” Krzyzewski is known to associate with his athletes on a personal level; he’s not only a coach on the court but also a coach in life. Krzyzewski knows if athletes are strong, confident and motivated they’ll be more likely to perform optimally. He is also the NCAA’s all time most winning coach for Men’s Division 1 Basketball.

If you come across a bully coach, instructor or teacher it may be time to make the necessary adjustments in your career and find a different mentor. That said, it’s of utmost importance to leave in a cordial manner. Don’t depart a bully as a bully. These coaches may lack tact, empathy and compassion but they can still offer valuable knowledge. If you find yourself in an abusive coach-to-student relationship, take all the applicable information and respectfully find a more conducive environment for your aspiring athletic career.

A respected coach exposes an athlete’s weaknesses only to make their weak points strong. They will offer constructive criticism. They will listen. They know when to turn up the intensity and will yield when necessary. They will demonstrate tact and great knowledge. Most importantly, they will function under pressure with an unsurpassed calm.

The bottom line? Treat your students and athletes with respect if you want to be respected. Use your incredible knowledge and unique training techniques as a quiet professional and your students will undoubtedly succeed.

Learn more about successful coaching techniques:
Duke Coach Mike Krzyzewski on His Motivational Techniques
The Power of Positive Coaching

Learn more about the Rice studies and antagonistic coaching:
Clemson Study: Aggressive Coaching isn’t the Best Coaching
The Consequences of Verbally Abusive Athletic Coaches

***
Nick Lynch is a Strength and Conditioning Coach at Milwaukee School of Engineering University (MSOE). He owns Superb Health Milwaukee, a kettlebell studio in Milwaukee, WI. Most recently, he became an RKC Team Leader. He has 13 years of full-time training and coaching experience and a lifetime of wellness education. Nick lives in Milwaukee, WI with his wife Natalie and son Weston.

Filed Under: Coaching Tagged With: Athletic Training, Coaching, mentoring, Motivation, Nick Lynch, Successful Coaching, Training Athletes

Using DVRT Training to Improve Your Turkish Get-Ups

August 13, 2014 By Steve "Coach Fury" Holiner 2 Comments

Coach Fury Kettlebell Get-Up

It’s time for another fitness tip from your man Fury. The Turkish get-up is one of my all time favorite lifts. The relative simplicity and overall impact of the TGU make it an absolute desert island movement in my book. Few things get me more excited than a beautifully executed TGU (especially when heavy). Sometimes we fall short of beautiful and need to think “out of the box” on how to hit that high standard we strive for. This is where Dynamic Variable Resistance Training (DVRT) and the Ultimate Sandbag (USB) comes into play.

Coach Fury TGU with Human Weight
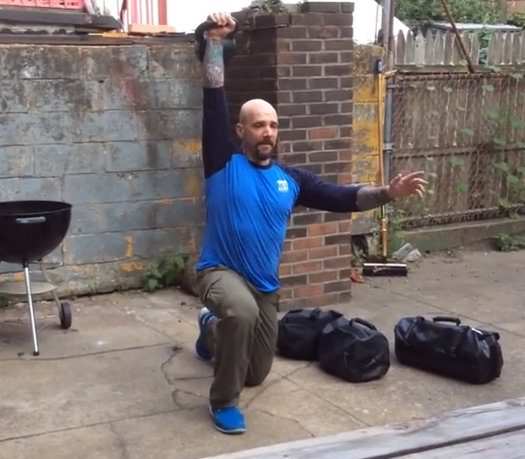
Personally, I find the three hardest parts of a get-up (regardless of weight) to be the initial roll to elbow, the half kneeling to stand and the final roll from elbow to your back. Whether it’s a kettlebell, barbell or the occasional human being (not recommended), I usually know I’ll make it (or come close) if I get to the elbow. The half kneel to stand will usually by my next sticking point. The roll back down from the elbow is often more nerve racking from a self preservation standpoint.

I think most will agree with me on these three positions within the TGU sequence. Here are three DVRT Ultimate Sandbag Training exercises that will help the cause.

1. Ultimate Sandbag TGU. In the DVRT TGU, the USB is loaded over the shoulder and it will drape over part of the back and chest as you move. Some key points here. Being shoulder loaded removes the leverage generally provided by the locked out arm of the kettlebell TGU. The USB is literally pushing you directly into the floor while sand in the front and back of the USB is pulling downward too. The USB is doing it’s best to keep you on your back. What’s awesome about this, is that you truly have to develop the rolling pattern to get to the elbow. You are forced to get that proper diagonal roll from the shoulder to opposite elbow. Given proper thoracic mobility and the ability to lockout the arm, a kettlebell TGU to elbow will feel easier after nailing this down. This delivers the same payday on the descending elbow to back roll. The USB TGU also removes all fear of dropping a bell on your head while training the roll to and from elbow. Strength+Safety=Glory.

2. USB Lateral Lunges. Damn you sagittal plane! That half kneeling lunge to stand is a stability monster when you’re doing a TGU. Sometimes, instead of stepping back from a problem it is best to step sideways. There are a bunch of killer USB Lateral Lunge exercises and any of them will help with your half kneel to stand. Training your lunges within the frontal plane (side to side) will help you build some untapped stability. Spend some time with USB Lateral Lunges and watch how your half kneel to stand becomes a thing to be feared.

3. Rotational Lunge. This move delivers similar benefits to the lateral lunges but now we’re moving in even more plains of motions. Transverse much yo! This will bullet proof your TGU. Ever feel those legs and hips wobble under a heavy getup? Get good at rotational lunges with a USB and see how they feel know. The RT adds another killer bonus: by snapping the hips similar to a swing, but within a lunge pattern, you will very likely find it easier to simply stand up a helluva lot quicker in your TGU.

Now those are three ways to use DVRT/Ultimate Sandbag Training to help your Turkish get-up. I’d bet these lifts would help your deadliest, squat and press too. Doubt me? Try it. These aren’t meant to be quick fixes or voodoo tricks. Step away from your TGU for 1-3 weeks and focus on one or more of these DVRT exercises. Then check out their impact on your TGU and smile big in the post PR selfie you just took.

Please keep me posted on your progress.

I suggest digging deeper into the DVRT Training system by attending a workshop or one of our certifications. Click here to find dates and locations. Yours truly will be leading a DVRT Level I Cert and an HKC Kettlebell Cert at Kathy Dooley, Joe Boffi and Jason Kapnick’s place Catalyst S.P.O.R.T. in NYC on November 1 and 2nd. You can register for one or both (big discount on both) through the link.

I hope to see you there.

-Fury out

Steve “Coach Fury” Holiner, DVRT Master Instructor, Senior RKC, Original Strength Instructor, is a proud member of the Ninja Army training staff at Mark Fisher Fitness in NYC. Fury is available for classes, semi-privates, instructor training and programming at MFF. He also has availability for private training at Five Points Academy and Catalyst S.P.O.R.T. Check out www.coachfury.com, facebook.com/coachfury and Twitter @coachfury for more info.

Filed Under: Tutorial Tagged With: Coach Fury, corrective exercise, dvrt, get up, how-to, Kettlebell, Steve Holiner, turkish get up, tutorial, video tutorial

Elite Abs: “Hollow Body Lat Pull” (Part 5 of 5)

July 30, 2014 By Keira Newton 1 Comment

Master RKC Keira Newton explains how to apply the hollow position on the pull up bar

The final installment of Master RKC, Keira Newton’s Elite Abs video series–how and why to apply the hollow position on a pull up bar.

***

Master RKC, Level 3 Z-Health, MCT. Keira first picked up a kettlebell in 2005 when her husband challenged her to stop laughing and start swinging. She stuck with the challenge when she realized that she could get an all-in-one workout in a fraction of the time she spent at the gym. Keira was convinced… Read more here.

Filed Under: Uncategorized Tagged With: abdominal exercises, abs, elite abs, hollow position, Keira Newton, tutorial, video tutorial

7 Fun and Whimsical Kettlebell Workouts to Burn Fat and Build Muscle

July 23, 2014 By Pat Flynn 1 Comment

Pat_Flynn_Dust

Yesterday, in the sultry middle of the afternoon, I went outside to do some sprints. There is a hill in the far corner of my neighborhood of the perfect gradation for this kind of work, and at the top, standing all alone, is a tree. After my rounds, I inspected the tree and made the wonderful discovery that this loveliness was a producer of blackberries, fresh, dark and delicious. I picked some, and ate. The verdict was that they were of top quality, and not costly; so I thought I’d gather two or three bunches, carry them home, and making an honest pie out of my efforts, but at the last minute decided against it. Pie is no good.  Too much sugar, too much work, and I don’t know the first or last thing about baking.

I unquestionably detest the fuss of baked goods, all the measuring that goes along with it. It is too much of a meticulous science for me—I need something that will give me the room to wiggle when I need it, or the ability to make things up as I go along without the promise of dismal results.

Today, and everywhere, all the people are training, following a strictly periodized program, and adhering to their charts and tables of statistics. Everything is baked goods—all the ingredients, now, are measured meticulously; the sets, the reps, and the time between exertions—and nobody has done a whimsical workout in years. Because nobody, so far as I know, has been given the permission to simply throw a bunch of exercises into a skillet and see how it turns out. Even CrossFit, the proposed inventor of stir-fried exercise (proposed…), well now all of them are following some sort of granular programming, too (I would say something further about that here, usually, and then regret it later).

I thought the purpose of exercise, like cooking, was meant to be fun. It’s the whimsy we are missing, now, and it’s the whimsy that can breathe freshness into an otherwise very stale exercise routine. Having said this, I am not against structure of any kind. I measure out ingredients for myself, certainly I do it for my clients, and I bake things—but every so often, like yesterday, I take out the skillet and see what I can come up with on the spot.  My creation wasn’t bad either. Sprints and hindu push-ups, ten rounds, resting as little as I needed between efforts. Could have used a little more heat, I think, but overall I was pleased with the dish.

What I say is pretty true. Whimsy has its proper place in training, and can be used usefully. The best place for it, by the way, is for your fat burning stuff. Strength work should be kept largely repetitious, and maybe even a little bit boring—but your conditioning! Ah, yes, your conditioning indeed! Well spruce that right up why don’t you? Throw in some red pepper flakes, a little splash bourbon even, and from time to time, feel free to go out on a limb and invent something new entirely. Mostly when I’m doing it—improvising, that is—I take the same, few basic ingredients (the fundamental human movements: push, pull, hinge, squat, core), and tinker with their ordering and dose. Rarely do I cook with any thing exotic as I’m somewhat cowardly, but maybe you will?

What follows are seven of my more whimsically put together kettlebell complexes. They’ve gained honorable mention here for being well-mannered, even-tempered, thoughtfully assembled, and worth doing.

–          Pat

PS – If you enjoy these workouts and kettlebell complexes, I have 101 more of them which you can get HERE, free of charge.

Double Kettlebell See-Saw Thrusters

Grab two bells: males use 2x24kg, females use 2×16. Then, clean the bells into the rack and perform the following:

1 squat to overhead press (right)

1 squat to overhead press (left)
1 squat to overhead press (right + left)
1 squat to overhead press (right)

1 squat to overhead press (left)
1 squat to overhead press (right + left)

Set 15 minutes on the clock, and gather as many quality rounds as you can.

The “Cardio” Workout that Builds Muscle

This I scrapped together on the spot when the strong and lovely Jen Sinkler came down to hang out, swing bells, and eat oysters with me.

Full Body “Girls Gone Strong” Workout

I can claim no credit for this as Molly either zipped it together on the spot or pulled it from out storage, I never asked which.

She explains the need to know in the video.

How to Crawl Your Way to Better Fitness

It was chilly weather when the Aleks “The Hebrew Hammer” came to town, but we were excited to see what the mixture of our demented brains could come up with.

The Beastmother

Fred, the groundhog who lives outside of the Dragon Gym, who is twenty pounds overweight and looks like an objectionable dog, waits in high anticipation each year for the budding of the peach tree. I was going to say Fred inspired this workout, but he really had nothing to do with it.

A Workout of Just Swings and Goblet Squat


A Complex of Uneven Proportions

This workout requires two bells of opposing sizes—for males I suggest a 24kg and a 16kg, for females a 16kg and an 8kg.

1 double swing
1 double clean
1 double press
1 front squat
2 double swing
2 double clean
2 double press
2 front squat
3 double swing
3 double clean
3 double press
3 front squat

Again, like all the other workouts (unless otherwise noted) set 15 minutes on the clock and accumulate as many quality rounds as you can.

***

About Pat Flynn:  Pat Flynn is a certified Russian Kettlebell Challenge instructor, fitness philosopher, and 7th degree blackbelt in hanging out. Pat is the founder of ChroniclesOfStrength.com and chief contributor to the Chronicles of Strength Inner Circle where he shares his best ideas on how to chop fat and multiply muscle through kettlebell complex training. Pat also offers online coaching. It’s expensive, and certainly not for those who are fragile by nature. Email Pat at PatFlynn@ChroniclesOfStrength.com with the subject line of “online coaching” to learn more.

Pat_Flynn_usual

Filed Under: Uncategorized Tagged With: exercise programming, Kettlebell, kettlebell complexes, kettlebell workouts, Pat Flynn, short workouts, workout variety, workouts

Put your pistols down!

July 16, 2014 By Max Shank Leave a Comment

The pistol has long be heralded as the king of bodyweight leg exercises. In some regards, rightfully so, it requires an incredible amount of mobility and stability in the ankle, knee, hip, and core. It is an impressive demonstration of these qualities–but is it the best way to train your legs?

Max2 (1)

The answer is that it depends.

One thing that I always try to do is identify what the goals, and the natural trends of the average exerciser. We can assume that the goal of the exercise is to improve strength and flexibility in the lower body on one leg without the use of heavy external load. I would hope that the goal is always to move better and become more athletic as well–this is something we put a lot of emphasis on at the RKC, being a complete, well-rounded athlete.

The natural trends that exercisers and athletes alike fall into are that of a body that spends too much time in a seated position.

Bad_posture

If the goal of exercise is improvement, then the effects of excessive sitting must be counteracted.

The main effects are as follows:

  • Loss of hip extension
  • Loss of ability to disassociate hips from each other, and trunk
  • Loss of thoracic extension
  • Stiffness in cervicothoracic junction (where neck meets back)

Even in a well executed pistol, the posture of the thoracic spine is nearly always caved forward (forcing the neck to make a sharp turn in relation to the spine), and both hips are in flexion–not off to a fantastic start. These issues aside, the pistol is still a terrific measure of relative flexibility, which is why it is included along with appropriate flexibility drills and progressions in RKC Level 2. Being able to do a pistol should be the goal, not necessarily making them a cornerstone of your training.

A better solution exists, and that is the airborne lunge. It’s the single leg exercise that everyone forgets about, and it has secret benefits that the pistol does not have.


As you can see in the video above, in the bottom position, one hip is in flexion while the other is in extension (just like sprinting, walking, etc). The posture is significantly improved and there is no spinal sharp turns. You will also get a little more overall hip mobility and glute activation when doing airborne lunges. Lastly, the airborne lunge is also much easier to load up to a heavy weight. My two favorites are with double kettlebells in the rack and a barbell held in the zercher position if you want to go exceptionally heavy.

Get stronger, run faster, all while increasing flexibility and movement quality–the airborne lunge is a win-win.

***

About Max Shank, Master RKC: Max Shank is not only an extremely gifted teacher, but one of the most well-rounded and capable athletes in the world. From excelling in Muay Thai and Jiu Jitsu to performing impressive feats of strength in weightlifting and gymnastics, Max has… Read more here.


Filed Under: Uncategorized

Dirty Dozen Move # 10: The Pull Up

July 9, 2014 By Phil Ross Leave a Comment

IMG_1939There is no other single barometer for upper body, bodyweight strength more accurate than the Pull Up. Many other tests are rendered useless after the Pull Up is employed. Think about it, have you ever met someone who can do 20 Pull Ups, yet has a weak core? How many people that can execute 20 Pull Ups can’t do 50 Push Ups? It boils down to this simple axiom, if you can move your own bodyweight a full arm’s length, a substantial amount of times (10 to 20 repetitions), you are strong.

Who can do Pull Ups? Where do I start? How do we get to this point? How far to we take it? What are our limitations?


Virtually anyone can do Pull Ups. You are probably saying to yourself that “I’ve lost my mind.” Well, maybe so – but that has nothing do with most people’s ability to perform some type of Pull Up and significantly increase their Upper Body Strength. I train a number of fighters and other highly competitive athletes, but we are not going to focus on them. Instead, we are going to consider my student that suffers from spina bifida as well as students enjoying their later years in life. When she first came to train with me, she was using a walker to get around after suffering through an accident which resulted in her requiring surgery. After 4 months of rehabilitation at a PT center, she was at a stand still as was very frustrated.
 
On the recommendation of her physician, her father brought her in and I honestly didn’t know if I would be able to help. She told me what was being done for her in therapy and for some reason her core strength was not being addressed. The Physical Therapists were treating her body as if it were a set of disconnected parts. I decided to work her from her core out. This included what I call Plank (PCC Terminology – Down Under) Pull Ups as part of the routine. We trained three times a week and within 6 weeks, she was walking without a walker, driving her car and could even carry a pizza from her car into her apartment!
 
I also have a few students over the age of 60. They came in with very little upper body strength. I started them in a doorway hanging onto the door jam while standing almost upright. Shortly thereafter they were on the Smith Machine performing Plank Pull Ups at various heights. Will they ever be able to do a full, neck to bar Tactical Pull Up? Probably not, but who cares? They have and will continue to grow stronger and live better with their new found strength. Both of these students feel better and are more empowered.
 
So, yes – virtually anyone can do Pull Ups! 
 
If you are not an extreme case, I would recommend that you start by using the Plank (or Down Under) Pull Ups. Once you are able to perform 20 repetitions at hip level, while touching your chest to the bar, you are ready to move overhead. The Pull Up Protocol in the Convict Conditioning book is excellent. For a quick read, feel free to read my Greasing the Groove blog regarding my use of Pull Ups to rehabilitate myself after having neck surgery on four vertebra. I chronicled my progress and wrote the blog shortly after I had completed my self administered rehabilitation.
 
There are a great variety of Pull Ups that one may perform. I would consider The Standard to be an Overhand, Tactical Pull Up. Thumbs over the bar, body straight, clear the bar with your chin well over the bar (men to their Adams Apple) so that your neck can touch the bar. There should be no “kipping” whatsoever, that does not produce strength. The Chin Up version would have the same components except no thumb-less grip is required and your palms face you. Due to the increased involvement of your biceps, this version is a bit easier than the palms facing away Pull Up.
 
It’s up to you how far you’d like to take your Pull Up training. There are Uneven Pull Ups, Archer,  One Arm Pull Up (Ultimate Display of Strength), Offset, Weighted, Levers to name a few. It’s best to mix them up and be certain to “de-load” your forearms. Practice plenty of Push Ups and Handstand variations as well as exercises to stretch the extensors and flexors of the forearm. Be cautious with loading up too quickly, you want to avoid damage to the connective tissue of your elbows. I would also strongly recommend that you cycle the variations and the volume of your Pull Up practice throughout the year.
 
There are additional methods to produce strength for your Pull Up. Bent Over Rows with a Kettlebell, Barbell or Dumbbell. The Flexed Arm Hang, with either the Down Under or Standard Pull Up. I will usually incorporate these at the end of my last set. Once I’m at 80-85% of my maximum, I hold the top position of the movement for varying amounts time.
 
Enjoy your Pull Ups! Have fun incorporating them into your routine.
 
Strength & Honor
Coach Phil
 
IMG_1940

***

About Master RKC Phil Ross: Master RKC, 8th Degree Black Belt, Specialist in Bodyweight Strength, PCC and CK-FMS Certified. His name is synonymous with Martial Arts and Fitness. He is known as the area’s Kettlebell King and has successfully competed on the National Level in…  Read more here.


Filed Under: Uncategorized

RKC Kettlebell Hinge Analysis

July 2, 2014 By Mike Krivka 5 Comments

Krivka_teachingOVERVIEW
There are six basic movement patterns : Push, Pull, Squat, Hinge, Carry and Groundwork (i.e. Turkish Get Up, Rolling, etc.).  A thorough understanding and utilization of these movement patterns will make you an exceptional athlete, a better rounded coach or trainer, and will allow you to move and grow old gracefully – which are no easy tasks.  Tens of thousands of words have been written in regard to Pushing, Pulling, and Squatting; of late the Hinge, Carry and Groundwork have started to get some well deserved attention as well.  Among all of the writing there are some real gems of information and guidance as to how to effectively implement the movements and safely execute them.  One area that is referenced a lot, but not clearly defined and explained, is the Hinge.  The Hinge is the basis for most of the Kettlebell techniques as well as the foundation for the barbell Deadlift. While it is being taught and practiced by athletes and clients every day there are still some issues with executing it safely and efficiently.  The following several paragraphs are my attempt to clarify some “gray areas” regarding the Hinge.

A HINGE IS A HINGE… OR IS IT?
There is a lot of confusion as to what a Hinge is and what isn’t.  If you spend any time on YouTube (and I do) you will see a wide variety of examples what people are doing that looks like a Hinge but in reality is something completely different.  Let’s define the Hinge first and see if we can identify where people go wrong.  First – a Hinge is not a Squat (but the Squat has a Hinge component; we’ll get back to this later on). The Squat requires maximum flexion of the Ankle, Knee and Hip and puts the butt parallel or below parallel. Second – the Hinge is not bending over or what some people call “The Sippy Bird”. Bending over requires that the Hip flexes and the head travels forward over the toes.  This type of Hinge presents itself with people who are trying to “pull” the Kettlebell or Bar.  Third – the Hinge is not done with a straight back – meaning upright, but a flat or neutral spine.  When you do the Hinge, the backin its entirety, needs to stay neutral or flat in order to not only protect it but to “stack” is so that you can transfer power through it.

So we have three things that the Hinge isn’t – so what is it?  The Hinge is a loading position that allows you to maximally translate energy from the ground via a ballistic extension of the ankles, knees and hips. This ballistic extension can then be translated into movement of the body or a secondary object like a Kettlebell.  There are a laundry list of variables that will affect the volatility of your Hinge (and yes it should be a “violent” extension” but I’m going to save that for another RKC Blog posting).  What I want you to imagine that the Hinge should be the position you feel that you can get the most drive or explosion out of.  Think “jumping over a building in a single bound” and you’ll get what I’m talking about.

LEADING WITH YOUR HEAD
Here’s the nitty gritty about the Hinge: it’s all about initiating, generating power, and transferring power.  And guess where the biggest errors occur? You’d think it’s with generating and transferring – but it’s actually on the initiation.  You see when most people do the Kettlebell Swing (or Clean or Snatch for that matter) they explode out of the Hinge position leading with their torso and head (back to that Sippy Bird” thing).  Don’t believe me?  Then try the simple test outlined in the video below.  The first demonstration shows the athlete trying to pull their way out of the Hinge position.  This position is so weak that light pressure on the head stalls the whole body.  The second demonstration shows the athlete driving up from the ground using their legs and finishing with a powerful Hinge movement. The presence of my hand on the top of the athletes head doesn’t deter them at all.

What you are going to find is that many of your athletes and clients are paying lip service the Hinge but are actually generating power through their lower back and acceleration of their head.  It’s going to startle many people when you are able to stop them dead in their track with gentle pressure on their head; careful when you try to demonstrate this because you can easily tweak someone’s neck or back if they try to “fight” their way through the obstruction.  Here’s the thing – you can train the Hinge in this manner and get reasonably strong and stay injury-free for a long time.  But… and it’s a big one… you are not going to be able to generate as much power as you could if you don’t learn to initiate and follow through with the Hinge  from the ground up.

Think about the Hinge this way: the best way to generate power is from a fixed object outward or upward (like the ground).  If you are initiating your Hinge by driving off the ground with an explosive push from your feet, the force will be transferred though the ankles to the knees, the knees into the hips, and ultimately into the Kettlebell.  This is generating power in one direction.  If you are inadvertently generating force by using your lower back and head (once again think “Sippy Bird”) then you have force being generated both upward towards the head and downward towards the ground and only a percentage of that will be able to be transferred into the Kettlebell.   Once again – watch the simple hands-on test and cueing that I demonstrate in the video and you’ll see that the most efficient and powerful way to create force in the Hinge is through initiating through the ground up.

WISDOM FROM A MASTER
Marty Gallagher is a master in the realm of strength.  He has made a career out producing world record holding athletes, writing about the iron game (have you read his opus “The Purposeful Primitive”?), and working with Tier One Special Operators.  To say he knows what it takes to be strong and get strong would be an understatement.  I’ve had the pleasure of sitting down and talking about strength training with Marty on a couple occasions and I always come away with insights that are light years away from where I currently am.  For instance, we were talking about Barbell Deadlifting (DL) and how many of the current crop of DL’ers you see start way too high and are facing down when they initiate the movement.  Sure, you can get the bar moving there but you’re never going to reach your potential using that technique; not to mention you are putting unnecessary stress and strain on your back. According to Marty the best “pulling position” for the  Barbell DL is the shins and the torso at almost the same angle – this allows you at to drive off the ground with the legs (squatting) and then transferring the load into the Hinge to complete it.  Once again – the Hinge completes the movement; it’s not the whole movement.

So how does this apply to the Hinge in regards to the Kettlebell? Directly! Do not pass Go, do not collect five hundred dollars! While pulling a heavy barbell Deadlift and performing a heavy Kettlebell Swing may look radically different they have a lot of similarities (and several differences). If you look at the Hinge from this perspective it will radically change how much more force you can generate (using the biggest muscles and drivers in your body) and will lessen your reliance on using your arms to move the Kettlebell. Several things that make a difference between the two are the position of the load during execution.  The barbell has no choice but to stay in front of the shins during the movement; this will change not only the loading but also affect the angles of all of the major joints.  With the Kettlebell you have much more latitude for positioning the load (those pesky shins don’t get in the way) and you can put it between and behind your feet to allow a more direct and powerful loading of the hips, glutes and hamstrings.

Don’t let my explanation of the positioning on the barbell Deadlift and Kettlebell Swing confuse you!  The point I am trying to make is that when you are practicing a technique that utilizes the Hinge the key factor is how you are initiating the movement.  Are you driving through the Hinge from the ground up or are pulling through the Hinge with your arms and head?  There is a HUGE difference and the results are profound…

CONCLUSION
What I’ve outlined above may be common knowledge to some and, even after a video and over a thousand words, will still be a mystery to others.  That’s okay!  Watch the video, re-read the above post and see if you can work out the specifics on your own or via experimenting with your athletes or clients.  The purpose behind the test I demonstrated is not to frustrate or confuse you – it’s to show you a simple and effective way to ensure that your athletes or clients are using the safest and most effective way to generate power for Kettlebell ballistic techniques.

Thanks for your time and attention and I look forward to your feedback and questions!

***

About Michael A. Krivka, Sr. – Senior RKC: Michael A. Krivka, Sr. is a Washington, DC native who has been involved in Kettlebell training for over a decade and is currently an RKC Team Leader and member of the RKC Board of Advisors and the RKC Leadership Team under Dragon Door (where he has been listed as one of the top reviewed RKC’s in the world for the last five years). He is also the author of a bestselling eBook entitled “Code Name: Indestructible” and is in the process of finishing up several other eBooks on Kettlebells, body weight, and the integration of other tools into an effective strength and conditioning program. Mike has traveled extensively throughout the United States teaching Russian Kettlebells to military (USMC, USN, USA and USAF) and law enforcement personnel (FBI, DEA, USSS and CIA)… read more here.

Filed Under: Uncategorized Tagged With: entry level, fitness instructor, get up, goblet squat, Hardstyle, hkc, instructor training, Kettlebell, squat, swing, turkish get up, workshop

Why are you working out?

June 25, 2014 By Jay Armstrong 1 Comment

Seesaw Press 2 - Red Shirt
Could exercise be fun and help you undo the dysfunction of your daily non-activities?

Most people treat exercise like it is a bad tasting prescription from the doctor.  They HAVE TO do it because someone told them to do it.  And what exactly are they supposed to do?  Well, of course they need to get into shape, because if they get into shape they will reduce their risk of heart disease, cancer and premature death.  At all costs we must avoid death.  Bad news happy campers and kiddie troupers.  It ain’t gonna happen.  For most of us … death is unavoidable.

Here is an alternative plan.  Exercise, work out, train, or play with the purpose of feeling better and being able to live life more fully.  Make yourself strong and mobile and develop some endurance.  As a result of your continued exercise program you should be able to engage in whatever physical activities give you joy.

If you are an American, you probably spend a lot of time at a computer, much of your day sitting at a desk texting, typing, or on the phone, and hour upon hour riding in a car.  As a result of these many cumulative hours spent sitting on your all-too-wide and weak butt, you may be ill equipped to engage in many intense exercises for 1 hour, three times per week.  This amount of exercise will probably not significantly change your weight.  (That is mostly about diet and hormones.) These exercise programs may in fact cause you more harm than good.  Furthermore, the thing you most need is to UNDO the damage done by the hours of maladaptation that is caused by sitting.

jay_thoracic_spineWhat kind of bad stuff is happening to your body and to your natural athleticism as a result of all this seated work?

  1. While you are seated your glutes are generally turned off (as are your abs).  So when you stand your hip flexors will seem overly tight and your pelvis will tip forward.  This puts stress (and excessive curvature) on your lower back.
  2. While working on the computer, your chest is collapsed (adversely affecting your breathing) and your shoulders are rounded forward.  This causes your upper back (or thoracic spine) to become stuck and excessively curved in the opposite direction of your lower back.
  3. Your eyes are fixed on a computer screen in an intermediate distance.  Your inner ear (responsible for balance and coordinated movement) is not being challenged because your body is not changing position.

So, consider this…  Choose some fun and engaging exercises that will help offset or counteract the ill effects of the daily desk job demise.

The kettlebell could be the training tool you have been looking for that will help you begin your rehabilitation.  Unlike most exercises on machines in a gym, kettlebell training requires you to stop sitting and stand up.  This might be the very first step to improved posture and a better you!

The kettlebell swing, the most fundamental move of the RKC system, includes a strong contraction of the glutes at the top of the swing.  This “hip-snap” helps open up the hip flexors and helps teach the athlete to once again contract the glutes during loaded movement.  The kettlebell swing and the lunge position of the Turkish getup both work to open up or release your tight hip flexors.

Putting a kettlebell overhead will help mobilize your upper back (or thoracic spine).  The kettlebell press, the kettlebell snatch, and the Turkish getup all involve movement with a weight overhead.  You must develop a strong, braced posture and a lengthened, erect spinal position to master these techniques.  Once your thoracic spine is mobile and you can neutrally align your pelvis, you are well on your way to improved posture and reaching your next level of athletic performance.

Your vision and vestibular system (the inner ear) will be stimulated whenever you move the torso.  This occurs when you turn around, bend over, lie down, stand up, etc.  The kettlebell swing and the kettlebell snatch both involve a hip hinge and a tipping forward of the torso.  This action will provide a significant amount of sensory input to the brain from the vision and vestibular systems.  An even greater challenge is provided to your balance and sense of 3D orientation while performing the Turkish getup.

The best exercise program for most people is one that UNDOES the damage caused by lack of daily mobility and the hours of our seated work.  Exercise programs must make you feel better, move better, and be able to handle the daily demands of life.  If you workout program isn’t fun, you probably will not be able to sustain the practice for a very long time.

Kettlebell training is fun and challenging and is an engaging skill practice.  Regular practice of the basic kettlebell drills will help you undo some of the damages of the standard American working environment.

***

Jay Armstrong is a Senior RKC, 6 Degree Black Belt TKD, and Master Z-Health Trainer.  The past 30 years have been dedicated to helping others develop confidence through increased strength and pain-free, exceptional mobility.  His quest for knowledge continues.  He runs The Kettlebell Club in Houston, Texas and can be reached here.

Filed Under: Uncategorized Tagged With: exercise, Jay Armstrong, Kettlebell, kettlebells, senior rkc, thoracic spine

Elite Abs: “Hollow Plank Positions” (Part 4 of 5)

June 18, 2014 By Keira Newton Leave a Comment

Master RKC Keira Newton performs a plank

Master RKC, Keira Newton continues her series on how to use your new “hollowed out” position with more advanced plank variations.

***

Master RKC, Level 3 Z-Health, MCT. Keira first picked up a kettlebell in 2005 when her husband challenged her to stop laughing and start swinging. She stuck with the challenge when she realized that she could get an all-in-one workout in a fraction of the time she spent at the gym. Keira was convinced… Read more here.

Keira_thumbnail


Filed Under: Uncategorized Tagged With: abs, elite, hollow plank, Keira Newton, master rkc, plank

Why The Double Kettlebell Push Press

June 12, 2014 By Aaron Pierson Leave a Comment

aaron_pierson_dbl_kb_pushpress
Aaron Pierson performs a double kettlebell push press.

The double kettlebell push press may easily be one of the most under-used skills when it comes to training clients. In many circles it’s become known as the “cheater” press or the equivalent to a kipping pull up. For some individuals the push press may not always translate over to a stronger strict press and because of that, many people feel it’s a skill not worth working on.

Most people would agree that the best way to improve a strict press is to work the strict press on a regular basis. What about those who are not concerned with max strength or those who have a history of shoulder injuries? How about the athlete who needs to focus on strength endurance or power rather than raw strength? For those people, the push press may be the perfect answer.

The push press and the strict press have similarities. Both require an appropriate degree of shoulder mobility as well as core and shoulder stability. However the push press offers many qualities the strict press does not offer.

  1. The push press allows a heavier working weight and/or higher repetitions. Consider a person working the strict press with a basic ladder of 3 x (1-2-3-4-5) for a total of 45 reps with double 24kg kettlebell. That same person can nearly triple the amount of work completed with the same weight using the push press ladders of 3 x (2-4-6-8-10).
  2. Another benefit often forgotten about with the push press is the utilization of the legs. Instead of initiating the movement from the upper body, the push press utilizes the legs as it’s driving force. Add a clean between each push press and you have a very powerful full-body workout.
  3. The third piece the push press can offer is shoulder protection for those with a history of shoulder problems. Obviously this is dependent on shoulder mobility and injury history but let’s face it, not everybody is built to overhead press. In this case the push press may be the better alternative considering it bypasses the most risky part of the overhead press.

When building a program for yourself or clients, keep the big picture goal in mind. If the goal is to improve GPP, lose weight, increase muscle mass or increase power, the double kettlebell push press should be considered a top candidate for exercise selection.

***
About Aaron Pierson RKC Team Leader: Aaron has been apart of the RKC since 2010. He currently works full time as an EMT and owns Fundamental Strength in Fort Collins, Colorado. He can be reached at [email]aaron@fundamentalstrengthllc.com[/email] or by visiting www.fundamentalstrengthllc.com

Filed Under: Uncategorized Tagged With: Aaron Pierson, double kettlebell, dragon door, Kettlebell, kettlebells, push press, strength

  • « Go to Previous Page
  • Page 1
  • Interim pages omitted …
  • Page 18
  • Page 19
  • Page 20
  • Page 21
  • Page 22
  • Interim pages omitted …
  • Page 30
  • Go to Next Page »

Primary Sidebar

Featured Products

previous arrow
BOOK-RKCBookofSnC
HardStyleKettlebellChallegeDanJohn700
BookCoverMasterTheKettlebell1
RKCiconKettlebell512
KettlebellGoddessdv040
next arrow

Recent Posts

  • RKC Big Six Workout
  • The Kettlebell Swing & Low Back Pain
  • Key Kettlebell Exercises To Help You Create Better Balance
  • How to Most Effectively Use Kettlebells to Meet Your New Year Goals
  • 1 Exercise That Checks All The Boxes
FOLLOW US ON TWITTER!

Archives

Copyright © 2025

Dragon Door Publications / The author(s) and publisher of this material are not responsible in any manner whatsoever for any injury that may occur through following the instructions or opinions contained in this material. The activities, physical and otherwise, described herein for informational purposes only, may be too strenuous or dangerous for some people, and the reader(s) should consult a physician before engaging in them.