• Skip to main content
  • Skip to primary sidebar
  • Home
  • Contributors
    • Matt Beecroft, Master RKC
    • Martijn Bos, Master RKC
    • Andrea Du Cane, Master RKC
    • Angelo Gala, Master RKC
    • Chris Holder, Master RKC
    • Steve Holiner, Master RKC
    • Dan John, Master RKC
    • Mike Krivka, Master RKC
    • Thomas Phillips, Master RKC
    • Robert Rimoczi, Master RKC
    • Phil Ross, Master RKC
    • Max Shank, Master RKC
  • Workshops
    • HKC Workshops
    • RKC Workshops
    • RKC-II Workshops
  • Find an RKC Instructor
  • Resources
    • Articles
    • Forums
    • Kettlebells
    • Products
  • Blogs
    • PCC Blog
    • Strong Medicine Blog
  • Archives

RKC School of Strength

Official blog of the RKC

RKC Team Leader

Achieve Pain-Free Single Kettlebell Cleans From The Start

January 28, 2015 By Lori Crock 5 Comments

RKC Team Leader Lori Crock's Kettlebell Cleans Tutorial

I am a coach who hates to see people in pain from doing cleans.

And it doesn’t matter whether it’s a beginner, or a more advanced kettlebell athlete, the clean can be a challenge to do as effortlessly as its kindred ballistic—the swing or even the snatch.

I speak from experience—the clean was hard for me when I was preparing for the RKC-I. It wasn’t hard with the typical thump on the wrist and forearm in the catch. No. My issue was a shoulder-hike on one side as the kettlebell made its way up … which can be even worse with the trap pain and the potential for some serious asymmetry down-the-road.

To avoid this, read on!

When you are first learning the clean, it can seem mysterious as to what the hand, arm and kettlebell are doing on the way up to the racked position. It happens so fast!

Often we see the clean only as a transitory movement that prepares us for pressing, front-squatting or doing racked carries—instead of focusing on the quality of the clean—even though we know a more efficient clean results in stronger pressing and squatting. And the clean is a nice alternative to the swing or snatch for conditioning.

You might not realize the inefficiencies in your clean if you don’t train it on its own very often—until you notice bruises on your wrist or arm the next day.

So let’s review the phases of the clean to achieve pain-free cleans. Note that the coaching cues included here are phrases I use when teaching to help people remember key points. The phrases may not exactly match the words used in our RKC manual, but they are rooted in my RKC kettlebell training.

The Swing

Get your two-hand and one-hand swing down first to set your start position, hip hinge and especially a deep back swing. Use cheat cleans (two-hand cleans) while you are learning the swing to prevent grooving bad movement patterns with your single kettlebell clean.
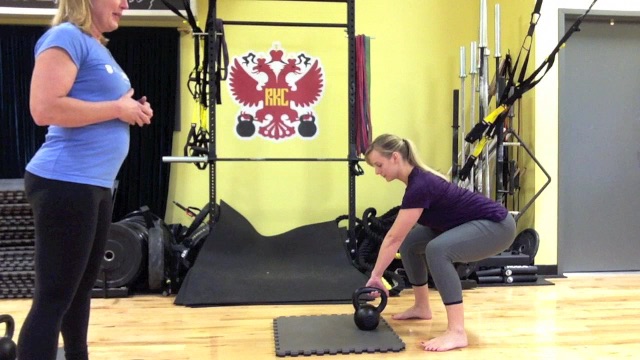
The Setup

Clean setup is just like the swing, holding the center of the handle, except the handle is tipped vertically for internal shoulder rotation to prepare your elbow to lock into your side once your arm moves through to the front of the body.

Coaching Cue: Set up like a slingshot.

Lean back with hamstrings on, lats activated, the kettlebell is tipped toward you—the whole body is taunt and slightly leaning back—and ready to release the kettlebell into a deep back swing.

You are in this same slingshot position each time you clean, whether from the ground or in the air into another rep. This athletic, ready position also applies to the Swing and Snatch with the handle in a horizontal position … but when learning the clean, in my experience, students need a reminder about the importance of the setup because they are more focused on the finish.

Lori Crock Kettlebell Cleans Tutorial: The Setup
The Set Up

The Back Swing

Get into your best hip hinge and hike the bell back as deep as possible to load and explode out of your hips. Shortchanging the back swing means you’ll end up without the power to send the kettlebell upward; so your body may compensate by arm curling the kettlebell or hiking the shoulder to assist the kettlebell upward.

Coaching Cue: Crush the wall behind you with your tailbone and explode up.

Go back to the swing if you are having problems achieving a deep back swing and hip explosion.

Practice: Swing-Swing-Clean 3 times each side to refine the back swing for the clean.

Lori Crock Kettlebell Cleans Tutorial: The Back Swing
The Back Swing

The Breathing

Breathe in through your nose to fill the diaphragm on the back swing. Exhale as the hips snap and knees and glutes lock.

Hardstyle breathing is used for power production and safety at the concentric or positive part of the clean (and all ballistic kettlebell movements). Exhaling when the hips snap creates a powerful muscular contraction in the torso that assists the body with the movement.

Coaching Cue: Explode, exhale.

Time your exhale on the hip snap/lock—not on the catch of the kettlebell in the racked position.

The Rise

When the kettlebell enters the front of the body there is some quick work to lock the elbow against the side of the body and get the hand around the kettlebell handle with a loose grip. Do this right away after the back swing when the hand is at hip level rather than waiting until you are about to rack the kettlebell.

Coaching Cue Elbow and Arm: Hip and zip

Lock the elbow into you side above your hip, zip up your jacket; keep you hand and arm close to your chest as you guide the kettlebell upward.

Coaching Cue Hand: Houdini hands

Move your hand quickly around the kettlebell handle as soon as it enters the frontal plane; do this quick hand work at approximately hip/waist level.

Practice: Clean in front of a wall, door, or post to practice keeping the kettlebell close to the body if you tend to cast it out away from the body. Use your other hand to cover your face in case of actual impact to the wall.
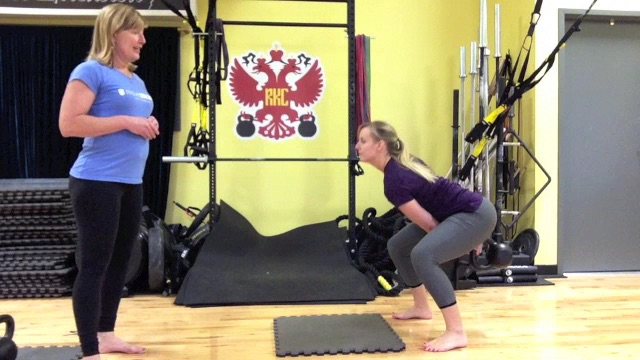
The Catch

The triangle of your forearm / upper arm will receive the kettlebell and hold it with even pressure (50% pressure on forearm and 50% on your bicep), but think of the whole body as catching the kettlebell. We move into a vertical Hardstyle plank when receiving the kettlebell to help avoid high impact on the wrist and forearm.

In the racked position, the kettlebell will not be sitting on your chest; instead, the inside of your arm will connect with at the side of your torso with a vertical forearm and vertical wrist about at the level of your collarbone. Do not hold your racked arm out in space—keep it touching the body to prevent overloading the elbow joint and to engage the lats. The arm and the body are connected and working as one unit.

Coaching Cue Torso: Catch with your cylinder of strength (Thanks, Andrea Du Cane for this phrase!)

Feel the muscular sinking in of your whole body around the kettlebell (not a collapse, but a tightening) as your abdominals and glutes contract, lats engage, knee caps roll up into quads and the entire body links and locks to receive the kettlebell in the racked position.

Coaching Cue Wrist: Knuckle up!

Because we use a loose grip on the rise of the kettlebell, beginners sometimes end up catching with a ‘broken wrist’ (wrist slightly bent back) in the racked position. To avoid this, re-tighten the grip after the catch so that knuckles are flat and facing the ceiling.

Practice: 5 Cleans left and 1 Hardstyle plank for 15 seconds / repeat right.

The Drop

Tip the wrist to release the kettlebell into a downward descent with a relaxed arm, thumb down slightly and the shoulder will be slightly internally rotated. Use only enough tension to hold on to the kettlebell and guide it to the floor or into another rep. Your hips, as usual, are doing most of the work. Keep the kettlebell as close to your body as possible, with your arm still touching your body, and finish with the arm straight in the back swing position at the end of drop before setting the kettlebell gently on the ground.

Note that death-gripping the kettlebell on the drop can lead to elbow pain.

Coaching Cue: “Waterfall” the kettlebell downward.

Allow gravity to do most of the work on the descent of the kettlebell using only a light grip.

Putting it All Together

Now you are ready to put it all together and practice your (hopefully!) pain-free cleans.

The Practice

I use the clean for conditioning in complexes and chains. I also like kettlebell chains that include a clean to practice smooth transitions between movements. This complex meets both of those goals. I use one kettlebell for all movements with 1 minute of rest between 3-5 rounds.

10 Cleans left / 10 Cleans right

SA 2 Swings-2 Cleans-2 Press left

SA 2 Swing-2 Clean-2 Press right

***
By Lori Crock, RKC Team Leader, FMS II and MovNat MCT II. Lori owns MoveStrong Kettlebells in Dublin, Ohio where she teaches small group kettlebell classes to all ages and fitness levels and continues to be amazed, inspired and educated by her students. Her email address is lori@movestrongkbs.com

Filed Under: Kettlebell Training, Tutorial Tagged With: clean a kettlebell, kettlebell cleans, kettlebell how to, kettlebell instruction, kettlebell technique, kettlebell video, Lori Crock, RKC Team Leader, video

From Broken to Team Leader

December 17, 2014 By Paul Britt, DC 2 Comments

Paul Britt Double Press At RKC

I was broken in October 2012 at the RKC-II. It happened because I was stupid and I let my ego get the best of me at the certification. I thought that I only had a minor training injury prior to arriving in St. Paul for the workshop. I had been working on heavy double presses on a day that I was tired, but due to having to attend this particular cert, I stayed with my “program”. In the middle of my final set, I felt a sharp pain on my left hip and back. I dropped the kettlebells and decided to take a few days off. It was still bugging me a few days later, so I went to a chiropractor. The consensus was that it was just a minor strain and that I would be okay to attend the certification. So off I went, with some kineseo tape to hold me together for the three days ahead of me.

I knew the snatch test would probably put too much stress on my back, so decided that I would wait till the last day to take it. I was able to get through all of my Level 1 skills and the half-body weight press on day 1 without too much trouble. But, I had a few problems with stability that I should have paid more attention to during the skills test. I noticed that I struggled with my foot on the left side for the get-up as it did not want to stay locked down as I moved through the different parts of the movement.

I initially started out with lighter weights than normal, just to allow me to get through the certification. I had a past Master RKC give me a hard time about the weight and I let my ego override what little sense I had and I bumped my weights up. Sometime during the day, I felt a pop in my back on the left side. I did not really feel a lot of pain at the time, so I kept on training. I got back to the hotel in a lot of pain and barely slept. When I got up the next morning, I literally had to drag my leg as I walked down the hall to find some Advil. I ended up buying eight packages and using four to get to breakfast and the first half of the cert. I had to take the other four to get through the rest of the day. The last day was even worse, I thought about just quitting, and I should have. Unfortunately, I am a little stubborn and hate to give up. At that point, nobody really knew what was going to happen to the RKC after that weekend, so in my head, I had to get through the weekend and earn what could possibly be the last RKC-II certification. So I pushed through and passed all of the tests except for the Jerk and the Snatch test. I knew that I had 90 days to send the video into someone to pass those two skills. Turns out that was not going to happen for a long time.

I knew as soon as I got off the airplane in Dallas that I was not right. I struggled to get out of the seat, get to my bags and walk to my car. I ended up getting home and telling my wife that I had screwed up and was badly injured. The pain was pretty constant, so I took off from all training for what was supposed to just be November, but it ended up being a nine month break. I had to train my lead coach, Justine Deets RKC, to pass her HKC and RKC skills without being able to perform them myself. She was my gym replacement while I was recovering. I hosted an HKC in January, but was unable to assist because even picking up 12kgs caused me a lot of pain.

I was not healing, so after the first of the year, it was time to see someone about it. I ended up being referred to the top spine doctor in the area. At my appointment he told me that I had herniated discs at L4-L5 and L5-S1, both on the left side. He informed me that it was a lifelong injury and that my days of heavy lifting were over. To say that I was not thrilled by that was an understatement, so I decided to show him that I would be back to heavy lifting again. I went with a non-surgical solution for the problem and had a series of injections into my back that gave some minor relief. While the injections did not allow me to start lifting again, they did allow me regain some everyday quality of life. It was at that time I met Dr. Steve Horwitz, DC (and now RKC instructor). Dr. Horwitz worked with me on my nutrition and showed me how to ease the inflammation and pain with proper supplementation. Once my nutrition was dealt with, I was able to start healing and training again.

I had scheduled an HKC/Primal Move Certification Weekend with Master RKC, Andrea Du Cane and Senior RKC Jay Armstrong, but was not really doing much in the way of training yet. Andrea knew about the injury, so she would not let me do much during the HKC. I was the ‘go-fer.” While I was finally moving better, I was still in pain with bad movement patterns most of the time. I was able to participate in the Primal Move Certification that weekend and found that it was life changing for me. I was able to go through the workshop pain free. It was amazing how much better I felt just going through the workshop. The one day workshop was like a reset button. It was the first time I was pain free during my day to day activities of living. It improved my movement, eased my pain and that definitely helped my outlook. I had been in a depression since being injured because I was unable to train and burn through my day to day frustrations.

Andrea and Jay also showed me a few drills, including pendulum swings. I also started playing with Figure 8’s as they allowed me to strengthen my posterior chain without moving through painful patterns and positions. I also went to town with Primal Move and added in Convict Conditioning on a daily basis. I would train something every day, but never to failure or into pain. That was my training program for about 3 months and every day I felt better, moved better and got stronger. My focus was on healing and avoiding pain. I spent lots of time on the pullup bar, doing handstand pushups and Convict Conditioning skills on top of daily Primal Move work.

In October of 2013, I hosted an RKC with Andrea Du Cane, Master RKC leading the workshop. She asked to see my skills as an Assistant. I hadn’t trained with any weight over 16kgs in any of the RKC Basics prior to the certification weekend. This was one year after blowing out my back and I figured that it would be ugly. I had not even attempted any of the skills with my snatch test weight prior to this attempt. I was actually scared when I was asked to do it as I knew it was going to be a hot mess. I was pain free and nailed my skills test. After that it was as if I had been freed from a dark hole. Andrea had to keep me reined in all weekend because I was so excited that I was able to train again. She told Shane England RKC, that they had “unleashed a monster”, I could not stop playing around with the kettlebells. I participated in as many of the drills as the attendees did as I tried to fix the bad habits that got me into the position I was in.

After that weekend I continued to train and work on a lot of rehab style work to get back to a decent level of strength. In that time, I was able to host and assist at several HKC’s and RKC’s. I improved my skills and movement at every event I attended. Andrea let me assist at every event and she helped me improve my skills at every certification. If it had not been for her friendship and mentoring, I would not have been able to train or teach at the level I am at now. In July, I was promoted to RKC Team Leader, based in part on my ability to come back as a better instructor because of my injury. It forced me to re-evaluate everything that I was doing as an RKC. Prior to this, my skills were not as good as they should have been. The injury made me a better coach, and I became stronger because of it. I have to use the RKC Principles correctly to avoid being injured again.

Paul Britt Coaching

I was able to get to the point where I was able to press half bodyweight again and knew that I had to try RKC-II again. In October, I hosted the RKC-II at my gym. We had a great group of strong people in attendance. Like the last time, Day 1 was RKC I and our strength requirement test. I felt that it was the easiest and best RKC recert test that I have ever performed. My skills were dialed in and the snatch test was by far my best one that I have ever completed, it was almost easy (the snatch test is never really easy). I passed RKC-II after a long weekend of heavy lifting. I had gone into the weekend with some trepidation, because I had been hurt. It was probably harder for me mentally than physically due to my last attempt ending so badly. I was nervous going into the testing as I did not fully believe that I could get through it without being injured, but I only had a slight issue with my left side pistol stability.

RKC-II Group Photo in Texas

What did I learn from all of this? I learned a lot, though I wish I had learned it without being injured. I was once taught that experience came after you needed it. I hope that someone uses mine to avoid taking the same path. Do not terrain into pain. If you are injured and your life is not in danger, take a break and heal. Do not let your ego cause you to do stupid stuff. There is no certification that is worth permanent injury and we hold a lot of certifications during the year. That is why I am glad that I chose to stay with the RKC. Dragon Door and the RKC’s focus on being a great instructor and their focus on the safe building of your skills is why I am proud to be a part of this community.

What’s next? I am training for the Beast Tamer. The plan is to do it for my 48th birthday at the October 2015 RKC led by Master RKC Andrew Read. There is still room and time to sign up for that certification.

***
RKC Team Leader Paul Britt has been an RKC kettlebell instructor since 2006. He trains clients at Britt’s Training Systems, his award-winning Hardstyle Kettlebell Training Facility in Rockwall, Texas. Paul has served as an assistant instructor at many RKC and HKC Courses, is a Certified Kettlebell Functional Movement Specialist (CK-FMS) and works with some of the top Chiroprators in North Texas. Please visit his website brittstrainingsystems.com for more information.

Filed Under: Kettlebell Training Tagged With: hosting workshop, injury recovery, kettlebell training, mobility, Paul Britt, recovery, RKC, RKC Principles, RKC Team Leader, RKC-II, Texas, workshop experience

The Four Pillars of Strength

February 12, 2014 By Mike Krivka Leave a Comment

Mak_110lbs_KB_pngINTRODUCTION

People are constantly looking for new ways to increase their strength.  They get wrapped up in changing up reps, loads, intensity, and new exercises in the blind pursuit of strength. This pursuit usually entails looking for a new training program, tool, or gimmick that they desperately hope will give them an edge and increase their athletic abilities.  Unfortunately what usually happens is that they fall back on their old training habits and apply them to their new program with dismal results.  Let me borrow a definition from someone who is (obviously) smarter than I am: “Insanity: doing the same thing over and over again and expecting different results” – Albert Einstein.

So if I told you that there are four basics tenets of strength that you can apply to the training program that you are doing right now, that would almost instantly increase your strength – would you try it?  Really?  Then I’ll let you in on a trade secret in the strength and conditioning world!  The keys to strength lie in the “Four Pillars of Strength” (and they all start with the letter “G”): Grip, Gut, Glutes and Gaze.  Let’s take a look at each one and see how focusing on one or all of them will ensure that you actually do get what you are looking for!

GRIP

I know this seems obvious but increasing your grip strength, or even focusing on what your grip is doing, will give you a huge jump in the strength game.  Think about when you missed that heavy Deadlift – what failed?  Your grip failed.  How about when you tried to do that strict pull-up and you couldn’t ramp up the tension to complete it – what kept you from making it happen?  Your grip failed. How about the last time you did your RKC Snatch Test (05 minutes to do 100 reps with a 24 kg Kettlebell) – what happened around minute four that made the last thirty or so reps hard?  Your grip failed.

So is it really a question of increasing your grip strength or learning how to manage your grip?  Well it couldn’t hurt to increase your grip strength, and I strongly suggest that you do, but the better you become at managing your grip the better results you are going to get. What do I mean by “managing your grip”?  What I mean is that you need to learn when you should be applying maximum tension and when you should be using just enough tension to keep control of the situation.  Taking the time to master this one technique will make your Kettlebell technique improve, help you manage your fatigue, and allow you to train harder and (more importantly) harder.

Does strengthening your grip only apply to your hands?  Heck no!  Your feet are almost as important as your hands when it comes to grip strength.  The recent appearance of “minimalist” shoes is nothing new to traditional strength athletes who know that without a firm, direct connection to the ground their strength will be fragile and tenuous.  For athletes, especially contact or combat athletes, strengthening your feet and how well they grip the ground during dynamic and ballistic loading will go a long way in protecting your ankles, knees, hips and back.

When it comes to your feet do you know what they are doing when you are swinging or snatching?  How about when you are doing pull-ups or push-ups? Well you should!  When you are performing any movement skill you not only need to maintain control of the load, be it your body weight or a Kettlebell, but you also need to get feedback.  If you are compromising the surface area of your foot, and therefore compromising the quality and quantity of feedback you are getting from your feet, then you are never going to be able to get as strong as your potential.

Test it out:

Pistol or Body Weight Squat – Pick either the Pistol of the Body Weight Squat (Squat) and take some time to explore what your feet are doing when you do this movement. Chances are that your feet are tapping like you are playing the piano with your feet or you are rolling onto the edge of your foot.  Both of these are very common and are easily remedied!  As you are pulling yourself down into the Squat or Pistol “grab the ground” with your whole foot, especially your toes, and feel how much more stable and strong you feel.  Don’t lose this tension at the bottom; instead let it by the driving force behind driving the ground down and away from you as you come up.  BTW – does your hand grip affect your Pistol and Squat?  Heck yes!  Having trouble maintaining tension throughout the whole movement?  Make a fist and crush your grip to help create stabilizing tension throughout your upper body that will irradiate into your legs. You can also squeeze a towel or a hand gripper to get the same effect.

Kettlebell Swing or Snatch – the same concept holds true here as it did with the Pistol or Squat. You’ve got to pay attention to what your feet and hands are doing if you are going to ever become stronger doing the Swing or Snatch.  There are two key moments in the execution of both the Swing and the Snatch that you want to pay close attention to what your hands and feet are doing: during the backswing of the Swing and the Snatch and in the overhead lockout of the Snatch.  In both of these positions it’s easy to concentrate on your grip, as you should, but are you over-concentrating on your grip?  Maximum tension should only be applied to the Kettlebell grip at the bottom of the backswing and at lockout overhead; all the rest of the time you need to use just enough grip to keep the Kettlebell under control.  How about looking at what your feet are doing as well?  Your feet should be gripping the ground maximally on the backswing, really grabbing the ground and giving you a solid base to drive off of. During the Snatch you should think about doing the same thing when you hit the overhead lockout; grip the Kettlebell tightly to buffer the impact and create a stable strong base to receive the load on.

GUT

Your Abs are the bracing system for everything you do and learning how to use them properly will allow you to generate more force as well as accept more of a load.  Being able to regulate your abdominal tension is critical when it comes to creating power from the ground up – and it’s invaluable when it comes to protecting your back.  The concepts behind Intra Abdominal Pressure (IAP) will teach you how to create a “virtual belt” around your midsection that not only reinforces the spine but allows you to transfer energy more efficiently.

Just bracing your gut and hoping for the best isn’t enough; learning how and when to tighten is the real key.  Coordinating breathing and the amount of breath you inhale and exhale are important as well as learning how to “bleed off” tension (through hissing and/or the martial arts kiai).  You’ll see people panting, huffing and puffing while training; never once thinking about how that unregulated breathing is affecting their performance.  Having a strong gut is not a matter of doing sit-ups and crunches – both those exercises have faults that only lead to more problems down the road.  While I’m a big fan of the Ab Wheel, or as I call it “The Wheel of Pain”, you really need to shown how to use it correctly or you’ll overstress your shoulders and lower back.  So how do you get a strong gut?  Learn when and how to breath.

Sucking in a big gut full of air and letting it out is going to get you nowhere.  You need to regulate the amount of air you bring in, how much tension is used to maintain it, and how to effectively release it.  Taking in too much air at one time is counterproductive as well as taking in too little; not to mention trying to maintain it by using your throat. Yikes!  I teach a really simple technique to get enough air in, braced, and ready for use that seems to work well for most people.  First off you can’t take a big “gulp” of air through your mouth. It’s going to create pressure in the wrong area and lead to problems.  All you need to do is take a “predatory sniff” of air through your nose and hold it. NOTE: the “predatory sniff” is a technique you can observe right before someone take a swing or tackles a defender.  It’s a cue that an attack is imminent but it is also a great way to prepare for an explosive energy requirement.  Hold that breath in your gut, deep in your gut and not up in your chest, then let it out under control through your teeth like you are hissing.  This sequence will take a while to develop but once you get it down you will be able to reference the skill on demand.  Time this breathing sequence with your efforts and you will find that you aren’t getting breathless or winded… but did I mention that this takes practice to achieve?

Test it out:

Pull-ups – applying this directed breathing during a grand makes it easier to stay “tight”.  Try doing a pull-up with a big gut full of air and see how it feels.  Now try it with the method described above.  It should be a lot easier and feel tighter and “crisper”. One of the things you will need to work on is regulating how much air you release. Too much too soon and you’ll be left only half way up… this is a regulated release of air, with the accompanying abdominal pressure, that lasts the whole movement.

Swings – Kettlebell Swings can make even the most well conditioned athlete breathless; but it doesn’t have to happen early in the session. Take a quick sniff of air on the backswing of the Swing and then explosively let it out in conjunction with your hip snap.  You’ll find that the Kettlebell moves faster, and higher, than usual and that you are able to regulate your breathing for longer as well. This breathing pattern is quick and crisp and doesn’t require as much air to make it effective as the grinding version.

GLUTES

Much aligned and often ignored, especially by guys, the glutes are the biggest, and as far as I’m concerned, the most important muscles in the body.  So developing the ability to integrate them fully and activate them at the appropriate time will make you strong – fast!  While everyone knows (not really, but let’s assume they do) how important the Glutes are then why do we still see people with soft knees and soft Glutes at the top of their Kettlebell Swing and Snatch? That’s because they aren’t tying in the Glutes to the end of the hip snap and missing out on tying in the biggest muscles in the body into their technique.

When I talk about working the Glutes most guys ignore my advice and head for the nearest set of dumbbells to work on their curls or grab a bar to work on their bench press.  Women are more receptive to my advice because they understand the “power” of strong Glutes… but for a different reason than the one that I’m interested in addressing!  So why are the Glutes so important?  Because the Glutes are not only the biggest group of muscles in the body they are also the brace for the abs and the foundation for the back.  Weak Glutes and you’re going to be overtaxing your abs and lower back to do the work that the Glutes are designed for.  Especially bothersome are people who have spent an inordinate amount of time developing their abs (think mucho sit-ups or crunches) and have compromised their posture and have effectively short-circuited their ability to fully engage their Glutes.  Don’t believe me?  Take the following two tests and see what happens when you are able to clench your Glutes for all they are worth!

Test it out:

Tip-over Test – Have someone stand tall and strong, locking their knees and clenching their Glutes as hard as they can. Place your hand on their chest and slowly start pushing.  See how hard it is to rock them back onto their heels. Do this again a second time but have them keep their Glutes relaxed; slowly start pushing against their chest and see how easy it is to rock them back onto their heels. Now here comes the clincher: same setup as the previous two but this time have them relax their Glutes and only clench them when they feel like they are going to tip over and fall. Be sure to put your other hand behind them just in case they can’t “catch” themselves. If they can’t catch themselves then they need some serious “Glute therapy” to get them turned back on! If they are able to catch themselves then they will have a shocked look on their face when they realize that their Glutes are the reason why they didn’t fall.

Stance Test – how wide you have your feet apart can directly impact how tightly you can clench your Glutes.  Is really that important? Only if you want to move faster, hit harder, and translate more energy from your body into a Kettlebell or bar. Try this series of tests to see how your stance (distance between your feet) impacts your Glute tension. Start with your feet in stance that is wider than your shoulders. Squeeze your Glutes as hard as you can and make a mental note of how tight they are.  Move your feet in a little this time, just inside shoulder width, with your heels right under your arm pits. Squeeze your Glutes as hard as you can and make a mental note of how tight they are. Now place your feet together with your big toes almost touching. Squeeze your Glutes as hard as you can and make a mental note of how tight they are. Last one: with your feet together once again, put your heels together and let your feet point off at an angle, let’s see 15-20 degrees. Squeeze your Glutes as hard as you can and make a mental note of how tight they are.  What did you find?  Did you find that the wider the stance the less Glute contraction you get and the more narrow the stance (especially with your heels together!) the more Glute contraction you get? What does that tell you about how you can get more power out of your hip snap if you learn to maximize your Glute contraction by minimizing your stance?  Yeah, I thought so…

GAZE

What the heck are you looking at? No really. What the heck are you looking at while you are training?  How much do your eyes, and how they are being used during movement, impact your performance? Quite a bit actually!  If you watch people doing Kettlebell Swings or Snatch you’ll see that most of them have their eyes going up, down, left, right, pretty much everywhere and it gets even worse when they change hands. Training yourself to focus internally is hard enough but you also need to create some discipline in what you are doing with your eyes and your head as you are training. Remember that your head is going to follow your eyes and you can end up doing some weird stuff to your neck and back if you’re not careful.

So what should you be doing with your eyes? First think about keeping your head neutral on your neck.  Neutral means that your chin is neither pointing up or down – you are looking straight ahead. You will see a lot of people putting their head into weird alignments because they are trying to look at one spot while they are performing a lift or movement.  This is something you can do and it does have its benefits – except for the fact that it’s going to put your neck and thoracic spine into some weird loading configurations that you are going to regret in the long run. So if your head is neutral and you start to do a squat what should your eyes be doing?  As you pull yourself back into your Squat your head should track with your torso and your gaze should end up stopping about 08-10 feet in front of you. As you drive up out of the Squat your head should remain neutral and finish where it began at the beginning.

I know what you’re thinking!  You’ve seen pictures of athletes going for a world record Deadlift or Squat with their head up and back and their chin jutting forward. Yep – you can do that! If you’re chasing a world record and you are familiar with the risks that you are taking when you do that, and then by all means proceed.  But if you are training on a regular basis and don’t want to take risks with your neck and thoracic spine then stick with the neutral position. You’ll thank me one day…

Test it out:

Posterior Chain Activation Test – Take a stance with your feet just inside shoulder width and with your head in a neutral position, squeeze all the muscles in your body from head to toe. Get a feeling for how much tension you’re able to create with your head in a neutral position.  Now try looking straight down at your toes and then squeeze all the muscles in your body from head to toe.  Once again get a feeling for how much tension you’re able to create, especially in the posterior and anterior chain (front and back of your body). For the final attempt try looking straight up at the ceiling and then squeeze all of the muscles in your body from head to toe. Get a feeling for how much tension you were able to create and if there was any difference in the amount of tension you could produce front and back.

What did you find?  I’m guessing that if you created enough tension in all three positions were surprised to find that you were able to balance out the tension with your head in a neutral position but you lost tension either in the posterior or anterior chain when you looked up or down.  Kind of strange that most coaches recommend that you look up when you Squat or Deadlift but in reality you lose tension in the muscles you are trying to activate. Something to think about… Look up too much, shifting the tension from the posterior to the anterior chain, and you can say hello to Mr. Hernia because you’re going to shift the tension too far and put stress on the abdominal wall.

NOTE: a slight downward tilt of the head works best to fire up the posterior chain, especially if you are a martial artist, soldier or law enforcement officer. This part physiological and part psychological phenomenon but it really works.  Keep looking straight ahead, but tilt your chin down and in a little bit, and you can take advantage of the physical and psychological boost this head position gives you.  

Swing Test – This is an easy test to do and experience.  Grab your favorite Kettlebell and do a handful of Swings.  First try doing them with your head staying neutral throughout the movement; that means that your gaze will shift from ahead of you to in front of you as you swing.  Then try to do the Swings with your head up the whole time.  Keep looking up throughout the technique and get a feel for how your hip snap feels and the weight of the Kettlebell. Finally attempt to do some Swings while looking down throughout the technique.  Get gauges for how your hip snaps feels, how heavy or light the Kettlebell feels, and how your breathing is. What did you find?  Did you notice that with your head in the neutral position throughout the movement that you were stronger, faster, and more relaxed?  If you didn’t go back and try it again; I think you’ll be shocked at the difference.

CONCLUSION

I hope that you take the time to look at how these four pillars can be added into your existing strength training program, regardless of if it is with kettlebells, body weight, or barbells.  I am confident that if you mindfully apply the principles that I outlined above that you will be amazed at how quickly you will get gains!  BTW – don’t try to implement all of these new skills at the same time.  I would strongly suggest that you take one and apply it across a spectrum of techniques and see how it works for you. Then, once you’ve given yourself a chance to explore it fully, add another element to the mix.  Being able to apply all the variables surrounding Grip, Gut, Glutes and Gaze will take practice and few people will be able to get them all working at the same time.  But if you can get two out of three you are well on the way to making some great gains!

***

About Michael A. Krivka, Sr. – RKC Team Leader: Michael A. Krivka, Sr. is a Washington, DC native who has been involved in Kettlebell training for over a decade and is currently an RKC Team Leader and member of the RKC Board of Advisors and the RKC Leadership Team under Dragon Door (where he has been listed as one of the top reviewed RKC’s in the world for the last five years). He is also the author of a bestselling eBook entitled “Code Name: Indestructible” and is in the process of finishing up several other eBooks on Kettlebells, body weight, and the integration of other tools into an effective strength and conditioning program. Mike has traveled extensively throughout the United States teaching Russian Kettlebells to military (USMC, USN, USA and USAF) and law enforcement personnel (FBI, DEA, USSS and CIA)… read more here.

Filed Under: Uncategorized Tagged With: four pillars, gaze, glutes, grip, guts, leadership, MAK, mike krivka, RKC Team Leader

Primary Sidebar

Featured Products

previous arrow
BOOK-RKCBookofSnC
HardStyleKettlebellChallegeDanJohn700
BookCoverMasterTheKettlebell1
RKCiconKettlebell512
KettlebellGoddessdv040
next arrow

Recent Posts

  • RKC Big Six Workout
  • The Kettlebell Swing & Low Back Pain
  • Key Kettlebell Exercises To Help You Create Better Balance
  • How to Most Effectively Use Kettlebells to Meet Your New Year Goals
  • 1 Exercise That Checks All The Boxes
FOLLOW US ON TWITTER!

Archives

Copyright © 2025

Dragon Door Publications / The author(s) and publisher of this material are not responsible in any manner whatsoever for any injury that may occur through following the instructions or opinions contained in this material. The activities, physical and otherwise, described herein for informational purposes only, may be too strenuous or dangerous for some people, and the reader(s) should consult a physician before engaging in them.