• Skip to main content
  • Skip to primary sidebar
  • Home
  • Contributors
    • Matt Beecroft, Master RKC
    • Martijn Bos, Master RKC
    • Andrea Du Cane, Master RKC
    • Angelo Gala, Master RKC
    • Chris Holder, Master RKC
    • Steve Holiner, Master RKC
    • Dan John, Master RKC
    • Mike Krivka, Master RKC
    • Thomas Phillips, Master RKC
    • Robert Rimoczi, Master RKC
    • Phil Ross, Master RKC
    • Max Shank, Master RKC
  • Workshops
    • HKC Workshops
    • RKC Workshops
    • RKC-II Workshops
  • Find an RKC Instructor
  • Resources
    • Articles
    • Forums
    • Kettlebells
    • Products
  • Blogs
    • PCC Blog
    • Strong Medicine Blog
  • Archives

RKC School of Strength

Official blog of the RKC

RKC kettlebell training

Fine-Tuning the Get-Up

January 27, 2016 By Andrea Du Cane 14 Comments

Master RKC Andrea Du Cane Get-Up Lead Photo

How and when to use the high bridge and when to use the “step-across” instead of the “windshield wiper”

At every HKC and RKC, I’m asked why we test the low sweep instead of the high-bridge. I also get a lot of questions regarding the “windshield wiper” vs. the “step-across” to transition in and out of the kneeling windmill to the lunge position. It’s time to explore each movement and gain a deeper understanding of some of the benefits of the get-up.

When I first became certified and started teaching the get-up, it was referred to as the “Turkish get-up”. Here’s the criteria that was given and tested at that time:

  1. Keep both shoulders packed.
  2. Keep the wrists neutral at all times.
  3. Keep the elbow locked at all times.
  4. Keep your eyes on the kettlebell.

Oh and well…. get-up! That was it, get up anyway you can.

Let’s just say the get-up has come a long way, baby. It’s transitioned from having very little explanation and direction to (for a time) elaborate direction, with a focus on corrective uses and advanced movement patterning.

You can say that now we have found a happy medium, erring on the side of explanation and points of movement. But, we have also found a good balance and an easier way to teach the get-up to newer kettlebell instructors and users.

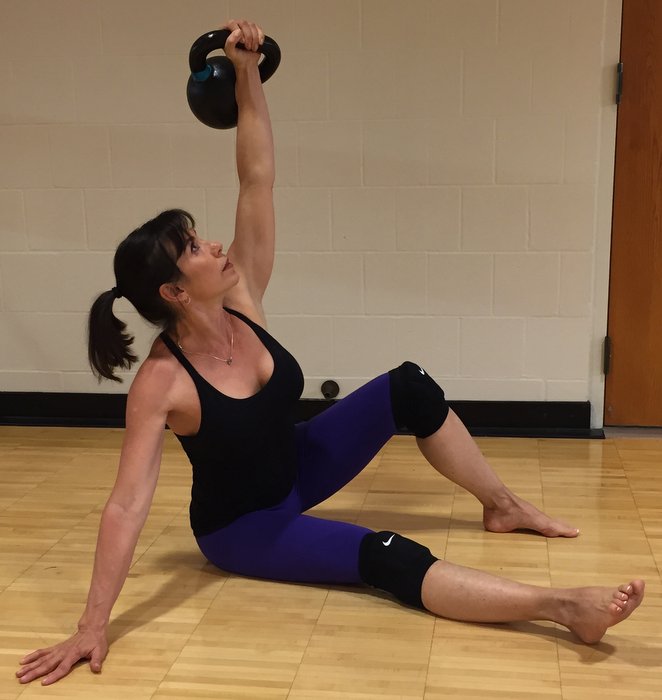
The High Bridge or the Low Sweep

One area of confusion with the get-up is whether to use the high bridge or low sweep.

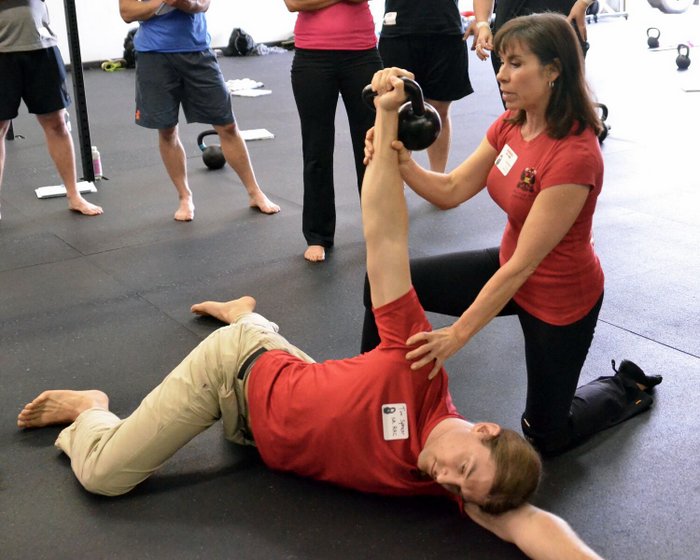
First, let me explain where the high bridge came from, and why it was initially introduced as a teaching and testing skill. The high bridge came from the FMS concept of using movement as a screen. When it was first introduced into the RKC curriculum, the high bridge was used as a screen for tight hip flexors. However, we began to notice that when people were doing the high bridge, their lumbar spine was actually in hyper-extension instead of full hip extension. I remember discussing this with Gray Cook, and he agreed with that it was one problem with using the high bridge as a screen, since it is easily cheated. It does not actually demonstrate whether the person is in full hip-extension or hyper-extension of the lumbar spine.

Secondly—and more importantly—you would not put a client, with a kettlebell in their hands, into a high bridge and then say, “Aha! You have tight hip-flexors”. Of course not. Long before they do that high bridge, you have deduced that they have tight hip-flexors from other screens. And from a safety perspective, you would not let someone perform a high bridge until they had opened up their hip flexors and could perform the movement correctly without a kettlebell.

Since one of the end goals of the get-up is to go heavy, for the purpose of safety and efficiency, you will want to pull your leg back and get your hips under the load as quickly as possible. The high bridge takes unnecessary risks with a heavy load during the transition.

That said, the high bridge is great with a moderate to light weight for a more advanced kettlebell user. Done correctly, it demonstrates shoulder stability, hip flexibility and control.

Master RKC Andrea Du Cane Get-Up Kneeling Windmill

Performance Tip: Think of the high bridge and sweep through as a tall side plank. When moving into a high bridge, post over towards the side, your shoulders should be stacked over each other. The hips will rotate slightly upwards, but the shoulders and t-spine are stacked vertically. Practice lots of side planks from the elbow and tall side planks, before moving onto the high bridge.

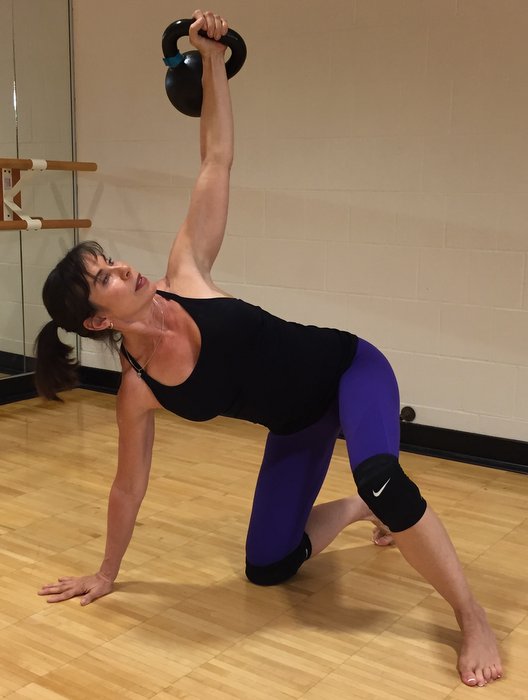
The “Step Across” Variation

Moving on to the next modification, using the “step across” instead of a windshield wiper. As stated earlier, the body needs to transition from the tall-sit position smoothly and with control all the way to lunge. That means the hips need to get under the kettlebell as quickly and safely as possible—this includes the sweep through and transitioning to the lunge.

From the kneeling windmill position, the torso is moving from a horizontal position to upright, as the hips are coming under the torso and kettlebell. The hips need to fully extend with the glutes tight as you move into the lunge position. That’s a LOT of movement happening at the same time. The more stable and connected to the ground the body is, the safer and smoother the transition.

That is why the windshield wiper is taught and tested. Both legs remain firmly on the ground and the hips easily and fully extend.

Performance Tip: think about finishing at the top of a swing. The glutes contract hard and fast and the hips fully extend, allowing your body to find stability in the lunge position as soon as you hit it.

A potential problem with this movement is the pressure and friction placed on the knee. Obviously, if the knee is feeling pain, this could jeopardize the movement. The ground you are training on becomes an issue, and individual knee sensitivities should be taken into account as well.

One way to solve the issue is to use the “step-across” modification. From the kneeling windmill, you simply lift your torso up and then step your loaded foot across into a lunge position. This will take the windshield wiper out of the movement and “save” the knee.

The downside to this modification is the inherent lack of stability as you lift your loaded leg up and step it across. You are also changing the orientation of your head and body, which can also cause us to lose stability and control.   Lastly, it is much harder to keep your glute and hip tight and contracted as you move the leg, leading to another possible loss of control.

As we say in the RKC, “safety trumps performance”, so if you have sensitive knees or are training on a hard or rough surface, the step-across is a modification you can use to protect your knee and stay in control.

My personal recommendation is to buy a $20 pair of knee pads or have your clients purchase them for training. I do a lot of kneeling training and take knee pads with me everywhere to use for all kneeling training and stretching. $20 knee pads are a cheap and easy way to protect your knees and increase the effectiveness of your kettlebell training.

****

Andrea Du Cane is a Master RKC Kettlebell Instructor, CK-FMS, CICS, and RIST, ZHealth certified, she has a BA in Psychology from the University of Minnesota and is also a Pilates instructor. She is the author of several books and dvds including The Ageless Body, The Kettlebell Boomer, and The Kettlebell Goddess Workout.  She has over twenty years of aerobics, weight training and fitness experience, with an additional background in… Read more here.

Filed Under: Coaching, Kettlebell Training, Tutorial Tagged With: Andrea Du Cane, get up, get ups, Getup, kettlebell technique, kettlebell training, RKC, RKC kettlebell training

The Single Rep Dead Stop Swing, Clean, Snatch Workout

July 1, 2015 By Andrea Du Cane 13 Comments

Master RKC Andrea Du Cane and Senior RKC Timothy Spencer Demonstrate the RKC Arm Bar

As I travel around teaching HKC and RKC workshops, I notice a common problem (theme – challenge), the sloppy start/stop of a kettlebell ballistic lift.

Imagine this scenario: someone is getting set up to swing; it doesn’t matter if it’s 2-handed, single arm or double. They stand over the kettlebell, lift it up, and rock it back a couple of times between their legs and THEN swing it back far enough to load their hips and explode up.

What’s wrong with this picture? The set-up was not correct. It was not focused or properly executed. There must be an intention and preparation before the start of the pull—before anything happens.

I like to say in regards to all kettlebell lifts, “You’re only as good as your set-up”.

Here is the correct way to start a swing (clean or snatch):

  • Place the kettlebell a foot or two in front of you.
  • Bend forward and grab the kettlebell handle.
  • Pull the kettlebell slightly toward you, while engaging your lats.
  • Set your weight way back on your heels, while keeping your feet planted & spine neutral.
  • “Hike” the kettlebell back behind you—fast.
  • Explode your hips forward and feet down into the ground. Let your arms be propelled forward by the force of the hips.

That’s it. Simple. No lifting the kettlebell up and rocking it a couple of times before hiking it back and exploding up. One crisp explosive hike pass and forward movement is all it takes!

This is the same for ALL the kettlebell dynamic lifts; including double kettlebell swings and cleans.

Scenario #2: someone has just finished a great set of swings, but on the last rep they fall forward while rounding their back and then dropping the bell down in front of them.  They nearly topple forward.

No further explanation is needed here, this is simply dangerous. The most common time for an injury to occur during any kettlebell exercise is on the last rep or while the kettlebell is being set down.

In both cases—the first rep or the last rep of a set—the lack of focus, intention and safety is to blame.

The answer to this problem is to training your single-rep or dead-stop swings. In essence that is what the single-rep is: the start and end of a swing, clean or snatch.

Programming single-rep sets is an easy way to reinforce good technique throughout a set of any ballistic lift.

The truth is, they are HARDER than continuous reps because you lose the assistance of gravity during the backswing. With single-rep workouts, each rep is initiated by the power of the lifter. The hips and lats have to work that much harder to generate the force to project the kettlebell up. Hence, an additional bonus is increased force production and explosive power. So this type of training is perfect for any athlete.

You can also modify single-rep workouts for any level kettlebell lifter.

Single-rep 2-handed swings are a progression to learning continuous swings, but for the advanced lifter, doing single rep heavy cleans or snatches or double swings and cleans, puts the burn in your butt!

Here are some workout examples (note: “SR” stands for Single Rep):

Beginner:

SR-Swings:   2-handed for 5 reps

Continuous:   2-handed for 10 reps

Repeat as long as you wish

OR use timed sets for 25-30 seconds of work to equal rest


Intermediate: (proficient with cleans and snatches)

SR-Swings 1-arm   5-10 reps left/right

Continuous 1-arm   10 reps left/right

SR- Cleans 1-arm   5-10 reps left/right

Continuous 1-arm   10 reps left/right

Repeat as long as desired or timed sets


2nd workout

SR-Swings 1-arm   5-10 left/right

SR- Cleans 1-arm   5-10 left/right

SR-Snatch 1-arm   5-10 left/right

Repeat as long as desired or timed sets


Advanced

SR-double swings   5-10 reps

SR-double cleans   5-10 reps

Repeat as desired or timed sets

***

Andrea Du Cane is a Master RKC Kettlebell Instructor, CK-FMS, CICS, and RIST, ZHealth certified, she has a BA in Psychology from the University of Minnesota and is also a Pilates instructor. She is the author of several books and dvds including The Ageless Body, The Kettlebell Boomer, and The Kettlebell Goddess Workout.  She has over twenty years of aerobics, weight training and fitness experience, with an additional background in… Read more here.

Filed Under: Kettlebell Training, Tutorial, Workout of the Week Tagged With: Andrea Du Cane, dead stop swing, dead swing, hkc, kettlebell swing, kettlebell technique, kettlebell training, kettlebell workout, kettlebell workouts, kettlebells, RKC, RKC kettlebell training, workout of the week

The Best and Simplest One Kettlebell Workout

May 27, 2015 By Max Shank 12 Comments

Max Shank Single Kettlebell Workout

With the following single kettlebell workout, you can work on all your strength movements in one session with 2-6 sets of 3-8 reps. Each movement provides an adequate amount of rest for the next item in the superset. The finisher, which consists of swings and planks or pushups is a great way to add some cardiovascular work as well as some extra core/arm training.

Superset the exercises below for 2-6 rounds:

Press (up to 80% effort)
Row (up to 80% effort)
Squat (front squat or goblet squat)

Then perform kettlebell swings and planks (or pushups) for 2-5 sets

Together, this workout covers all the main strength movement categories:
Upper Push (press and/or pushups)
Upper Pull (rows)
Lower Push (squats)
Lower Pull (swings)

Part of the reason that programs generally work well is that they provide workouts which are already designed for you. If you struggle to think of what you should do at the gym, you’re less likely to do as much work–or any at all! It’s very helpful to at least have a go-to workout in your collection.

Another great thing about the workout listed above is that you’ll probably want to do more reps of rows than presses anyway. This often happens because  most of us can row with more weight than we can press. In other words, you’ll likely press the same kettlebell 5 times and then row it for 8-10 reps with the same weight (which will put both exercises at 80% of your effort). That’s a good thing!

Finally, this takes very little time–I was recently able to do 3 rounds of each part in about 12 minutes.

It’s so simple that it almost seems too silly to work, but it does–and it covers all of your bases regardless of which kettlebell you use. For example, if you choose a kettlebell that you can press once, the workout might look like this:

Press x 1
Row x 5
Squat x 6
Or whatever rep range is within your 80% effort.

It’s beautifully simple, and it can really remove some potential barriers to training consistently–you can do a version of this workout anywhere in a very short amount of time.

****

Master RKC Instructor Max Shank is the owner of Ambition Athletics in Encintas, California. He is very active in martial arts, competes in the Highland Games, and promotes a holistic approach to overall fitness. For more information about Max please visit www.ambitionathletics.com.
Max Shank is also the author of Master the Kettlebell, now available in ebook and paperback format.

Filed Under: Kettlebell Training, Workout of the Week Tagged With: kettlebell training, kettlebell workout, Master the Kettlebell, max shank, MTK, RKC, RKC kettlebell training, RKC kettlebells, simple workout

Why We Grunt

February 25, 2015 By Felix Sempf 6 Comments

RKC Instructor Felix Sempf

When entering a room where RKC kettlebell training is in progress, one quickly notices the characteristic way people breathe while performing the exercises. Although this “grunting” may sound unfamiliar and disconcerting at first, breathing in sharply through the nose and breathing out slowly while gritting the teeth should become a part of everyone’s training routine.

In order to understand why we use the “biomechanical breathing” method for improved performance and safety, we first need to talk about the anatomy of the trunk and core. Today, most researchers agree that the lumbar region is an area that relies heavily on stability and where excessive range of motion should be avoided (Battie et al, 1990; Biering-Sorenson, 1984; Cuoto, 1995; Saal & Saal, 1989; McGill, 2010). In the original sense, the widely-used term “core stability” describes “the ability of the lumbopelvic hip complex to prevent buckling and to return to equilibrium after perturbation” (Wilson et al., 2005). In other words, core stability is the ability to produce and maintain a neutral lumbar spine (Gottlob, 2001). According to the National Institute for Occupational Safety and Health, keeping a neutral spine is recommended when lifting something heavy off the ground or being under load…

Several muscles, such as the latissimus dorsi, erector spinae, quadratus lumborum, multifidii, and obliques—but also the glutes and adductors contribute to the stability of the core (Filey, 2007). More importantly, most of these muscles are connected via the thoracolumbar fascia, thereby forming a natural weightlifting belt around the lumbar spine. In conjunction with the diaphragm and the muscles of the pelvic floor, they help to maintain or build core stability by forming a shell around the lumbar region. Contracting the core and hip muscles leads to muscular stiffness and therefore the flexibility of the shell decreases and becomes more rigid. Filling the rigid shell with air by sharply inhaling through the nose will increase the so-called intra-abdominal pressure, leading to greater compression of the spine and consequently higher intervertebral stiffness (increased lumbar spine stability).

diagram of human breathing

A sharp inhalation has the advantage of automatically contracting the core muscles, which does not happen during slow breathing. The same effect is observed when exhaling while gritting one’s teeth—sufficient intra-abdominal pressure is maintained because more air will remain in the respiratory pathways while air flow is constricted. Continuous breathing allows continuous spine stability and is therefore preferable to the “valsalva maneuver”, when performing a task for more than one repetition. In support of this theory, Stuart McGill (2007) reported that using this breathing technique—known as “kime” in martial arts—when performing swings lead to a significantly greater contraction of the obliques. Thus, safety and performance can be enhanced by just breathing the right way.

***

Felix Sempf M.A. Sportscience, RKC, FMS, PM trains and instructs at the FIZ in Göttingen, Germany. He can be contacted by email at: felix.sempf@sport.uni-goettingen.de and his website: http://www.kettlebellperformance.de

Filed Under: Kettlebell Training Tagged With: breathing, breathing technique, core stability, effective breathing, Felix Sempf, intra-abdominal pressure, kettlebell technique, RKC kettlebell training

Primary Sidebar

Featured Products

previous arrow
BOOK-RKCBookofSnC
HardStyleKettlebellChallegeDanJohn700
BookCoverMasterTheKettlebell1
RKCiconKettlebell512
KettlebellGoddessdv040
next arrow

Recent Posts

  • RKC Big Six Workout
  • The Kettlebell Swing & Low Back Pain
  • Key Kettlebell Exercises To Help You Create Better Balance
  • How to Most Effectively Use Kettlebells to Meet Your New Year Goals
  • 1 Exercise That Checks All The Boxes
FOLLOW US ON TWITTER!

Archives

Copyright © 2025

Dragon Door Publications / The author(s) and publisher of this material are not responsible in any manner whatsoever for any injury that may occur through following the instructions or opinions contained in this material. The activities, physical and otherwise, described herein for informational purposes only, may be too strenuous or dangerous for some people, and the reader(s) should consult a physician before engaging in them.