• Skip to main content
  • Skip to primary sidebar
  • Home
  • Contributors
    • Matt Beecroft, Master RKC
    • Martijn Bos, Master RKC
    • Andrea Du Cane, Master RKC
    • Angelo Gala, Master RKC
    • Chris Holder, Master RKC
    • Steve Holiner, Master RKC
    • Dan John, Master RKC
    • Mike Krivka, Master RKC
    • Thomas Phillips, Master RKC
    • Robert Rimoczi, Master RKC
    • Phil Ross, Master RKC
    • Max Shank, Master RKC
  • Workshops
    • HKC Workshops
    • RKC Workshops
    • RKC-II Workshops
  • Find an RKC Instructor
  • Resources
    • Articles
    • Forums
    • Kettlebells
    • Products
  • Blogs
    • PCC Blog
    • Strong Medicine Blog
  • Archives

RKC School of Strength

Official blog of the RKC

Master RKC Phil Ross

How Well Do You Move?

April 19, 2017 By Phil Ross 4 Comments

Master RKC Phil Ross, Kettlebell Pullover

How well do we—as humans—move? When we move are we trying to avoid or minimize pain? There seem to be three major areas of pain, have you wondered why these areas are so afflicted, even with people who are “in shape”?

The low back (lumbar region), the knees (distal femur, proximal tibia, fibula and patella) and the shoulders (glenohumeral and sterno-clavicular joints) are the pain points for many people. Why?

Two words need to be considered: stability and mobility. Certain joints of the body prefer stability and others favor mobility. Feet, knees, the low back and scapular regions favor stability. Ankles, hips, the thoracic spine (middle back) and glenohumeral joints (shoulders) flourish with mobility. The joints need to do what they are designed to do. If not, then asymmetries and injuries occur. And here’s the double whammy—not only will the misaligned joint be affected, the ones above and below it will too! For example, if a person has tight hips, their hip movement will be compromised. The movement will need to take place in other parts of the body, usually the knees and low back, both of which are stability-favoring joints above and below the hips. This creates instability in these joints, resulting in pain and anomalies.

Many people have low back pain. They might stretch their backs, get chiropractic adjustments, or take pain pills, but the issue will still not be addressed. The real issue be that the hips are tight and immobile, and/or the hamstrings are too tight. They may also have immobility issues if their thoracic spine (t-spine) is not strong enough or mobile enough to move safely. Are the erector spinea and the multifidi muscles (muscles that connect the vertebra) strong and engaged? Are the rhomboids, trapezius and other muscles of the scapula developed? Does the individual know how to keep them engaged? On many occasions, low back issues really lie in the areas above and below. Addressing the strength and flexibility of these major joints often significantly relieves back pain.

How do we address and avoid these issues? First, if you are not training, start. You’ll move better, feel better and live a longer (and often more productive) life. Next, consider that type of training, is it cardio, mobility or strength based? Are you getting the correct balance for optimal health? With your strength training or resistance training, are you using closed chain or open chain exercises? Closed chain movements involve more joints of the body and tend to be better for you. Open chain movements are more isolated and can have a shearing effect on the joint.

For example, let’s compare bodyweight squats and leg extensions. Bodyweight (or weighted for that matter) squats are a closed chain movement. The major joints and muscle groups addressed are the hips, knees and ankles, and the glutes, quadriceps, hamstrings and gastrocs (calves) are on the muscle side of the equation. Other muscles and stabilizers are involved at lesser degrees along with a good deal of core engagement for bracing. When performing squats, the feet are firmly planted and positive joint compression is employed. In contrast, leg extensions only address the quadriceps with concentric and eccentric contractions. The other leg muscles are virtually dormant and only the knee joint is involved. There is a shearing effect on the knee joint which may cause injury over time. In my estimation, this machine should be disassembled, melted down and repurposed as something useful, like a kettlebell! Just ask yourself, when you walk, run or jump, do you isolate a muscle or use your whole limbs and torso? In a rehabilitation situation or in bodybuilding, then muscle isolation may be appropriate, but otherwise multi-joint movements are superior.

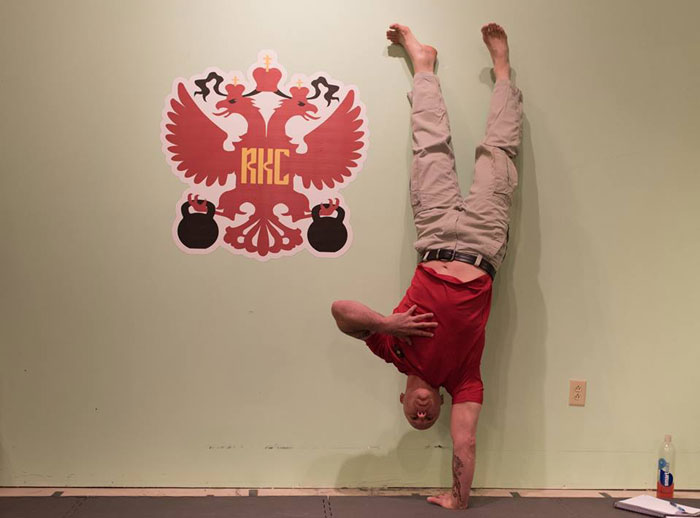
There are many reasons why kettlebell training is my central mode of training. With kettlebells, all of the facets of fitness are addressed: strength, explosive power, flexibility, durability, muscular endurance, cardiovascular training, and mobility. Let’s consider mobility. Outsiders (I’m referring to those not acquainted with bonafide kettlebell training), only view kettlebell training as strength, explosive power and muscular endurance, but not necessarily promoting healthy mobility.

Along with the bo staff, freehand mobility and calisthenics I lead on a daily basis in my classes, there are three kettlebell based complexes we use to prepare for the rigors of the training session. We execute 10 repetitions of each movement on each side, or in each direction where applicable. The first complex is figure-8, then low, middle, and high halos. The second complex is bottoms-up crescent swings, kettlebell good mornings, and goblet squats. The third complex is the RKC armbar, lying side swings, and kettlebell pullovers.

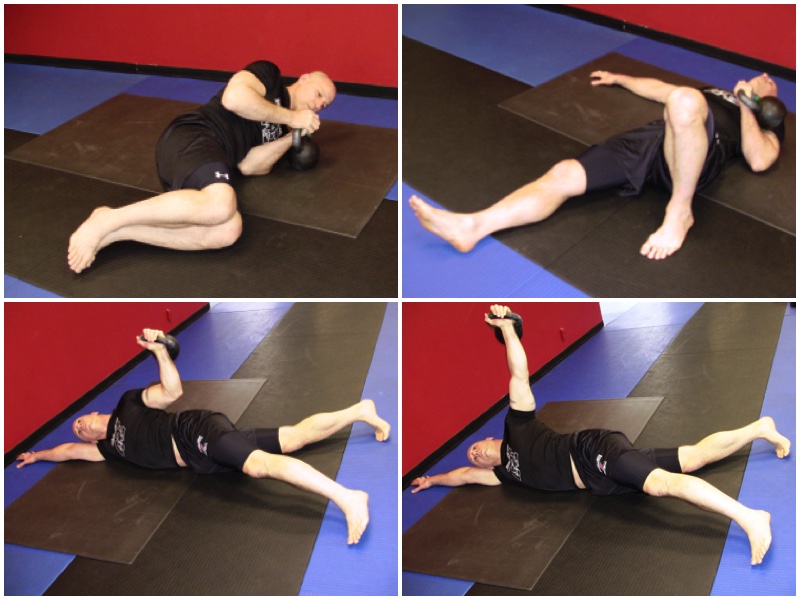
Let’s discuss the third complex: the RKC armbar, lying side press and the kettlebell pullover. Generally, we do 10 repetitions of the armbar, 10 reps of the lying side press on both sides, and then 10 reps of the kettlebell pullover. Two sets of each.

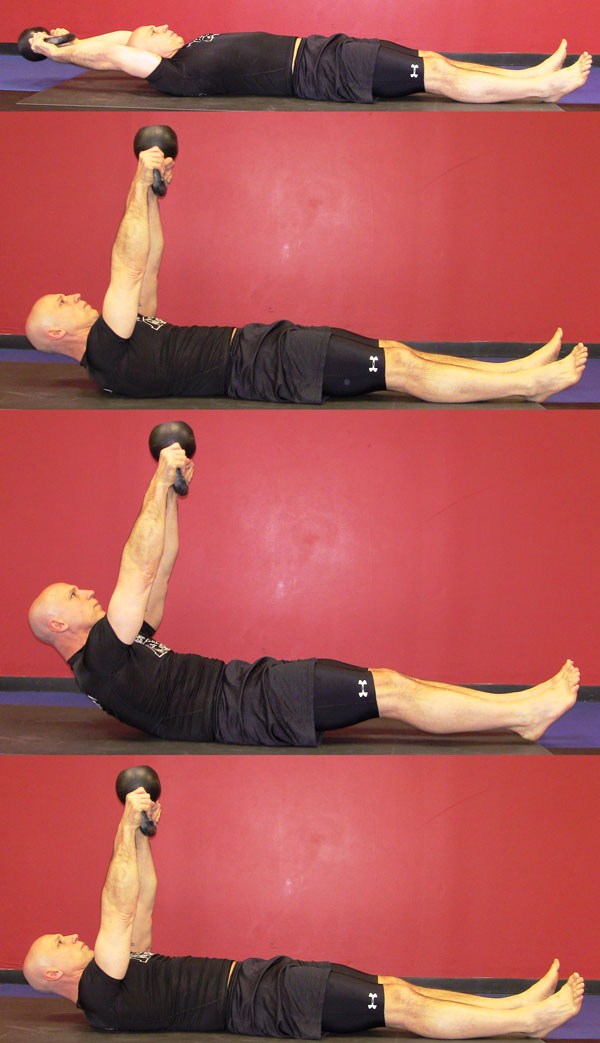
The Armbar packs the shoulder and prepares the participant for overhead work. Lie on your side in the fetal position as if you were starting a get-up. Grasp the kettlebell by the handle, bring it to your shoulder, then roll onto your back. With two hands, press the kettlebell upward. Make sure that your wrist is straight, your elbow is locked, and your shoulder is packed. If the kettlebell is in your right hand, take your right leg and bring it to the other side of your body so that your hip is facing the floor and most of your anterior is in the prone position. Do all of this while maintaining a relaxed neck and while rotating kettlebell in space. Attempt to bring your right hip as close to the floor as possible as you keep your arm and wrist locked. Once you’ve settled into the bottom of this movement, bring your right leg across the body until you are supine with the kettlebell above. This movement needs to be performed slowly, to maximize the opening of the hips and packing of the shoulders. Relish the time under the kettlebell as your thoracic region savors the mobility!

The Lying Side Press is to be done as soon as you have completed the armbar. As you are on your side, press the kettlebell upward. It is imperative to maintain a straight wrist and vertical forearm throughout this exercise. Pull the kettlebell down so that your elbow is slightly behind your hip. Keep the kettlebell steady and feel your rhomboids working. If you feel stress in your anterior deltoid, you are doing the movement incorrectly and most likely not keeping your forearm vertical.

Phil Ross Lying Side Press Sequence

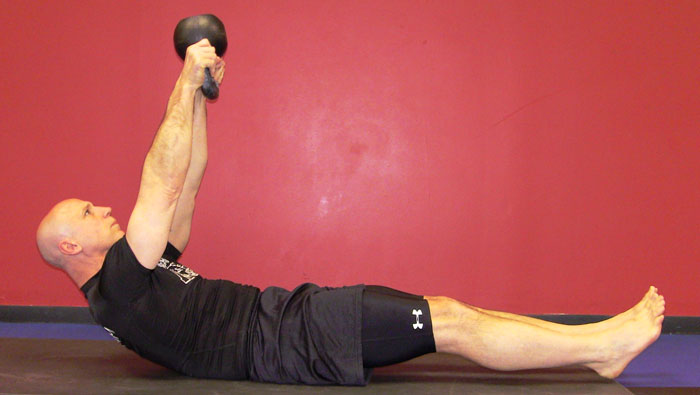
The Kettlebell Pullover is a movement that’s very easy to cheat! Don’t be “that guy” or “that girl”. The kettlebell is on the ground above your head as you lie in the supine position. Grasp the kettlebell in both hands at the horns and bring it overhead. Now, lock your arms. While you lower the kettlebell, remember the phrase “sometimes, always, never”. Sometimes your thoracic region comes off of the ground, Always have your head and cervical spine off of the ground and Never let your lumbar spine or hips come off of the ground. So, lower the bell with your head off of the mat and do not allow the kettlebell to touch the ground. As you keep the bottom of the kettlebell facing away from you, raise it so that it is perpendicular to the floor. Pause. Next, contract your abdominals as you bring the kettlebell straight upward while keeping your lumbar spine on the floor. Repeat this process for 10 repetitions.

PhilRoss Kettlebell Pullover Sequence

If you have any questions regarding this RKC blog post or any other kettlebell or fitness related matter, please feel free to contact me.

Strength and Honor!

Coach Phil 


***

Phil Ross Master RKC, 8th Degree Black Belt, CK-FMS, PCC and ACE Certified. Author of Ferocious Fitness and Survival Strong, producer of The Kettlebell Workout Library. He is also the Chief Instructor at American Eagle MMA & Kettlebells

Filed Under: Kettlebell Training, Mobility and Flexibility Tagged With: kettlebell training, Master RKC Phil Ross, mobility, mobility training, mobility warmup, phil ross, warmups

My “Body” of Work: Part 1

December 2, 2016 By Phil Ross 5 Comments

Phil Ross One Arm Handstand

Having recently hit my 54th birthday, I can’t help but reflect on what I’ve put my body through and how lucky I was to find the RKC‘s incredible strength and mobility training. The system is truly remarkable. This is a long post, but I strongly feel that many people will benefit from this information. I also want to give hope and inspiration to those who are in pain, struggle with immobility and injuries from their “sins of the past”. More importantly, I want to help instructors, trainers, and their students (or clients) avoid injuries and set-backs. Enjoy!

For most of my life, I was a competitive combat athlete. I played contact football at age 9 and at age 13, had my first combat competition. There weren’t many junior wrestling leagues or martial arts schools around in 1975. I still spar (stand-up kickboxing) and roll (ground fighting in Jiu Jitsu), but not nearly as intensely or as often as I did from 1976 to 2011. However, I keep my skills sharp by doing a great deal of drilling and bag work. Scaling down from that level of training and giving up competition was–and still is–a difficult thing for me. But, my current situation allows me to focus my professional energies on other challenges: developing my students, growing my business, producing videos, writing books and furthering my education. I also get to spend a little more time with my family, coaching my little one and helping my older children reach their goals. This is something I cherish very much.

A couple of years ago, John Du Cane and I were talking. I told him how my kettlebell training and the other movement training I’ve learned since I started with the RKC has enabled me to move much more effectively and overcome the many injuries sustained during a lifetime of contact activities. The many years of football, wrestling and combat sports training and competition took their toll on my body, but I still workout virtually every day. I’m only able to do this is because of my kettlebell and bodyweight training regimen. John said that I should write a blog post and list all of the injuries. I agreed, and while some of the injuries haven’t had any effect on my ability to train, I’ll furnish the list of the most significant. I’ll also put forth the movements that have helped me the most.

Here’s my “Body of Work”

I won’t bore you with all the times that I’ve cracked a toe or broken a finger. I’ve had so many jams, sprains, minor dislocations, and stitches that I can’t remember them all. Many times, I’d simply pop my finger, toe–and once even my knee–back in place, throw on some tape and go back to training or back in the fight. At 17, I broke my thumb in two places while wrestling in the NJ State Freestyle Championships. But I taped it up, finished that match and wrestled in the finals. In my mind, that was “just another day at the office”.

So, we’ll start from the top…

Head:

I have had four diagnosed concussions, and several minor ones that I just shook off and either went back on the field, got back on the mat or went out for the next round. Since most of them occurred in the 70’s and 80’s, there was no real treatment, and not much time off. I took a week off when I had my worst concussion, but my eye was also swollen shut at the time and I had 17 stitches in my head and 5 more in my arm. I wasn’t going to be doing much for a few weeks anyway.

I also had my nose broken four times and had it repaired twice. This has had an adverse effect on breathing while training. At one point, one nostril was fully closed and the other operating at 50%. It was difficult not to be a “mouth breather” at that point. Getting enough oxygen into my lungs was tough for a while until my second nose operation. I still use saline spray (Xlear with xylitol) and a nasal inhaler (Oblas with menthol, and oils of peppermint, cajeput, eucalyptol) several times a day. Incidentally, this practice has also helped me avoid many colds and sinus infections. I haven’t had or needed antibiotics in years, which has further bolstered my immune system.

philrossarms

Neck:

I’ve had three memorable injuries to my neck and have experienced countless “burners” during competition or fight training. For those of you who don’t know what a “burner” or “stinger” is, it’s when your neck (or head) gets twisted, jammed or otherwise forced into a compromising position, usually very quickly and a “hot”, “shocking” or “burning” sensation runs from your neck down your arm. Generally, you experience a “flash of light” in your eyes, pain, and temporary lose the use of your arm. I’ve had this happen more than once in actual combat and had to just deal with it. I’ve experienced so many of these in training and competition that I can’t even try to remember how many times it has happened.

One of my major neck injuries occurred in a football game, and another during a wrestling match. But, the most notable injury required surgery on four levels of my neck. This injury occurred during fight training at the end of 2011, but the situation was acerbated from years of abuse. The MRI revealed two herniated and five bulging discs in my neck, spinal stenosis in many of my foramen, and an osteophyte on the inside of my spinal canal. This caused an edema (bruising/scarring) on my spinal cord, resulting in a permanent spinal cord injury. Four levels of my vertebra had their foramen removed, “windows” were put in the vertebra, and the osteophyte was removed. But, the damage had already been done.

I started my rehabilitation a little less than two weeks after the operation. For the first week, I could only do planks. I progressed to plank pull-ups (Aussie pull-ups) and incline push-ups for sets of five reps. Within five months, I was able to perform most of my movements again, and began to film The Kettlebell Workout Library. Prior to my operation, I was unable to press a 10kg kettlebell overhead. After only four months of training I was able to press a 20kg kettlebell bottoms-up. I attribute my speedy recovery to my strength and conditioning practice both prior to the operation and the RKC methodology employed afterward.

Shoulders:

I have a torn labrum (slap tear) in my right shoulder. Prior to 2006, it used to slide out on a regular basis. At that time, I had just gotten into kettlebell training–my first set of kettlebells was delivered in December 2005. I hadn’t quite developed the ability to engage my lats and pack my shoulders properly at this point. In June of 2006, I was set to shoot 3 DVDs: Fit 2 Fight, Combat Ready and Let’s Sweat. Five days before the shoot, my shoulder popped out–and stayed out. I drove myself to the hospital and they couldn’t get it to stay in. The next day, I got an ART (Active Release Technique) treatment from Dr. Michael Dworkin and my shoulder slid back into place. At first, I rehabbed it with swings while only focusing on packing my shoulders and engaging my lats. My shoulder hasn’t slid out in over 10 years!  Not only was I able to complete shooting the videos, but the new strength permitted me to get back to live grappling. I was also able to successfully compete through 2010 in submission fighting. Kettlebell training changed my life and extended my competitive career to span four decades. Very cool!

Elbows:

I’ve had an ongoing battle with my elbows. Back in the day, I used to spend endless hours pounding on the Makawara affixed to the concrete wall in my garage. As a fighter in my early twenties, I didn’t consider the long term repercussions of sending force into an object that could not give way. I just wanted to toughen my hands and hit hard. By hitting the wall-mounted striking surface, all the force that I put into the punches came back at me. All of the years spent fighting, sparring, grappling, and getting armbars finally caught up to me in 2005. I was doing heavy cable curls and the next day my forearms, particularly my brachial radiali were screaming in pain. I could barely turn a door knob, walk my dog, shovel snow off of my driveway or even start my car without an excruciating pain shooting through my arm. It was so bad that one day in 2005, I was training with Frank Shamrock and I couldn’t move my arm at all. He said, “Bro, I’d get that taken care of ASAP”. Good advice. He told me about ART and that’s how I found Dr. Mike Dworkin (the guy who fixed my shoulder).

Kettlebell training taxes your grip. Doing pull-ups and hanging abs wreaks havoc on your grip and elbows. Not to mention BJJ (Brazilian Jiu Jitsu), grappling, kickboxing and weapons training. All of the activities I love were adding to and were the root cause of my elbow pain. I tried all of the standard and non-standard treatments. Here’s what didn’t work: cortisone injections, acupuncture, prescription and a myriad of useless bands, straps and sleeves. Don’t waste your time or money. Here’s what worked: ART and Graston Technique, dry needling, oblique activation and a sound stretching regimen. I leveraged my relationships with the many professionals that I met through the RKC and put together a stretching routine for my forearms/elbows.

These are the best exercises I have found to maintain elbow and forearm health:

This first exercise is a stretch. I place my palm, fingers down, against the wall and keep my arm straight while pressing against the wall for 30 to 60 seconds. Now, I also do this stretch against a suspended, supported horizontal bar for a greater range of motion.

Back of the wrist push-ups: start on your knees if necessary, turn your hands inward and make sure that your arms are completely straight. After you become more advanced, ball your fists and press your knuckles together as you press up to full extension.

Handstands, wall handstands, crow stands, and toad stools: these movements build strength in the shoulders, arms, and core. More importantly, they de-load the the forearms. Practice these strength movements with your hands completely open and gripping the floor will do wonders to counterbalance the effects of a great deal of clenched-fist work.

For the last exercise, stand tall, pack your shoulders, and keep your neck, shoulder and arm in the same vertical plane. Grasp a small kettlebell, nothing heavier than 16kg, with your thumb facing forward. Rotate your palm so it faces forward, then bring your opposite ear to your shoulder. Be sure to maintain the same plane. For example, if you have the kettlebell in your left hand, bring your right ear toward your right shoulder while keeping all your moving parts in the same plane.

Hands:

My hands are crucial to my work, activities and life. I’ve had many fractures, jams, sprains and dislocations. Strong hands are critical. There was a time when one of my hands was so weak that I couldn’t even military press a 10kg (22lb) kettlebell. This is coming from guy who had to strict press the Bulldog (44kg – 97lbs) to attain my RKC Level-II! Yes, I was a little down.

The main exercises that helped me regain my strength are: single kettlebell deadlifts, kettlebell wrist twists, pitcher curls, bottoms-up presses, bottoms-up carries, farmers walks, Neuro-Grip push-ups and kettlebell snatches.

Single kettlebell deadlifts: keep your shoulders and hips in prefect alignment, pack your shoulders, engage your lats, grasp the kettlebell handle firmly, and lift. It’s important not to “dip” your shoulder or twist your hips. I am now up to using a 150 pound kettlebell for sets of five reps.

Kettlebell wrist twists: lay the back of your hand against the floor as you grab the kettlebell by the handle. Twist the kettlebell back and forth as you “kiss” the ground with the bell. Repeat for 5 to 10 repetitions.

Pitcher curls: grasp one or two kettlebells by the handle(s) and start with them at your thighs. Maintain a straight back with your arms held at your sides. Keep your elbows in the same position, move the kettlebell(s) upward to the bottoms up position. Repeat the movement for 5 to 10 repetitions.

Bottoms-up press: this movement is the most effective pressing motion to engage your lats and improve your overall overhead press, and it’s incredible for grip development. On a good day, I can do it with a 28kg kettlebell, but I can invariably perform this movement with a 24kg kettlebell, even on my worst day.

Bottoms-up carries: this exercise forces the recruitment of additional stabilizers, not only in the forearms, but in the whole body, and aids in discovering new neural pathways for the hands. Since several muscles in my hand not longer had a signal coming form my brain, I had to find new pathways and develop additional strength in other, previously ancillary muscles and stabilizers. This movement also creates greater muscular endurance.

Farmer’s walks: grip strength development is one of the many benefits of the farmer’s walk. I will typically do 4 to 6 minutes of farmer’s walks as the last part of my workout–as a finisher. In contrast, I generally perform the bottoms-up carries in the beginning of the session.

Neuro-Grip push-ups: I have to thank my buddy Jon Bruney for inventing this device and bringing it to Dragon Door. I love this device and use it a great deal! Grip strength, wrist strength, balance, and core recruitment are developed to such a high level with this little tool. When I first got them in, I could only do about 20 repetitions. Fast forward a year later, my PR is 57 on two hands and 5 with the one armed version. My best is two in a row on my damaged (right) side. I recommend that everyone get Neuro-Grips.

Snatches: snatches tax the grip. Even if you pop the kettlebell in your hand from palm to fingers on the downward movement, spear your hand at the top and rotate your thumb inward at the bottom. The grip will be the first thing that goes, check out people’s hands after doing their first RKC Snatch Test or after executing the V02 protocol, if you have any doubt.

There are a few other practices I employ. I use a thumbless grip whenever possible, and I focus on squeezing my pinky when I’m doing grinds with my full grip. These two variations have helped me avoid recurring elbow problems. The thumbless grip forces you to use your lats more.

There are many other exercises: hanging from a pull-up bar, rows, bottoms-up cleans. I’m not back up to pressing the 44kg yet, but I can get the 40 up on a good day and recently did a get-up with the 44kg. So four and 1/2 years after my surgery, I continue to improve!

Strength and Honor!

Coach Phil

Stay tuned for Part 2!

****

Master RKC Phil Ross is the creator of many strength and conditioning programs, including The Kettlebell Workout Library. Visit www.philross.com to learn about his programs, classes, and workshops. Subscribe to his YouTube channel for more workout and exercise info.

Filed Under: Kettlebell Training, Tutorial Tagged With: kettlebell training, Master RKC Phil Ross, mobility, phil ross, training around injuries, wellness

Primary Sidebar

Featured Products

previous arrow
BOOK-RKCBookofSnC
HardStyleKettlebellChallegeDanJohn700
BookCoverMasterTheKettlebell1
RKCiconKettlebell512
KettlebellGoddessdv040
next arrow

Recent Posts

  • RKC Big Six Workout
  • The Kettlebell Swing & Low Back Pain
  • Key Kettlebell Exercises To Help You Create Better Balance
  • How to Most Effectively Use Kettlebells to Meet Your New Year Goals
  • 1 Exercise That Checks All The Boxes
FOLLOW US ON TWITTER!

Archives

Copyright © 2025

Dragon Door Publications / The author(s) and publisher of this material are not responsible in any manner whatsoever for any injury that may occur through following the instructions or opinions contained in this material. The activities, physical and otherwise, described herein for informational purposes only, may be too strenuous or dangerous for some people, and the reader(s) should consult a physician before engaging in them.