• Skip to main content
  • Skip to primary sidebar
  • Home
  • Contributors
    • Matt Beecroft, Master RKC
    • Martijn Bos, Master RKC
    • Andrea Du Cane, Master RKC
    • Angelo Gala, Master RKC
    • Chris Holder, Master RKC
    • Steve Holiner, Master RKC
    • Dan John, Master RKC
    • Mike Krivka, Master RKC
    • Thomas Phillips, Master RKC
    • Robert Rimoczi, Master RKC
    • Phil Ross, Master RKC
    • Max Shank, Master RKC
  • Workshops
    • HKC Workshops
    • RKC Workshops
    • RKC-II Workshops
  • Find an RKC Instructor
  • Resources
    • Articles
    • Forums
    • Kettlebells
    • Products
  • Blogs
    • PCC Blog
    • Strong Medicine Blog
  • Archives

RKC School of Strength

Official blog of the RKC

get up

The Get-Up—The Ultimate Triplanar Exercise

December 7, 2016 By Ashoka McCormick 3 Comments

training get-ups for judo athletes

When we think of Bruce Lee throwing a kick, Muhammad Ali dodging a punch, or a great wrestler like Dan Gable swiftly shooting in for a double-leg takedown and dumping his opponent on the mat, we can easily imagine strength exerted on multiple planes.  This multi-dimensional strength and stability is achieved through specific strength conditioning. It is the key for optimizing body movement and power for a combat athlete’s knock-out punch. It also provides incomparable groundwork for other athletes, too.

The majority of today’s programs favor traditional strength and conditioning approaches which are often heavily biased towards sagittal plane (forward and backward) movements. We definitely need strength in the sagittal plane, and many of the big-bang-for-the-buck exercises like squats and deadlifts occur in this plane.

But in designing our training, it is important to understand that the human body does not move in just one direction. We can also move side-to-side, forward, backward, and in rotation. Training in multiple planes, or multiple directions, helps us achieve higher levels of body awareness, balance, and coordination. This improved programing allows for quicker reaction times and more efficient neuro-motor function. Training in all the planes can help athletes and clients avoid injury and enhance their performance. It’s a required practice for any athlete determined to consistently perform on an elite level.


The Three Planes:

Sagittal Plane:

Movements in the sagittal plan move forward and back, or through the mid-line of the body. Common examples of sagittal plane movements are a biceps curl or a sit-up.

Frontal Plane:

Movements along the frontal plan can be described as side-to-side, such as abduction and adduction. Exercises that work through the frontal plane are side lunges and jumping jacks.

Transverse Plane:

Movements in the transverse plane include horizontal abduction, adduction or rotational actions. Exercise examples include the Russian twist or a cable woodchop.

One major reason most sports injuries occur in the frontal and transverse planes is that most athletes are only training in the sagittal plane. Athleticism depends on a tremendous amount of movement in different planes of action. Strength and conditioning programs for athletes should strive to include as many variations of movement as possible to train muscles in as many planes as possible (Kenn, 2003).

As trainers and coaches, we must prepare our athletes by strengthening their bodies in all three planes. If your athletes understand the difference between these three planes of movement and can develop their ability to efficiently weave their movements together, then they will be well-rounded and less prone to injury.  For example a fighter in the ring or cage spins, moves left and right, dodges kicks, pivots, punches, and is constantly tackled.  If his or her body is weak in a particular plane, the likelihood of an injury is much greater.

Most popular training methods do not use multi-planar movements. Powerlifting, Olympic lifting, CrossFit training, and bodybuilding tend to primarily work in the sagittal plane. Very few movements are in the transverse or frontal planes. Additionally, most of these training methods do not include multi-planar movements—combinations of frontal, sagittal, and transverse planes of motion. These popular training methods are still valid for training athletes, but coaches should also consider ways to train sport-specific movements that athletes will perform on the field of play (Brown, 2013).

Ashoka McCormick at the whiteboard

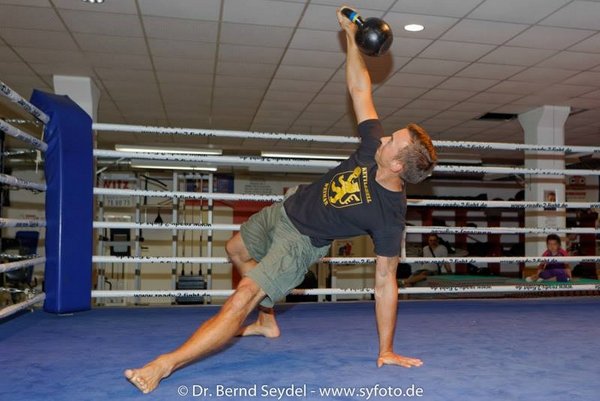
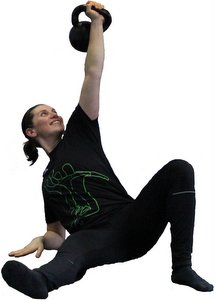
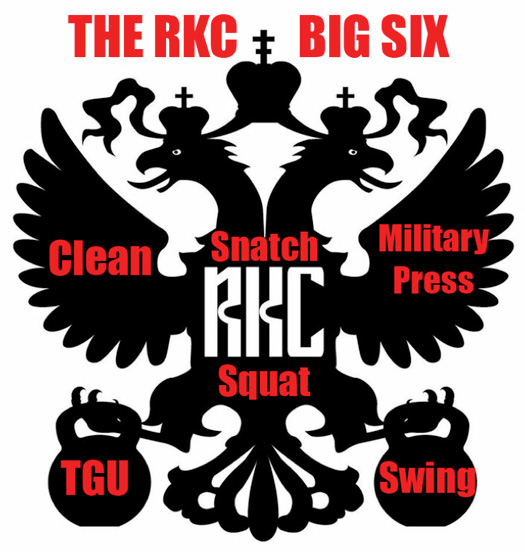
As strength coaches and trainers, we can create workouts that hit all of these planes, or we can select compound exercises—triplaner movements—that hit all three planes in one rep. One of the best triplanar movements of all is already a staple among RKC and HKC Instructors: the get-up

In the kettlebell community and the strength and conditioning world, the get-up is highly regarded, and with very good reason. It’s a highly functional movement and total body exercise. Its benefits include improved shoulder stability and strength, correction of left-right asymmetries, overall mobility, core strength, improved movement skills, overall proprioception / coordination, and time under tension. The get-up also teaches athletes to stabilize themselves and create whole body tension in a variety of positions.


Truly Triplanar

The above-mentioned list of benefits is more than enough justification to include the get-up in our workouts. But, I think that one of the most valuable benefits provided by the get-up is that it passes through all three movement planes from the ground up, and again on the way back down to the ground. For that reason alone, the kettlebell get-up is one of my favorite options—it forces you to work in EVERY plane of motion.

Body Awareness

The get-up provides a variety of functional movement patterns and an unmatched stimulation to our vestibular and nervous systems. Once they have mastered all the steps of the get-up, you can even lead your clients and athletes through the movement with their eyes closed for a greater nervous system challenge. The body awareness developed from practicing get-ups provides tremendous value for athletes and the general population.

Ashoka McCormick spotting kettlebell get-up

Five Minute Get-Ups

At my HKC certification in April, RKC Team Leader Chris White mentioned doing “Five Minute Get-Ups.” Since then I have added this drill into many of my programs for Judo athletes. At first, they should be practiced without weight, then balance a shoe on the fist for added challenge.  I tend to use the “Five Minute Get-Up” protocol at the beginning of our workouts, it serves as a good warm-up, and a great opportunity for skill development.

During the drill, we focus on one quality rep at a time. I encourage the athletes to take their time. You can incorporate “Five Minute Get-Ups” at the beginning of your workout, on a recovery day, or even as a stand-alone skill practice session. Advanced athletes can try it with weight. But, with or without a kettlebell, the main focus is on the fluidity of the movement.

When designing a strength and conditioning program, we need to include multi-planar movements, multi-directional movements, and various stances which are appropriate for our athletes. Exercises like the get-up will help athletes move more efficiently and will decrease their chances of injury while increasing their overall functional strength.

Winning Athletes At the podium

References:
Brown, T. (2013, September). NSCA’s Performance Training Journal, Issue 12. Retrieved November 18, 2016
Kenn, J. (2003). The Coach’s Strength Training Playbook. Monterey, CA: Coaches Choice.

****

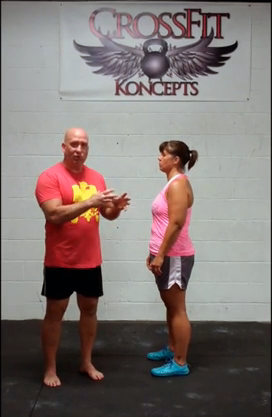
Ashoka McCormick, HKC is a performance coach in Santa Cruz, California.

Filed Under: Coaching, Kettlebell Training Tagged With: Ashoka McCormick, Athletic Training, fitness training, get up, hkc, kettlebell get-up, kettlebell training, stength and conditioning for sports, tri-planer training, triplanar exercises, triplanar movement, triplanar training

Programming the TGU

November 9, 2016 By Jason Kapnick 5 Comments

Programming the TGU by Jason Kapnick

“What sets and reps should I use to make progress on my TGU?”

This is one of the most common questions about programming kettlebell training. Finding the right scheme of sets and reps is especially challenging because the get-up doesn’t follow the same rules as any other exercise in the gym. Because a single repetition of the TGU can take roughly 30-seconds, doing “5 sets of 10” simply doesn’t make sense.

Below are a few of the strategies that I’ve found to be effective for adding the TGU into your strength training program.

1. The “3-Week Wave Cycle”

This first option is intended for intermediate to advanced kettlebell lifters, and it’s my favorite way to use the get-up as a “main lift.” In other words, this option will treat the TGU as a primary exercise. Make sure that you’re relatively fresh in your workout (I would recommend doing get-ups first), leave plenty of time, and don’t plan to do an excessive amount of assistance work afterwards. Simply put, this progression WILL produce PRs.

TGU with partner spotting

Do get-ups once per week, according to the following loading scheme:

  • Week 1 “Volume Accumulation”: 8-12 get-ups with a medium weight (a good rule of thumb is 60-70% of your best-ever TGU).
  • Week 2 “Weight Ladders”: Choose three kettlebells, a light kettlebell, a medium-heavy kettlebell (similar or slightly heavier than week 1), and a heavy kettlebell (not quite your personal best). The kettlebells should be evenly spaced about 4-8kg apart (12-16-20, or 24-32-40, for example).Perform 3 rounds of 1 TGU on each side, first with the light kettlebell, then with the medium, and finally with the heavy kettlebell. The idea is that the heavy kettlebell will show you where your technique needs work, then the light kettlebell will allow you to practice and correct technique errors or inefficiencies. The “wavy” load is also useful for learning.
  • Week 3 “Run the Rack”: On this day, you’ll start with a very light kettlebell, perform a TGU on each side, and keep working up to progressively heavier kettlebells. Once you’ve reached the heaviest kettlebell you can manage for that day (which may or may not be a personal best), work with it for a few sets. Then perform a few slightly lighter get-ups to cleanse your palate. The total number of get-ups per side for the entire workout should be 8-10.
  • Week 4: Either start at Week 1 (trying to exceed either the previous weight or number of reps from last time), or take a light week to recover.

Heavy kettlebell TGU

Here’s an example of how this program might look over a few months. In this example, the athlete’s previous personal record for the TGU is a 40kg kettlebell:

  1. 32kg x 8 reps per arm
  2. (28-32-36) x 3 cycles; 9 total get-ups per arm
    3. 16×1, 20×1, 24×1, 28×1, 32×1, 36×1, 40x1x2, 32×1
  3. 32kg x 9 reps per arm; Note that this is more than the 8 reps in week 1
    5. (28-32-36) x 3 cycles; a chance to drill technique
  4. 16×1, 20×1, 24×1, 28×1, 32×1, 36×1, 40x1x3, 32×1; On this day he manages one more rep at 40kg vs. the prior week.
  5. Rest week
  6. 32kg x 10 reps per arm; Note that this is more than the 9 reps in week 4
  7. (24-32-40) x 3 cycles; Today he feels strong and increases the top set from 36kg to 40kg, but drops the weight on light and medium bells such that he can still complete the workout comfortably.
  8. 16×1, 20×1, 24×1, 28×1, 32×1, 36×1, 40×1, 44×1 PR!, 36kgx1 32×1;Today, he sets a new personal record before dropping down!

2. The TGU as a Warm-Up

Simply perform 3-5 get-ups with a light-medium kettlebell (~50% of your best-ever get-up) before your scheduled workout. This is a great option if you’re working on a more involved bodyweight or barbell program, and don’t have the bandwidth or desire to fit a lot of get-ups into your program. This option also emphasizes the idea that the get-up is not just training, but also assessment.

A note on the get-up as assessment: While we use the TGU as a stimulus for adaptation, the TGU also has a useful role as a form of assessment. By mindfully practicing the get-up and noticing where the challenges are and how they evolve, you can gain important insights into the quality of your movement. For example, if I’m in a heavy powerlifting cycle involving high-volume bench pressing, and the “low sweep” of my get-up starts becoming challenged, I might conclude that my pectoral muscles have become tight, and that I need to spend some time mobilizing my overhead position.

TGU in group fitness

3. 10-15 Minute Practice Blocks

Simply set a timer for 10-15 minutes and practice the TGU until the time is up.

This is our preferred way to teach the get-up to novices in a personal training or semi-private training scenario. While this program works great for those working with a coach or trainer, it’s also an excellent option for self-coached kettlebell lifters. When learning, it can be useful to remove the pressure of hitting a certain weight or number of reps, and let the athlete simply explore the movement and work on technique. We usually program this towards the end of a training session.

TGU partner spotting

4. 10-15 Minute Work Capacity Blocks

This option uses exactly the same parameters are #3, except with a different purpose. Now, the goal is to perform as many get-ups as possible within the time interval, while never sacrificing quality for quantity. Record your results, and look to improve each week. This is a great option for losing weight while also improving movement quality, or for conditioning and building work-capacity.

An appropriate weight for this option is anywhere from 50-75% of your best get-up.


****

Jason Kapnick is the co-founder of Catalyst SPORT, one of New York City’s top kettlebell training facilities. He has made multiple Elite powerlifting totals, with best lifts of 545/355/660 in the 198lb weight class, and achieved the Beast Tamer Challenge at his RKC in April 2013. He can be contacted through catalystsportnyc.com .

Filed Under: Kettlebell Training, Tutorial Tagged With: fitness, fitness program, fitness programming, get up, get-up programming, Jason Kapnick, kettlebell program, kettlebell workout, TGU, turkish get up, workout

Fine-Tuning the Get-Up

January 27, 2016 By Andrea Du Cane 14 Comments

Master RKC Andrea Du Cane Get-Up Lead Photo

How and when to use the high bridge and when to use the “step-across” instead of the “windshield wiper”

At every HKC and RKC, I’m asked why we test the low sweep instead of the high-bridge. I also get a lot of questions regarding the “windshield wiper” vs. the “step-across” to transition in and out of the kneeling windmill to the lunge position. It’s time to explore each movement and gain a deeper understanding of some of the benefits of the get-up.

When I first became certified and started teaching the get-up, it was referred to as the “Turkish get-up”. Here’s the criteria that was given and tested at that time:

  1. Keep both shoulders packed.
  2. Keep the wrists neutral at all times.
  3. Keep the elbow locked at all times.
  4. Keep your eyes on the kettlebell.

Oh and well…. get-up! That was it, get up anyway you can.

Let’s just say the get-up has come a long way, baby. It’s transitioned from having very little explanation and direction to (for a time) elaborate direction, with a focus on corrective uses and advanced movement patterning.

You can say that now we have found a happy medium, erring on the side of explanation and points of movement. But, we have also found a good balance and an easier way to teach the get-up to newer kettlebell instructors and users.

The High Bridge or the Low Sweep

One area of confusion with the get-up is whether to use the high bridge or low sweep.

First, let me explain where the high bridge came from, and why it was initially introduced as a teaching and testing skill. The high bridge came from the FMS concept of using movement as a screen. When it was first introduced into the RKC curriculum, the high bridge was used as a screen for tight hip flexors. However, we began to notice that when people were doing the high bridge, their lumbar spine was actually in hyper-extension instead of full hip extension. I remember discussing this with Gray Cook, and he agreed with that it was one problem with using the high bridge as a screen, since it is easily cheated. It does not actually demonstrate whether the person is in full hip-extension or hyper-extension of the lumbar spine.

Secondly—and more importantly—you would not put a client, with a kettlebell in their hands, into a high bridge and then say, “Aha! You have tight hip-flexors”. Of course not. Long before they do that high bridge, you have deduced that they have tight hip-flexors from other screens. And from a safety perspective, you would not let someone perform a high bridge until they had opened up their hip flexors and could perform the movement correctly without a kettlebell.

Since one of the end goals of the get-up is to go heavy, for the purpose of safety and efficiency, you will want to pull your leg back and get your hips under the load as quickly as possible. The high bridge takes unnecessary risks with a heavy load during the transition.

That said, the high bridge is great with a moderate to light weight for a more advanced kettlebell user. Done correctly, it demonstrates shoulder stability, hip flexibility and control.

Master RKC Andrea Du Cane Get-Up Kneeling Windmill

Performance Tip: Think of the high bridge and sweep through as a tall side plank. When moving into a high bridge, post over towards the side, your shoulders should be stacked over each other. The hips will rotate slightly upwards, but the shoulders and t-spine are stacked vertically. Practice lots of side planks from the elbow and tall side planks, before moving onto the high bridge.

The “Step Across” Variation

Moving on to the next modification, using the “step across” instead of a windshield wiper. As stated earlier, the body needs to transition from the tall-sit position smoothly and with control all the way to lunge. That means the hips need to get under the kettlebell as quickly and safely as possible—this includes the sweep through and transitioning to the lunge.

From the kneeling windmill position, the torso is moving from a horizontal position to upright, as the hips are coming under the torso and kettlebell. The hips need to fully extend with the glutes tight as you move into the lunge position. That’s a LOT of movement happening at the same time. The more stable and connected to the ground the body is, the safer and smoother the transition.

That is why the windshield wiper is taught and tested. Both legs remain firmly on the ground and the hips easily and fully extend.

Performance Tip: think about finishing at the top of a swing. The glutes contract hard and fast and the hips fully extend, allowing your body to find stability in the lunge position as soon as you hit it.

A potential problem with this movement is the pressure and friction placed on the knee. Obviously, if the knee is feeling pain, this could jeopardize the movement. The ground you are training on becomes an issue, and individual knee sensitivities should be taken into account as well.

One way to solve the issue is to use the “step-across” modification. From the kneeling windmill, you simply lift your torso up and then step your loaded foot across into a lunge position. This will take the windshield wiper out of the movement and “save” the knee.

The downside to this modification is the inherent lack of stability as you lift your loaded leg up and step it across. You are also changing the orientation of your head and body, which can also cause us to lose stability and control.   Lastly, it is much harder to keep your glute and hip tight and contracted as you move the leg, leading to another possible loss of control.

As we say in the RKC, “safety trumps performance”, so if you have sensitive knees or are training on a hard or rough surface, the step-across is a modification you can use to protect your knee and stay in control.

My personal recommendation is to buy a $20 pair of knee pads or have your clients purchase them for training. I do a lot of kneeling training and take knee pads with me everywhere to use for all kneeling training and stretching. $20 knee pads are a cheap and easy way to protect your knees and increase the effectiveness of your kettlebell training.

****

Andrea Du Cane is a Master RKC Kettlebell Instructor, CK-FMS, CICS, and RIST, ZHealth certified, she has a BA in Psychology from the University of Minnesota and is also a Pilates instructor. She is the author of several books and dvds including The Ageless Body, The Kettlebell Boomer, and The Kettlebell Goddess Workout.  She has over twenty years of aerobics, weight training and fitness experience, with an additional background in… Read more here.

Filed Under: Coaching, Kettlebell Training, Tutorial Tagged With: Andrea Du Cane, get up, get ups, Getup, kettlebell technique, kettlebell training, RKC, RKC kettlebell training

Movement and Learning the Get-Up

June 3, 2015 By Paul Britt, DC 1 Comment

Paul Britt Coaching Get-Up

movement (ˈmuːvmənt)
noun
Movement –

  1. The act or an instance of moving; a change in place or position.
  2. A particular manner of moving.
  3. A series of actions and events taking place over a period of time and working to foster a principle or policy
  4. A tendency or trend
  5. An organized effort by supporters of a common goal.

Movement is the back bone of athleticism and life. But, as a society we do not move the way that we did in youth. We are tied to desks, vehicles, and entertainment that requires us to just sit and become one with a chair. I started this post with the definition of movement as a beginning reference point.

The first two parts (a & b) of the definition are easy to cover and understand. We all move, and each of us has a particular way of moving. The question is, are we moving well? Most people seem to live in a position of flexion. We sleep, eat, drive and watch television from a bent and hunched position. We slouch and sag all day long. Guess what? Our bodies will take the path of least resistance and will stay in the posture that we live in. We were not created to just sit around; we were created to move, run, jump and play.

The third and fourth parts (c & d) of the definition describe what we need to change. We need to change our daily actions and events so that we restore the movement potential we were given at birth. It is time to get off the couch, up from the desk and actually start moving. We need to change our daily habits to allow our bodies to re-learn the movements and positions that we were born to do. Our kids are becoming slugs, thanks in part to videogames and constant visual entertainment. I have seen some kids play twelve hours of PS3, all while slouched and bent into weird positions. What happened to being outside all day, every day until the street lights came on?

The positions that we’re in all day do not help us live a full life. They prevent us from being able to run, play catch, or to live everyday life in the most efficient manner possible. We are held back by being bent and twisted in a life of sitting down. Sitting has been shown to increase the risk of death. Research has shown that sitting is associated with a higher risk of death after controlling for factors including age, gender, smoking status, physical activity, education, body mass index, and living in an urban/city environment.

I know that everyone wants to be active with their friends and family, and stay pain free and mobile into old age. I know I do! I want to be a pain in the rear of my family as long as possible! I think the best way to do this is to be 90 and move so well that no one can catch me!

We should move as much as we possibly can. Better movement allows us to have fewer injuries, live longer and have more productive lives. It is the cornerstone for our overall health.

How Do We Improve Movement Quality?

I teach the get-up as an antidote to improper movement and posture. The get-up is one of the best ways to battle the less-than-ideal positions our bodies grow into from our daily life of texting, sitting, and while working at most jobs. I find that while the get-up works wonders as a transformational exercise, many clients have a hard time learning it.  Some even need to earn the right to perform it.

I teach the steps a little different than most trainers. I like to teach the get-up from the bottom to the middle, and from the top to bottom. This approach seems to work really well for grooving the correct patterns into the neurological system.

Get-Up Tall Sit

I start from the Pick Up to the Tall Sit position. In the first step, roll from your side to prone. This strengthens a primal rolling pattern. Rolling patterns are great tools for teaching the body how to engage the core and stabilize the body under load. Why is this important? It allows the body to develop its innate stability and to connect the lower body to the upper body for more strength.

The next step is the Tall Sit. It allows you to work on shoulder mobility and stability. It will reinforce the connection the core has with the upper body. This is often the step that most of my clients need if their mobility is compromised. I kept one client at this stage for nine months while we worked on improving his thoracic mobility and core strength. During that time, the heaviest weight he used for the training was 4kgs. If we had forced the issue, he would have been injured. He was 60 when he began, and last I checked, he was using a 20kg kettlebell for full get-ups at age 63.

I teach the Hip Lift only as part three of the movement. I find that the movement becomes a little harder for my clients to perform after that point. They cannot initially get the idea of the moving from the low sweep to half kneeling or they do not have the proprioception to make the transition.

The next step that is taught is from standing down to half-kneeling. This allows the student to develop leg strength and improve their stability. It has been my experience that many clients lack stability in the lunge position. By working from standing to half kneeling, then moving through the reverse lunge under control, you can train stability while detecting any asymmetries the student may have. This lets us correct the asymmetry before continuing and possibly causing an injury.

Coaching the Get Up

Once the student has practiced the get up from the floor to low hip lift, and standing to half kneeling, it is time to teach the entire get up. I start from the top and have the student work from the standing position to the half kneeling position. We add the low sweep to the tall sit at this time. They finish the get up to the prone position. Then, they stand back up (not doing a get-up, they simply return to a standing position) and repeat the sequence a few times on each side. The student will perform the get up from standing to prone before reversing the process and performing the get up from the pick up to standing.

I have found that this approach has helped my students learn the get up much faster. By working on these pieces as needed, their mobility and stability has improved even on their first day. This sequencing seems to be less threatening and neurologically taxing for my students, which also allows them to learn it faster.

If you look back at the definition of movement at the beginning, the get up fits it to a “T.”

***
RKC Team Leader Paul Britt has been an RKC kettlebell instructor since 2006. He trains clients at Britt’s Training Systems, his award-winning Hardstyle Kettlebell Training Facility in Rockwall, Texas. Paul has served as an assistant instructor at many RKC and HKC Courses, is a Certified Kettlebell Functional Movement Specialist (CK-FMS) and works with some of the top Chiroprators in North Texas. Please visit his website brittstrainingsystems.com for more information.

Filed Under: Coaching, Kettlebell Training Tagged With: Coaching, get up, kettlebell technique, kettlebell training, movement, Paul Britt, teaching get-up, training get-up

Getting the Most Out of Your Turkish Get-Up

March 11, 2015 By Sebastian Müller 11 Comments

Sebastian Muller Kettlebell get up

The Turkish get-up… beginners hate it and experienced kettlebellers praise it. The TGU is one of the most fundamental movements because it progresses from lying to standing with a kettlebell. Along with the Hardstyle kettlebell swing, the TGU is one of the basic exercises which will prepare you well for all of the other exercises of the RKC training system.

My earlier post about the get-up was more philosophical and discussed the five things the get-up teaches you about life. Today’s post focuses more on the practical aspects of this movement pattern and how you can implement it in your training to get the most out of it.

Coach Gini performs a kettlebell get up
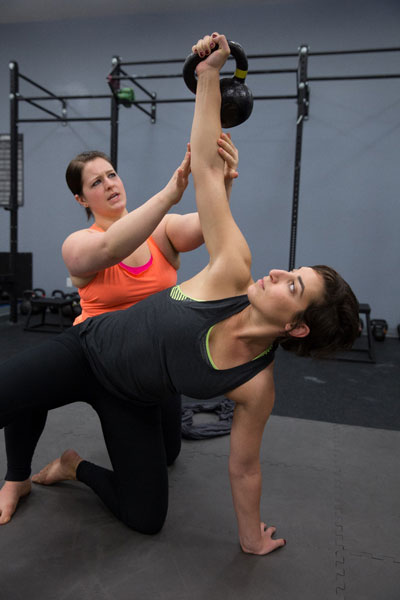
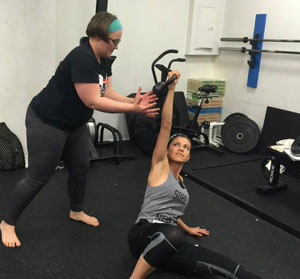
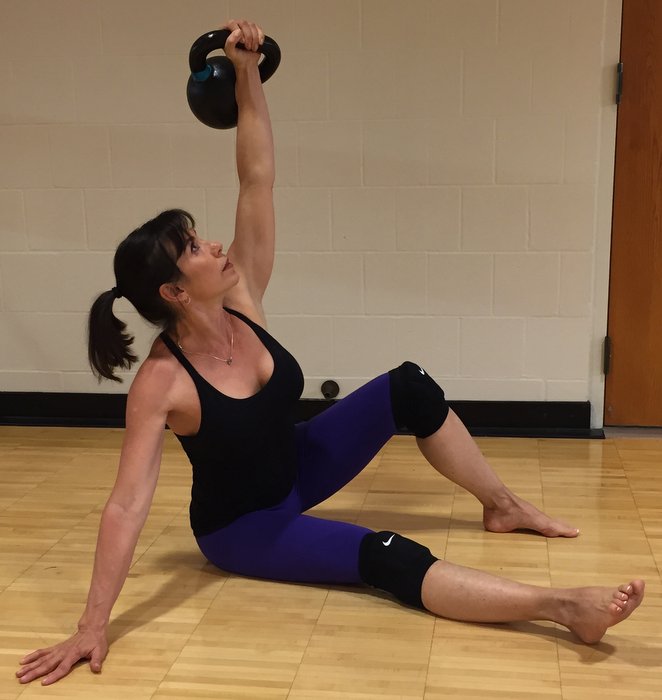
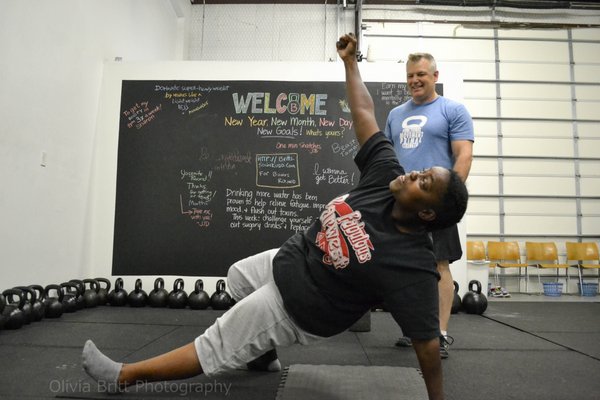
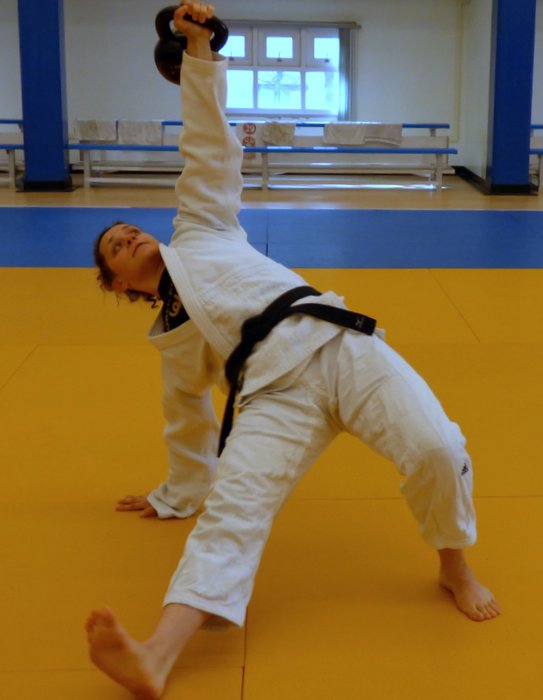
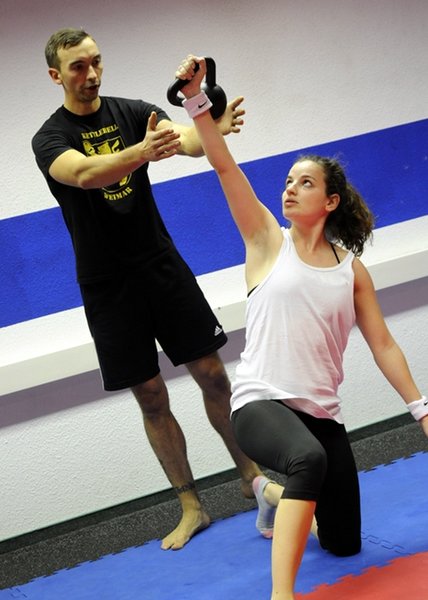
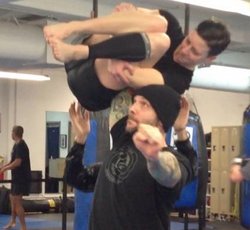
Your body learns to work as a whole unit when performing a Turkish get-up.

This exercise integrates every muscle in your body. If there’s a weak spot somewhere, you will find it very quickly—this is also one of the reasons why beginners especially have a hard time with the TGU. The same goes for athletes who are used to training isolated muscles. I have seen many trained 100 kg guys struggling to do their get-ups with a 12 kg kettlebell.

But, this is also what experienced kettlebellers love about the TGU: when you take the time to learn this movement pattern and can flawlessly perform get-ups with a 24 kg kettlebell, many good changes have already happened within your body. The TGU creates flexibility and mobility in the joints along with the basic strength you need to playfully get up from the ground with weight.

Over 200 years ago, Turkish wrestlers already knew that the TGU could prepare them for many things in life. Back then, wrestlers were required to get up while holding half of their body weight in one hand before they could even consider participating in training specific to wrestling. This is also why the get-up is often called the Turkish get-up.

The TGU Consists of 9 Positions, Making It a Complex Exercise.

Take a look at this video of Gini, one of our coaches, doing a 32kg (50% of her body weight) TGU:

What will you gain from frequently practicing and performing Turkish get-ups?

  • Improved shoulder stability and flexibility
  • The ability to train the whole body as one unit
  • A strengthened mid-section improving the reflexive stability of the core, and providing improved injury prevention
  • Improved interaction of the muscular chains, intramuscular coordination, and improved interaction between the brain and muscles
  • Improved fat burning capacity as large muscle groups are activated causing high calorie demands

Gray Cook, physical therapist and co-founder of Functional Movement Systems refers to the Turkish get-up as “Loaded Yoga”.

There are Tons of Possibilities for Using Turkish Get-Ups in Your Training.

Performing the TGU without weight or with a light weight is a perfect warm-up exercise, or as a component of active recovery/regeneration days. Performed under heavy load, the TGU is one of the best full body strengthening exercises on the planet. For men, a goal of 50% body weight and for women 33% of body weight are absolutely realistic. But as you saw in the video above, these guidelines are relative and can be exceeded!

Another thing that I really like about the get up is how it allows you to lift a weight overhead that you might not be able to press yet. Here is a get-up variation that can help you prepare for heavy presses: choose a weight you can’t (yet) press and bring it over your head by performing a Turkish get-up. Now go take a walk with the weight overhead. By doing this, your body gets used to the weight being in lock-out position overhead and will automatically learn how to stabilize it.

There are tons of get-up variations which provide different focuses on many training aspects. Another variation is performing a bottom-up Turkish get-up to challenge and improve your grip. Hold the kettlebell in a pistol grip (the bottom of the kettlebell will be pointing at the ceiling) and get up from the ground. This is also a great variation for using kettlebells which would ordinarily be too light for your training.

Finally, I have a variation perfect for everyone who has just learned the TGU. This variation will help to “grind” the single positions—it is called the Pyramid. You’ll only need a light kettlebell for it, because you will perform each position repeatedly. Also, be sure to always move into each single position perfectly, and always work in a very controlled manner.

Generally, the Turkish get-up is About Working Slowly and Controlled, Eventually Under a Great Load.

Maybe the get-up is simultaneously so loved and hated is because it can help you get a great deal better, stronger and healthier while rigorously pointing out issues that still need work. Together with the Hardstyle kettlebell swing, it can help you to constantly get constantly stronger, more flexible and even improve your overall endurance.

Hopefully my examples have shown you what an incredibly versatile exercise the TGU is, and that it’s always a good thing to continue improving your get-up.

***

Sebastian Müller, RKC Team Leader, PCC Instructor, FMS, and Primal Move Instructor, trains and instructs at the KRABA location in Wiemar, Germany. He can be contacted by email at: info@kraba-erfurt.de and his website: http://www.kraba-erfurt.de. His Blog is Vereinfachedeintraining.com

Filed Under: Kettlebell Training Tagged With: coordination, flexibility, full body exercise, get up, get-up variations, grip strength, kettlebell training, Sebastian Muller, turkish get up

Five Things The Turkish Get-Up Teaches You About Life

January 14, 2015 By Sebastian Müller 7 Comments

RKC Team Leader Sebastian Muller performs a TGU

Try to imagine an exercise that could make your life easier—a “magical” exercise that improves your response to everyday challenges and can make you into a better human being? Would you include it in your training?

That exercise exists, it’s the kettlebell Turkish get-up.

For more than four years, I’ve been doing heavy Turkish get-ups with kettlebells at least once a week. Besides the Hardstyle kettlebell swing, the Turkish get-up is a basic exercise in RKC kettlebell training and one of the reasons I ending up training with kettlebells.

Even though it is pure fun and constantly provides new training stimuli, over time I became aware of the other benefits of the get-up, that also apply to life in general.

  • You’ll need to be flexible and work on your weaknesses
  • You’ll learn to set up for the next step, instead of just staying put
  • The more resistance you encounter, the stronger you’ll get
  • Consistency and discipline always pay off
  • Training is life

These are all things you need to realize when working on a solid and strong Turkish get-up and these same ideas also help in everyday life.

Be Flexible and Work on Your Deficits

If you’re thinking about performing a Turkish get-up with half of your body weight, everything must fit. You need to be flexible and stable in your joints, and have the necessary strength—along with a strong will.

If one of these things is problematic, it will pay off in multitudes if you work on that deficit. Otherwise, you’ll probably plateau at some one point or weight weight sooner or later.

Two personal examples:

With Turkish get-ups, my thoracic spine mobility has always been a problem, but now it is almost perfect because I kept specifically working on it for a long time.

Another thing – when I started kettlebell training over five years ago, the English language was a big problem for me. There were practically no articles about kettlebells written in German. Even now, I almost exclusively read in English, and not just about training. Now I have completed many certifications in English and have even held entire training sessions in English. Working on these deficits paid off very well and made me a lot better.

Learn to Set Up for the Next Step Instead of Just Staying Put

Eventually, after the floor press (you’ve pushed the kettlebell overhead with your arm) you need to decide whether you want to stand up or to stay put. If you decide to get up, you have many exhausting steps ahead of you. You’ll need to get up from a prone to standing position with a kettlebell overhead making it difficult for you. There are no exits and no shortcuts.

The same is true in life. Will you stand still or take the next step forward? One thing is for sure, the more resistance you meet, the more it usually pays off if you keep going forward. This brings us to our next point…

The More Resistance You Meet, the Stronger You’ll Get

If you use a heavier weight with your Turkish get-up, you’ll get stronger. “Progressive (Capacity) Overload” are the magic words with this concept. If you keep working with the same weight all the time, you’ll get used to it, and it will no longer be a challenge. Your body won’t receive new stimuli to force it to become stronger. You strength will plateau, because there is no reason for your body to adapt to a new task.

There is some truth to the German saying, “You grow with your tasks”. When you stop facing new challenges in life, you will stop growing. Of course it’s nice and safe in your comfort zone, but that doesn’t mean you should make yourself comfortable in it.

Heavy Turkish get-ups will be mostly outside your comfort zone, and the feeling of accomplishing these challenges is awesome. It’s just the same in life!

Consistency and Discipline Always Pay Off

I want to be straight with you, to conquer a half body weight Turkish get-up won’t happen overnight. You’ll definitely need to be persistent. If you’re not afraid of that, it will eventually pay off, guaranteed! There will be days when it’ll be hard for you, and days when everything will happen easily. The most important thing is to stay persistent. The best part of all this is the journey itself—your way, your personal records, and the moment you realize the little improvements toward your goal.

Sebastian Muller Spotting Student performing a get up

A Turkish get-up with half your body weight is an absolutely realistic aim, but it doesn’t have to stop there!

While you should celebrate your small, but important achievements in training, you should also do the same thing in your life! Focus on your goal, but be aware of all the things you have already achieved on your way to get there. This is an incredibly important thing to do! Be thankful for what you have already mastered, then it will be easier to focus on the bigger goals in the future.

Training is Life

At this point, you should have realized one thing, training is life or should be at least be a regular part of it. You probably also noted that the individual components of training and life have a lot in common, and together they form a bigger picture. Just like the Turkish get-up—where all muscles need to work together as a unit and you need to consider every aspect on your way to more weight—it should be the same in your life. Take a look at the whole picture. Everything is part of your life—work, training, spending time with your family, and the time you’re on your own. If you harmonize these things, nothing in life can stop you.

The Turkish get-up taught me many things during the past few years. Today I train my body as a whole, and according to how I use it in everyday challenges. I train my body because it is a part of me and therefore a part of my life.

***

Sebastian Müller, RKC Team Leader, PCC Instructor, FMS, and Primal Move Instructor, trains and instructs at the KRABA location in Wiemar, Germany. He can be contacted by email at: info@kraba-erfurt.de and his website: http://www.kraba-erfurt.de. His Blog is Vereinfachedeintraining.com

Filed Under: Kettlebell Training, Motivation Tagged With: fitness, fitness goals, get up, goals, half body weight get-up, kettlebell training, life lessons, lifestyle, mental training, Sebastian Muller, turkish get up

Smart Kettlebell Training for Competitive Endurance Athletes

September 17, 2014 By Aaron Pierson Leave a Comment

Erika Woolsey RKC from Fort Collins, Colorado running the Boston marathon
Erika Woolsey, RKC from Fort Collins, Colorado running the Boston Marathon

For endurance athletes, time well spent is time working toward a specific goal. Unfortunately this often means strength training takes a back seat or becomes obsolete. In the world of strength and conditioning we like to believe that getting stronger solves all our problems. How much strength does the endurance athlete really need?

For those looking to take on the challenge of completing a 50 or 100 mile run, a 100 mile mountain bike race, the Iron Man, or marathon the specific training alone consumes most people. No amount of time in the gym is going to replace the time spent on the road or trail. Taking time and energy away from their specific training to focus on building a bigger press or deadlift, is time wasted. These people don’t need to focus on raw strength. Instead the focus should be spent developing relative strength. Remember they only need to be strong enough to avoid injury.

If we already know that preparing for endurance events requires a lot of time on the road then we must assume there is very little time for other forms of training. This is where the kettlebell can become a quick and easy tool of choice.

Goblet Squat (with a pry):

The goblet squat is great exercise for many of these athletes. It allows the athlete to maintain or improve their squat pattern, build leg and core strength without excessive weight to overly fatigue the legs. By adding the prying element to this squat we allow the athlete to work on the hip mobility which so many runners and cyclist struggle with.

Turkish Get-Up:

The Turkish get-up is a must for any athlete especially those who require a great deal of core strength to get through the later stages of an endurance event. The get-up will also provide a great deal of thoracic mobility as well as increased stability in the trunk and hips.

Single-Leg Deadlift:

The single leg deadlift might be the single most important skill for injury prevention in these athletes. Improved glute and hamstring strength, balance and rotational stability is going to pay dividends when it comes to IT band issues.

Kettlebell Swing:

I prefer to train the swing primarily in the off-season due to the excessive fatigue of endurance training. The swing is an outstanding exercise to develop powerful hip drive and strong legs. It is also one of the best ways to build strength endurance in the core which is something every endurance athlete requires.

When we combine these exercises with basic push-ups and pull-ups we are creating a successful recipe for almost any endurance athlete. Remember the goal is not to be the best in the gym. The goal is to keep them healthy and injury free so they can put in the miles and time required to succeed outside the gym.

***
About Aaron Pierson RKC Team Leader: Aaron has been apart of the RKC since 2010. He currently works full time as an EMT and owns Fundamental Strength in Fort Collins, Colorado. He can be reached at aaron@fundamentalstrengthllc.com or by visiting www.fundamentalstrengthllc.com

Filed Under: Kettlebell Training Tagged With: Aaron Pierson, Athletic Training, endurance athletes, get up, kettlebell swings, kettlebell training, kettlebell training for endurance athletes, marathon

The RKC–the Perfect Training System?

August 27, 2014 By Mike Krivka 5 Comments

RKC Big Six Kettlebell Exercises
Graphic: Senior RKC, Robert Rimoczi


INTRODUCTION

Everyone is looking for the perfect “thing”–the perfect diet, the perfect car, the perfect vacation, the perfect look, the perfect mate (sorry, not going to happen and this isn’t the venue for that conversation), or the perfect workout. Looking to find the “perfect” anything is a fool’s quest but the pursuit of perfection makes champions. This article will explore what I consider to be the almost perfect strength and conditioning program: the Russian Kettlebell Certified (RKC) Kettlebell training system.

PREFIX

To determine if something is “perfect”, you have to either compare it against other similar items or at least have a list of criteria that you can judge it against. Fair enough. In this instance we are looking for the perfect strength and conditioning program and while I’m not going to point fingers or name names, I will define the characteristics that I think make the RKC superior. In my humble opinion for a strength and conditioning program to be anywhere “near perfect” it needs to have (at a minimum) the following components:

  1. It must address the six basic movement patterns:
    • Push
    • Pull
    • Squat
    • Hinge
    • Carry
    • Groundwork (ex. Turkish Get Up)
  2. It must have both Ballistics and Grinds as part of the training program:
    • a. Ballistics for strength endurance and impact generation
    • b. Grinds for deep strength and tenacity under pressure

Those are the basic criteria for analysis and they are pretty easily defined. The goal of the perfect system should be to enhance the athlete’s or client’s overall strength, mobility, work output and athleticism. Read on to find out why I think the RKC meets these criteria and much more.

SWING (Ballistic)

To say that the kettlebell swing is the foundation that all ballistic movements with the kettlebell are based on would be an understatement. The swing establishes a deep and powerful explosive groove that allows the athlete to generate power from the ground up. It reinforces transitional and positional strength skills as well as developing a fine tuned ability to go from absolute relaxation to absolute tension in a heartbeat (one that is beating very fast as well).

Training the kettlebell swing develops the hugely important hinge movement in a dynamic manner. Most athletes will train the hinge, or something that looks like it, while doing barbell deadlifts. But the kettlebell swing gives the athlete a platform to practice exploding out of the hinge, dynamically loading the hinge, and teaches how to transition quickly and efficiently from loading to unloading while seamlessly applying force when and where it is needed. This is a tremendously valuable skill for anyone involved in contact sports or who has to move fast and recover quickly–like Moms and Dads chasing kids around!

GOBLET SQUAT (Grind)

The squat has been the staple of most strength and conditioning programs since before the invention of the barbell–as well it should be. The squat develops tremendous strength in the legs, hamstrings and glutes. It also requires the athlete to establish and maintain bracing throughout the torso. Understanding how to squat well is one of the foundational movement patterns and one that is overlooked by many athletes; you know the ones – big guns and chicken legs. In the RKC System, the goblet squat is the primary squatting movement for a good reason: most people (even those who have been squatting for years) lack the strength, mobility, and awareness to squat safely and effectively.

The goblet squat establishes a solid structure for loading the posterior chain, reinforcing the anterior chain, and creating alignment in the joints that ensures safe loading and transitions. For some, the goblet squat takes on a more rehabilitative form since it trains the client or athlete to open their hips and use their knees safely and effectively while teaching how to avoid undue stress on the lower back. The only drawback of the goblet squat is that it cannot be loaded to the same extent as a barbell squat. The inclusion of the kettlebell squat with one or two kettlebells makes this point almost moot. Once again, you can’t go to extreme loads but the efficiency but efficacy of the squat with the kettlebell almost makes up for it.

TURKISH GET-UP (Grind)

The Turkish get-up (TGU) or just plain old “get-up” is new to this generation of athletes and has found many ardent followers. The TGU is relatively hard to categorize.  Some people consider it to be a pure strength technique while others categorize it as a mobility or pre-hab/rehab tool. Regardless, the TGU is an essential tool in the quest to make athletes move better and develop integrated strength. With modest loads, the TGU can be used as a strength endurance tool; the stresses placed on the athlete getting up and down are phenomenal for conditioning and rival the dreaded burpee for the language they generate. With heavier loads, the TGU can be used to develop transitional and positional strength like no other technique that I am aware of. Mastery of a number of planes of movement, the ability to maintain tension and establish intermediate loading and unloading positions, are all challenges that must be overcome if you are going to be successful at doing the TGU. From a pure movement perspective the TGU is golden and adequately fills in the “groundwork” section of the basic movement pattern requirements.

CLEAN (Ballistic)

The kettlebell clean is often overlooked and under-appreciated when it comes to developing strength. But I will tell you this from the outset–show me someone with a weak clean and I will show you someone who has an even weaker snatch and military press. The clean is the foundation for all of the overhead ballistics and grinds with the kettlebell and it also establishes an efficient and powerful groove that will be reflected in the kettlebell snatch. The clean, just like the swing, is a foundational move that relies on a powerful backswing to get the kettlebell moving. But unlike the swing, the clean requires that the kettlebell be directed upward as opposed to outward. A “swingy” clean is ugly and painful as well as being inefficient. Once the kettlebell has been “cleaned” it is considered to be in the “rack”–and that is where the magic happens. The “racked” kettlebell is now being supported by a complex symphony of tension from the anterior and posterior chains and is ready to be cleaned again or (military) pressed or jerked. The stability of the kettlebell in the clean (racked position) has to be absolute if it is going to be used to grind the kettlebell overhead via the military press or as a ballistic via the kettlebell jerk.

MILITARY PRESS (Grind)

The military press (MP) is the first overhead technique in the RKC System. The MP trains full body tension, bracing or “wedging” of the body under the load, efficient grooving (the path the kettlebell takes), the overhead lockout, and much more. More than just a mindless pressing movement with the kettlebell, the MP trains the client or athlete to drive from the ground up to press the kettlebell overhead, hold the lockout, and then to pull the kettlebell back into the racked position of the clean. The last five decades or so has seen the MP being supplanted in most strength and conditioning programs by a heavy emphasis on the bench press. While the bench press has many and varied benefits the MP is (in my opinion) superior to developing integration with the torso and power from the upper torso that translates over to many sporting and daily functions. The MP can be very frustrating for both sexes as well. Men who have a “big bench” find that they have puny MP’s. Women who have strong legs and good kettlebell swings are stymied by trying to get even a light load safely overhead. With a little practice and some determination, both groups will find their strength improve and will reap the benefits of being stronger overhead (especially when it comes time to snatch the kettlebell).

SNATCH (Ballistic)

The kettlebell snatch is a riddle wrapped in an enigma. It looks so easy and effortless when you watched it done by a well trained practitioner and it can also look like a tragedy in the making when done by someone without the proper coaching. As a ballistic technique it is comprised of many facets that appear to be one smooth and seamless movement (if done correctly). I have heard the snatch described as a “swing that ends up overhead” but I don’t think that is an accurate assessment of the movement. The swing is more like a clean that ends up overhead. I’ve always said that a “clean is a short snatch and a snatch is a long clean”. Why? Because the trajectory of the clean and the snatch are almost exactly the same; one ends up on your shoulder and the ends up overhead. But why is the snatch such an important part of the RKC? Because it trains the client or athlete to develop and master a number of skills and make them appear as one.

To master the snatch you have to be able to generate, manage, and absorb force; you need to be able to manage tension and relaxation; you need to be able to create and demonstrate positional and transitional strength; and so much more. Hopefully you can see why the snatch is held in such high regard and considered by some as the “King of the Ballistics”.

CONCLUSION

Six techniques – that’s it. With those six you have met all of the requirements of the six basic movement patterns with the exception of one: the carry. That’s pretty easy to fix with some farmers’ carries or walking with the kettlebell in the clean (racked position) or held overhead. Okay, okay – the pull is somewhat sketchy as well, although you are getting some great pulling work out of all the kettlebell ballistics. The addition of renegade rows or pull ups will fill that gap nicely as well.

Here’s the thing – there is no “perfect” system but the RKC comes darn close to hitting the basic requirements that any client or athlete needs to improve their movement, their athleticism, and their longevity. A nice balance of ballistics and grinds as well as a series of movements that hit every major muscle (and most of the minor ones as well) makes the RKC system “near perfect” as far as a strength and conditioning program goes – and that’s about all you can ask for in this lifetime.

***

About Michael A. Krivka, Sr. – Senior RKC: Michael A. Krivka, Sr. is a Washington, DC native who has been involved in Kettlebell training for over a decade and is currently an RKC Team Leader and member of the RKC Board of Advisors and the RKC Leadership Team under Dragon Door (where he has been listed as one of the top reviewed RKC’s in the world for the last five years). He is also the author of a bestselling eBook entitled “Code Name: Indestructible” and is in the process of finishing up several other eBooks on Kettlebells, body weight, and the integration of other tools into an effective strength and conditioning program. Mike has traveled extensively throughout the United States teaching Russian Kettlebells to military (USMC, USN, USA and USAF) and law enforcement personnel (FBI, DEA, USSS and CIA)… read more here.

Filed Under: Kettlebell Training Tagged With: clean, get up, goblet squat, kettlebell squat, Master the Kettlebell, mike krivka, military press, RKC, RKC system, Russian Kettlebell Challenge, snatch, strength and conditioning, swing, turkish get up

Using DVRT Training to Improve Your Turkish Get-Ups

August 13, 2014 By Steve "Coach Fury" Holiner 2 Comments

Coach Fury Kettlebell Get-Up

It’s time for another fitness tip from your man Fury. The Turkish get-up is one of my all time favorite lifts. The relative simplicity and overall impact of the TGU make it an absolute desert island movement in my book. Few things get me more excited than a beautifully executed TGU (especially when heavy). Sometimes we fall short of beautiful and need to think “out of the box” on how to hit that high standard we strive for. This is where Dynamic Variable Resistance Training (DVRT) and the Ultimate Sandbag (USB) comes into play.

Coach Fury TGU with Human Weight
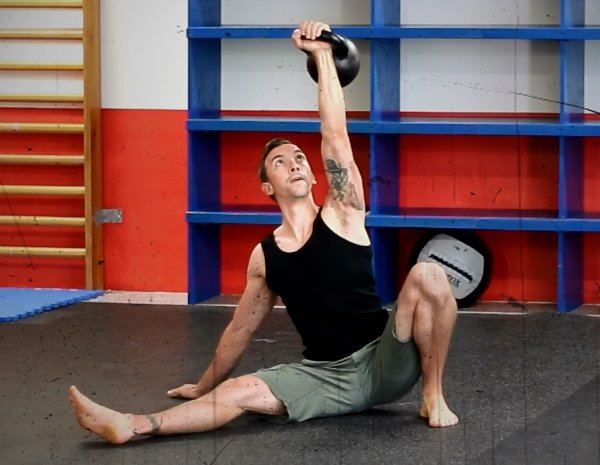
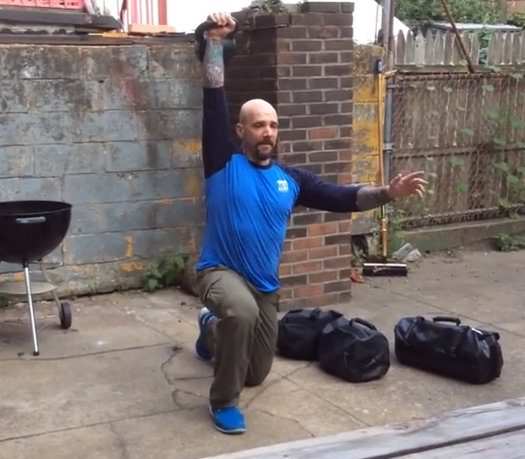
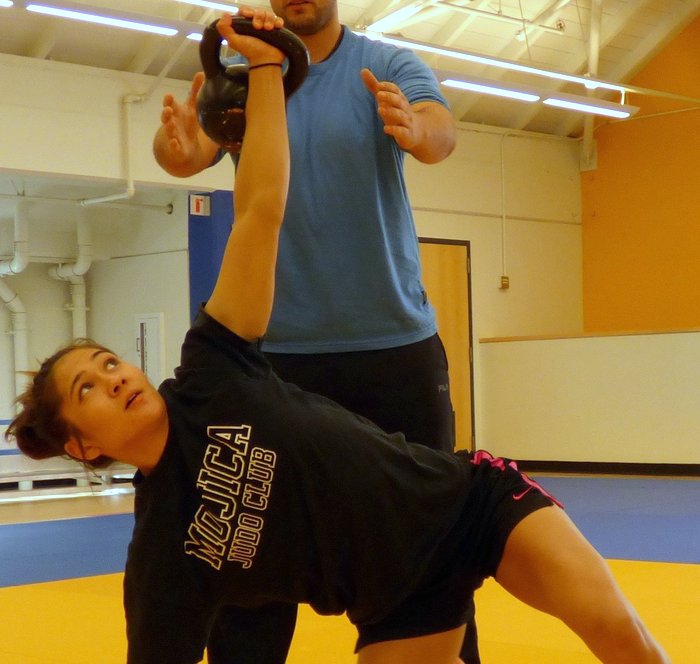
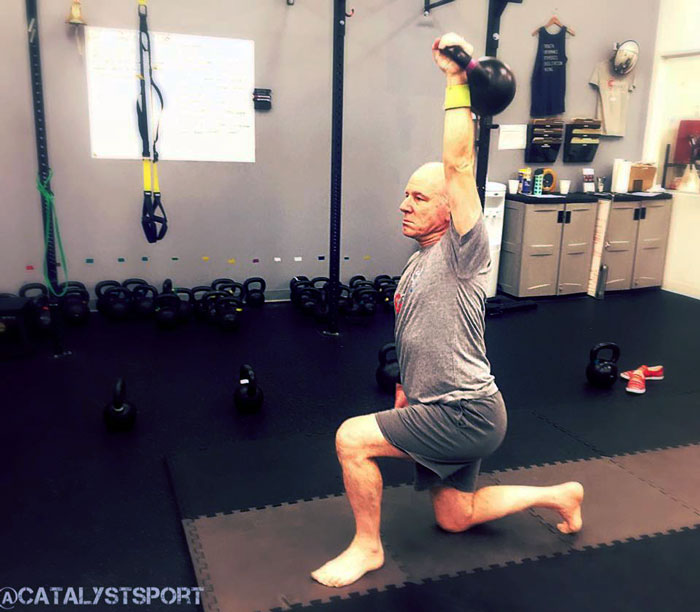
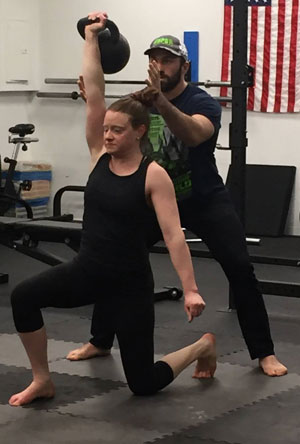
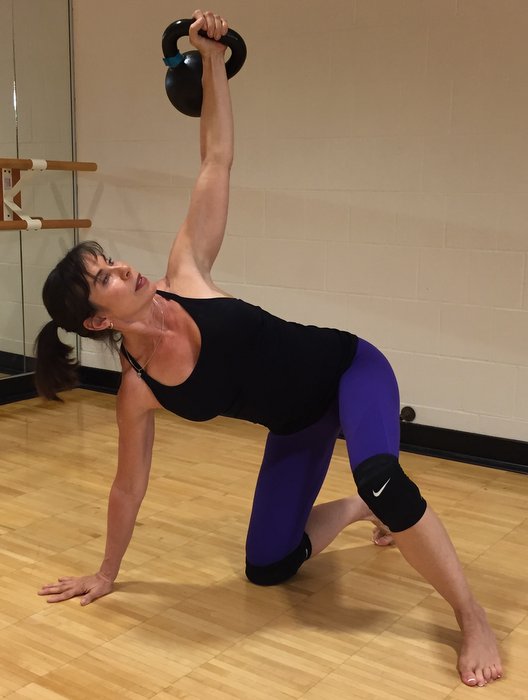
Personally, I find the three hardest parts of a get-up (regardless of weight) to be the initial roll to elbow, the half kneeling to stand and the final roll from elbow to your back. Whether it’s a kettlebell, barbell or the occasional human being (not recommended), I usually know I’ll make it (or come close) if I get to the elbow. The half kneel to stand will usually by my next sticking point. The roll back down from the elbow is often more nerve racking from a self preservation standpoint.

I think most will agree with me on these three positions within the TGU sequence. Here are three DVRT Ultimate Sandbag Training exercises that will help the cause.

1. Ultimate Sandbag TGU. In the DVRT TGU, the USB is loaded over the shoulder and it will drape over part of the back and chest as you move. Some key points here. Being shoulder loaded removes the leverage generally provided by the locked out arm of the kettlebell TGU. The USB is literally pushing you directly into the floor while sand in the front and back of the USB is pulling downward too. The USB is doing it’s best to keep you on your back. What’s awesome about this, is that you truly have to develop the rolling pattern to get to the elbow. You are forced to get that proper diagonal roll from the shoulder to opposite elbow. Given proper thoracic mobility and the ability to lockout the arm, a kettlebell TGU to elbow will feel easier after nailing this down. This delivers the same payday on the descending elbow to back roll. The USB TGU also removes all fear of dropping a bell on your head while training the roll to and from elbow. Strength+Safety=Glory.

2. USB Lateral Lunges. Damn you sagittal plane! That half kneeling lunge to stand is a stability monster when you’re doing a TGU. Sometimes, instead of stepping back from a problem it is best to step sideways. There are a bunch of killer USB Lateral Lunge exercises and any of them will help with your half kneel to stand. Training your lunges within the frontal plane (side to side) will help you build some untapped stability. Spend some time with USB Lateral Lunges and watch how your half kneel to stand becomes a thing to be feared.

3. Rotational Lunge. This move delivers similar benefits to the lateral lunges but now we’re moving in even more plains of motions. Transverse much yo! This will bullet proof your TGU. Ever feel those legs and hips wobble under a heavy getup? Get good at rotational lunges with a USB and see how they feel know. The RT adds another killer bonus: by snapping the hips similar to a swing, but within a lunge pattern, you will very likely find it easier to simply stand up a helluva lot quicker in your TGU.

Now those are three ways to use DVRT/Ultimate Sandbag Training to help your Turkish get-up. I’d bet these lifts would help your deadliest, squat and press too. Doubt me? Try it. These aren’t meant to be quick fixes or voodoo tricks. Step away from your TGU for 1-3 weeks and focus on one or more of these DVRT exercises. Then check out their impact on your TGU and smile big in the post PR selfie you just took.

Please keep me posted on your progress.

I suggest digging deeper into the DVRT Training system by attending a workshop or one of our certifications. Click here to find dates and locations. Yours truly will be leading a DVRT Level I Cert and an HKC Kettlebell Cert at Kathy Dooley, Joe Boffi and Jason Kapnick’s place Catalyst S.P.O.R.T. in NYC on November 1 and 2nd. You can register for one or both (big discount on both) through the link.

I hope to see you there.

-Fury out

Steve “Coach Fury” Holiner, DVRT Master Instructor, Senior RKC, Original Strength Instructor, is a proud member of the Ninja Army training staff at Mark Fisher Fitness in NYC. Fury is available for classes, semi-privates, instructor training and programming at MFF. He also has availability for private training at Five Points Academy and Catalyst S.P.O.R.T. Check out www.coachfury.com, facebook.com/coachfury and Twitter @coachfury for more info.

Filed Under: Tutorial Tagged With: Coach Fury, corrective exercise, dvrt, get up, how-to, Kettlebell, Steve Holiner, turkish get up, tutorial, video tutorial

RKC Kettlebell Hinge Analysis

July 2, 2014 By Mike Krivka 5 Comments

Krivka_teachingOVERVIEW
There are six basic movement patterns : Push, Pull, Squat, Hinge, Carry and Groundwork (i.e. Turkish Get Up, Rolling, etc.).  A thorough understanding and utilization of these movement patterns will make you an exceptional athlete, a better rounded coach or trainer, and will allow you to move and grow old gracefully – which are no easy tasks.  Tens of thousands of words have been written in regard to Pushing, Pulling, and Squatting; of late the Hinge, Carry and Groundwork have started to get some well deserved attention as well.  Among all of the writing there are some real gems of information and guidance as to how to effectively implement the movements and safely execute them.  One area that is referenced a lot, but not clearly defined and explained, is the Hinge.  The Hinge is the basis for most of the Kettlebell techniques as well as the foundation for the barbell Deadlift. While it is being taught and practiced by athletes and clients every day there are still some issues with executing it safely and efficiently.  The following several paragraphs are my attempt to clarify some “gray areas” regarding the Hinge.

A HINGE IS A HINGE… OR IS IT?
There is a lot of confusion as to what a Hinge is and what isn’t.  If you spend any time on YouTube (and I do) you will see a wide variety of examples what people are doing that looks like a Hinge but in reality is something completely different.  Let’s define the Hinge first and see if we can identify where people go wrong.  First – a Hinge is not a Squat (but the Squat has a Hinge component; we’ll get back to this later on). The Squat requires maximum flexion of the Ankle, Knee and Hip and puts the butt parallel or below parallel. Second – the Hinge is not bending over or what some people call “The Sippy Bird”. Bending over requires that the Hip flexes and the head travels forward over the toes.  This type of Hinge presents itself with people who are trying to “pull” the Kettlebell or Bar.  Third – the Hinge is not done with a straight back – meaning upright, but a flat or neutral spine.  When you do the Hinge, the backin its entirety, needs to stay neutral or flat in order to not only protect it but to “stack” is so that you can transfer power through it.

So we have three things that the Hinge isn’t – so what is it?  The Hinge is a loading position that allows you to maximally translate energy from the ground via a ballistic extension of the ankles, knees and hips. This ballistic extension can then be translated into movement of the body or a secondary object like a Kettlebell.  There are a laundry list of variables that will affect the volatility of your Hinge (and yes it should be a “violent” extension” but I’m going to save that for another RKC Blog posting).  What I want you to imagine that the Hinge should be the position you feel that you can get the most drive or explosion out of.  Think “jumping over a building in a single bound” and you’ll get what I’m talking about.

LEADING WITH YOUR HEAD
Here’s the nitty gritty about the Hinge: it’s all about initiating, generating power, and transferring power.  And guess where the biggest errors occur? You’d think it’s with generating and transferring – but it’s actually on the initiation.  You see when most people do the Kettlebell Swing (or Clean or Snatch for that matter) they explode out of the Hinge position leading with their torso and head (back to that Sippy Bird” thing).  Don’t believe me?  Then try the simple test outlined in the video below.  The first demonstration shows the athlete trying to pull their way out of the Hinge position.  This position is so weak that light pressure on the head stalls the whole body.  The second demonstration shows the athlete driving up from the ground using their legs and finishing with a powerful Hinge movement. The presence of my hand on the top of the athletes head doesn’t deter them at all.

What you are going to find is that many of your athletes and clients are paying lip service the Hinge but are actually generating power through their lower back and acceleration of their head.  It’s going to startle many people when you are able to stop them dead in their track with gentle pressure on their head; careful when you try to demonstrate this because you can easily tweak someone’s neck or back if they try to “fight” their way through the obstruction.  Here’s the thing – you can train the Hinge in this manner and get reasonably strong and stay injury-free for a long time.  But… and it’s a big one… you are not going to be able to generate as much power as you could if you don’t learn to initiate and follow through with the Hinge  from the ground up.

Think about the Hinge this way: the best way to generate power is from a fixed object outward or upward (like the ground).  If you are initiating your Hinge by driving off the ground with an explosive push from your feet, the force will be transferred though the ankles to the knees, the knees into the hips, and ultimately into the Kettlebell.  This is generating power in one direction.  If you are inadvertently generating force by using your lower back and head (once again think “Sippy Bird”) then you have force being generated both upward towards the head and downward towards the ground and only a percentage of that will be able to be transferred into the Kettlebell.   Once again – watch the simple hands-on test and cueing that I demonstrate in the video and you’ll see that the most efficient and powerful way to create force in the Hinge is through initiating through the ground up.

WISDOM FROM A MASTER
Marty Gallagher is a master in the realm of strength.  He has made a career out producing world record holding athletes, writing about the iron game (have you read his opus “The Purposeful Primitive”?), and working with Tier One Special Operators.  To say he knows what it takes to be strong and get strong would be an understatement.  I’ve had the pleasure of sitting down and talking about strength training with Marty on a couple occasions and I always come away with insights that are light years away from where I currently am.  For instance, we were talking about Barbell Deadlifting (DL) and how many of the current crop of DL’ers you see start way too high and are facing down when they initiate the movement.  Sure, you can get the bar moving there but you’re never going to reach your potential using that technique; not to mention you are putting unnecessary stress and strain on your back. According to Marty the best “pulling position” for the  Barbell DL is the shins and the torso at almost the same angle – this allows you at to drive off the ground with the legs (squatting) and then transferring the load into the Hinge to complete it.  Once again – the Hinge completes the movement; it’s not the whole movement.

So how does this apply to the Hinge in regards to the Kettlebell? Directly! Do not pass Go, do not collect five hundred dollars! While pulling a heavy barbell Deadlift and performing a heavy Kettlebell Swing may look radically different they have a lot of similarities (and several differences). If you look at the Hinge from this perspective it will radically change how much more force you can generate (using the biggest muscles and drivers in your body) and will lessen your reliance on using your arms to move the Kettlebell. Several things that make a difference between the two are the position of the load during execution.  The barbell has no choice but to stay in front of the shins during the movement; this will change not only the loading but also affect the angles of all of the major joints.  With the Kettlebell you have much more latitude for positioning the load (those pesky shins don’t get in the way) and you can put it between and behind your feet to allow a more direct and powerful loading of the hips, glutes and hamstrings.

Don’t let my explanation of the positioning on the barbell Deadlift and Kettlebell Swing confuse you!  The point I am trying to make is that when you are practicing a technique that utilizes the Hinge the key factor is how you are initiating the movement.  Are you driving through the Hinge from the ground up or are pulling through the Hinge with your arms and head?  There is a HUGE difference and the results are profound…

CONCLUSION
What I’ve outlined above may be common knowledge to some and, even after a video and over a thousand words, will still be a mystery to others.  That’s okay!  Watch the video, re-read the above post and see if you can work out the specifics on your own or via experimenting with your athletes or clients.  The purpose behind the test I demonstrated is not to frustrate or confuse you – it’s to show you a simple and effective way to ensure that your athletes or clients are using the safest and most effective way to generate power for Kettlebell ballistic techniques.

Thanks for your time and attention and I look forward to your feedback and questions!

***

About Michael A. Krivka, Sr. – Senior RKC: Michael A. Krivka, Sr. is a Washington, DC native who has been involved in Kettlebell training for over a decade and is currently an RKC Team Leader and member of the RKC Board of Advisors and the RKC Leadership Team under Dragon Door (where he has been listed as one of the top reviewed RKC’s in the world for the last five years). He is also the author of a bestselling eBook entitled “Code Name: Indestructible” and is in the process of finishing up several other eBooks on Kettlebells, body weight, and the integration of other tools into an effective strength and conditioning program. Mike has traveled extensively throughout the United States teaching Russian Kettlebells to military (USMC, USN, USA and USAF) and law enforcement personnel (FBI, DEA, USSS and CIA)… read more here.

Filed Under: Uncategorized Tagged With: entry level, fitness instructor, get up, goblet squat, Hardstyle, hkc, instructor training, Kettlebell, squat, swing, turkish get up, workshop

  • « Go to Previous Page
  • Page 1
  • Page 2
  • Page 3
  • Go to Next Page »

Primary Sidebar

Featured Products

previous arrow
BOOK-RKCBookofSnC
HardStyleKettlebellChallegeDanJohn700
BookCoverMasterTheKettlebell1
RKCiconKettlebell512
KettlebellGoddessdv040
next arrow

Recent Posts

  • RKC Big Six Workout
  • The Kettlebell Swing & Low Back Pain
  • Key Kettlebell Exercises To Help You Create Better Balance
  • How to Most Effectively Use Kettlebells to Meet Your New Year Goals
  • 1 Exercise That Checks All The Boxes
FOLLOW US ON TWITTER!

Archives

Copyright © 2025

Dragon Door Publications / The author(s) and publisher of this material are not responsible in any manner whatsoever for any injury that may occur through following the instructions or opinions contained in this material. The activities, physical and otherwise, described herein for informational purposes only, may be too strenuous or dangerous for some people, and the reader(s) should consult a physician before engaging in them.