• Skip to main content
  • Skip to primary sidebar
  • Home
  • Contributors
    • Matt Beecroft, Master RKC
    • Martijn Bos, Master RKC
    • Andrea Du Cane, Master RKC
    • Angelo Gala, Master RKC
    • Chris Holder, Master RKC
    • Steve Holiner, Master RKC
    • Dan John, Master RKC
    • Mike Krivka, Master RKC
    • Thomas Phillips, Master RKC
    • Robert Rimoczi, Master RKC
    • Phil Ross, Master RKC
    • Max Shank, Master RKC
  • Workshops
    • HKC Workshops
    • RKC Workshops
    • RKC-II Workshops
  • Find an RKC Instructor
  • Resources
    • Articles
    • Forums
    • Kettlebells
    • Products
  • Blogs
    • PCC Blog
    • Strong Medicine Blog
  • Archives

RKC School of Strength

Official blog of the RKC

clean a kettlebell

Regress to Progress—Why Patterning is the Key to Fixing Your Swing

October 28, 2015 By Matt Beecroft 5 Comments

Matt Beecroft Swing Setup
Matt Beecroft demonstrates the incorrect (left) and correct (right) position for starting a kettlebell swing

Movement quality underpins any good strength training system. The RKC has never been just about the kettlebell, it’s always been about learning to move better. And the key to moving better is often knowing the right time to progress an exercise—and when to regress. It can be challenging to know when to increase the movement challenge, complexity or difficulty of an exercise if you don’t have an RKC instructor to coach you. Fortunately, the RKC system also includes an awesome system for teaching the movements progressively and safely.

Sure, you could go out and learn 17 different techniques in other one or two day workshops… But not only will your personal proficiency in those lifts be suspect (unless you are an athletic freak, like our own Master RKC, Max Shank) but more importantly your ability to communicate and teach the information to others will also be questionable. This is especially true when attempting to coach someone who is new to training efficiently, safely, and effectively.

Also, the skill set of an athlete and a coach are very different. Many of your clients aren’t really interested in your amazing athleticism, they are much more interested in how amazing you can make them. We all know great athletes who are terrible coaches and vice versa.

The intelligent progression of exercises which teach how to get from “point A” to “point B” is what sets the RKC apart. If someone is having trouble mastering the swing, you probably know by now that trying to correct it is difficult. Because swings are ballistic, they’re fast, so trying to correct a client (or yourself) during an exercise like a swing can be almost impossible.

The first thing I want to emphasize that you must be patient with the steps leading up to the kettlebell swing. You will know if you have successfully completed the steps if you finally pick up the kettlebell and swing it with some grace and efficiency. But, if you have sped through the progressions too quickly, your swing will be ugly and dangerous. And then more problems will arise when you progress to the clean and the snatch—which should look exactly like a swing in many ways since your arms simply guide the kettlebell to these other positions while your hips do all the work. These more sophisticated exercises will amplify and illuminate all the flaws with your kettlebell swing technique.

Many people speed through the progressions in various exercises thinking that if they have to be patient and spend the time mastering the basics (note: basic doesn’t mean easy) or need to regress the exercise, then they have somehow failed or gone backwards. This couldn’t be further from the truth.

A few things happen when people try to outsmart the process, or jump ahead in the progressions:

  1. They find out that their swing is terrible and have many things to troubleshoot.
  2. They get injured.
  3. All of the above.

Either way, they will end up spending much more time ironing out their kettlebell swing issues. Hopefully they will go to an RKC Workshop to learn the “a-ha drills” we teach to troubleshoot and save time. Otherwise, they risk getting sidelined by injury instead of patiently mastering the progressions and enjoying the journey. Speeding ahead with load and intensity usually causes limited or dysfunctional movement patterns, if adequate mobility and motor control (stability) aren’t achieved beforehand.

So, how should you fix your kettlebell swing?

Embrace the suck and regress to progress. One reason the swing is taught through a progression—at least in my opinion—is because of the patterning. In many respects, it’s similar to some of the ideas in the Functional Movement Screen (FMS). By the time you pick up a kettlebell, after all the correct patterning you have practiced , it shouldn’t look like you are trying to hump the bell! Instead, your kettlebell swing will be a thing of power and beauty.

The general rule is to only use techniques that improve form, quality of movement, and quality practice while reducing compensations. Unfortunately, many trainers don’t have a system for teaching the swing, they just pick up the kettlebell any way they can and then try to get it to move!

The FMS and the RKC teach patterning in this order:

  1. No load, pattern assistance.
  2. No load, no pattern assistance.
  3. Load, with pattern assistance.
  4. Load, with no pattern assistance.

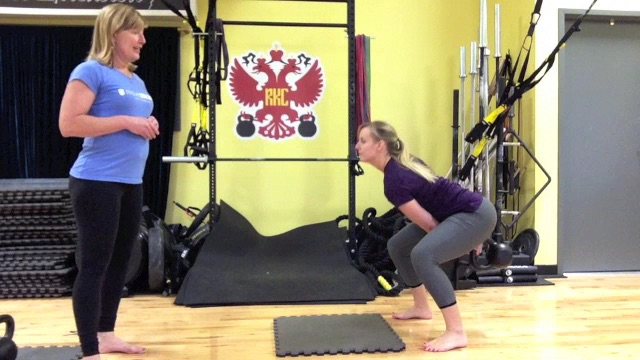
In the RKC, we begin by teaching the hinge unloaded. This is often assisted in a variety of ways – either the student uses the blades of their hands in their hips to help find the hip crease (sometimes coined “chopping and popping”), they might push their butt back towards a wall, or use a dowel touching three points along the spine (head, between the scapula, and the sacrum) to teach how to maintain a neutral spine.

Next we would aim to do this without load, but with no pattern assistance. Our goal is to remove the pattern assistance and do the movement unloaded with perfect form. If the form breaks down we can go back and return to the pattern assistance method (dowel, wall, etc.) until the right movement becomes what we do every time. Old strength coaches were renowned for not letting their athletes pick up a bar until they could first do the movements correctly with a dowel or a stick.

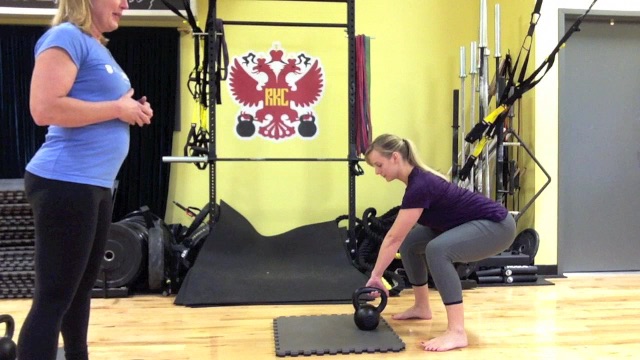
The third stage is load with pattern assistance. In the RKC curriculum, this is the kettlebell deadlift. Placing the kettlebell in line with the heels also places the shoulder blades over the kettlebell. This makes for a foolproof deadlift when we simply stand up with the bell. If you can’t do it slow then you probably can’t do it fast—this is what grinds like the deadlift are all about. Slow is smooth, smooth will become fast later. If the deadlift lacks stiffness or tension, we can use the static stomp deadlift or Hardstyle plank to link the body with tension and to keep midline stability and posture.

The next step is using the deadlift drag or pendulum swing to teach the backswing and the start of the swing—pattern assistance with load. At the final stage we will do dead swings or the proper two handed swing, which is the load with no pattern assistance. If we have adequately mastered the first three steps, the final stage, load with no pattern assistance, will be solid.

Every time I progress a client who isn’t ready, I find that I spend a lot of time trying to troubleshoot their swing. Regressing these clients back to one of the first three stages of patterning was the fastest way to actually help them master the swing.

So relax and enjoy the journey. Be patient in your progress and understand you don’t have to master everything immediately. Basic doesn’t mean “easy”. Spend more time on patterning and you will likely spend less time with the difficult task of troubleshooting swings at full speed. This approach also works with more advanced exercises, for example if your clean isn’t great, your one arm swing probably will need work. If your press isn’t great, your clean will need work. If your kettlebell snatch isn’t great, then your one arm swing, clean, and press probably all need work too.

If you find that your swing isn’t great, don’t think of regressing to an earlier step as failure, or that you’ve made a mistake. You are still traveling in the right direction. Regressing to progress is an amazing strategy that will still have you traveling in the right direction.

***

Matt Beecroft, RKC Team Leader, PCC Instructor is the director and head coach of Reality Self Defense & Conditioning in Adelaide, South Australia. He can be contacted through his website at realitysdc.com.au email: matt.beecroft@realitysdc.com.au or follow him on Facebook: facebook.com/MeetLifeHeadOn.

Filed Under: Coaching, Kettlebell Training, Tutorial Tagged With: clean a kettlebell, how to learn kettlebell swing, how to teach the kettlebell swing, how-to, kettlebell squat, kettlebell swing regressions, kettlebells, Matt Beecroft, movement patterning, movement patterns, movement quality, tutorial

Achieve Pain-Free Single Kettlebell Cleans From The Start

January 28, 2015 By Lori Crock 5 Comments

RKC Team Leader Lori Crock's Kettlebell Cleans Tutorial

I am a coach who hates to see people in pain from doing cleans.

And it doesn’t matter whether it’s a beginner, or a more advanced kettlebell athlete, the clean can be a challenge to do as effortlessly as its kindred ballistic—the swing or even the snatch.

I speak from experience—the clean was hard for me when I was preparing for the RKC-I. It wasn’t hard with the typical thump on the wrist and forearm in the catch. No. My issue was a shoulder-hike on one side as the kettlebell made its way up … which can be even worse with the trap pain and the potential for some serious asymmetry down-the-road.

To avoid this, read on!

When you are first learning the clean, it can seem mysterious as to what the hand, arm and kettlebell are doing on the way up to the racked position. It happens so fast!

Often we see the clean only as a transitory movement that prepares us for pressing, front-squatting or doing racked carries—instead of focusing on the quality of the clean—even though we know a more efficient clean results in stronger pressing and squatting. And the clean is a nice alternative to the swing or snatch for conditioning.

You might not realize the inefficiencies in your clean if you don’t train it on its own very often—until you notice bruises on your wrist or arm the next day.

So let’s review the phases of the clean to achieve pain-free cleans. Note that the coaching cues included here are phrases I use when teaching to help people remember key points. The phrases may not exactly match the words used in our RKC manual, but they are rooted in my RKC kettlebell training.

The Swing

Get your two-hand and one-hand swing down first to set your start position, hip hinge and especially a deep back swing. Use cheat cleans (two-hand cleans) while you are learning the swing to prevent grooving bad movement patterns with your single kettlebell clean.

The Setup

Clean setup is just like the swing, holding the center of the handle, except the handle is tipped vertically for internal shoulder rotation to prepare your elbow to lock into your side once your arm moves through to the front of the body.

Coaching Cue: Set up like a slingshot.

Lean back with hamstrings on, lats activated, the kettlebell is tipped toward you—the whole body is taunt and slightly leaning back—and ready to release the kettlebell into a deep back swing.

You are in this same slingshot position each time you clean, whether from the ground or in the air into another rep. This athletic, ready position also applies to the Swing and Snatch with the handle in a horizontal position … but when learning the clean, in my experience, students need a reminder about the importance of the setup because they are more focused on the finish.

Lori Crock Kettlebell Cleans Tutorial: The Setup
The Set Up

The Back Swing

Get into your best hip hinge and hike the bell back as deep as possible to load and explode out of your hips. Shortchanging the back swing means you’ll end up without the power to send the kettlebell upward; so your body may compensate by arm curling the kettlebell or hiking the shoulder to assist the kettlebell upward.

Coaching Cue: Crush the wall behind you with your tailbone and explode up.

Go back to the swing if you are having problems achieving a deep back swing and hip explosion.

Practice: Swing-Swing-Clean 3 times each side to refine the back swing for the clean.

Lori Crock Kettlebell Cleans Tutorial: The Back Swing
The Back Swing

The Breathing

Breathe in through your nose to fill the diaphragm on the back swing. Exhale as the hips snap and knees and glutes lock.

Hardstyle breathing is used for power production and safety at the concentric or positive part of the clean (and all ballistic kettlebell movements). Exhaling when the hips snap creates a powerful muscular contraction in the torso that assists the body with the movement.

Coaching Cue: Explode, exhale.

Time your exhale on the hip snap/lock—not on the catch of the kettlebell in the racked position.

The Rise

When the kettlebell enters the front of the body there is some quick work to lock the elbow against the side of the body and get the hand around the kettlebell handle with a loose grip. Do this right away after the back swing when the hand is at hip level rather than waiting until you are about to rack the kettlebell.

Coaching Cue Elbow and Arm: Hip and zip

Lock the elbow into you side above your hip, zip up your jacket; keep you hand and arm close to your chest as you guide the kettlebell upward.

Coaching Cue Hand: Houdini hands

Move your hand quickly around the kettlebell handle as soon as it enters the frontal plane; do this quick hand work at approximately hip/waist level.

Practice: Clean in front of a wall, door, or post to practice keeping the kettlebell close to the body if you tend to cast it out away from the body. Use your other hand to cover your face in case of actual impact to the wall.

The Catch

The triangle of your forearm / upper arm will receive the kettlebell and hold it with even pressure (50% pressure on forearm and 50% on your bicep), but think of the whole body as catching the kettlebell. We move into a vertical Hardstyle plank when receiving the kettlebell to help avoid high impact on the wrist and forearm.

In the racked position, the kettlebell will not be sitting on your chest; instead, the inside of your arm will connect with at the side of your torso with a vertical forearm and vertical wrist about at the level of your collarbone. Do not hold your racked arm out in space—keep it touching the body to prevent overloading the elbow joint and to engage the lats. The arm and the body are connected and working as one unit.

Coaching Cue Torso: Catch with your cylinder of strength (Thanks, Andrea Du Cane for this phrase!)

Feel the muscular sinking in of your whole body around the kettlebell (not a collapse, but a tightening) as your abdominals and glutes contract, lats engage, knee caps roll up into quads and the entire body links and locks to receive the kettlebell in the racked position.

Coaching Cue Wrist: Knuckle up!

Because we use a loose grip on the rise of the kettlebell, beginners sometimes end up catching with a ‘broken wrist’ (wrist slightly bent back) in the racked position. To avoid this, re-tighten the grip after the catch so that knuckles are flat and facing the ceiling.

Practice: 5 Cleans left and 1 Hardstyle plank for 15 seconds / repeat right.

The Drop

Tip the wrist to release the kettlebell into a downward descent with a relaxed arm, thumb down slightly and the shoulder will be slightly internally rotated. Use only enough tension to hold on to the kettlebell and guide it to the floor or into another rep. Your hips, as usual, are doing most of the work. Keep the kettlebell as close to your body as possible, with your arm still touching your body, and finish with the arm straight in the back swing position at the end of drop before setting the kettlebell gently on the ground.

Note that death-gripping the kettlebell on the drop can lead to elbow pain.

Coaching Cue: “Waterfall” the kettlebell downward.

Allow gravity to do most of the work on the descent of the kettlebell using only a light grip.

Putting it All Together

Now you are ready to put it all together and practice your (hopefully!) pain-free cleans.

The Practice

I use the clean for conditioning in complexes and chains. I also like kettlebell chains that include a clean to practice smooth transitions between movements. This complex meets both of those goals. I use one kettlebell for all movements with 1 minute of rest between 3-5 rounds.

10 Cleans left / 10 Cleans right

SA 2 Swings-2 Cleans-2 Press left

SA 2 Swing-2 Clean-2 Press right

***
By Lori Crock, RKC Team Leader, FMS II and MovNat MCT II. Lori owns MoveStrong Kettlebells in Dublin, Ohio where she teaches small group kettlebell classes to all ages and fitness levels and continues to be amazed, inspired and educated by her students. Her email address is lori@movestrongkbs.com

Filed Under: Kettlebell Training, Tutorial Tagged With: clean a kettlebell, kettlebell cleans, kettlebell how to, kettlebell instruction, kettlebell technique, kettlebell video, Lori Crock, RKC Team Leader, video

Primary Sidebar

Featured Products

previous arrow
BOOK-RKCBookofSnC
HardStyleKettlebellChallegeDanJohn700
BookCoverMasterTheKettlebell1
RKCiconKettlebell512
KettlebellGoddessdv040
next arrow

Recent Posts

  • RKC Big Six Workout
  • The Kettlebell Swing & Low Back Pain
  • Key Kettlebell Exercises To Help You Create Better Balance
  • How to Most Effectively Use Kettlebells to Meet Your New Year Goals
  • 1 Exercise That Checks All The Boxes
FOLLOW US ON TWITTER!

Archives

Copyright © 2025

Dragon Door Publications / The author(s) and publisher of this material are not responsible in any manner whatsoever for any injury that may occur through following the instructions or opinions contained in this material. The activities, physical and otherwise, described herein for informational purposes only, may be too strenuous or dangerous for some people, and the reader(s) should consult a physician before engaging in them.