• Skip to main content
  • Skip to primary sidebar
  • Home
  • Contributors
    • Matt Beecroft, Master RKC
    • Martijn Bos, Master RKC
    • Andrea Du Cane, Master RKC
    • Angelo Gala, Master RKC
    • Chris Holder, Master RKC
    • Steve Holiner, Master RKC
    • Dan John, Master RKC
    • Mike Krivka, Master RKC
    • Thomas Phillips, Master RKC
    • Robert Rimoczi, Master RKC
    • Phil Ross, Master RKC
    • Max Shank, Master RKC
  • Workshops
    • HKC Workshops
    • RKC Workshops
    • RKC-II Workshops
  • Find an RKC Instructor
  • Resources
    • Articles
    • Forums
    • Kettlebells
    • Products
  • Blogs
    • PCC Blog
    • Strong Medicine Blog
  • Archives

RKC School of Strength

Official blog of the RKC

kettlebell cleans

7 Steps to a Bang-Free Kettlebell Clean

May 11, 2016 By Steve "Coach Fury" Holiner 7 Comments

Steve Holiner Kettlebell Clean

Few movements in “kettlebell land” frustrate people like kettlebell cleans. Not everyone enjoys the bruising and soreness we often deal with while learning cleans. And, cleans can get stressful if we’re anticipating multiple slams to the arm.

In my years as an RKC Instructor, I’ve found kettlebell cleans to be one of the most challenging moves to truly own.

The common issues most people have with cleans fall well within the learning curve. Bruising, soreness, and forearm slamming stop as technique improves. Cleans should not hurt. However, you will need to invest some quality time to smooth out your clean. Patience and practice will go a long way!

Here are seven tips for achieving bang-free cleans:

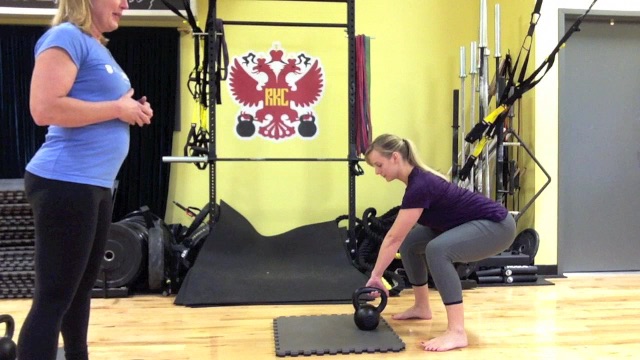
1.    HINGE. People often begin to squat their cleans when they focus on getting the kettlebell up. From watching your backswing, I shouldn’t be able to tell if you’re going to do a swing, clean, or snatch. Keep the hinge consistent.

2.    GRIP. Loosen up folks! Your grip should be fairly relaxed. Think of your fingers as a hook and your thumb as a safety latch. The kettlebell handle must be able to move within your hand.

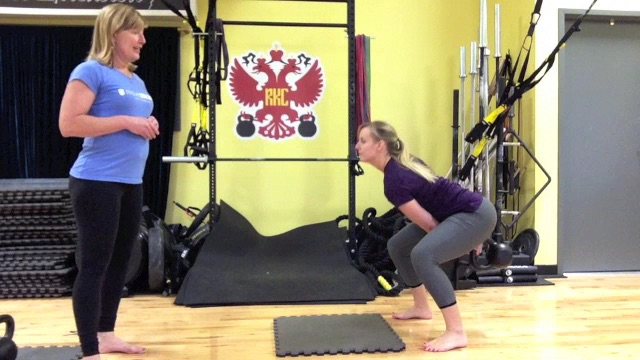
3.    ROTATE. As soon as your kettlebell is at the end of the backswing, begin to externally rotate your arm toward the rack position. Think “THUMB TO BUM” in the backswing—then, what my buddy Geoff Hemmingway calls “OLD TIMEY MAYOR” in the rack position. The kettlebell will actually make contact with the forearm during the float. This allows the kettlebell and arm to meet the torso at the same time. This tip will eliminate the big bang that can happen when the kettlebell lands last.

4.    VOLUME CONTROL. With practice you will learn to exert the right amount of force from the hamstrings, glutes, and hips to ease the kettlebell into the rack position. If the kettlebell is coming in too fast, and you can’t slow it down to prevent banging, then lower the volume. On the flip side, if you are using your biceps to curl the kettlebell into the rack, then you’ll need to turn the volume up. The kettlebell must float during the clean!

RKC Kettlebell Cleans

5.    LOW AND CLOSE. The path of the kettlebell should be low and close to you during the clean. If the kettlebell goes too high, it will arc down and slam into you. If the kettlebell goes too far away from you, it will whip into you. Keep your elbow close to your ribs. While some say to pin the elbow to your ribs, I’m not a huge fan of that cue, because when the focus shifts to the elbow, the arm will often get tense. Excess tension in the arm often leads to banging, curling, and eventual elbow discomfort.

6.    NEUTRAL WRIST. Keep your wrist neutral for a smooth bang-free clean. Own that rack position!

7.    REVERSE. Don’t over-think the eccentric part of the clean. Keep the kettlebell close, keep the grip relaxed, and rotate “thumb to bum” as the kettlebell goes into your hinge. Keep your shoulder in the socket as you spill the kettlebell into the backswing.

These seven tips will have a big impact toward removing the impacts on your arm! But, don’t try them all at once, or your brain will smoke. I suggest trying one drill at a time. You’ll have bang-free cleans in no time!

Let me know how these work for you.

Thanks for your time!

-Fury

***

Steve “Coach Fury” Holiner’s superhero headquarters is Mark Fisher Fitness in NYC. Fury’s a Master RKC, a DVRT Master Chief, and an Original Strength Instructor. He is available for classes, semi-privates, instructor training and programming at MFF. Check out coachfury.com, facebook.com/coachfury Instagram @iamcoachfury and Twitter @coachfury for more info.

Filed Under: Kettlebell Training, Tutorial Tagged With: Coach Fury, fixing kettlebell cleans, how to do a kettlebell clean, kettlebell clean, kettlebell cleans, kettlebell technique, Steve Holiner, video

Achieve Pain-Free Single Kettlebell Cleans From The Start

January 28, 2015 By Lori Crock 5 Comments

RKC Team Leader Lori Crock's Kettlebell Cleans Tutorial

I am a coach who hates to see people in pain from doing cleans.

And it doesn’t matter whether it’s a beginner, or a more advanced kettlebell athlete, the clean can be a challenge to do as effortlessly as its kindred ballistic—the swing or even the snatch.

I speak from experience—the clean was hard for me when I was preparing for the RKC-I. It wasn’t hard with the typical thump on the wrist and forearm in the catch. No. My issue was a shoulder-hike on one side as the kettlebell made its way up … which can be even worse with the trap pain and the potential for some serious asymmetry down-the-road.

To avoid this, read on!

When you are first learning the clean, it can seem mysterious as to what the hand, arm and kettlebell are doing on the way up to the racked position. It happens so fast!

Often we see the clean only as a transitory movement that prepares us for pressing, front-squatting or doing racked carries—instead of focusing on the quality of the clean—even though we know a more efficient clean results in stronger pressing and squatting. And the clean is a nice alternative to the swing or snatch for conditioning.

You might not realize the inefficiencies in your clean if you don’t train it on its own very often—until you notice bruises on your wrist or arm the next day.

So let’s review the phases of the clean to achieve pain-free cleans. Note that the coaching cues included here are phrases I use when teaching to help people remember key points. The phrases may not exactly match the words used in our RKC manual, but they are rooted in my RKC kettlebell training.

The Swing

Get your two-hand and one-hand swing down first to set your start position, hip hinge and especially a deep back swing. Use cheat cleans (two-hand cleans) while you are learning the swing to prevent grooving bad movement patterns with your single kettlebell clean.

The Setup

Clean setup is just like the swing, holding the center of the handle, except the handle is tipped vertically for internal shoulder rotation to prepare your elbow to lock into your side once your arm moves through to the front of the body.

Coaching Cue: Set up like a slingshot.

Lean back with hamstrings on, lats activated, the kettlebell is tipped toward you—the whole body is taunt and slightly leaning back—and ready to release the kettlebell into a deep back swing.

You are in this same slingshot position each time you clean, whether from the ground or in the air into another rep. This athletic, ready position also applies to the Swing and Snatch with the handle in a horizontal position … but when learning the clean, in my experience, students need a reminder about the importance of the setup because they are more focused on the finish.

Lori Crock Kettlebell Cleans Tutorial: The Setup
The Set Up

The Back Swing

Get into your best hip hinge and hike the bell back as deep as possible to load and explode out of your hips. Shortchanging the back swing means you’ll end up without the power to send the kettlebell upward; so your body may compensate by arm curling the kettlebell or hiking the shoulder to assist the kettlebell upward.

Coaching Cue: Crush the wall behind you with your tailbone and explode up.

Go back to the swing if you are having problems achieving a deep back swing and hip explosion.

Practice: Swing-Swing-Clean 3 times each side to refine the back swing for the clean.

Lori Crock Kettlebell Cleans Tutorial: The Back Swing
The Back Swing

The Breathing

Breathe in through your nose to fill the diaphragm on the back swing. Exhale as the hips snap and knees and glutes lock.

Hardstyle breathing is used for power production and safety at the concentric or positive part of the clean (and all ballistic kettlebell movements). Exhaling when the hips snap creates a powerful muscular contraction in the torso that assists the body with the movement.

Coaching Cue: Explode, exhale.

Time your exhale on the hip snap/lock—not on the catch of the kettlebell in the racked position.

The Rise

When the kettlebell enters the front of the body there is some quick work to lock the elbow against the side of the body and get the hand around the kettlebell handle with a loose grip. Do this right away after the back swing when the hand is at hip level rather than waiting until you are about to rack the kettlebell.

Coaching Cue Elbow and Arm: Hip and zip

Lock the elbow into you side above your hip, zip up your jacket; keep you hand and arm close to your chest as you guide the kettlebell upward.

Coaching Cue Hand: Houdini hands

Move your hand quickly around the kettlebell handle as soon as it enters the frontal plane; do this quick hand work at approximately hip/waist level.

Practice: Clean in front of a wall, door, or post to practice keeping the kettlebell close to the body if you tend to cast it out away from the body. Use your other hand to cover your face in case of actual impact to the wall.

The Catch

The triangle of your forearm / upper arm will receive the kettlebell and hold it with even pressure (50% pressure on forearm and 50% on your bicep), but think of the whole body as catching the kettlebell. We move into a vertical Hardstyle plank when receiving the kettlebell to help avoid high impact on the wrist and forearm.

In the racked position, the kettlebell will not be sitting on your chest; instead, the inside of your arm will connect with at the side of your torso with a vertical forearm and vertical wrist about at the level of your collarbone. Do not hold your racked arm out in space—keep it touching the body to prevent overloading the elbow joint and to engage the lats. The arm and the body are connected and working as one unit.

Coaching Cue Torso: Catch with your cylinder of strength (Thanks, Andrea Du Cane for this phrase!)

Feel the muscular sinking in of your whole body around the kettlebell (not a collapse, but a tightening) as your abdominals and glutes contract, lats engage, knee caps roll up into quads and the entire body links and locks to receive the kettlebell in the racked position.

Coaching Cue Wrist: Knuckle up!

Because we use a loose grip on the rise of the kettlebell, beginners sometimes end up catching with a ‘broken wrist’ (wrist slightly bent back) in the racked position. To avoid this, re-tighten the grip after the catch so that knuckles are flat and facing the ceiling.

Practice: 5 Cleans left and 1 Hardstyle plank for 15 seconds / repeat right.

The Drop

Tip the wrist to release the kettlebell into a downward descent with a relaxed arm, thumb down slightly and the shoulder will be slightly internally rotated. Use only enough tension to hold on to the kettlebell and guide it to the floor or into another rep. Your hips, as usual, are doing most of the work. Keep the kettlebell as close to your body as possible, with your arm still touching your body, and finish with the arm straight in the back swing position at the end of drop before setting the kettlebell gently on the ground.

Note that death-gripping the kettlebell on the drop can lead to elbow pain.

Coaching Cue: “Waterfall” the kettlebell downward.

Allow gravity to do most of the work on the descent of the kettlebell using only a light grip.

Putting it All Together

Now you are ready to put it all together and practice your (hopefully!) pain-free cleans.

The Practice

I use the clean for conditioning in complexes and chains. I also like kettlebell chains that include a clean to practice smooth transitions between movements. This complex meets both of those goals. I use one kettlebell for all movements with 1 minute of rest between 3-5 rounds.

10 Cleans left / 10 Cleans right

SA 2 Swings-2 Cleans-2 Press left

SA 2 Swing-2 Clean-2 Press right

***
By Lori Crock, RKC Team Leader, FMS II and MovNat MCT II. Lori owns MoveStrong Kettlebells in Dublin, Ohio where she teaches small group kettlebell classes to all ages and fitness levels and continues to be amazed, inspired and educated by her students. Her email address is lori@movestrongkbs.com

Filed Under: Kettlebell Training, Tutorial Tagged With: clean a kettlebell, kettlebell cleans, kettlebell how to, kettlebell instruction, kettlebell technique, kettlebell video, Lori Crock, RKC Team Leader, video

Primary Sidebar

Featured Products

previous arrow
BOOK-RKCBookofSnC
HardStyleKettlebellChallegeDanJohn700
BookCoverMasterTheKettlebell1
RKCiconKettlebell512
KettlebellGoddessdv040
next arrow

Recent Posts

  • RKC Big Six Workout
  • The Kettlebell Swing & Low Back Pain
  • Key Kettlebell Exercises To Help You Create Better Balance
  • How to Most Effectively Use Kettlebells to Meet Your New Year Goals
  • 1 Exercise That Checks All The Boxes
FOLLOW US ON TWITTER!

Archives

Copyright © 2025

Dragon Door Publications / The author(s) and publisher of this material are not responsible in any manner whatsoever for any injury that may occur through following the instructions or opinions contained in this material. The activities, physical and otherwise, described herein for informational purposes only, may be too strenuous or dangerous for some people, and the reader(s) should consult a physician before engaging in them.