• Skip to main content
  • Skip to primary sidebar
  • Home
  • Contributors
    • Matt Beecroft, Master RKC
    • Martijn Bos, Master RKC
    • Andrea Du Cane, Master RKC
    • Angelo Gala, Master RKC
    • Chris Holder, Master RKC
    • Steve Holiner, Master RKC
    • Dan John, Master RKC
    • Mike Krivka, Master RKC
    • Thomas Phillips, Master RKC
    • Robert Rimoczi, Master RKC
    • Phil Ross, Master RKC
    • Max Shank, Master RKC
  • Workshops
    • HKC Workshops
    • RKC Workshops
    • RKC-II Workshops
  • Find an RKC Instructor
  • Resources
    • Articles
    • Forums
    • Kettlebells
    • Products
  • Blogs
    • PCC Blog
    • Strong Medicine Blog
  • Archives

RKC School of Strength

Official blog of the RKC

jerk

Getting Strong Fast: Four Effective Overhead Kettlebell Exercises

March 15, 2017 By Sebastian Müller 12 Comments

Sebastian Muller Overhead 40kg kettlebell press

Kettlebell exercises are much more common in fitness these days because of the RKC, CrossFit, strongman and functional training. But, only truly strong athletes will be able to lift heavy kettlebells overhead without risking injury.

When I began my training a few years ago, I hated it. No matter where I looked, everybody was stronger than me—at least that’s what I thought when I saw what others were lifting. But, the further I went down the path of strength training, I discovered a real secret. I learned why—after months of training—I still lifted lighter weights than the other guys (and girls).

The difference was that I pressed the weights with very strict form. I would clean a kettlebell and then press it until my arm was straight overhead. While this is an extremely effective way to train your body, it is not really useful for lifting very heavy weights.

If you want to move big kettlebells, you have to be creative. You’ll need to look for effective exercises and movements that allow you to use more of your muscles. This post will outline the four best exercises I’ve found for this purpose.
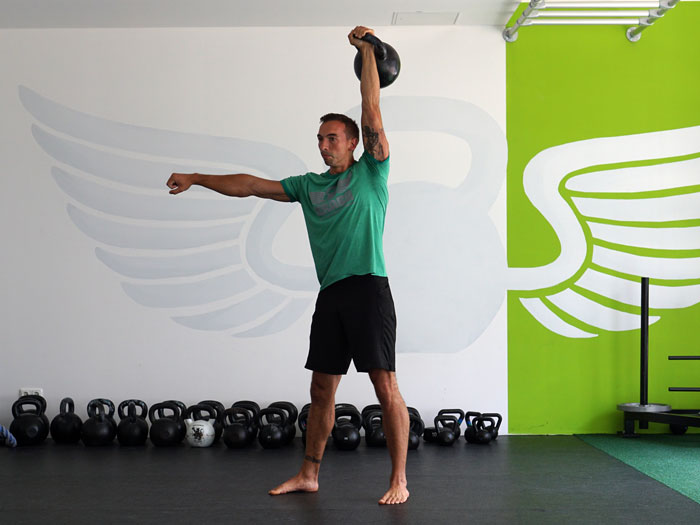
1. The Get-Up

Turkish wrestlers and aspiring athletes who trained with them used this exercise to prepare for the hard and demanding sport-specific wrestling training. If an athlete couldn’t “get up” with at least half of his body weight, he wasn’t allowed to participate in wrestling training. Being able to lift a lot of weight is just one advantage of the get-up. Your body will learn to work as a unit, and every muscle is involved with this movement. When I first did the get-up with a kettlebell, I chose the same weight I was using for strict presses. After a few weeks, I increased that weight by 100%.

Since one arm is holding the weight straight overhead during the entire get-up exercise, it strengthens and stabilizes your shoulder muscles. When you’re able to do the movement correctly and smoothly, then the goal of using half your body weight is absolutely realistic.

Sebastian Muller 40kg Get-Up

Performing the Get-Up

  • Start on your back, lying on the ground.
  • Safely pick up the weight, and extend your arm to press the weight overhead.
  • Push with your supporting leg to the side and roll up on your elbow.
  • Sit up straight.
  • Bring the knee of the extended leg under your hip.
  • Be sure your upper body is upright, and rotate it straight forward.
  • Stand up into a shoulder-width stance.

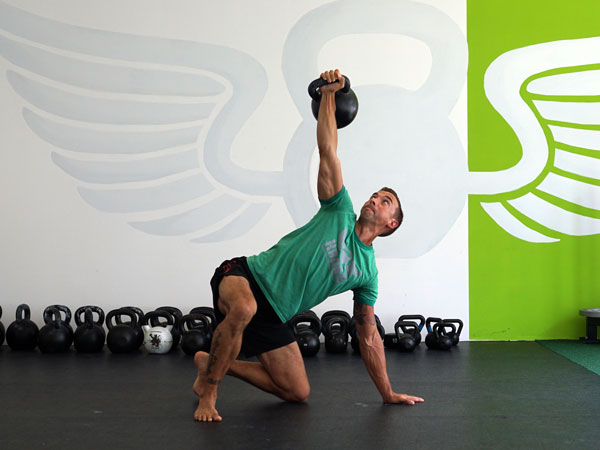
2. Bent Press (Advanced)

Old time strongmen and athletes of the 19th century did tremendous feats of strength with this exercise. You don’t see it very much these days, despite its many advantages. (The bent press is a very advanced exercise and should only be attempted when the kettlebell lifter is ready. Find an RKC-II instructor near you for help and coaching with this movement.)

But, if it is safe and appropriate for the trainee, the carryover from the bent press to other movements is gigantic. It also enormously improves hip and thoracic spine mobility. Another special thing about the bent press is that it has no “perfect form”. Everyone does it a bit differently. Although the process is always the same, there are three options: hip dominant (similar to the windmill), thigh dominant (closer to a squatting pattern), or a version that incorporates both movement patterns.

Sebastian Muller Bent Press 40kg

Performing the Bent Press:

  • Bring the weight up to the chest safely (the “rack position”).
  • Position your arm onto your big back muscles and let it remain there.
  • “Sit” under the weight by opening or hinging the hip and rotating the upper body until the arm holding the kettlebell is completely straight.
  • Straighten the hip and legs to return to the standing position.

3. Push Press

The push press bears the most resemblance to the strict press. But with the push-press, the upper body muscles only start to work when the kettlebell is already on its way up. The force of the push press comes from the legs and the hips. A small knee dip followed by an explosive hip extension transfers the force to propel the kettlebell overhead.

Sebastian Muller Push Press Bump with 40kg kettlebell

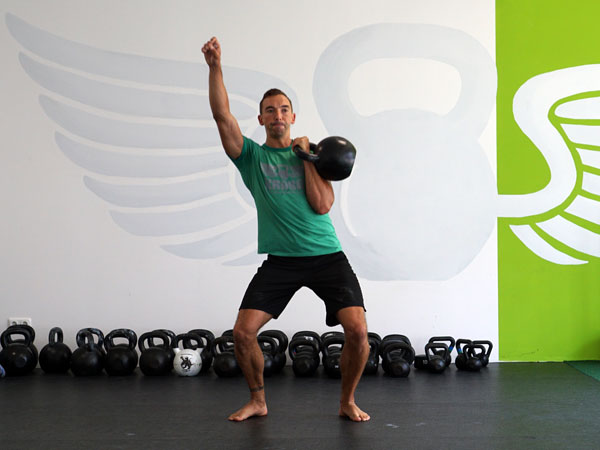
Performing the Push Press:

  • Bring the weight up to the chest safely (the “rack position”).
  • Hinge the hips and bend your knees slightly (about one quarter of a squat).
  • Explosively extend legs and hips (“bump” see the photo above).
  • Straighten the arm. After the bump, the handle of the kettlebell should be at about the height of your forehead, before you straighten the arm.

4. Jerk

The jerk is an exercise to bring up the most weight overhead with two kettlebells. It takes the upper body muscles responsible for the press almost completely out of the game. Everything in the jerk is similar to the push press up until the bump. When the kettlebells are forehead height, you have to do another dip with the knees and hips—and simultaneously extend both arms.

This exercise is super complex, but also allows you to use a lot of weight.

Performing the Jerk

  • Safely clean the kettlebells up to the chest (the “rack position”).
  • Hinge the hips and slightly bend your knees (about one quarter of a squat).
  • Explosively extend your legs and hips (“bump”).
  • Bend your knees and hinge your hips again when the kettlebell reaches your forehead. Simultaneously extend your arm.
  • Extend your legs and hips to stand up straight with the weight overhead.

Prerequisite Requirements for Safely Lifting Heavy Kettlebells Overhead:

Before you try these exercises, there are prerequisite requirements for lifting heavy kettlebells overhead—which include a certain level of mobility and stability to prevent overtraining or injury.

Sebastian Muller Overhead Reach Test

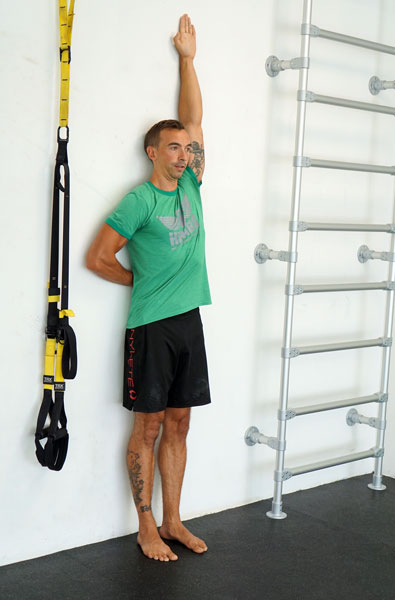
Test your overhead lockout position:

  • Stand with your back facing a wall with your heels about 5cm (about 2 inches) from the wall.
  • Your buttocks, upper back, shoulders and back of your head are touching the wall.
  • Hinge the hip so that you ‘’pinch’’ your hand to the wall. The pressure on the hand should be there during the entire exercise.
  • Put your other hand straight up overhead.

When the wrist of your fully extended arm touches the wall while your back remains stable, you will have fulfilled the mobility requirements. If you’ve run into trouble here, first work on your thoracic spine mobility and shoulder joints. To safely lift heavy kettlebells overhead, you will also need stable shoulder joints and a strong core musculature. You should have also mastered the basic kettlebell movements: swing, get-up, clean, press, squat, snatch.

The get-up is the best exercise to prepare your shoulders for heavy weights. When you master the get up, you will build a strong foundation for lifting heavy kettlebells. You can even increase the effectiveness of the exercise by adding overhead walks to your get-up sessions. For example, walk with the kettlebell overhead every time you are in the standing position of the get-up.

When a get-up with half your bodyweight is no problem for you anymore, and you are safe in the kettlebell basics, you are ready for the bent press, push press and jerk.

When Training with Heavy Kettlebells, Movement Quality is Essential

The movement patterns of the get-up, bent press, push press and jerk are complex. Many joints and big muscle groups have to work together perfectly. Before you can load these movement patterns with heavy kettlebells, you should master the movements. You simply can’t afford to stop and think about what you have to do next while you are holding a heavy kettlebell. The best way to avoid mistakes is to do everything correctly from the start. Be a professional and learn the exercises from a qualified coach.

Sebastian Muller Rack Position 40kg

How to Use These Exercises:

The movements we’ve discussed in this blog post can be divided into two categories: skill and power. Skill and power exercises belong at the beginning of your training routine. They require high focus, and we want to lift heavy kettlebells with these exercises. It’s a bad idea to tackle this combination while fatigued.

The get-up and bent press are in the skill category. They are complex movements that involve many muscle groups and joints. They are also performed slowly and under high tension. After warming up, do perfect repetitions in turns, always starting with your less strong side. One to a maximum of five sets will do a fine job. After ten total repetitions (five for each side), move on to other exercises.

The push press and jerk are power exercises. While these movement patterns are less complex, you need a lot of explosiveness and power. After warming up, do perfect repetitions in turns, always starting with your less strong side. One to a maximum of five sets will do a fine job. After ten total repetitions (five for each side), move on to other exercises.

Important Rules:

  • Be sure to fulfill the stability and mobility requirements for the overhead movements before attempting them—especially with heavy kettlebells.
  • Master the basics!
  • Learn all of the described movements from a qualified coach.
  • Always practice while fresh, with high focus. Aim to improve a little at every training session.

If you follow these rules, you will surely draw the admiration of others and have the best workouts of your life. Now that you know four exercises for lifting heavy kettlebells, go and lift your training skills to the next level.


***

Sebastian Müller, RKC Team Leader, and PCC Instructor is a personal trainer in Erfurt (Germany) and teaches seminars all over Germany. After 16 years of training he founded the first kettlebell studio in his federal state. He is the head coach of KRABA Erfurt (“Strength and Movement Academy”) and a passionate blogger. His focus lies on what he enjoys the most: to inspire people for simple training and making it an important part of their lives!  Translation by Martin Breternitz HKC, KRABA Erfurt

Filed Under: Kettlebell Training, Tutorial Tagged With: advanced kettlebell exercises, bent press, get up, heavy kettlebells, jerk, kettlebell training, kettlebells, push press, Sebastian Muller, tutorial

The Kettlebell Jerk

July 10, 2013 By Mike Krivka Leave a Comment

329

Overview
The strength of the RKC is its reliance on the development of the six fundamental techniques that are taught as part of the baseline RKC curriculum: the Swing, Clean, Front Squat, Press, Snatch, and Turkish Get-Up.  These foundational techniques give the trainer and the athlete a solid foundation to start with and enough variety in movement and skills mastery to keep them busy for years to come.  But is there a missing link? Is a critical technique excluded that would round out the six and make it a lucky seven?  I think the missing link would be the Kettlebell Jerk and in the following paragraph’s I’ll try to explain to you my reasoning.

BTW – the Kettlebell Jerk is part of the RKC II curriculum so fear not—it’s part of the program!

What is the Kettlebell Jerk?
The Jerk, by extension, is within the same family as all of the other overhead techniques that can be performed with the Kettlebell.  Meaning that it is related to the Press and Snatch – at least it’s a distant cousin of both.  In reality it is part of the loading progression to getting heavy weights overhead; starting with the Press, moving on to the Push Press, and then ending with the Jerk.  The Jerk isn’t as “ballistic” as the Snatch, but its close; and it’s not as “grinding” as the press, because it shouldn’t be.  This means that the carryover skills that you will develop when practicing the Jerk will benefit both sides of the movement coin.

The Jerk is comprised of the “Dip and Drive” of the Push Press followed by a soft lockout in a high Overhead Squat or high Hip Hinge.  The key behind having success with the Jerk is in how well you can translate the energy behind the Dip and Drive into the Kettlebell and get it moving overhead.  If your Dip and Drive isn’t strong enough to get the Kettlebell to “float” then you won’t be able to get under the it and “catch” it with a locked out arm.  Now if your Dip and Drive really is strong enough to “float” the kettlebell, but your initial racked position is weak or loose, then there’s no way you’ll get it overhead or you’ll struggle to press it out.  Your racked position has to keep the Kettlebell in the perfect alignment with the torso and legs to accept the power from the Dip and Drive, and the elbows have to be tight against the body and ready to transition from holding to driving upward once the legs have done their job. So you might say that your Jerk depends on fast knees and tight elbows.

So far we’ve talked about transferring energy from the lower body to the upper body—now we need to talk about what the lower body is doing to set up the energy transfer.  First thing you need to think about is your stance width or how far apart your feet are.  Many people take a wide stance assuming that if their feet are far apart they will get more power.  Well in this case it just doesn’t work that way.  Remember, we are trying to create a ballistic transfer of energy from your legs to the Kettlebell.  To do that you want to have a shoulder-width stance (be realistic about how wide your shoulders are) that will allow you to drive hard off the ground and get a maximum contraction of the glutes.  If your starting stance for the Jerk is too wide then you won’t get maximum glute contraction and you’ll have to make up the difference somewhere else.  So, after you’ve got the perfect stance you need to make sure that you Dip doesn’t go too deep.  The Dip should be a quick and forceful bending of the knees (not the hips) that lets you get underneath the Kettlebell and start driving it upwards.  The Drive starts immediately after the Dip; don’t hesitate – explode! Once you starting driving off of the ground through the knees you need to make sure that you follow all of the way through to engage the glutes and transfer the energy into the torso.

Now that your Dip and Drive are in place and working the way you want them to, you still don’t have a Jerk yet.  What you’ve got is the underpinnings for a decent Push Press.  Now you have to master the most difficult part of the Jerk: the Drop.  This seems to be the most common area of confusion and difficulty for most athletes when in actuality it should be the easiest.

Then why is it so hard for most people?  All you have to do is look back at their Dip and Drive.  If they aren’t fully transferring the energy generated by the Drive into the torso, thereby allowing the Kettlebell to float, then they are going to be stuck under the Kettlebell and won’t be able to drop underneath to catch it.  Remember: you can’t effectively drop out from under the Kettlebell if you are still loaded with it.  You’ve got to off-load the kettlebell and then quickly drop or hinge out underneath it.

If all of the elements described above line up, then the Kettlebell will be caught in the overhead position with a locked elbow but a “soft arm.”  What do I mean by a “soft arm?”  It means that you shouldn’t be punching through the lockout with any more force than what’s needed to brace the arm for receiving the load from the Kettlebell.

Better than the Kettlebell Snatch?
Is the Jerk (or the Clean and Jerk to be specific) better than the Snatch?  It could be—it just depends on the person and what they are training for.  The Snatch, when executed properly, trains a laundry list of qualities that will benefit the athlete. It trains maximizing the Backswing, taming the arc, transitioning from pulling to punching, the overhead lockout position and the commensurate mobility required to attain it, maximizing the trajectory of the Kettlebell throughout the movement, and other important qualities.  The Jerk, also when executed properly, trains a similar list of qualities. Foremost are translating energy/motion from the legs to the torso, translating energy/motion from the torso to the arm via the elbow, perception of movement and split-second timing while under load, transitioning from driving to catching, and anticipating load and velocity while in motion.  Sounds pretty complex and it is; but the work is worth it once you get the proper timing and sequencing down.

So, it looks like they are both pretty beneficial—so which one comes out on top?  Well if you are looking for a great way to build up your grip and develop explosive power from ground to sky then the Snatch will fit the bill.  It’s also a great way to build up some serious anaerobic endurance.  Don’t believe me? Ask someone who trains for the RKC Snatch Test what it feels like around minute four. Oh I’m sorry, they can’t talk right now, they’re gasping for air!

In regards to the Jerk, I think it comes out on top for someone who is trying to move a near one-arm maximum load in a ballistic manner and learn how to deal with it in the overhead lockout.  For the combat athlete it is a great technique to develop a more intimate appreciation for how to apply maximum force to any upper body striking technique and how to conserve energy until the very last millisecond.  Remember that time under tension is how you get strong and the Jerk will allow you to put a greater load overhead and train you to manage the position as well.

Conclusions
Training the Jerk will benefit anyone who has mastered the “Big Six” Kettlebell techniques already and are ready for a challenge that will allow them to develop the strength to manage a heavier load overhead.  While it is a simple technique, it is not easy to master—and success with it will be dependent on not only have a strong Press and Push Press but also a relatively high degree of physical awareness and how to manage quick height transitions.  If you are truly interested in learning how to perform the Jerk, I strongly suggest you find an RKC that can help you fine-tune all of the precursors to this dynamic, fun and positively challenging technique.

About Michael A. Krivka, Sr. – RKC Team Leader: Michael A. Krivka, Sr. is a Washington, DC native who has been involved in Kettlebell training for over a decade and is currently an RKC Team Leader and member of the RKC Board of Advisors and the RKC Leadership Team under Dragon Door (where he has been listed as one of the top reviewed RKC’s in the world for the last five years). He is also the author of a bestselling eBook entitled “Code Name: Indestructible” and is in the process of finishing up several other eBooks on Kettlebells, body weight, and the integration of other tools into an effective strength and conditioning program. Mike has traveled extensively throughout the United States teaching Russian Kettlebells to military (USMC, USN, USA and USAF) and law enforcement personnel (FBI, DEA, USSS and CIA)… read more here.

Filed Under: Uncategorized Tagged With: advanced, jerk, Kettlebell, Krivka, mike, skills, techniques, training

Primary Sidebar

Featured Products

previous arrow
BOOK-RKCBookofSnC
HardStyleKettlebellChallegeDanJohn700
BookCoverMasterTheKettlebell1
RKCiconKettlebell512
KettlebellGoddessdv040
next arrow

Recent Posts

  • RKC Big Six Workout
  • The Kettlebell Swing & Low Back Pain
  • Key Kettlebell Exercises To Help You Create Better Balance
  • How to Most Effectively Use Kettlebells to Meet Your New Year Goals
  • 1 Exercise That Checks All The Boxes
FOLLOW US ON TWITTER!

Archives

Copyright © 2025

Dragon Door Publications / The author(s) and publisher of this material are not responsible in any manner whatsoever for any injury that may occur through following the instructions or opinions contained in this material. The activities, physical and otherwise, described herein for informational purposes only, may be too strenuous or dangerous for some people, and the reader(s) should consult a physician before engaging in them.