• Skip to main content
  • Skip to primary sidebar
  • Home
  • Contributors
    • Matt Beecroft, Master RKC
    • Martijn Bos, Master RKC
    • Andrea Du Cane, Master RKC
    • Angelo Gala, Master RKC
    • Chris Holder, Master RKC
    • Steve Holiner, Master RKC
    • Dan John, Master RKC
    • Mike Krivka, Master RKC
    • Thomas Phillips, Master RKC
    • Robert Rimoczi, Master RKC
    • Phil Ross, Master RKC
    • Max Shank, Master RKC
  • Workshops
    • HKC Workshops
    • RKC Workshops
    • RKC-II Workshops
  • Find an RKC Instructor
  • Resources
    • Articles
    • Forums
    • Kettlebells
    • Products
  • Blogs
    • PCC Blog
    • Strong Medicine Blog
  • Archives

RKC School of Strength

Official blog of the RKC

Archives for December 2015

Friend Zone Exercises

December 30, 2015 By Max Shank 8 Comments

Max Shank Side Plank With Leg Lift

Ladies, you have that friend who is awesome in every way but just doesn’t excite you. He’s funny, smart, nice, and doesn’t look horrifying–but for some reason he just doesn’t strike passion in your heart.

Because of this, whether he knows it or not, he is stuck in the friend zone.

Let’s take a moment of silence for all the gentlemen before us who have fallen into the friend zone.

In today’s world, the same thing has happened with certain exercises. Because social media is now a window into people’s lives, you’d think that training was all back flips and heavy deadlifts. The problem is that anyone who doesn’t have a thorough understanding of exercise and building a well-balanced program, doesn’t see the important foundational stuff.

The following exercises get no love because they just aren’t that sexy.

  • Rows
  • Split Squats
  • Push Ups
  • Side Planks
  • Single Leg Deadlift
  • Mobility training in general

Rows always get cast aside in favor of pull-ups or chin-ups. This is not to say that these exercises are bad, but rows are actually the better choice for most people. The postural benefits along with the promotion of shoulder health and biomechanics from rows far outweigh pulls or chins. Consider adding rows to your session either as a big strength movement or as a high rep accessory work movement toward the end of your session. Then, even if it’s not considered all that cool, post it on Instagram with the hashtag #IDoRows.

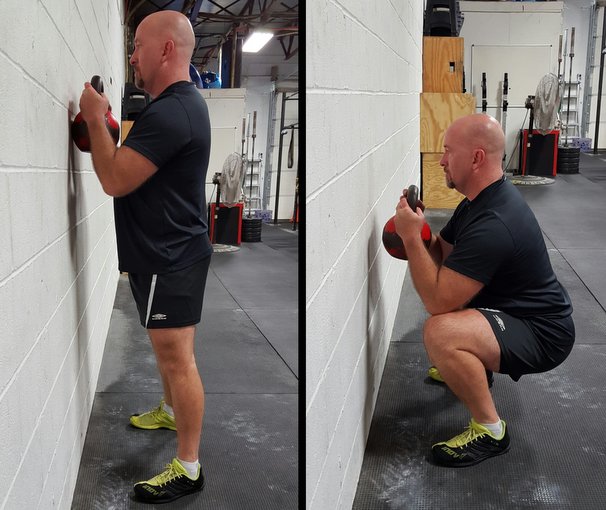
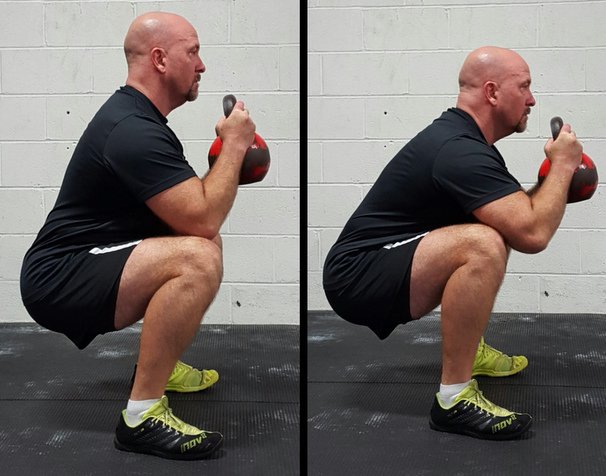
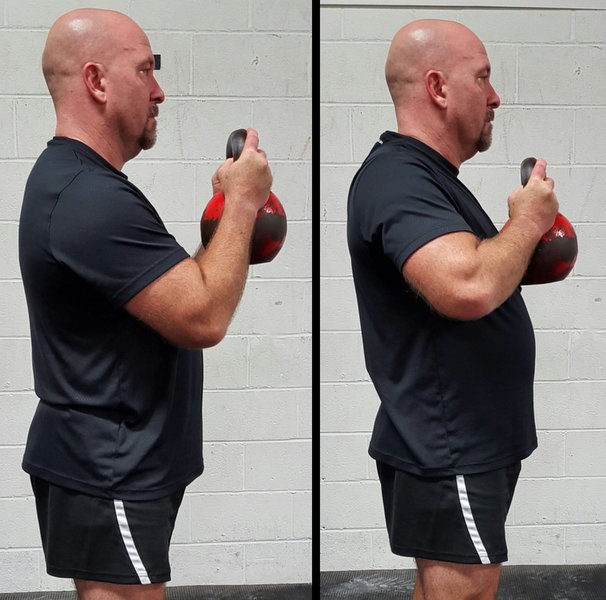
Split squats, walking lunges, rear foot elevated split squats, jumping lunges are all great exercises. The humble split squat is another exercise that gets little to no love. First, they are extremely user friendly. Second they do a terrific job of mobilizing the hip flexor/quadriceps and ankle/toes of the rear leg. The toe and ankle mobility is easy to avoid during normal lunges and other substitute exercises. Lastly they also are crucial for owning split-stance balance which will have a good carryover to other areas of life.

Push-ups… if you’re not clapping your hands or spinning around like a whirling dervish, then push-ups just don’t have that “shiny-thing” appeal. However, if done properly, the push-up will help you get stronger upper body pushing muscles. Also, push-ups train the abs to maintain stability–which has been proven to help prevent back problems. The push-up also allows for full scapular movement–important for maintaining shoulder health–unlike the bench press.

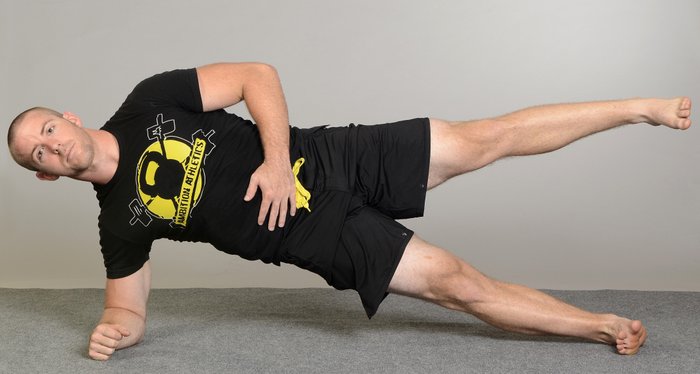
Side planks don’t look that cool, but they really turn on your lateral chain. The oblique and gluteus medius are important for stabilizing the pelvis (especially while you’re on one leg). This is sometimes a magic bullet for improving function in the upper and lower body.

Master RKC Max Shank Single Leg Deadlift with Barbell

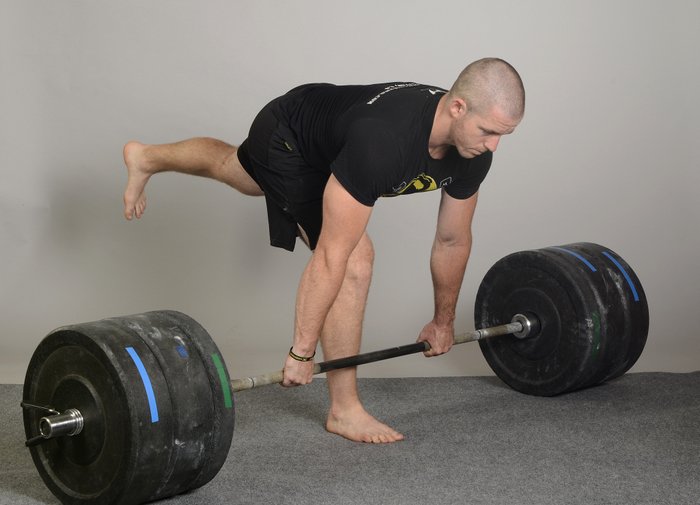
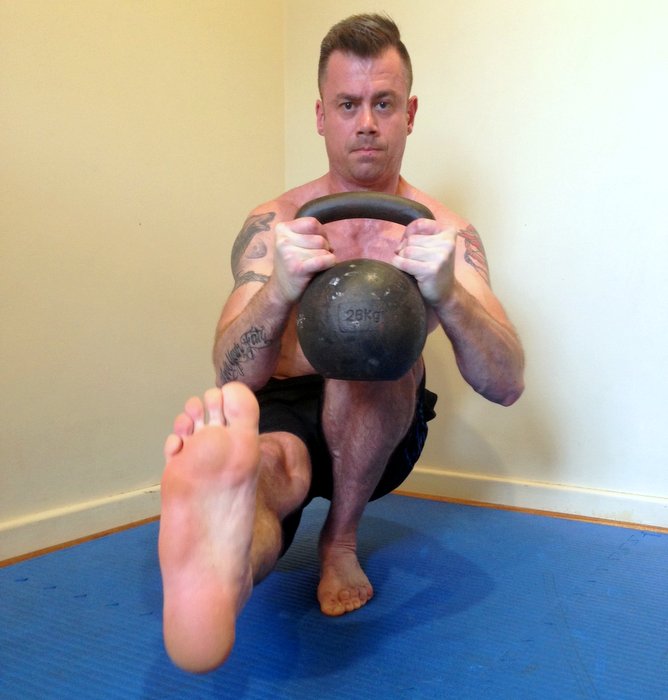
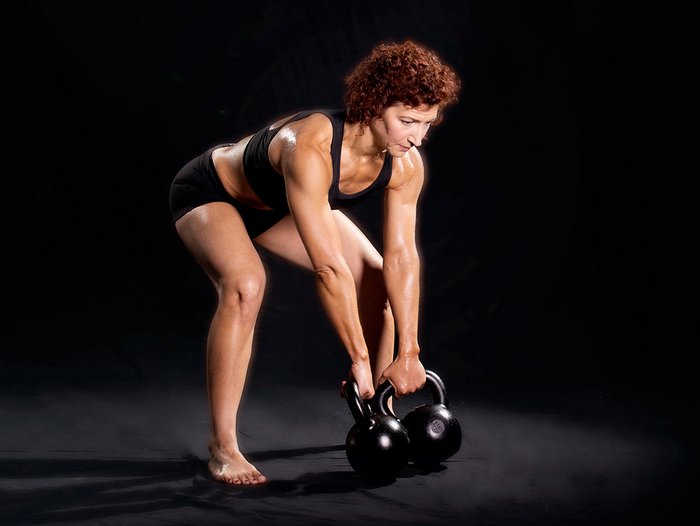
The single leg deadlift is another exercise that is absolutely awesome for improving mobility, strength, balance, and coordination–all which have great carryover to athletics. The main criticism is that it’s just not heavy enough.

I beg to differ (barbell and kettlebell examples):

https://www.youtube.com/watch?v=SbsETxo8Vps

Wake up your glutes and get to work on some single leg deadlifts. They are especially challenging if you hold the weight in the hand opposite of the leg you are standing on.

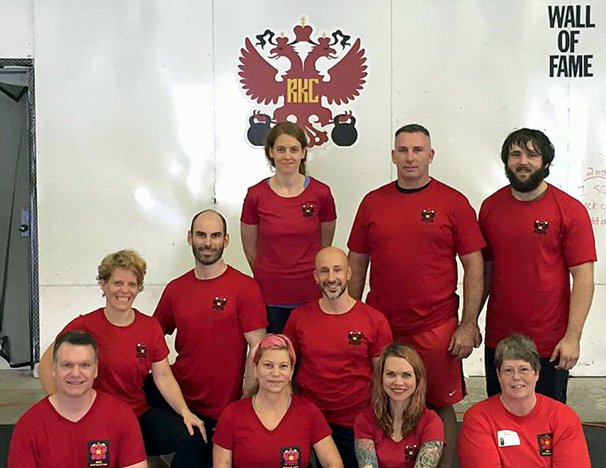
Joint circles for mobility training aren’t all that cool looking, but they are a key component of a well rounded health and strength plan. In the RKC we take care to mobilize the joints before heavy lifting to prevent injury and enhance strength. Most people are too stiff, not too loose–you have to mobilize those joints every day if you want to be able to stay loose.

Side note: Mobility drills actually look kind of cool at 4x speed in my #5minuteflow video:

https://www.youtube.com/watch?v=k3ZD8s15ckc

Don’t forget the exercises that will stand by you through thick and thin, and reward you with sustainable progress through your whole life.

Better every day,
-Max

****

Master RKC Instructor Max Shank is the owner of Ambition Athletics in Encintas, California. He is very active in martial arts, competes in the Highland Games, and promotes a holistic approach to overall fitness. For more information about Max please visit www.ambitionathletics.com.
Max Shank is also the author of Master the Kettlebell, now available in ebook and paperback format.

Filed Under: Kettlebell Training Tagged With: forgotten exercises, foundational exercises, kettlebell rows, Master RKC Max Shank, max shank, mobility training, push-ups, RKC, rows, side plank, single leg deadlift, split squats

5 Reasons Every RKC Should Train for the RKC-II

December 23, 2015 By Matt Beecroft 1 Comment

Matt Beecroft Kettlebell Pistol

In 2008, in Hungary, I completed my first RKC. As one of the longest-certified RKCs in Australia, one of the most important things that has kept me motivated as an instructor is furthering my education. Constantly learning, evolving and setting new goals every year has kept me passionate about the fitness industry. Most importantly, I have sought out the best knowledge to help my clients be healthier and to become better athletes.

The RKC has always been touted as the “black belt” of kettlebell certifications—and it is! Earning it comes with a great sense of pride, achievement, and status within the kettlebell community. As a martial artist who holds qualifications higher than black belt in two different systems (which took me many years to achieve), I can say that earning your black belt is not an end point. There is much more beyond earning your black belt. In many systems, the black belt is just the beginning—it’s a rite of passage for practice at a deeper level.

For me, earning certifications isn’t about the ranking or increase in my perceived status, nor is it about the piece of paper. It’s is all about what is learned along that journey—that is the real gold. While the certification experience itself is amazing, the golden nuggets are found along your journey to the RKC. And the same is also true for the RKC-II.

I think many people shy away from the RKC Level-II because it may seem like too lofty a goal. The techniques are challenging, and for people without a big background in strength training, the strength prerequisites can be daunting. In the past, people have gotten injured while they were training for it, and some even arrived injured at a Level 2 workshop, knowing they wouldn’t pass the certification. Coincidentally that is exactly what happened to me the first time around. Even though I knew I was injured and wouldn’t pass, I still decided to attend. I traveled to the other side of the world to gain the knowledge and experience to bring back home to my clients. And it was well worth it. Afterwards, I came back home, healed my injury and embarked on a new training program with a coach. I reinvented myself and came back to smash the test and achieve my goal. I had the sweet satisfaction of overcoming my challenges and achieving my long term goal—and not quitting.

However, what I learned along the way was far more valuable. In my own training, the biggest growth periods seem to happen because of an injury. Making mistakes and overcoming obstacles often means big time growth.

As an RKC, the RKC Level-II might be the single best thing you aren’t training for at the moment. Training for and earning your RKC Level-II certification demonstrates a number of things:

  1. It shows that you can be a client.

If you are a personal trainer, but have never trained with a personal trainer or a coach then you will probably struggle to understand the experience of being a client. It’s hard to lead someone through something you haven’t experienced for yourself.

It’s best to train for an RKC workshop or the Level-II by finding an RKC-II instructor to train you and write a program for you. This also means you will need to be a client. Dan John has eloquently said, “ A coach who coaches himself has an idiot for a client”. While I was able to train myself for the RKC—at the time, there were only a few RKCs spread out across Australia, so training with an RKC meant a few hours on a plane for a training session—training myself for the RKC Level-II wasn’t as successful. I needed someone to carefully assess my level, weaknesses, strengths, and technique. I needed honest feedback and a program specifically designed for me and my level of training at the time. This kind of instruction can only happen face to face, not with cookie-cutter, generic training programs. I needed a program written by a skilled coach.

  1. It shows that you are coachable and can follow a program.

The only program that works is the one you will actually follow—and the devil is in the details. Preparing for and passing the RKC Level-II demonstrates that you can follow multiple programs for a long period of time. At the time of my first RKC Level-II certification, the guys had to press ½ their bodyweight. Without enough absolute strength in the “strength bank” for a few years prior, candidates would need to follow a strict program to increase their overall strength over a period of six months to two years. In my opinion, many people attempt the Level-II too soon after their RKC Level-I. They sometimes overestimate how strong and mobile they are, only to discover that they may need another six months to a year—or even longer to really be prepared. Following a program also shows that even as a coach, you are still coachable.

  1. It shows you can take care of your body and auto-regulate your training.

In the lead up to my RKC Level-II, I became too focused on quantity to get the volume up for my big lifts. Once I started sacrificing quality for quantity, and pushed through workouts when I was fatigued, it only led to one thing—injury. Statistically, I am sure about 30% of potential candidates don’t make it to the Level-II because of shoulder or other injuries. Another 30% (or probably more) arrive to the certification with an injury. Preparing for and passing the Level-II demonstrates that you can sweep emotions aside, listen to your body, and auto-regulate your training so that you do not get injured. In other words, it demonstrates that you can train intelligently.

  1. It shows you have learned about programming and progressions.

How do you improve program-writing skills? You improve by following a great program a coach has written specifically for you. Some of the biggest things I learned while training for my Level-II were about writing programs. I learned the most by talking to my coach and trying to understand the “whys” of my program. My understanding of the benefits and pitfalls of particular exercises and programming principles skyrocketed. Learning from a textbook will only get you so far. Nothing can replace the experience—and more importantly the feeling—of following specific programming, particular exercises, and how they all fit together. Writing programs is a science and an art. Many trainers make the mistake of writing programs for clients without first testing them on themselves or someone else. It helps to know firsthand how these programs and exercises will affect your clients. It is challenging to know when a client is ready to progress, and when to hold off. Learning progressions and regressions of kettlebell exercises is a big part of programming, and you learn all of this on the road to the RKC Level-II.

  1. It shows you have the required mobility, stability and strength.

Learning and successfully executing the windmill, pistol, jerk, and bent press means you have earned the prerequisite mobility, stability and strength! These lifts demand that that you have the required blend of t-spine, hip, and ankle mobility/stability and strength. These specific lifts are a demonstration of your athleticism. Some trainers may say that these lifts are “circus tricks” and there is no need for clients to learn them, but this couldn’t be further from the truth. Comments like these often come from trainers who don’t have the athleticism to do these techniques well, if they can even do them at all. While the bent press is an old-time strongman lift, it is also the perfect demonstration of hip mobility, thoracic mobility, and shoulder stability. Old-time strongman lifts and “circus tricks” like the bent press demonstrate strength, flexibility and athleticism—why wouldn’t I want my clients to possess these attributes? Sure, it is easier to be mediocre and not an athlete, but for those who want to deepen their practice and their movement quality, I can’t think of many other lifts with the perfect blend of athleticism that these lifts demonstrate.

RKC-Level2-LogoSo, are you up for the next challenge in your kettlebell practice? While full of challenges, the road to the RKC Level-II is rich with the priceless experience and knowledge for your development as a girevoy and fitness professional. As a RKC, it could be the single best thing you aren’t training for right now.

 ****

Matthew Beecroft is an RKC Team Leader, PCC, and CK-FMS certified instructor. He is also a GFM and Animal Flow instructor and an Expert Level 2 instructor with Krav Maga Global. As a Muay Thai coach, he has trained amateur and professional Muay Thai champions. He can be contacted through his website: www.realitysdc.com.au

Filed Under: Coaching, Fitness Business, Kettlebell Training, Motivation Tagged With: Coaching, professional development, professional goals, programming, RKC instructor, RKC Level 2, RKC-2, RKC-II, RKC2

How to Become a Kettlebell Professional

December 16, 2015 By Shari Wagner 4 Comments

Shari Wagner Double Kettlebell Swing Setup

A recent conversation with a client went something like this, “Of course you can do [insert exercise]…you’re a professional.” A little while later, a prospective client asked, “Do you think I have the potential to be good at kettlebells?” Combine that with another amazing weekend hosting an RKC workshop, and this blog post was born.

Of course I can do all of these kettlebell lifts, I’m a professional. But how do you think I became a professional? I certainly didn’t come out of the womb able to do all of this stuff. I had to learn it and practice it, and be open to more learning and more practicing. Every. Day. Every day until I earned my RKC and every day since I earned my RKC.

I didn’t just pick up a kettlebell and magically start using it perfectly. I was once in exactly the same position as anyone who comes to my gym to learn kettlebells. I had to learn each exercise from square one, just as all of my clients do. Truth be told, it took me a long time to learn a proper swing! That deep hike and explosive hip snap was as foreign to me as it is to you. After lots of dedicated practice and consistency, it’s now feels so natural it’s hard to remember how awkward I once felt.

Even after 6+ years of being an RKC, I still don’t just pick up a kettlebell and magically start using it perfectly. Every time I pick up a kettlebell, I focus on all the components that I know make up proper technique.

I make sure I set up with proper form and I make sure I swing, clean, press, etc. with proper form. I think about making every rep the best I can make it. I concentrate on how each rep feels… “That one needed a little more tightness in my snap, I need to make sure I keep my back flat when I hike.” I video myself now and again to check and hone my technique. I never approach or pick up a kettlebell on auto-pilot.

I’m better able to recognize and make micro adjustments, but that certainly didn’t happen overnight either! It took a lot of time, patience, practice and consistency. It sometimes took losing my patience a bit. It certainly took lots of coaching and the ability to be coachable.

At an HKC workshop several years ago, after all the other participants and instructors introduced themselves and told about their vast athletic backgrounds, I said “I have a background in nothing.” I wasn’t an athlete and I didn’t participate in any sports. I had a history of being sedentary and inactive or yo-yo exercising, until I found kettlebells in my late 30’s. That is when I found the athlete inside me.

Shari Wagner Kettlebell Press and Strength Quote

Some people are more naturally athletic and can learn technique more easily than others. I’m not one of those people, but that doesn’t mean I’m not capable of learning a new technique. For me, it just means that it might take me a little longer to learn something new, and I might have to put in a little more time practicing a new skill but I’m okay with that. I allow it to leave me with a bigger sense of accomplishment.

I believe that anyone can become an RKC, and the recipe is simple. Start with a dedicated mindset to your training practice, add to it lots of hard (but smart) work and consistency, and sprinkle in some patience and time. Yes you; the one who picked up your first kettlebell today! Or you;  the one who’s been using kettlebells for a few years. ANYONE willing to put in the time and dedicated effort to good technique can achieve RKC status, or any goal you set for yourself. Some of you may be like me and might have to work a little harder or a little longer than others, but either way, I truly believe that anyone can do it.

The way the RKC course is structured, everyone learns the progressions and regressions for each exercise so that you are able to teach people of all fitness levels. In the process, you are learning what you need to improve your own technique. The structure of the course also allows you to constantly practice coaching others, so you can hone your teaching skills while you’re learning everything. Combine that with the plethora of valuable resources offered by Dragon Door, titles like Master the Kettlebell, Strong Medicine and Mental Muscle and you have everything you need to succeed.

Over the years I’ve participated in several RKC workshops. Whether the participants are seasoned athletes or new to training and whether they do or do not pass the requirements, the one common theme I see among them is that the RKC was the best course they have ever attended and many report that it was life changing. It certainly was for me!

So, what’s stopping you? Go sign up for those kettlebell lessons or for an RKC workshop!

****

Shari Wagner, RKC-II, CK-FMS owns Iron Clad Fitness in Denver, Colorado. She can be contacted through her website at IronCladFit.com, email: info@ironcladfit.com or by phone 720-900-4766. Follow her on Facebook: facebook.com/IronCladFitness and Twitter: twitter.com/IronCladFitness.

Filed Under: Coaching, Kettlebell Training Tagged With: becoming an RKC, Coaching, how to become an RKC, kettlebell training, kettlebell training principles, kettlebells, RKC Workshop, Shari Wagner

So, You Want to Train Athletes…

December 9, 2015 By Laurel Blackburn 2 Comments

Tallahassee 2015 RKC Group Photo

Recently, I had the pleasure of assisting Master RKC, Keira Newton at the Tallahassee RKC. We spent a lot of time talking about and practicing drills, modifications and regressions for training the average client. By average, I am referring to the clients most likely to come to you for training.

When I began my journey as a trainer and gym owner in 1998, I had visions of training elite athletes. I fantasized about working with high school, college and professional teams. I had visions of taking athletes to the “next level” and eventually being hired as a trainer with a professional football team—preferably, the Indianapolis Colts.

I know I am not the only trainer or coach who doesn’t fantasize about this.

Several years ago, I set up an appointment with the new strength coach at Florida State. Go Noles!! I remember being both scared to death and excited at the prospect of bringing kettlebell training to the football team. I arrived at my appointment totally prepared to wow the staff with my knowledge and skills. When I arrived, the coach was in a meeting so I waited and waited. After about an hour, I left. My dreams were dashed and my hopes were crushed.

Then I got a call from the strength coach at the University of Florida. Boo Gators! Yes, they were our biggest rival but I couldn’t give up this opportunity. They placed a big order with me for kettlebells, so I loaded up my truck and headed down to Gainesville. I sat with the coach and we talked about training with kettlebells and all the benefits that would help the team. He even had me doing Turkish get-ups in his office. I drove back to Tallahassee, planning my new life as part of the training team for the Gators.

I waited for the call that never came. I knew from my conversations with the assistant strength coach, that he had been training with kettlebells while at Texas Tech. Although he wasn’t certified, I knew that he felt he could train the guys with kettlebells. With my dreams dashed again, I continued training average clients.

My average clients are people who have many issues including obesity, very poor movement and the over 50 crowd.

I found I couldn’t do anything fancy. Most of the time I had to progress them very slowly and come up with my own creative ways to help them learn the kettlebell basics while improving their movement and overall strength. One of those clients, Helen, is an 82-year-old woman who suffers from a rare bone disorder, Hereditary Multiple Exostoses.

She required multiple surgeries to remove excessive bone growths. She has some bones that are shorter than others as well as bowed limbs. She has the inability to fully straighten her arms and legs—and of course, all of that affects her movement and ability to do many of the exercises I would normally use in training. To top it all off, she was run over by farming equipment and suffered severe injuries. Helen is one tough broad!

I began each session with ankle mobility. She sat and I manipulated her ankles and feet until she was able to do it herself. One of her main goals was to lose weight and be able to complete a .6 mile walk around the park without stopping. My workout program for her included full body strength and conditioning. An important goal for older clients (that I think many of us miss) is to regain the ability to get up off the ground.

Most of the injuries in the elderly result from falls. There are many horror stories out there about people who fall and can’t get up. I’m sure we all remember the commercial, “I’ve fallen and I can’t get up”. So, I make getting up from the floor a priority.

We did a lot of squats. In the beginning, I put her on a box with bumper plates to raise her high enough so she could stand up without much trouble. I set up elevated boxes about 10 feet from each other so that she could get up, walk and sit back down. I progressed her by lowering the height and adding small hurdles or cones to help her with agility. Yes, older people need agility!

We did very modified get-ups using a wedge so she didn’t have to lay flat on the floor. We did a lot of band work and then started adding kettlebells. Doing swings and goblet squats were out of the question. We worked deadlifts, lots of deadlifts.

A sample-beginning workout that I have used with Helen and other elderly clients would look like this:

  • Seated mobility drills beginning with ankles
  • Seated thoracic spine mobility
  • Seated cervical spine mobility
  • Box squats elevated to client’s ability x5
  • Box squats with walk to another box x2
  • Deadlifts with kettlebell elevated enough to allow good form x5  (or behind-the-back deadlifts)
  • Band pull-downs x8
  • Band presses or wall push-ups x8
  • Elevated get-ups x2/2
  • Getting off the ground x2 (They can do whatever they need to do, including grabbing on to something)

Depending on the client, I might do add exercises that are a little more challenging:

  • Kettlebell rows from an elevated plank position x5/5
  • Rolling to a get-up x3/3
  • Suitcase deadlift with kettlebell elevated to allow good form x5/5

This is just a sample. I encourage you to use a lot of creativity to progress your client safely while focusing on workouts that will improve function in their day-to-day living.

When I began my RKC journey, I thought I wanted to train athletes. But, training my “average” clients has helped me grow and become a better trainer. I have experienced incredible joy watching them get stronger, move better and live healthy, productive lives.

****

Senior RKC, Laurel Blackburn owns Boot Camp Fitness and Training and Tallahassee Kettlebells.  Look for Laurel at www.bootcampstogo.com or www.tallahasseekettlebells.com.

In her early fifties, Laurel is out to prove that age is just a number. Her goal is to motivate and inspire people everywhere, both young and old that strength, flexibility and mobility can get better with age. Follow her adventures on her blog: www.SuperStrongNana.com.

Filed Under: Coaching, Kettlebell Training Tagged With: Laurel Blackburn, RKC, RKC Workshop, special populations, Training Athletes, training for the elderly

Hacks for an Iron Clad Goblet Squat

December 2, 2015 By Mike Krivka 11 Comments

MikeKrivkaGobletSquatLeadPhoto

What is a hack? Hacks are shortcuts or enhancements and can be technical or lifestyle based. Think of hacks as inside tips to get the good stuff—the stuff that works fast and gets you to the tasty, rich and gooey center quicker! In this case, my goal is to provide you with hacks that will allow you how to get the most out of the kettlebell goblet squat.

What’s the Big Deal?

The goblet squat lies squarely within the realm of “simple but not easy”. But, don’t confuse the goblet squat with something that is so “simple” to master that it’s not worth your time. On the contrary—it is supremely important for all demographics, age groups and athletic abilities. Because it is so “simple”, it is easy to underestimate what needs to be in place for it to be maximally effective. Anyone looking at the goblet squat would immediately think “I can do that” …and they can. Once they get the feel for what the goblet squat really is, then they can then learn the specifics that take the goblet squat from simple to sublime.

By the way, if you don’t grasp the importance of the goblet squat yet, consider this: the goblet squat is part of both the HKC (Hardstyle Kettlebell Certification) and the RKC (Russian Kettlebell Certification). It is also one of the techniques Master RKC Dan John recommends to any and all of the athletes he trains—that should give you some indication of its value and application.

Hacking Away at the Goblet Squat

The following are a series of hacks that will allow you to get the most from the goblet squat. Take a look at the pictures so that you can effectively model the movement.

Elbows to Knees—It’s a Straight Line!

  • Don’t unload the torso by flaring the elbows outward or forward—you are supposed to feel the weight of the kettlebell on the front of your body, especially the stomach.
  • Where you start dictates where you end up—if you unload the torso by flaring the elbows, you will find it difficult, if not impossible to find the correct bottom position in the goblet squat.
  • Kiss your knees with your elbows—go down slow enough so that your elbows and knees barely touch; think of it as a caress! From some of the examples I’ve seen there would be a lot of bloody lips!
  • Tall and proud—with near vertical forearms, torso, and shins in the bottom position.
Mike Krivka Goblet Squat Elbow Position
Left: correct elbow alignment, Right: incorrect elbow alignment and posture faults

Find the Perfect Stance That Works For You

  • Heels in your armpits, or slightly wider is a good starting point. Going excessively wide is not going to help.
  • The toes may face straight forward or slightly turned out within 15-20 or so degrees, depending on each person’s individual hip structure.
  • Excessive external rotation should be limited. There may be mobility issues that need to be addressed if they flare excessively. This is a real problem especially if the feet rotate outward while squatting.

The Rack Is Where It’s At!

  • The kettlebell should not be resting on the chest—I know, I know, I know! It’s easier to hold it there but you are offloading the weight to the shoulders and neck.
  • Wedge it—the kettlebell should be held in a “wedge” created by the triceps locked into the lats and the elbows tight against the ribs.
  • Short of breath? The “wedge” should focus the load on the abs, lats, and pecs, not the shoulders and neck.
  • Heavy—the kettlebell is going to feel exceptionally heavy if held correctly in the wedge. Good! You’re doing it right!
  • Straight wrists—don’t break the wrists while holding the kettlebell. Broken wrists are going to adversely affect the movement down the line and you will be sneaking in compensations to correct them.
MikeKrivkaGoblet Squat Kettlebell Position
Left: correct elbow alignment, Right: incorrect elbow alignment and posture faults

It’s a GRIND, Damn It!

  • Lock down: “Lock down” your ribs before you start your decent. Some people call this bracing, but the end result is that you are clenching your abs, pulling your ribs down, and minimizing slack in the upper torso and thoracic spine.
  • Slow down: Slow way the heck down and pull yourself into the bottom position.
  • Hold it: Once you get to the bottom, maintain the tension. If you release it you’re going to be challenged to get it back and not comprise coming up out of the bottom position.

Bust a Move!

  • Don’t “pop and drop” into the goblet squat, this refers to the tendency for athletes to load forward through the hips and then throw them back to initiate the goblet squat.
  • Lock the ribs down first, this will keep you from even thinking about loading forward and backwards to initiate the movement.
  • Initiate with the hips—but not with a ballistic unlocking of the hips. The hips unlock and are pulled straight down.
  • Don’t drop—in no uncertain terms, do not drop into the bottom position of the goblet squat. Pull yourself slowly down into the bottom of the squat. Think G-R-I-N-D! I know it sucks, deal with it!

Start Strong to Finish Strong!

  • Where you start will either help you or hurt you. If you start in a bad position, chances are you are going to end up in an even worse one. With that in mind, your starting position for the goblet squat should be considered very carefully.
  • Down, not back: Pull yourself straight down leading/initiating with the hips. “Pry” the hips away from the elbows
  • Face the wall: The goblet squat can (and should be practiced) facing a wall. Start with the kettlebell touching the wall. Done correctly, you will still end up with plenty of space at the bottom.
  • Enough is enough: The goblet squat terminates when the point of the elbow touches just inside the knee; there’s no reason to go lower unless you are working on mobility.
  • Stack it up! From the bottom position, keep driving and maintaining alignment until all of the “parts” snap back into place. You should end up exactly where you are started!

Putting It All Together

The goblet squat is part of the “Trinity” in the HKC and “The Big Six” in the RKC for good reason. It looks so simple—and it is—but it will only be effective if you know how to efficiently load and unload it, as well as how to make the transitions smooth and flawless. Making the goblet squat look “simple” is not so much a factor that it is simple to do, but that the athlete has taken the time to properly cultivate the movement. Take some time to explore the points that were made above, get a feel for how the load is set and maintained throughout the movement, and I’m sure that you will come away with a new and profound appreciation for the goblet squat.

I look forward to seeing your thoughts and comments below. Until then, “Squat On Garth!”

***

About Michael A. Krivka, Sr. – Senior RKC: Michael A. Krivka, Sr. is a Washington, DC native who has been involved in Kettlebell training for over a decade and is currently a Senior RKC and member of the RKC Board of Advisors and the RKC Leadership Team under Dragon Door (where he has been listed as one of the top reviewed RKC’s in the world for the last five years). He is also the author of a bestselling eBook entitled “Code Name: Indestructible” and is in the process of finishing up several other eBooks on Kettlebells, body weight, and the integration of other tools into an effective strength and conditioning program. Mike has traveled extensively throughout the United States teaching Russian Kettlebells to military (USMC, USN, USA and USAF) and law enforcement personnel (FBI, DEA, USSS and CIA)… read more here.

Filed Under: Kettlebell Training, Tutorial Tagged With: goblet squat, goblet squat tutorial, how to do the goblet squat, kettlebell how to, mike krivka, tutorial

Primary Sidebar

Featured Products

previous arrow
BOOK-RKCBookofSnC
HardStyleKettlebellChallegeDanJohn700
BookCoverMasterTheKettlebell1
RKCiconKettlebell512
KettlebellGoddessdv040
next arrow

Recent Posts

  • RKC Big Six Workout
  • The Kettlebell Swing & Low Back Pain
  • Key Kettlebell Exercises To Help You Create Better Balance
  • How to Most Effectively Use Kettlebells to Meet Your New Year Goals
  • 1 Exercise That Checks All The Boxes
FOLLOW US ON TWITTER!

Archives

Copyright © 2025

Dragon Door Publications / The author(s) and publisher of this material are not responsible in any manner whatsoever for any injury that may occur through following the instructions or opinions contained in this material. The activities, physical and otherwise, described herein for informational purposes only, may be too strenuous or dangerous for some people, and the reader(s) should consult a physician before engaging in them.