• Skip to main content
  • Skip to primary sidebar
  • Home
  • Contributors
    • Matt Beecroft, Master RKC
    • Martijn Bos, Master RKC
    • Andrea Du Cane, Master RKC
    • Angelo Gala, Master RKC
    • Chris Holder, Master RKC
    • Steve Holiner, Master RKC
    • Dan John, Master RKC
    • Mike Krivka, Master RKC
    • Thomas Phillips, Master RKC
    • Robert Rimoczi, Master RKC
    • Phil Ross, Master RKC
    • Max Shank, Master RKC
  • Workshops
    • HKC Workshops
    • RKC Workshops
    • RKC-II Workshops
  • Find an RKC Instructor
  • Resources
    • Articles
    • Forums
    • Kettlebells
    • Products
  • Blogs
    • PCC Blog
    • Strong Medicine Blog
  • Archives

RKC School of Strength

Official blog of the RKC

Phil Ross

Dirty Dozen Move #7: The Kettlebell Clean

December 4, 2013 By Phil Ross Leave a Comment

dirty_dozen_number7_smallThe Kettlebell Clean is often overlooked as an essential exercise because it lacks the “sexiness” of the Swing and Snatch, the power of the Squat and Press and it does not stimulate the intrigue of the Turkish Get-up. However, couple your Swings with Cleans or perform a chain with a Swing, a Clean and a Snatch and you’ll have some great routines. Also, if you want to perform your Presses and Squats, how will you get your Kettlebells into the Racked position? You got it, The Kettlebell Clean.

In all of it’s simplicity, the Clean is more often performed incorrectly. This results in bruised wrists, strained biceps, elbows or forearms as well a faulty rack incapable of providing a stable starting point for your Press or Squat. Also, casting of the Kettlebell on the descent will place undue stress on the low back and possibly result in a face-plant!

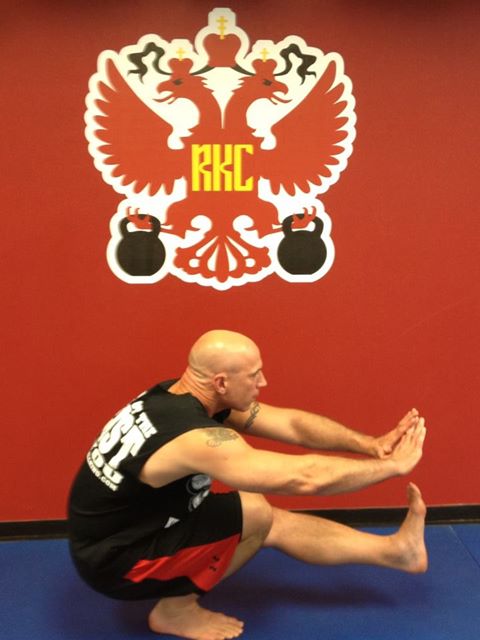
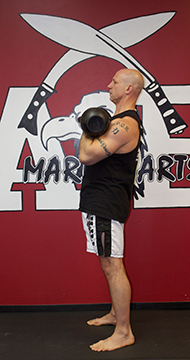
Simply put, a Clean is nothing more than a Swing with your elbows pinned to your sides. There is no jerking up into the position, nor is there a “curling” of the bell into the rack (try to use that method to rack the Beast and let me know how many pieces you shred your bicep into). I have also found that teaching people how to Clean two kettlebells at once is easier. The students don’t have to be concerned with over rotating one hip and they are also psyched about using two Kettlebells at the same time. Once they have the idea that the Clean is identical to the swing at the start point, exhale and hip movement, the Clean becomes easier to perform. Pay particular attention to the breathing aspect. The breath of the Clean occurs at the exact point as your exhale while performing the Swing – at the top of the hip motion when your knee caps are drawn into your quads and your legs are locked. The sharp exhale does not occur when the Kettlebells are in the Rack, it happens slightly before. This simple tip will significantly reduce the amount of “smashing” that occurs on your wrists. At this point, the top of the Swing portion of the clean, you stop pulling and allow the Kettlebells to “float” into position. The float will occur only when your breath is timed correctly and you allow the bells to achieve the Rack position without using your arms to pull.

If you find that you are “curling” the bell during your Cleans, use a heavier bell. This will cure many issues because you will not be able to “curl” a heavier bell into position. Once your technique improves, you should be able to execute proper form of your Cleans with any sized bell. For one to attain mastery of the Clean, the technique should look identical, regardless of the size of the Kettlebell.

There are also several extremely beneficial variations of the Clean. Alternating Cleans provide an incredible core workout, Bottoms-up Clean and Hold are one of the best grip development exercises available. Have Cleans as part of any Chain or Complex for a transitory or additional movement to enhance the circuit.

The Kettlebell Clean is not only essential for transitions from one movement to another, but it is an incredible exercise for going from ballistic to static to ballistic again. The athletic application from the Clean is is beneficial for development of power for strikes, throws, synergy of upper and lower body movements, not to mention the incredible way it develops superior core strength.

Good luck with your Training!

Strength & Honor,

Coach Phil 

www.kettlebellking.com

***

About Master RKC Phil Ross: Master RKC, 8th Degree Black Belt, Specialist in Bodyweight Strength, PCC and CK-FMS Certified. His name is synonymous with Martial Arts and Fitness. He is known as the area’s Kettlebell King and has successfully competed on the National Level in…  Read more here.

Filed Under: Uncategorized Tagged With: athletic application, ballistic to static, clean, dirty dozen, Kettlebell, kettlebell king, phil ross

Dirty Dozen Move # 6: The Pistol

November 13, 2013 By Phil Ross 5 Comments

Phil_Ross_Pistol

The Pistol (Single Leg Squat): The most difficult and beneficial leg exercise – period. The training enroute a butt to heel Pistol develops balance, trunk stability and incredible leg strength. There are weight lifters that can full squat 500 to 600 pounds, yet they collapse and fall over when attempting the Pistol.

Let me relay a little story to you. I was cornering at a UFC Event in Houston in 2011 and went out for a bit of R & R before the fight, once my fighter was in bed. As a typical occurrence, the supporting fight team trainers and coaches usually run into each other and discuss their “Trade Secrets” and training methods. As it happened, I ran into a couple of other trainers in a local watering hole (that’s another name for a bar incase the younger crowd is wondering what I’m talking about.) So I’m talking to a couple of the other trainers and we strike up a conversation about strength training, what works best, how we train, etc… Our conversation moves onto squats. Now both of these guys were around 30 years old and are built like brick outhouses. They could both squat in excess of 600 lbs, but were not overweight or disproportionate. We started talking about the one-legged squat (Pistol) and I proceeded to demonstrate a few of them. They, of course, had to try and promptly fell over – on every attempt. Not a clean pistol performed between the both of them. I now had their attention.

The balance, core strength and overall athletic development gained from performing the Pistol are incomparable. In most athletic events (even in walking!) you are placing all of your weight on one foot and then the other.  When you make a “cut” on the field, quickly hop from one side to the other or have to scale a deep incline, your stabilizers, tendons and and core are continuously firing. Pistols, much more than machines or bilateral, two legged exercises, increase your strength more efficiently.

As far as injury prevention, the development of the synergy with these muscles of the leg – all at once – is incredible. I experienced a trilateral break o my left leg which resulted in 10 screws and a 5″ plate being installed.  I used Pistols as part of the rehabilitation process. I realize that whole industries have been built and billions spent on leg muscle “isolation” machines. However, when you walk, perform a task or athletic event – do you ever isolate your gastrocs, quads or hammys? The answer is a resounding “No”. Unless you’ve experienced some type of injury to a specific area, you will be creating asymmetries by muscle isolation. If you have a leg extension/hamstring machine, do yourself favor and sell it for scrap metal and practice your Pistols!

So, how do we achieve the proper execution of this Ultimate Leg Exercise? You need to employ progressions and at times, regressions. This exercise, up to a certain weight, is more easily achieved with a kettlebell. The counter weight aides your downward momentum.  One of the best books on the subject is Coach Paul Wade’s Convict Conditioning:  http://www.dragondor http://www.dragondoor.com/?apid=4640 & visit products/books. The progressions enroute achieving the Pistol are the best available.

To start your Pistol Training, you must first be able to perform narrow stance squats. Once you are able to do 20 or so, you are ready to attempt shifting the weight from two legs to one. I believe the best methods to improve your Pistol is with both Top Down and Bottom Up motions. Maintaining tension throughout the full range of the movement is tantamount, especially at the bottom of the Pistol. That is the point where most people lose their tension and collapse. Go down into a full narrow stance squat and thrust one foot forward and then go up. Be sure to stomp your Pistol foot into the ground and drive your power through the heel of the unweighted leg. Grunting and focused hissing, especially when you are first learning, is very helpful.  Again, creating and maintaining the tension throughout the whole movement is essential. For the Top Down training – employ the use of a bench and once your buttocks touches the bench, EXPLODE Upward. When practicing the Bottom Up training, use a rope or band thrown over a high bar. While you improve, you’ll have to use your arms less and less to help you come out of the bottom position. There are also a variety of steps explained thoroughly in Coach Paul Wades Convict Conditioning book. Once you start to develop the ability to perform the Pistol, do it from a raised platform so that your unweighted leg does not have to be held so high. When you can perform 5 or more on a raised platform, you are ready to try a Pistol from the floor. The actual amount of repetitions before you are ready to move to the next step may vary from individual to individual. However, the numbers listed are good guidelines.

There are more advanced levels of the pistol as well. One or two hands raised in the air adds an element of difficulty and makes the Pistol a truly Elite Movement. You may add weight. It is true that a smaller kettlebell makes performing the movement a bit easier, but once you start increasing the weight or use two kettlebells or a barbell, then you have significantly increased the difficulty of the movement.

As Always, Train Hard & Train Often! – Coach Phil

www.kettlebellking.com

***

About Master RKC Phil Ross: Master RKC, 8th Degree Black Belt, Specialist in Bodyweight Strength, PCC and CK-FMS Certified. His name is synonymous with Martial Arts and Fitness. He is known as the area’s Kettlebell King and has successfully competed on the National Level in…  Read more here.

Filed Under: Uncategorized Tagged With: dirty, dozen, Kettlebell, phil ross, pistol, press

Dirty Dozen Move # 5: The Kettlebell Press

August 21, 2013 By Phil Ross Leave a Comment

Spencer Ross Demonstrates the Kettlebell Press

There are not too many many things cooler than pressing heavy weight over your head. The Kettlebell press is one of the best methods available to enable you to achieve these great feats of strength.

You may say that I can press dumbbells and barbells and get the same effect. Yes, you can press dumbbells and barbells – and there is nothing wrong with it. However for the “Best Bang for your Buck,” maximum shoulder load with reduced shoulder stress and a greater recruitment of stabilizers, the Kettlebell Press can’t be beat.

The Kettlebell Press differs from the dumbbell press and the barbell press in several ways. Dumbbells and barbells have a unilateral weight distribution, so there is a less of a need for the body make adjustments. Due to the shape of the Kettlebell, with it’s offset Center of Gravity (COG), the position of the weight constantly changes during the movement of the press. This requires more involvement of the core, stabilizers and lats to complete the movement. The pressing motion starts in a racked position with a tensioning of the body ends with the full lockout and the arm pressing the Kettlebell in line with or slighting behind the ear. This motion upward is accomplished with a “J” pattern of travel. The degree of the “J” may vary from practitioner to practitioner.

When pressing, you not only want to focus on pressing the bell skyward, but think about pressing your body away from the bell as well. This will also aid you in rooting with the floor and employing total body tension. We also need to pay particular attention to the width of your stance. Experiment with the wider then more narrow stance. You will discover that you are able to create more tension with a less than shoulder width stance.

As with many Kettlebell exercises, root with the floor, bring your coccyx to your naval, contract your glutes and abs, pack your shoulders and engage your lats. Focus on an exhale with the eccentric movement of the press and an inhale with the concentric portion, all accomplished while maintaining tension and compression.

When pressing heavier Kettlebells, you may employ a slight hip hitch to the opposite side of your pressing hand. This will help you recruit more of your lats. However, be certain no to go so far as to turn the press into a side press. In addition to the Military or Kettlebell Press and the Heavy Press there are many other presses with Kettlebells. Push Press, Jerk Press, Bottoms-up Press, Waiters Press, Side Press and the Bent Press, to name a few. There are also dual bell versions of most of the aforementioned.

Good luck with discovering or enhancing your Kettlebell Pressing Skills! If you have any any questions or comments on this introduction to the Kettlebell Press or any of the other Dirty Dozen Exercises, do not hesitate to contact me.

Train Hard and Train Often – Coach Phil

***

About Master RKC Phil Ross: Master RKC, 8th Degree Black Belt, Specialist in Bodyweight Strength, PCC and CK-FMS Certified. His name is synonymous with Martial Arts and Fitness. He is known as the area’s Kettlebell King and has successfully competed on the National Level in…  Read more here.

Filed Under: Uncategorized Tagged With: dirty, dozen, Kettlebell, move, phil ross, press, Spencer Ross

My Best Friend …

June 11, 2013 By Phil Ross Leave a Comment

jumprope

Are you a fitness enthusiast that takes their running shoes on trips, only to feel uncomfortable road running in unfamiliar areas? Are you tired of endlessly waiting for cardio equipment to free up at your gym, only to feel like a hamster running on a wheel? Do you love to run outdoors, yet shy away from putting on five layers of under-armor and sweats on in order to brave the sub arctic temperatures?

Well, let me introduce you to my “Best Friend,” the jump rope. You can take it anywhere, you do not need much space, it does not matter what the weather is like outside, you do not need expensive equipment ($2.00 to $20.00 for a rope, my favorite costs $8.00) and you can vary the routines and movements to keep it interesting. My Grandfather was a boxing trainer in Paterson, NJ back in the 30’s, 40’s and into the 50’s. He instructed me on how to jump rope as a teenager as a means to improve my foot speed and endurance for wrestling and football. I then began to realize the incredible benefits of jumping rope.

If you jump rope at a good pace for 5 minutes, it’s equivalent to running a mile! The coordination of your hands and feet moving in rhythm with each other is essential for a fighter. All of my martial arts classes begin with 3 to 5 minutes of jumping rope. In addition to the coordination development, jumping rope is an incredible means to warm up the body.

Even if you are a beginner and you miss on your jump, keep moving your feet. To learn how to jump, here are a couple of tips:

1) Play some music that you like with a good beat. You should put together a playlist for at least the same amount of time that you want to jump for. Use your favorite, upbeat songs & make a mix. Or, for those with obsessive, manic personalities, repeat the same song as an extended version. This also helps you jump rope longer. You basically fool your self into NOT thinking that you are jumping that long.

2) To initially get your timing, watch as the rope hits the ground. That’s when you time your jump. It may take a few weeks to get your timing, but keep working, it will eventually happen.

3) If you are still having issues, try putting the rope in one hand and jump up and down while rotating your wrist. This will help you to find your timing.

4) Remember the less movement of your arms, the better. Your wrists are the primary focus of the rotation. Try also to keep them in the same spot, approximately chest level. This does not hold true when you are doing more advanced movements, like crossing the rope or double jumps.

5) You do not have to jump very high. You only need to jump high enough to allow the thin rope to pass under your feet. Get your rhythm and all else will fall into place.

If you’d like to workout the rest of your body, try performing push-ups and abdominal exercises in a rotation with jumping rope. You can start with 100 jumps, 20 push – ups and 30 abdominals. Start with 3 rotations and then increase to 5. You may also execute additional push – ups or abdominals. What a great way to start the day!

Victory Favors the Prepared!

– Phil

P.S. If you have any questions or comments, feel free to reach me at www.philross.com.

About Master RKC Phil Ross: Master RKC, 8th Degree Black Belt, Specialist in Bodyweight Strength, PCC and CK-FMS Certified. His name is synonymous with Martial Arts and Fitness. He is known as the area’s Kettlebell King and has successfully competed on the National Level in…  Read more here.


Filed Under: Uncategorized Tagged With: best, experts, fitness, friend, jump, jumprope, Marlboro, master, my, New Jersey, phil, RKC, rope, ross, says, When

The Dirty Dozen Exercises: Move #4, The Hanging Abdominals

May 24, 2013 By Phil Ross 1 Comment

Jack_Knife_Abs_Touch_Finish_Side_Close_up

There is nothing sought after more than a set of “washboard abs.” A set of ripped, hard looking, abdominal region inspires awe and envy in everyone that sets eyes upon them. A “Cut Gut” is a sure telltale sign the the bearer is in incredible physical condition and that they “don’t have an ounce of fat” on them. How do we achieve these legendary abdominals of steel and sinew? How do we develop 6-pack abs that can withstand having cinder-blocks piled on it and being hit with a sledgehammer? Can we develop our midsection so that we can absorb a full power knee drive from a Muay Thai Fighter or an uppercut from a Prize Boxer?

First of all, having a “ripped” abdominal section is not necessarily indicative of abdominal strength. It not simply the appearance, but how did they get those abs? By simply starving themselves or as the result of serious, pointed abdominal training? There are some fitness experts that recommend a thousand abdominal repetitions per day or some type of fitness apparatus that they are undoubtedly paid to endorse. These machines may or may not work and I don’t know how many of us have the time to perform a thousand or more crunches a day. So how do we achieve these legendary abdominals that can withstand having a 2 x 4 broken over them, but fit the workout into our overloaded lives?

2x4_Phil

If you are engaged in a consistent Kettlebell and Bodyweight training regiment, your abdominals and core are already receiving a great deal of work. However, if you want to take it to the next level and maximize the “best bang for the buck” for your abdominals,  then Hanging Abdominal training is a must. You will discover that I do detest long, drawn out training sessions. Who has the time? How long can ANY of us effectively train while maintaining intensity and proper form? Plus – if you are an athlete, you want to leave time to practice your sports skills, not spend the bulk of your day with your strength and conditioning. If you are not a competitive athlete, you probably have work, family or social matters that require your attention. Use your time wisely.

There are several methods of practicing the hanging abdominals. or a beginner, I will recommend that you use (or purchase) the Dip, Pull-up & Ab Machine. The are available new for about $300, used for $100 or less. It will be the most useful apparatus that you ever purchase. No moving parts whatsoever. In addition to the video demonstrating the higher level abs, check out this one on YouTube.  It will show the machine. For beginners, simply raise your knees up to chest (or as high as you are able) while keeping your lumbar region (low back) pressed firmly against the back board of the machine. When you able to accomplish 20 repetitions with bent knees, then move to straight legged version and bring your legs up so that your heels are level with your waist. For the next level of this exercise, you bring your feet up to or above head level. Please remember to maintain a flat back against the back pad. Packing your shoulders and assuming a tall chest position are a must.

Jack_Knife_Abs_Start2

Once you are able to to perform the suspended abdominals, you are ready for the Hanging Abdominal training. There are three basic movements that I recommend. The Hanging Knee Lift, Jackknife and the Side to Side Jackknife. The easiest are the Hanging Knee Lift. Grasp a pull-up bar with your elbows straight and your shoulders packed. Do not allow for body sway. Contract your abs and raise your knees up to chest level. Work up to at least 20 repetitions prior to advancing toward the Jackknife Abs. For the straight Jackknife abs, assume the same position as during the Knee Lifts. Straighten your legs, steady your body and contract your abs as you raise your legs so that your feet are above the bar. Repeat. For the Side to Side Jackknife, simply raise your feet to one corner of the pull-up bar and then the other. This contra-lateral movement is incredible. As far as repetitions are concerned, start with 3 to 5 and then work your way up to 10 per set. Do not permit yourself to swing. You will not maximize the effect of the movement and you may expose yourself to injury. Packed shoulders, locked elbows and a steady body.

As always, train hard, train often and TRAIN SMART!

Coach Phil

 ***

About Phil Ross, Master RKC, 8th Degree Black Belt, Specialist in Bodyweight Strength and CK-FMS Certified. Phil Ross’ name is synonymous with Martial Arts and Fitness. He is known as the area’s Kettlebell King and has successfully competed on the National Level in…  Read more here.

Filed Under: Uncategorized, Workout of the Week Tagged With: 4, abdominal, abdominals, dirty, dozen, four, hanging, move, phil, RKC, ross, the

Are You Making These Mistakes With This Key Kettlebell Drill?

May 1, 2013 By Phil Ross Leave a Comment

squat_1

Picture courtesy of Cathy Raimonda, HKC

The Kettlebell Front Squat is a key movement directly applicable to virtually every sport and to ALL sports requiring explosive power and strength positions. The squat is also essential to everyday life. Picking up our child, carrying suitcases, getting up out a chair – to name a few. Many people believe that they can’t squat. However after one short lesson they realize that they can. In most cases, if you can sit on a toilet you are able to squat. We utilize an active negative method of pulling the hips into the squat position. Barring any severe deficiencies or physical limitations, this method has remarkable results – usually the first time it is applied!

Why is the Kettlebell Front Squat such an essential movement? The strength gains from the Kettlebell Front Squat experienced in the legs, hips and especially the core are greater and with a significantly lighter load than required with the back squat. When considering Sports Performance and General Fitness, there is a breakpoint where the training required and the muscle size created actually hinders your performance. For example, if squatting 400 lbs. helps you reach a 10.4 second mark in the 100 meter dash, squatting 450 lbs may not necessarily bring your sprint down to 10.2; you may actually become slower!

Yes, your squat will increase, but your hamstrings and hips will become tighter thus slowing your movement. The aforementioned numbers are arbitrary. There are far too many variables in individuals and sports to effectively assign exact numbers. In order to provide accurate assessments, experimentation needs to be conducted on a case by case basis. However, I will add one caveat; if your goal to have an extremely heavy back squat and you are a powerlifter, you need to perform heavy sets of traditional, back squats. Even though the Kettlebell Front Squat (KFS) will help boost your back squat numbers, you still need to perform the actual movement that you are competing in.

The Kettlebell is placed in front of you, whether bottoms up, racked or bottoms down. Compression and core activation is required to stabilize your truck and and your spine. Compression, tension and an active negative are all employed as you inhale and pull yourself deep into your squat. The spine is kept long and strong with no “tail tuck” as you get to the bottom. A quick, short and forceful exhale shoots you upward to the fully locked position. The strength of your upper torso is also required/developed to hold the Kettlebell(s) in place as you perform your KFS. Proper power breathing and expansion of your intercostals and serratus, not to mention the development of your pectorals, forearms, biceps and triceps. The muscles that comprise latissimus dorsi are recruited to keep your back straight and strong to handle the load in front.

squat_2

As far as actual weight is concerned, you have to use considerably less weight with a KFS than for a back squat with better results and less chance of injury. On the back squat, the object is to break parallel with the greatest amount of weight possible on your back and then stand back up into the upright position. One’s back is compromised from having to bend forward to get lower and the hips are also overloaded due to the wide stance. This position does not aide you in developing the strength and proper neural pattern for strength development. On the other hand, the proper execution of the KFS lends itself to activating the Central Nervous System to develop incredible strength the legs as well as in the core/stabilizers. By keeping the spine long and strong, you develop a “Tower of Power” enabling you to move resistive loads and push with your whole body.

I could go on and on about the Kettlebell Front Squat, but I’m sure that you only have a limited time to read! You need to get in there and start practicing your KFS! Substantial gains in your leg strength, increased your cardiovascular capacity and explosive power development, while creating a healthy spine and a pair knees, are all benefits of the Kettlebell Front Squat.


Get Strong and Stay Strong!


Coach Phil Ross, Master RKC

***

About Phil Ross, Master RKC, 8th Degree Black Belt, Specialist in Bodyweight Strength and CK-FMS Certified: Phil Ross’ name is synonymous with Martial Arts and Fitness. He is known as the area’s Kettlebell King and has successfully competed on the National Level in…  Read more here.

Filed Under: Uncategorized Tagged With: drills, front, Kettlebell, key, master, mistakes, phil, RKC, ross, squat

The Dirty Dozen Exercises: Move #2, The Bridge

March 29, 2013 By Phil Ross 8 Comments

phil_ross

Master RKC Phil Ross explains the Bridge

The Bridge, what an incredible exercise! There is no single exercise for developing two steel cable like spinal erectors supporting and protecting your spine than the Bridge. Being a former wrestler, I had the fortune of being introduced to the Bridge at an early age and while training in Greco-Roman Wrestling, I was taught how to go belly to belly with another wrestler, pop my hips and bridge all the way backward, landing my opponent on his back (or head!) behind me. This required a great deal of practice bridging backward from a standing position. We would also “reverse bridge” from that position, coming up to fully upright and regain the standing position once again and repeat. Little did I realize at the time that I was equipping myself with an incredible foundation of strength that would help me with all of my other physical and athletic activities for the rest of my life. Other than gymnastics, very few high school sports develop the spinal erectors and utilize the bridge to the extent of wrestling and gymnastics.

The muscles in the back at the most important group of muscles in the body. The Bridge is exactly what the name connotes, the exercise “bridges” the upper and lower sections of your body together. Your back is also the support structure for your whole body. How many times have you seen (or experienced) throwing your back out and being completely helpless? One can have “biceps like mountain peaks”, they tweak their back and they are as helpless as a newborn lamb! The importance of the Bridge is second to none. Your central nervous system is housed in your spine and the spinal erectors and other support muscles protect and control the the spine and it’s movement. Why would anyone ignore the single exercise that develops the most important muscle group in the body? The Ancient Greeks knew the importance of a strong back. Look at the depictions of the god Atlas. His exceptionally prominent back muscles rippling under the stress of his eternal task of holding up the world!

How do we achieve this? Who does the Bridge work for?

There are many variations of the Bridge. You will find a variation or modification that may be used by virtually anyone at any age. Even people who have physical deficiencies will benefit from doing bridges. I have students that have suffered severe injuries or were born disabled and they have developed great strength in their backs and abdominals through employing bridging techniques. Not only does the Bridge develop the spinal erectors and other back support muscles but it has a profound positive effect on the abdominals, gluteus, hamstrings and in higher level movements, the shoulders and arms as well. The Tall Kneeling Bridge also develops great strength and flexibility in the quads.

The regenerative and restorative properties of the Bridge are unmatched by any other single exercise group. The Bridge develops stability, flexibility and durability like no other. Implement the Bridge into your workout regiment and develop a “Bullet Proof Back”!

***

Master RKC, 8th Degree Black Belt, Specialist in Bodyweight Strength and CK-FMS Certified. Phil Ross’ name is synonymous with Martial Arts and Fitness. He is known as the area’s Kettlebell King and has successfully competed on the National Level in…  Read more here.

Filed Under: Uncategorized, Workout of the Week Tagged With: ama, blackbelt, Bridge, dirty, dozen, Kettlebell, king, phil, ross, trainer

The Dirty Dozen: Move #1 – The Kettlebell Swing

February 13, 2013 By Phil Ross 18 Comments

The Kettlebell Swing: Often to referred to as the “Mother of All Kettlebell Exercises” and is the root of all Kettlebell Training.

The Kettlebell Swing is not only the basis but one of the biggest differentiators between Kettlebell Training and other strength and conditioning systems. The Kettlebell Swing “reverse engineers” the practitioner’s hips by the development of the hip hinge, hamstring and glute recruitment through the pop and lock required to execute the movement properly. In addition, the incredible rooting effect for power transference through the body is applicable to improved performance in virtually all sports and strength performance.

The Kettlebell Swing has so many benefits, yet many go untapped through poor execution. I’ve had people walk into my studio claiming “I love to swing, I do tons of them all of the time.”  Then I watch them swing – Ooof! I don’t know where the heck they learned to “swing”, but now I know why they thought that swings were easy! No eccentric/concentric motion, shoulder’s not packed, no rooting, legs bent at the top and to much at the bottom, chicken necking so much that I thought was I hanging with Frank Perdue, lats not engaged, power leaks all over!

Now that we’ve looked at the poor examples, how do we execute the swing? Step one, find a quality instructor or at least purchase some DVDs or get your hands on a video program from one of the top flight RKC Instructors. I will mention, no matter how good a video is, nothing replaces working under the scrutiny of a qualified Kettlebell Instructor.

Starting from the ground up, let’s consider our feet. First make certain that your feet are the correct width apart. If they are too close, you’ll never be able to swing the bell between your legs. If they are too far apart, you won’t be able to completely fire your gluteus, thus leaking power. Additionally, you will tax your hip flexors more which could result in injury. Rooting with the floor is key. Take advantage of the feedback from your feet with the floor. Establishing that that intimate contact with the floor creates a map of you body’s nervous system and helps facilitate feedback and feedforward of movement.

Draw your kneecaps up into your quadriceps as you lock out your knees. This should happen simultaneously to the driving of your coccyx to your naval and the contraction of your gluteus.

While all of this in occurring, you need to shorten your abdominals by “zipping up” and exhaling a short, hard purposeful breath.

Pack your shoulders and engage the lats as the power of the swing travels from the ground, through your feet, into your legs and through you hips and gluteus, up into your lats, passing through your arms and shoots out of the bottom of the Kettlebell.

When you are swinging, think of “hips and grips”. It’s also very important that you go between full relaxation and full tension. This is how to develop incredibly useful strength!

There are quite a few swing variations. There are the two hand swings, the one hand swing, hopping lateral swing, hand to hand swing, dual bell swing, dead start swing, walking swings and the much maligned bottoms up swing, to name a few. All of the same principles apply to all of the swing variations, however there are certain unique benefits to each variation. Check out the accompanying video demonstrating some of the variations of the swing.


Now its time to get off of the computer and start swinging!

—

Master RKC, 8th Degree Black Belt, Specialist in Bodyweight Strength and CK-FMS Certified. Phil Ross’ name is synonymous with Martial Arts and Fitness. He is known as the area’s Kettlebell King and has successfully competed on the National Level in…  Read more here.


Filed Under: Uncategorized, Workout of the Week Tagged With: dirty, dozen, Kettlebell, phil, ross, swing

The “Dirty Dozen” Exercises (Part 1) by Phil Ross

January 16, 2013 By Phil Ross 25 Comments

More often than not, I get asked “Coach, what are the best exercises to do?” Or “If you were to choose “X” amount of exercises, what would they be?”. There are a plethora of great exercises and variations that my students and I truly love to do. However if I were to boil it down to several movements that are essential to any strength and conditioning regimen, I would choose 6 Kettlebell exercises and 6 Bodyweight movements.

I’m not saying that these are the ONLY exercises you should do but they all should be included in your workout regimen, no matter what your focus is. These exercises will increase strength, endurance, coordination, flexibility and durability like no others. These exercises will even improve your performance with your bench press, deadlift and bar squats , not to mention your physique.

Over the next year, I’ll be putting forth write ups accompanied by videos on the “Dirty Dozen”. We’ll discuss variations and progressions, especially when considering bodyweight. I’ll discuss each movement in depth and give my reasoning for the selection of each movement.

OK- here’s the list.

Kettlebells

The Kettlebell Swing: This movement is the root of all Kettlebell Training and one of the great differentiators between Kettlebell based training and all other strength developing exercise systems. The Kettlebell Swing “reverse engineers” the practitioner’s hips by developing hip hinge through the pop and lock required to execute the movement properly.

The Front Squat: Single Rack or Bottoms up. Squatting is the most important movement for lower body strength. The Front Squat, by virtue of the position of the Kettlebell, requires the complete linkage of the upper and lower body. Tensioning of the trunk (I’m not a fan of the word ” core” ) and maintaining the bell in the prescribed position requires considerable upper body engagement in addition to the tension in the trunk.

The Kettlebell Press: Pressing heavy weight above your head is very cool and extremely useful. The Kettlebell Press employs full range of motion, full body tension and the active negative motion of the bell.

The Get-up: There is not a single movement that incorporates more muscles of the body than the Get up, also known as the Turkish Get Up or TGU. This incredible exercise is a signature movement of Kettlebell Training. Dynamic tension, balance, flexibility and body alignment are all developed with the TGU.

The Clean: The Kettlebell Clean is used in a great deal of Kettlebell complexes, racking the kettlebell for Squats and Presses, but it’s an incredibly beneficial stand alone movement. A single arm clean taxes the stabilizers in the trunk as well as reinforcing the tensioning and relaxing of the body.

Pose_A_No_Adj

The Kettlebell Snatch: This is my favorite of all Kettlebell movements. The Kettlebell Snatch is a ballistic movement that develops strength, endurance, speed, coordination and there is no question why this movement is used in both competitions and testing as a fitness barometer. The Kettlebell Snatch V02 Max workout is unmatched in maximizing one’s volume of oxygen uptake.

Bodyweight

The Bridge: An ignored movement in American physical fitness. Very few athletes, except for wrestlers and gymnasts, utilize this crucial movement. The Bridge is exactly what it’s name connotes. The development of a strong, flexible spine linking together the upper torso with the trunk and lower limbs. Strong spinal erectors are essential to a healthy spine and unhindered movement. Key to athletics, active living and certain vocations – not to mention every day living!

Hanging Abdominal: One can do thousands of crunches and buy every gimmicky ab machine on the TV at 2:00am, but nothing will develop your abdominal strength better than the Hanging the Abdominal. Lifting your legs up to your chest or your feet above your head develops and requires significant abdominal strength.

The Pistol (Single Leg Squat): The most difficult and beneficial leg exercise – period. The training en route a butt to heel Pistol develops balance, trunk stability and incredible leg strength. There are weight lifters that can full squat 600 pounds, yet they collapse and fall over when attempting the Pistol.

The Hand Stand: This is the coolest of all bodyweight exercises. Nothing demonstrates full body control and balance than being able to invert yourself in the middle of a room and hold it there. The progressions building up to the Handstand develop incredible shoulder and trunk strength.

The Pull-up: There is no single exercise that demonstrates and develops upper body strength like the Pull-up. If you can do 20 pull-ups, you are in great shape. I challenge you to show me a person who can do 20 pull-ups and doesn’t have a 6-pack.

The Push-up: The Push-up is my favorite for several reasons. There are fun and challenging variations, the movement works not only your upper body but conditions your abdominals and reinforces the total body tensioning. The best thing about Push-ups is that you can do them virtually anywhere that there is a floor. Your bedroom, basement or office – anywhere. There is no good reason for you not to do them.

Get started now!

There you have it. 12 exercises that no training regimen should be without. If you want to achieve ultimate, applicable strength and conditioning, your program needs to include these core “Dirty Dozen” exercises.

—

Phil Ross: Master RKC, 8th Degree Black Belt, Specialist in Bodyweight Strength and CK-FMS Certified. Phil Ross’ name is synonymous with Martial Arts and Fitness. He is known as the area’s Kettlebell King and has successfully competed on the National Level in Submission Fighting, Kickboxing, both Full Contact; Point Karate, Taekwondo and Olympic Style Wrestling from 1979 through 2010. He has also held several titles in Bodybuilding and Power Lifting. More important than his personal accomplishments are the many benefits that his students have gained. He has trained many National and State champions in a multitude of Combat Disciplines, Scholarship Athletes, Law Enforcement and Military Personal as well as professional athletes.

He has owned and operated his studio, American Eagle MMA & Kettlebells, ever since 1988, training thousands of students in his classes and seminars. In addition, he created the #1 Rated S.A.V.E. Self Defense and Fitness video series, has an online Kettlebell Training program and The Kettlebell Workout Library video training system.


Filed Under: Uncategorized Tagged With: dirty, dozen, exercises, phil ross

Can I Gain Size with Bodyweight Training?

December 10, 2012 By Phil Ross Leave a Comment

I’ve been asked “Is it possible to gain size with Bodyweight only exercise?” The short answer is “Yes”. It’s easier to accomplish upper body size gains with bodyweight training than with lower. Without meeting you personally or at least getting to know you better, it would be impossible to adequately provide you direct program recommendations. However, I will provide some guidelines and concepts.

First, a few “Don’ts”. Do not treat your calisthenics as a quasi-aerobic or simple warm up. Find challenging movements and utilize progressions, as employed in Coach Paul Wade’s book Convict Conditioning. Or view the video version with Max Shank.

Let’s address push-up, for example. I chose those to address, because you can do push-ups, even at the most difficult levels, anywhere and with no equipment. Remember to use progressions and be certain not to skip any levels in your progression. You may form “holes” on your training and hinder your ability to achieve your highest levels. Here are a couple of YouTube clips of me performing push-up variations.

Please make certain that you employ strict technique and do not rush through the movements. The combination of 10 second push-ups and spiderman push-ups have yielded some particularly favorable results.

As far as your legs and lower body are concerned. It is difficult reaching great size with simple bodyweight exercises. Squats and Pistol Squats (Single Leg) movements with result in a great deal of strength, but not a supper amount of size. Why is this so? You are on your legs all of the time and you need to substantially increase the resistive load to stimulate muscle hypertrophy. It’s most easily accomplished with adding weight to your exercises. I prefer kettlebells, because you can use much less weight for attain results than you would have to with barbells or machines. If you don’t have access to kettlebells or if you are adverse to using weights, employ a regiment of plyometric exercise. There is a great deal of plyometric literature and exercise programs available.

Good Luck!

Coach Phil Ross

Master RKC

www.kettlebellking.com

Filed Under: Uncategorized Tagged With: bodyweight, fitness, hkc, kettlebellking, max shank, mma, phil ross, RKC, strength, ufc

  • « Go to Previous Page
  • Page 1
  • Page 2
  • Page 3
  • Go to Next Page »

Primary Sidebar

Featured Products

previous arrow
BOOK-RKCBookofSnC
HardStyleKettlebellChallegeDanJohn700
BookCoverMasterTheKettlebell1
RKCiconKettlebell512
KettlebellGoddessdv040
next arrow

Recent Posts

  • RKC Big Six Workout
  • The Kettlebell Swing & Low Back Pain
  • Key Kettlebell Exercises To Help You Create Better Balance
  • How to Most Effectively Use Kettlebells to Meet Your New Year Goals
  • 1 Exercise That Checks All The Boxes
FOLLOW US ON TWITTER!

Archives

Copyright © 2025

Dragon Door Publications / The author(s) and publisher of this material are not responsible in any manner whatsoever for any injury that may occur through following the instructions or opinions contained in this material. The activities, physical and otherwise, described herein for informational purposes only, may be too strenuous or dangerous for some people, and the reader(s) should consult a physician before engaging in them.