• Skip to main content
  • Skip to primary sidebar
  • Home
  • Contributors
    • Matt Beecroft, Master RKC
    • Martijn Bos, Master RKC
    • Andrea Du Cane, Master RKC
    • Angelo Gala, Master RKC
    • Chris Holder, Master RKC
    • Steve Holiner, Master RKC
    • Dan John, Master RKC
    • Mike Krivka, Master RKC
    • Thomas Phillips, Master RKC
    • Robert Rimoczi, Master RKC
    • Phil Ross, Master RKC
    • Max Shank, Master RKC
  • Workshops
    • HKC Workshops
    • RKC Workshops
    • RKC-II Workshops
  • Find an RKC Instructor
  • Resources
    • Articles
    • Forums
    • Kettlebells
    • Products
  • Blogs
    • PCC Blog
    • Strong Medicine Blog
  • Archives

RKC School of Strength

Official blog of the RKC

hinge

The Who, What, Where, When and Whys of the Hinge and Wedge

April 15, 2015 By Nick Lynch 6 Comments

Margaret Domka Goblet Squat
Margaret Domka, 2015 Women’s World Cup utilizing the Goblet Squat

Three Examples of World Class Athletes Who Hinge and Wedge:

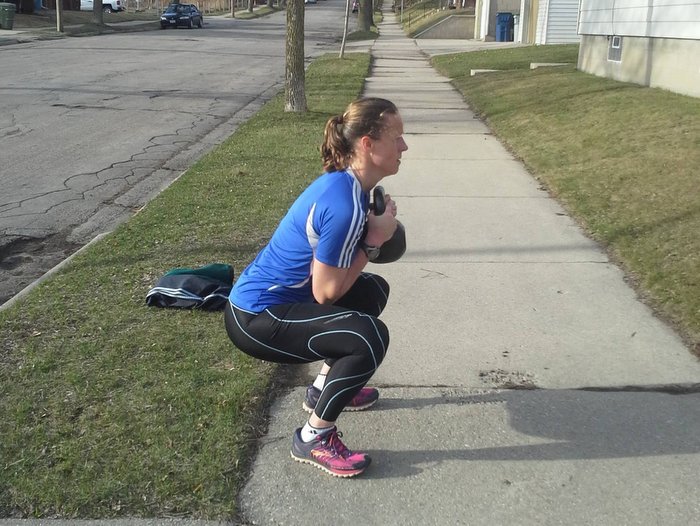
  • As seen above, Margaret Domka is performing a kettlebell goblet squat in her training for the 2015 Women’s World Cup. Goblet squats and hill sprints. She sprints when the goblet squat is correct, but not until then. First one must obtain the wedge and a proper hinge before sprinting. Margaret has shown a proper hinge and wedge which is why she’s fast and strong and therefore, going to the 2015 Women’s World Cup. Hurrah!
  • Nathan Mackinnon is ranked as the fastest skater in the NHL. Chris Hamelin is a gold medalist in speed skating. Both of these world-class athletes faced off in a short race. Both utilize a very strong and present hip hinge. To actually see what I’m talking about, take a second to search “Nathan Mackinnon vs. Chris Hamelin”. Pause the video when both athletes are in their starting stance. Take note of the hinge!
  • Nine-time gold medalist in sprinting, Carl Lewis, clearly utilizes both the hinge and wedge. His body is connected as one. Take a second to Google Carl Lewis and you’ll see a 0:54-second video. Watch how Carl moves his lower body without breaking the hinge. Carl runs like a 9-time gold medalist, not like a bulldog.

Carl Lewis, Margaret Domka and Nathan MacKinnon are not the only great athletes to have utilized a powerful hip hinge and wedge technique. Spend a few minutes watching the greats such as Michael Jordan in his defensive position, 2014 #1 center in the NFL Alex Mack, and so on. There is a secret which has been exposed thanks to all of us and you within the RKC community and that is this; Hardstyle training works for both high level athletes and pretty much everyone else too!

What is the Hinge and Wedge?

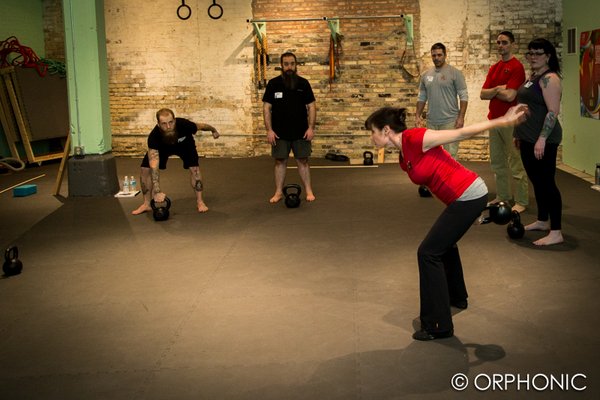
Hinge: move through your hips with minimal flexion through the knees. Stand on your right leg and raise your left knee up to 90 degrees–that left hip would now be hinged. Optimal hinge is approximately 80 degrees as seen on the image below. We hinge to load the largest and most primary muscle groups in the body, the gluteal muscles. Because we’re utilizing primary muscle groups during a hip hinge, our explosive power is greater. Bigger muscles provide bigger output. This is also the main reason why people who use Hardstyle kettlebell training techniques burn so many calories per minute. “They were burning at least 20.2 calories per minute, which is off the charts. That’s’ equivalent to running a 6-minute mile pace.” -Dr. John Pocari, UW-Lacrosse. These large muscle groups require much higher caloric output to function.

Andrea Du Cane, the longest standing and first female Master RKC is showing an approximate 80-degrees hip hinge with the single arm swing.

Wedging: is tensing the whole body while in a standing position. Your shoulders are packed, hips and knees are locked out, and abdominals are at maximum tension. We wedge to connect our lower body with our upper body. When the lats are contracted they pull down on the shoulders and bring our upper body closer to our center of gravity and hips. Wedging connects the upper and lower body as one! Think of a standing Hardstyle plank. It’s possible to achieve an almost constant wedge-like posture throughout the movement with enough practice. You know who utilizes such a posture with sports? Only the best!

Two Awesome Exercises for Hinge and Wedge

Two exercises which enhance the hinge and wedge are the Hardstyle swing and Turkish get-up. Regardless of your skill level with kettlebells, the Hardstyle technique will enhance your overall athleticism. With 8/10 runners in America injured, it’s clear we have some serious imbalances which need fixing. First we’ll need to get strong enough to hold the wedge while running and performing other physical activities. Ever seen a bulldog walk? Ever noticed the similarities between a bulldog’s stride and someone jogging down the street? Arms are crossing over the torso while the legs are flopping all over the place. Not good!

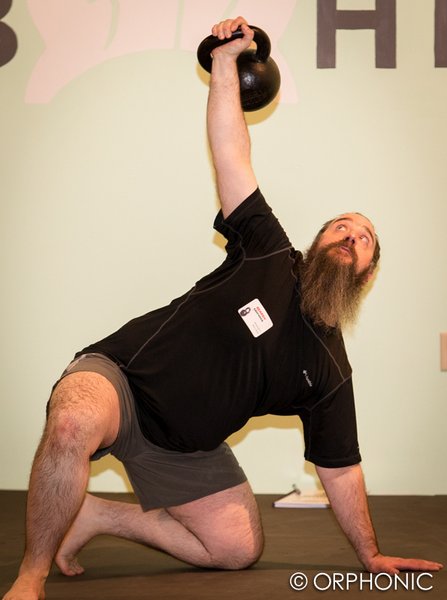
3 Tips for Enhancing the Wedge and Hinge in the Turkish Get-up

  • Hold the each stage for 5-10 seconds while packing the shoulders and pushing your knee out
  • Shrug and re-pack each stage of the get-up
  • Squeeze the handle as hard as you can at the pause in each stage of the get-up

TGU at Milwaukee RKC Workshop

If hinging your hips and wedging your torso is good enough for the best athletes in the world, I think it’s safe to say it’s good enough for you, me and our loved ones. When I get a room full of athletes at the start of another season and tell them we’re not touching any weights until we get the hinge and wedge down they look at me like I’m nuts. But after 4-6 weeks of hinge and wedge practice they double their mobility, speed and strength. Although they still look at me like I’m nuts they’re happy with their gains. Start simple; train simple and the results will be simply amazing!

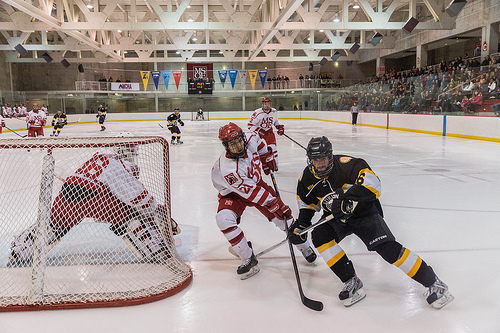
I’ll leave you with a picture from the 2014-2015 MSOE (Milwaukee School of Engineering) Men’s Hockey Team. We started the season with loads of injuries, a losing record and 14 freshmen. We’ve finished the season nationally ranked, zero injuries, beat the #1 team in the country and went to the semi-finals in the toughest conference in the country. We hinge and wedge!

MSOE Hockey Team

***

RKC Team Leader Nick Lynch is a Strength and Conditioning Coach at Milwaukee School of Engineering University (MSOE). He owns Superb Health Milwaukee, a kettlebell studio in Milwaukee, WI. Most recently, he became an RKC Team Leader. He has 13 years of full-time training and coaching experience and a lifetime of wellness education. Nick lives in Milwaukee, WI with his wife Natalie and son Weston.

Filed Under: Kettlebell Training Tagged With: athlete examples, athletes, Athletic Training, hinge, hinge and wedge, hip hinge, Kettlebell, kettlebell swing, kettlebell technique, Nick Lynch, wedge

Using the SAT to Fix Your Kettlebell Snatch

May 15, 2013 By Mike Krivka 2 Comments


Overview

The SAT, or Snatch Assessment Tool, is a tool that I created to help trainers and kettlebell practitioners alike to visually assess and correct their Kettlebell Snatch technique. Working with athletes on a daily basis makes it a requirement to have simple and effective tools in your “trainer’s toolbox” to quickly fix or remediate movement skills. Always on the lookout for new tools that I can use, I was thrilled when I learned about Dan John’s Hinge Assessment Tool and how simple and effective it was. Dan’s HAT or Hinge Assessment Tool inspired me to look at the Kettlebell Snatch in a very different light; interpreting the markers for a great Snatch technique as opposed to a poor Snatch technique. So once again I find myself thanking Dan John… Thanks!

The Snatch Assessment Tool (SAT)

The SAT is comprised of four tests that will allow the user to visually assess the subjects Kettlebell Snatch technique and hopefully lead them to several corrections or technique modifications. All that is required for the SAT is a stick or PVC pipe about six feet long, a bit of open space, and a Kettlebell. Once you have all those things in place you’re ready to go.

The four tests are: Taming the Arc, Trajectory, Transition, and Top Lockout. Looking at each one of these separately and in combination will improve your Snatch technique, make them more consistent and safer, and allow you to move more weight faster and more efficiently.

Taming the Arc

Taming the Arc means that you are using just enough forward swing to mobilize the Kettlebell and get it into the overhead position as safely and as efficiently as possible. What this means is that the forward arc that most people associate with the Kettlebell Swing needs to be dialed back and that energy needs to be translated into upward movement.

To check if the arc of the Kettlebell has been properly tamed you will need to have the subject stand with their arm bent at ninety degrees and the elbow tucked against their body. The fingertips should be extended and the stick should be placed at the end of the fingertips. This will be the testing distance for the Snatch and the subject should not realign their feet once they have found the correct distance. The trainer should stand in front of the subject, holding the stick in place, so that they can observe the arc of the Kettlebell. Have the subject do several Kettlebell Snatch on both the right and left side to see if they can effectively mobilize the Kettlebell within this testing zone.

Trajectory

Trajectory means the path that the Kettlebell takes from the backswing all the way to the overhead position and on the way back down. The trajectory of the kettlebell is important in that it tells a lot about the subject’s backswing, shoulder alignment, pull/punch transition, and hand position on the Kettlebell. Optimally the trajectory of the Kettlebell should be a straight line when viewed from the front. Deviations from this optimal trajectory indicate that there are compensations occurring during the movement that will need to be addressed.

To check if the trajectory of the Kettlebell both safe and efficient have the subject stand with their arm bent at ninety degrees and the elbow tucked against their body. The fingertips should be extended and the stick should be placed at the end of the fingertips. This will be the testing distance for the Snatch and the subject should not realign their feet once they have found the correct distance. In this instance the trainer should pay particular attention as to where the place the stick in relation to the subject. While maintaining the testing distance the stick should be placed so that it bisects the subject’s body; clearly defining their centerline. The trainer should stand in front of the subject, holding the stick in place, so that they can observe the trajectory of the Kettlebell. Have the subject do several Kettlebell Snatch on both the right and left side to see if they can effectively mobilize the Kettlebell within this testing zone. Observe the path that the Kettlebell takes and confirm that it is moving parallel with the stick from the backswing to the overhead lockout position. The easiest way to confirm this is to focus on the thumb of the hand holding the Kettlebell. Do not focus on the Kettlebell itself; watch the hand that is mobilizing the Kettlebell instead. This will give you a truer evaluation of the trajectory than focusing on the Kettlebell itself.

Transition

Transition means the timing between pulling through the backswing and the ballistic punch of the Kettlebell into the overhead lockout in addition well as managing the “float”. This is an oftentimes underappreciated aspect of the Kettlebell Snatch but by studying this part of the technique you can gain insight into how well the person is transferring energy to and from the Kettlebell.

To check and see if the transition of the Kettlebell is both safe and efficient once again have the subject stand in testing position described above. Make sure that you can easily see the subject from hips to shoulders and that once again the centerline is bisected by the stick. Have the subject do several Kettlebell Snatch on both the right and left side and note where the transition from “pulling” to “punching” occurs. In the instance where the energy derived from the backswing and the hip snap are effectively being transferred to the Kettlebell you will notice that the transition occurs above the waist and approaching the shoulders. This transitional zone should be consistent from the right side to the left side in the absence of any other factors. If the transition is observed as being well above the shoulders and almost at the lockout position then the Snatch technique should be evaluated again for leaks in the hip snap or a shortened backswing among other factors.

Top Lockout

Top Lockout means the position of the Kettlebell overhead once it has stopped moving. This is a loaded overhead position and it’s alignment with the shoulder, midline and hand tells a lot about the rest of the technique. Having a good top lockout means that the load from the Kettlebell is being transmitted through the whole body in a safe, efficient and strong manner and that the shoulders, neck and back are not unduly taxed in the process.

In this instance the trainer should stand beside the subject and line the stick up with the subject’s ear. There is no need to “crowd” the subject during this part of the assessment and it is important that the trainer has enough room to make a good visual assessment of the termination of the Snatch. Have the subject do several Kettlebell Snatch on both the right and left side, pausing in the overhead position until the trainer releases them for the next repetition. The trainer should observe the location of both the subject’s hand and the kettlebell at the termination of the Snatch. The optimal position of the subject’s hand should be inline or slightly behind their ear and the stick should make any deviations from this position quite obvious. If the subject is observed stopping the Kettlebell prior to a full overhead lockout position (i.e. the hand in front of the subject’s ear) then the Snatch technique will need to be reevaluated from the bottom to top to see where the truncation of the movement originates.

Summation

The Kettlebell Snatch is a visually simple but technically challenging technique with a host of subtleties involved. Mastering it will take the average athlete thousands and thousands of repetitions to be competent at it while true mastery of the movement will take tens of thousands of repetitions. While this might be daunting to some I hope it is a challenge to others in that is will inspire you to study the technique and find out how to make it more efficient, safe and powerful.

I hope this blog posting will benefit you and I look forward to your feedback and comments.

***

mike_krivka_Teaching


Michael A. Krivka, Sr., RKC Team Leader is a Washington, DC native who has been involved in Kettlebell training for over a decade and is currently an RKC Team Leader and member of the RKC Board of Advisors under Dragon Door (where he has been listed as one of the top reviewed RKC’s in the world for the last five years… read more here.

Filed Under: Uncategorized Tagged With: assessment, Dan John, HAT, hinge, Kettlebell, Krivka, mike, SAT, snatch, tool

Primary Sidebar

Featured Products

previous arrow
BOOK-RKCBookofSnC
HardStyleKettlebellChallegeDanJohn700
BookCoverMasterTheKettlebell1
RKCiconKettlebell512
KettlebellGoddessdv040
next arrow

Recent Posts

  • RKC Big Six Workout
  • The Kettlebell Swing & Low Back Pain
  • Key Kettlebell Exercises To Help You Create Better Balance
  • How to Most Effectively Use Kettlebells to Meet Your New Year Goals
  • 1 Exercise That Checks All The Boxes
FOLLOW US ON TWITTER!

Archives

Copyright © 2025

Dragon Door Publications / The author(s) and publisher of this material are not responsible in any manner whatsoever for any injury that may occur through following the instructions or opinions contained in this material. The activities, physical and otherwise, described herein for informational purposes only, may be too strenuous or dangerous for some people, and the reader(s) should consult a physician before engaging in them.